How to order a VPS/VDS: choose a plan, system and billing period
When buying a VPS/VDS, check more than the plan name. The server location, resources, operating system and billing period must also fit your needs. This guide follows the DC VDS Plans order flow in the DCHost customer portal using actual screenshots.
Before you start: Sign in to your DCHost customer account and complete email verification. Check the CPU, memory, storage and operating system requirements of the application you plan to run. Plans and prices in the screenshots reflect the time of capture; use the current options and total shown for your own order.
1. Choose your plan and server location
Open the VDS server page. Select Paketi seçin on the plan you want. This guide starts with the DC VDS1 link on the Turkish product page, which opens Create Your Server in the portal.
Choose where your server will run and which plan you want to use.
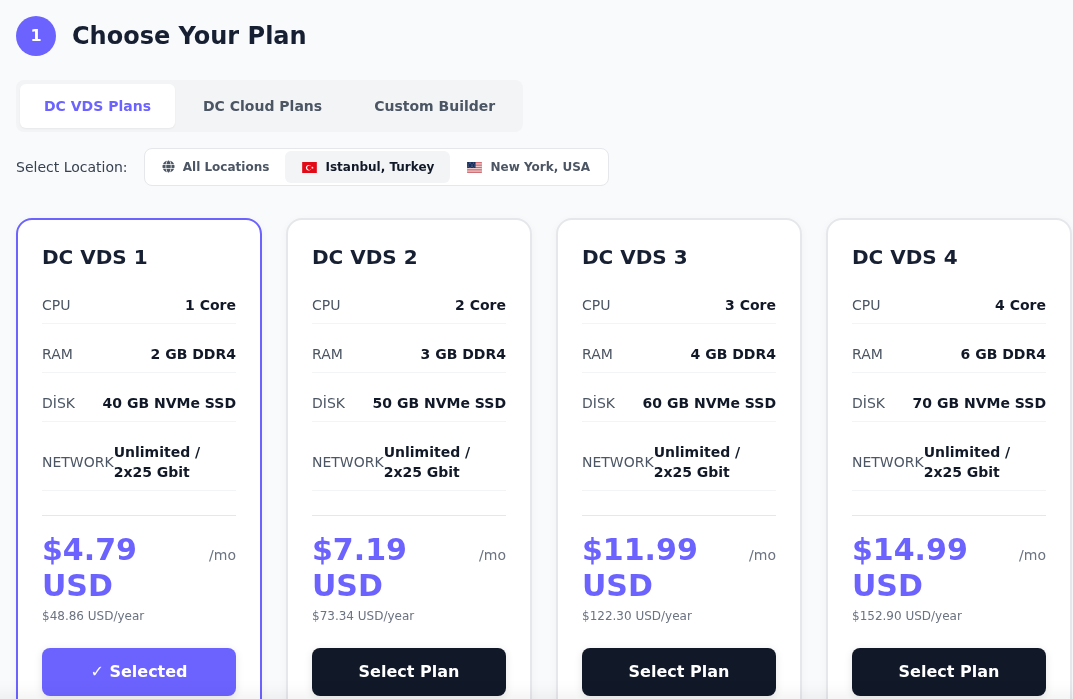
Step 1: Open DC VDS Plans
- Open DC VDS Plans
Select DC VDS Plans to choose a VDS server. The other tabs show different products or configuration options.
- Choose a location
Choose a location in Select Location. Istanbul, Turkey is selected in this example; All Locations shows every location.
- Compare resources and select a plan
Compare CPU, RAM and disk capacity. Select Select Plan on the plan you want, then check that it shows Selected.
Traffic is subject to the Unmetered (Fair Usage) terms in the current service agreement. Screenshot prices are examples from the capture date; check the current total in the order summary.
Compare the plans under DC VDS Plans. The screen also has DC Cloud Plans and Custom Builder tabs; this guide follows the DC VDS plan selection.
Use Select Location to choose where you want the server to be located. Istanbul, Turkey and New York, USA identify the available locations shown in this flow. All Locations lists plans across locations; it does not by itself select one server location. Consider where your users are and what your application requires.
What you should see: The chosen plan card shows Selected. This confirms your plan selection; it does not mean an order or server setup is complete.
2. Review plan resources and optional extras
On a plan card, CPU describes processing resources, RAM is memory used by running applications, and DISK is space for files and databases. At capture time, the selected DC VDS1 card showed 1 Core, 2 GB RAM and 40 GB NVMe SSD. Check the selected card again for your own order.
Traffic use is Unmetered (Fair Usage) and remains subject to the service's fair usage terms.
Additional IP addresses, storage, backups and snapshots are shown separately here.
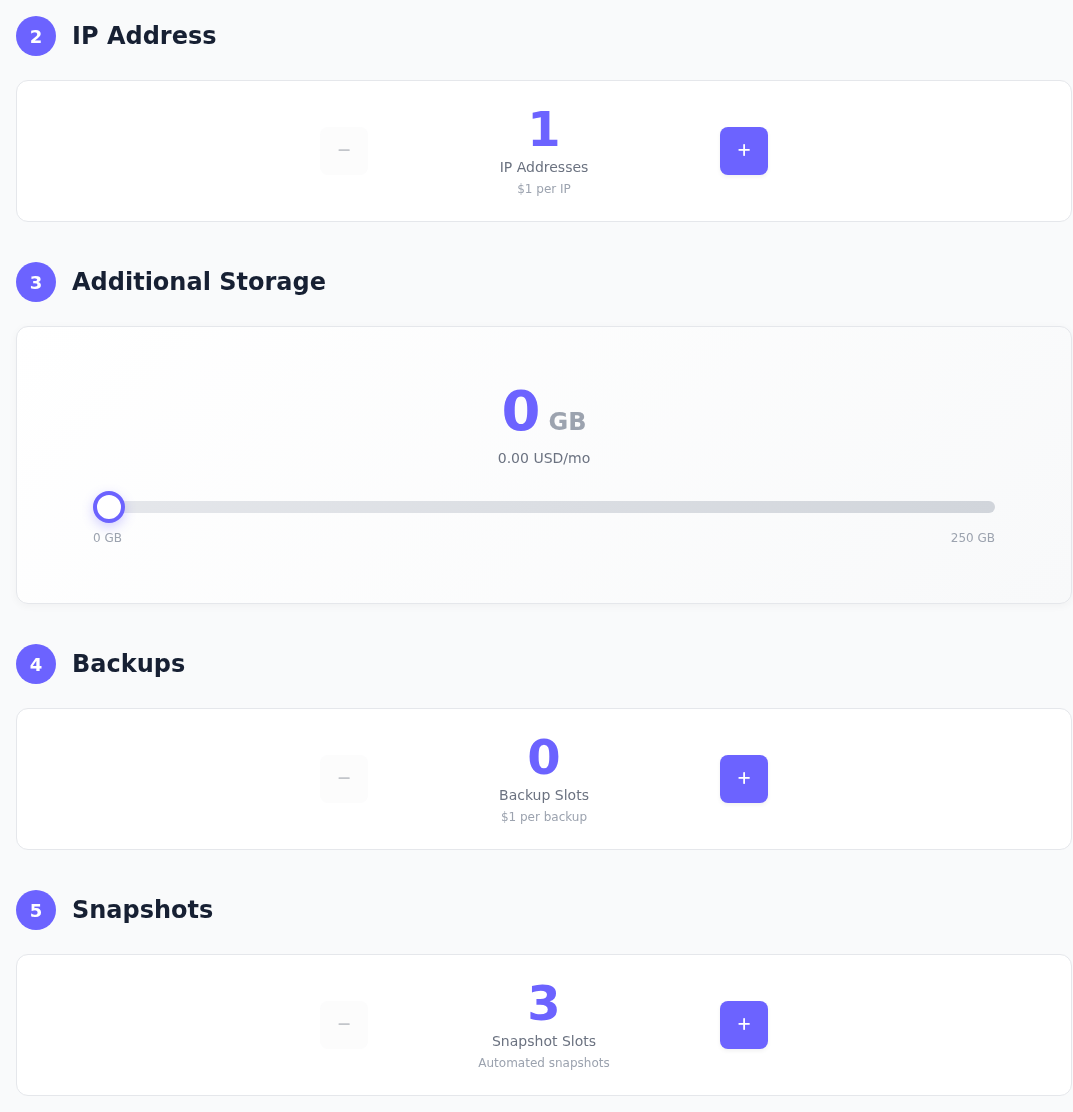
Step 1: Check the IP address quantity
- Check the IP address quantity
Use the plus and minus buttons in IP Address to adjust the quantity. Choose only the number you need.
- Use the slider if you need more storage
Move the Additional Storage slider to choose extra disk capacity. Read the selected GB amount and the displayed charge.
- Choose the backup quantity
Check Backup Slots under Backups and adjust it with plus or minus. The quantity alone does not describe the retention period.
- Review snapshots separately
Read Snapshot Slots under Snapshots. A snapshot and an independent backup are different; choose the coverage that fits your needs.
The quantities shown belong to this example. Confirm backup and snapshot coverage in the service terms, and review the order total after each change.
Scroll down and review these sections:
- IP Address: Check the IP option selected for the server.
- Additional Storage: If you need extra disk space, review the option and its price. Distinguish the plan's included disk from additional storage.
- Backups: Check the scope and price of your backup selection.
- Snapshots: Check the scope and price of your snapshot selection. A snapshot does not replace a separate backup copy stored away from the server.
Check the order total again after changing an option. The server backup planning guide can help you decide what protection you need.
3. Choose SSH access and an operating system
The SSH Key section affects how you will connect to the server. If you want to use an SSH key, use your public key with Add New SSH Key. The public key is the part you can share; the private key stays on your computer. See the SSH key guide for the difference and preparation steps.
No SSH Key means you are not adding an SSH key at this stage of the order. It does not mean you should enter a password or private key into another text field or send one in a support ticket.
Choose how you will connect and which operating system to start with.
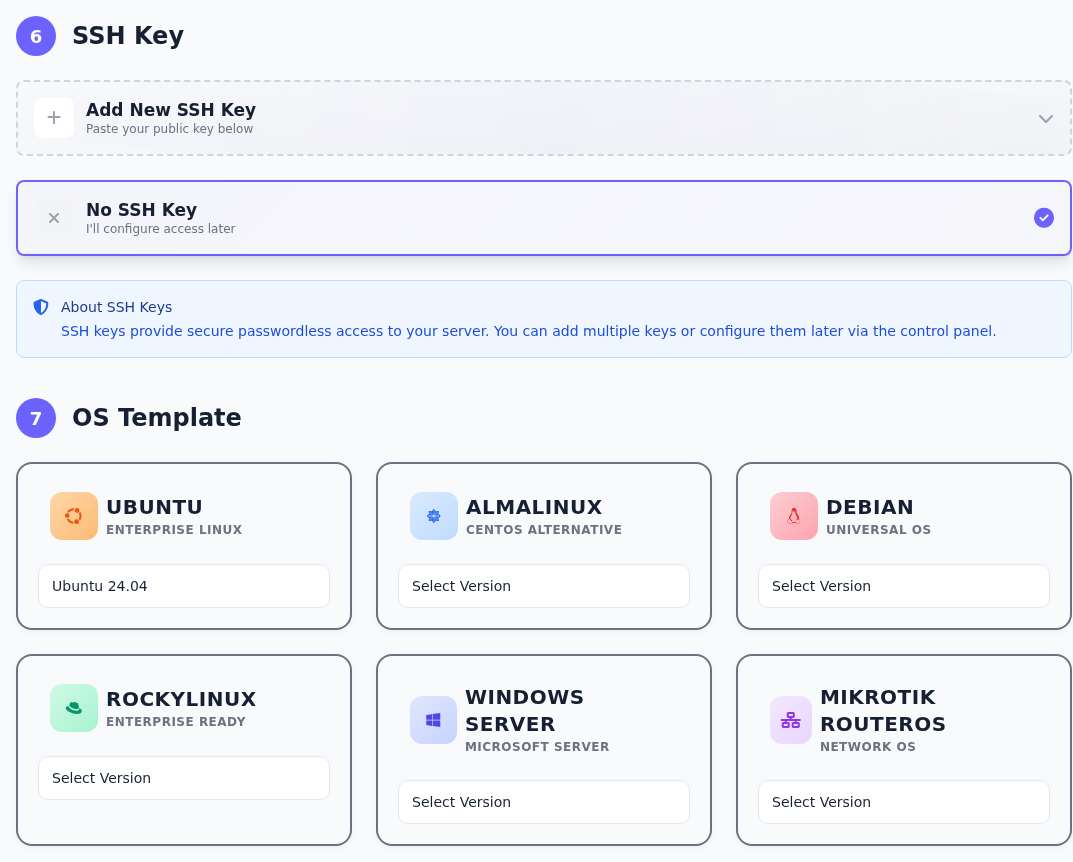
Step 1: Choose an option under SSH Key
- Choose an option under SSH Key
If you have a public key ready, you can open Add New SSH Key. Select No SSH Key if you will configure the key later; that option is selected in this example.
- Select a version under OS Template
Open the version list in the card for your chosen operating system. The Ubuntu card shows Ubuntu 24.04 in this example.
Use only the public key when adding an SSH key; keep the private key on your computer. The Ubuntu version shown is an example; choose an operating system that meets your application’s requirements.
Under OS Template, select the operating system and version to install. The example flow uses Ubuntu 24.04. Choose a version your application supports; you do not need to choose the same version just because it appears in the screenshot.
Before continuing: Check the system name and version you selected. Once the server is ready, follow the first Linux server connection guide to connect.
4. Review the billing period and order summary
Check the billing period control at the bottom of the page. Monthly means a monthly billing period. Distinguish a plan's monthly comparison price from the total for the period you selected. If you choose another period, read the total for that period separately.
Read the summary at the bottom after choosing the plan and options.
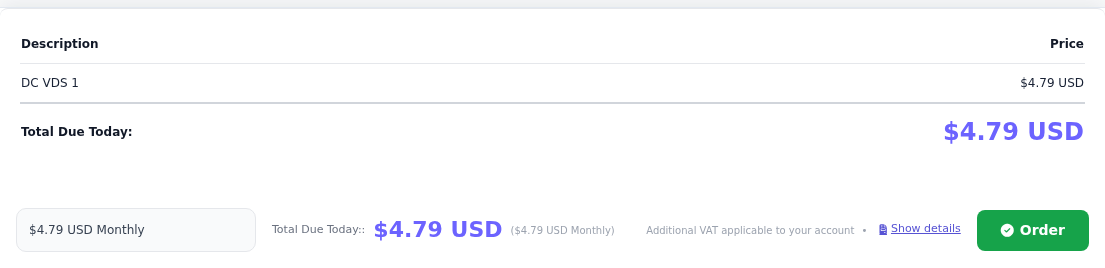
Step 1: Choose the billing period
- Choose the billing period
Choose the billing period in the list on the left. Distinguish the displayed monthly equivalent from the total due today.
- Read the total and its items
Open the breakdown with Show details. Review the selected plan and extras, Total Due Today and any tax note.
- Continue with Order when ready
If the selections are correct, select Order to continue to the next order step. Review the payment and order status on the following screen.
This is the configuration summary before payment. Selecting Order does not mean payment is complete or the service is ready.
Total Due Today is the amount currently shown for this order. The page also displays a notice about VAT that may apply to your account, so do not assume all displayed prices include tax. Check the currency, billing period and tax information together.
Select Show details to open the order details. Review your plan, location, optional resources and operating system selections. If the total or a selection is different from what you expected, correct the relevant option before selecting Order.
See the service renewal guide for help understanding renewal periods. If a price or option is unclear, gather the information described in the support request guide rather than creating the same order repeatedly.
5. Use Order to open the cart and review payment options
When your selections are correct, select Order. The cart opens with the heading Order Summary. This first Order button takes you to checkout; it does not complete a payment.
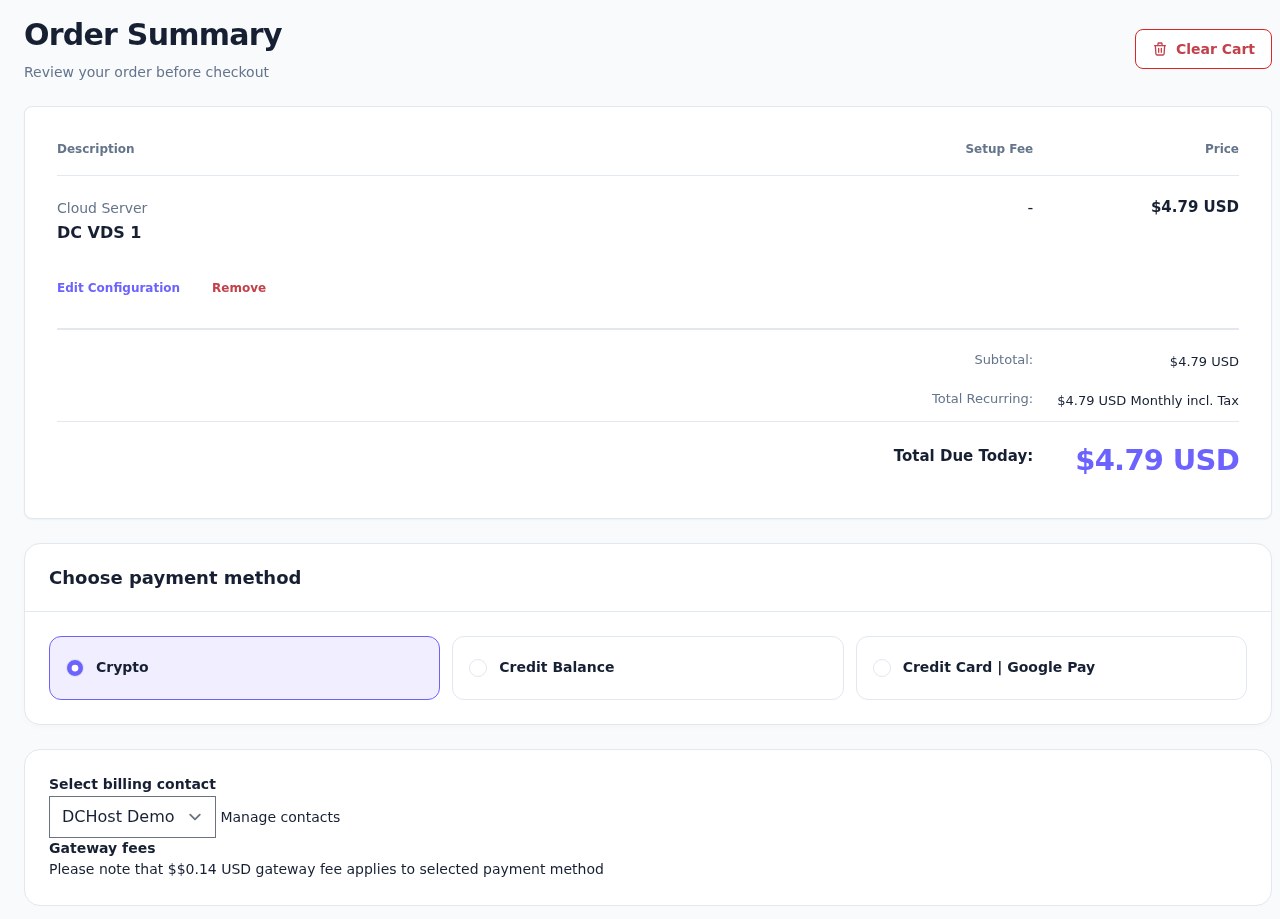
Order Summary opens after you select Order. Check the plan, total, payment method and billing contact together.
Step 1: Check the plan
- Check the plan
Read the plan name under Description. Use Edit Configuration to change your choices. Remove removes that item; Clear Cart clears the whole cart.
- Compare the cycle and amount due today
Total Recurring shows the recurring amount; Total Due Today shows the amount requested today. Distinguish a monthly equivalent from a total charged in advance.
- Choose a payment method
Choose a suitable option under Choose payment method. Crypto is selected in this example; Credit Balance and Credit Card | Google Pay are also visible.
- Check the billing contact and extra fee
Select the correct billing contact. Use Manage contacts if details need updating. Read Gateway fees and verify your own current details in Client Information below.
Prices belong to this example order at capture time. Payment method fees and taxes applicable to your account can change the final total.
Check that Description shows the right plan. Use Edit Configuration to change a selection. Remove takes the item out of the cart; it is different from editing the plan configuration.
Read each amount separately: Subtotal is the subtotal, Total Recurring is the recurring period charge, and Total Due Today is the total the cart shows at this stage. Check the currency and the period shown alongside Total Recurring.
Choose the method you want under Choose payment method. This example flow shows Crypto, Credit Balance and Credit Card | Google Pay. The Gateway fees notice describes an extra processing charge for the selected method. If you change methods, check the fee and final total again. The fee in the screenshot is not a fixed charge for every payment method.
A payment method fee can be added to the amount shown for the plan. Read the total on the resulting invoice in the next step too.
6. Check billing details and submit the order
Choose the correct billing contact under Select billing contact. Use Manage contacts to review your contacts. In Client Information, check that your name, company name if applicable, address and country are accurate. This section displays a summary; do not copy the example account's blank fields or default details into your own order.
Once your billing details are correct, move to the final confirmation section at the bottom.
Step 1: Add an order note if needed
- Add an order note if needed
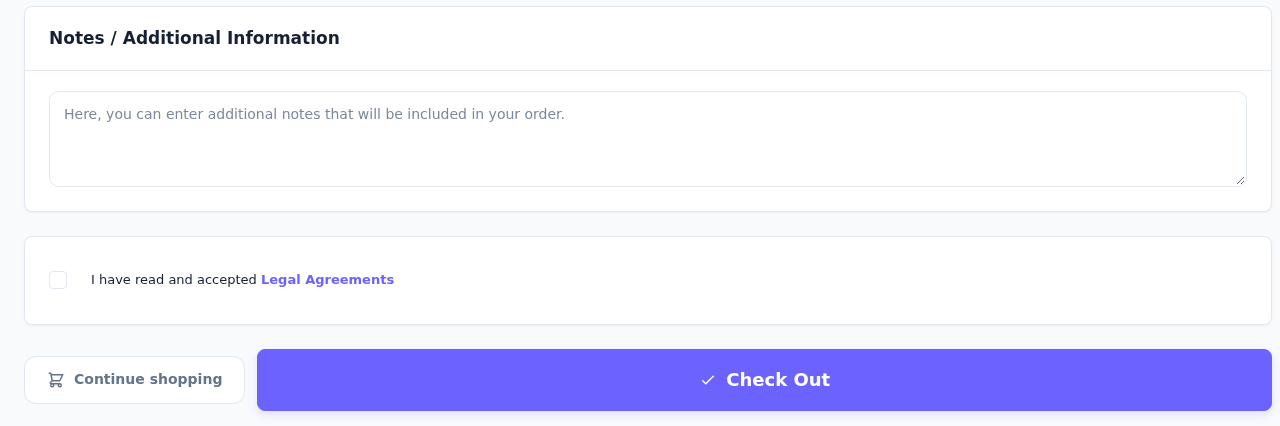
Notes / Additional Information is for an optional order note. Do not enter passwords, private SSH keys or card details here.
- Read the agreements
Open Legal Agreements and read the terms. Tick the adjacent box if you accept them.
- Select Check Out once
If the plan, cycle, billing details and totals are correct, select Check Out. Wait for the page to respond.
Check Out can create an order record. Check the payment status on the next screen separately; do not submit repeatedly.
If needed, add an order-related note in Notes / Additional Information. Do not use this field for passwords, private SSH keys or card details.
Read the terms through Legal Agreements. Select the agreement checkbox if you accept them. When the plan, billing details, payment method and amount are correct, select Check Out once. Check Out submits the cart as an order; it is a different stage from the first Order button.
7. Check the resulting invoice and payment status
In this guide, Check Out produced an actual Pro Forma Invoice page with the status Unpaid. This means a pro forma awaiting payment was created for the order. It does not mean payment was made or the server is ready.
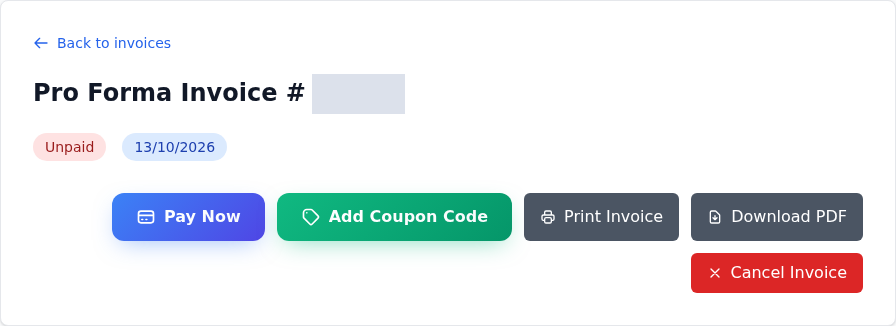
This real example order opened Pro Forma Invoice. Its status is Unpaid.
Step 1: Check the Unpaid status
- Check the Unpaid status
Unpaid means this invoice has not been paid. The existence of an invoice alone does not confirm a completed payment.
- Open the payment options
Pay Now opens the payment method window. First review the invoice lines and total below.
- Get an invoice copy
Download PDF lets you download a PDF copy. Print Invoice is for printing. Downloading a copy does not pay the invoice.
This example order has not been paid. The invoice number is redacted. A pro forma record does not show that payment was received or that the server is ready.
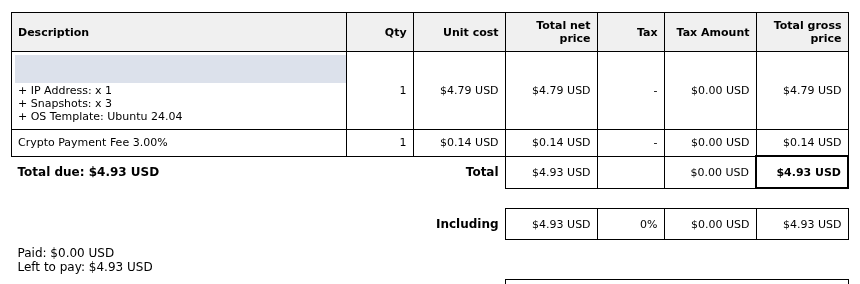
After checking the status at the top, read the invoice lines. Description shows the selected service and additional options. A payment method fee may appear as a separate line. In this example it is labelled Crypto Payment Fee.
Read the invoice line by line. In this example, a separate payment method fee appears below the plan charge.
Step 1: Check the selected options
- Check the selected options
Compare IP Address, Snapshots and OS Template below the plan line with the choices you made when ordering.
- Read the extra fee line
Crypto Payment Fee is listed separately in this example. Include any fee for your chosen method when checking the total; changing methods may change the amount.
- Verify the paid and remaining amounts
Paid shows the amount received; Left to pay shows what remains. After paying, check these values together with the invoice status above.
Account-specific description lines are redacted. Amounts are examples; use the line items and currency on your own current invoice.
Paid is the amount paid, and Left to pay is the remaining amount. Review the plan price, additional charges, tax and overall total together. The amounts in these screenshots belong only to the example order at the time of capture.
Check the method in the Pay Now window
Select Pay Now on the invoice page. The selector in the window offers Crypto, Credit Balance and Credit Card | Google Pay in this example. Choose the method you want from the current options offered for your account.
This window opens when you select Pay Now on the invoice.
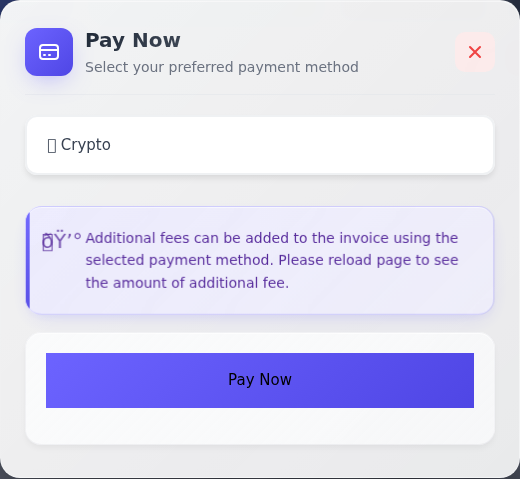
Step 1: Select the method you will use
- Select the method you will use
Open the selector at the top and choose your payment method. Crypto is shown in this example; use the current options offered for your account.
- Read the additional-fee notice
The notice explains that the selected method may add a fee to the invoice. If you change methods, check the updated total before paying.
- Continue when you are ready to pay
When the method and total are correct, use Pay Now in this window to continue to payment. Seeing the button or opening the window is not a payment confirmation.
This screenshot shows the payment method window; no payment was made. Return to the invoice to verify the payment result.
The notice says that the selected method can add a fee to the invoice and asks you to reload the page to see the additional amount. Check the updated invoice total before paying. When the method and total are correct, use Pay Now inside the window to continue to the payment flow.
Only the method window was opened for this guide. Its payment form was not submitted and no payment was transferred. Opening the window or seeing Pay Now is not a payment confirmation. After completing your own payment, check the invoice status again. If the payment provider reports success but the invoice still shows an amount due, contact support before sending the same payment again.
Check the invoice status separately from service setup. When your server is ready, continue with the first Linux server connection guide. When asking support to review an invoice, use your own invoice number and transaction time rather than copying the example order details.