How to add credit to your DCHost account
Account credit is a balance you can use for DCHost transactions. It is not a loan or an overdraft. Add Funds starts a top-up; Available Credit shows the usable balance. To pay an existing invoice directly, use the invoice payment guide.
1. Open Add Funds
Sign in to the customer portal, open Billing, then select Add Funds. You can also open the top-up page directly.
Quick Actions links to account credit, payment records and billing preferences.
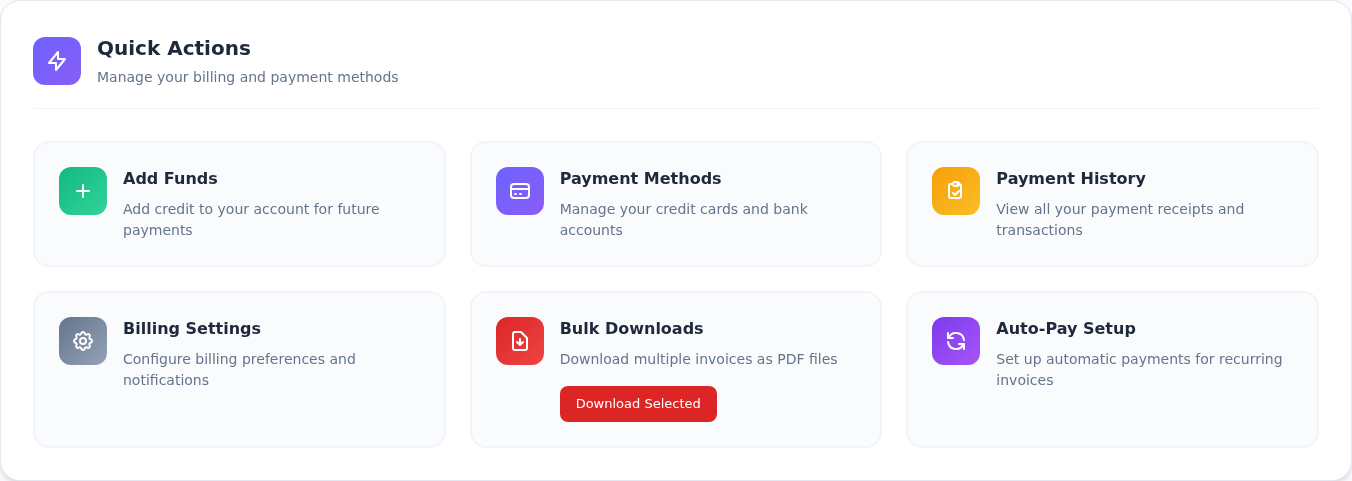
Step 1: Open Add Funds to add account credit
- Open Add Funds to add account credit
Select Add Funds. The form lets you choose the amount to add and a payment method.
- Open Payment History for credit activity
Payment History opens Credit Logs, which records increases and decreases in account credit. Use Payment Methods for saved-card tools.
- Open Billing Settings for billing preferences
Select Billing Settings to review billing and notification preferences. Read what an option affects before saving a change.
Opening a card does not make a payment or save a setting. Review the amount, selection and any final confirmation on the page that opens.
Outstanding Balance is the total outstanding on your invoices. Available Credit is your usable account balance. A value in one field does not mean the other has been paid.
Account Balance Overview shows outstanding charges and usable account credit separately.

Step 1: Read the outstanding balance
- Read the outstanding balance
Outstanding Balance shows the amount due. Review the invoice list below to identify the invoices behind it.
- Check the available credit
Available Credit is the credit available in your account. It is $0.00 USD in this example and is separate from the outstanding balance.
The amounts describe the demo account at capture time. Submitting an add-funds form alone does not confirm that Available Credit has increased.
2. Enter the amount
Review Current Account Balance. Select a quick amount or enter a custom amount. Check the currency and the minimum and maximum amounts shown on your own screen.
Under Select Amount, choose a preset or enter your own amount.
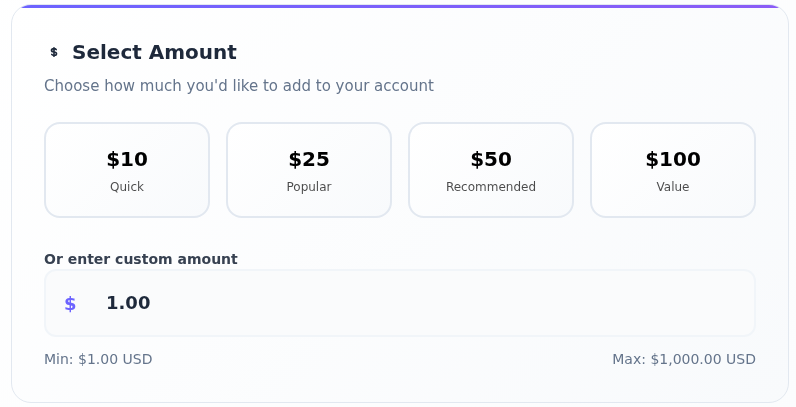
Step 1: Choose a preset amount
- Choose a preset amount
Select $10, $25, $50 or $100 if one matches your needs. These buttons select an amount; they do not submit a payment.
- Enter a different amount if needed
Use Or enter custom amount for another amount. Read Min and Max below it, and keep the credit amount separate from the processing fee.
At capture time, the minimum was $1.00 USD and the maximum was $1,000.00 USD. Use the current limits and currency shown for your transaction.
The amounts and limits in the screenshot were available when it was captured. They are examples, not a promise that the same limits apply to every future transaction.
3. Choose a payment method
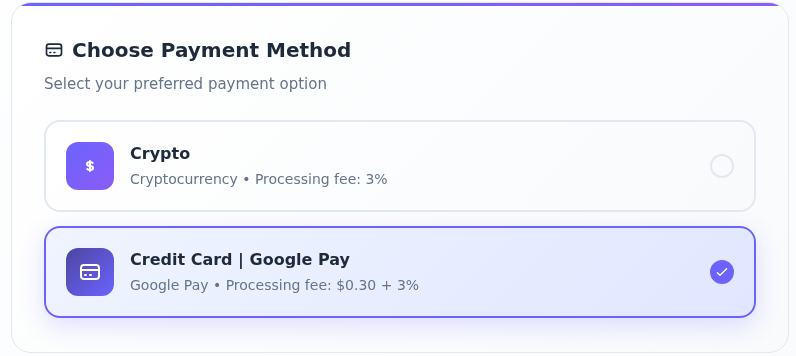
Select one of the methods offered for your account. The example shows Crypto and Credit Card | Google Pay. Review any processing fee displayed beside the method and wait for the summary to update.
The check mark under Choose Payment Method identifies the selected method.
Step 1: Choose your payment method
- Choose your payment method
Select the method row. The selected row is highlighted and shows a check mark on the right; this example selects Credit Card | Google Pay.
- Read the processing fee
Compare Processing fee beneath the method names. After changing the method, review the fee and total again in Transaction Summary.
This screenshot illustrates selecting the card method. At capture time, Crypto showed 3% and cards showed $0.30 + 3%; these are not permanent fee commitments. Review the current total after making your own selection.
This image demonstrates selecting a card method. The next summary is a separate 1 USD / Crypto example; do not read them as the amounts for a single unchanged transaction.
4. Compare the credit with the total charge
| Summary field | Meaning |
|---|---|
| Amount to add | Credit you want to add to the account |
| Payment method | The method selected for this transaction |
| Processing fee | The payment method's transaction fee |
| Total | The total to check at the payment step |
Transaction Summary shows the credit amount, selected method, processing fee and total.
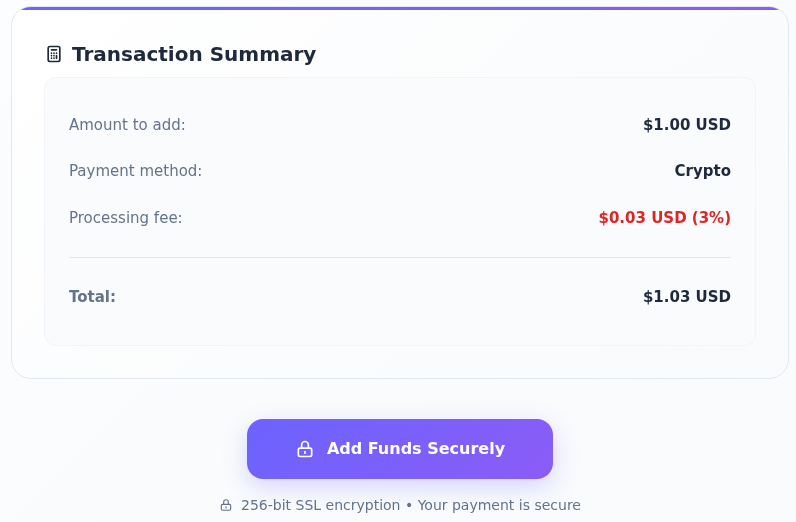
Step 1: Read the three different amounts
- Read the three different amounts
Amount to add is the credit to be added. Processing fee is the payment charge. Total combines them for this stage: $1.00 + $0.03 = $1.03 USD in the example.
- Continue with Add Funds Securely when correct
If the amount and method are correct, select Add Funds Securely once. Check the invoice status and amount remaining before continuing to payment.
This summary is a $1.00 top-up example with Crypto selected. Add Funds Securely created an unpaid invoice; no payment was made and account credit did not increase.
For example, a 1 USD top-up with a 0.03 USD fee totals 1.03 USD. The fee is not extra usable credit. This is an arithmetic example, not a fixed fee schedule. Changing the method may change the fee and total.
When the details are correct, select Add Funds Securely. This starts the top-up process; it does not confirm a successful payment.
5. Pay the invoice and check the result
In the real example, the request created an Unpaid pro forma invoice. No usable credit had been added at that stage.
Submitting the form opened a Pro Forma Invoice. Check its payment status first.
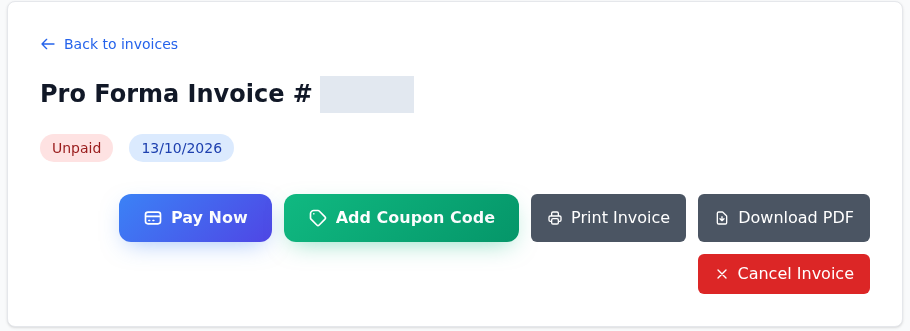
Step 1: Check the Unpaid status
- Check the Unpaid status
Unpaid beneath the title means the invoice has not been paid. Creating an invoice does not make the credit available.
- Open Pay Now to continue to payment
After reviewing the invoice items and total, use Pay Now. Check the payment method and the result on the payment screen that opens.
The demo invoice number is hidden. Unpaid means payment is still due; this screenshot does not confirm a payment or a credited top-up.
- Confirm that the invoice is for the top-up and review the total.
- Select Pay Now and follow the payment steps.
- Return from the payment provider and check the invoice status and remaining amount.
- Review Billing → Available Credit and your credit history.
If Auto-apply credit is enabled, available credit may be applied to new orders and recurring invoices. If your balance is lower than expected, review decreases and related invoices in Credit Logs before repeating the top-up.
Redeem a credit voucher
If you have a voucher valid for your DCHost account, enter it in Redeem Voucher and select the button with the same name. Check the result message, available balance and credit history.
Redeem Voucher is a separate section for people who have a credit voucher code.
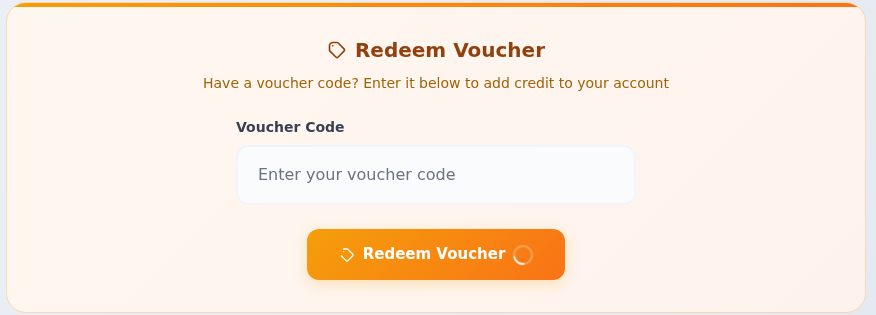
Step 1: Enter your own code in Voucher Code
- Enter your own code in Voucher Code
Enter the credit voucher code you received in Voucher Code. Do not invent an example code, and check for extra spaces at either end.
- Use Redeem Voucher and check the result
If the code is correct, select Redeem Voucher. Read the result on screen; if it succeeds, also check your available credit.
No voucher code was entered or redeemed in this example. Skip this section if you do not have a valid credit voucher; an invoice discount coupon may use a different process.
A credit voucher differs from Add Coupon Code on an invoice. Use the screen specified in the code's conditions. If a voucher is rejected, check for extra spaces, eligibility and previous use.
If the credit does not appear
- An Unpaid invoice is not a completed top-up. Opening checkout is a separate step from paying.
- If the provider reports success, refresh the invoice and balance records before attempting another payment.
- If money was taken but the portal has not updated, contact support with the invoice number, date, amount and payment reference. Do not send full card details, security codes or bank verification codes.
- If credit decreased, inspect automatic credit application and the related invoice.
These are real demo-account screens. The example was not paid and does not represent a successful top-up or charge.