How to move a domain to another DCHost customer account
A domain account transfer changes the customer account the domain belongs to in the DCHost portal. The recipient must already have a DCHost customer account. The transfer form uses the email address registered to that account.
This is separate from an EPP/AuthCode transfer to another registrar, a hosting migration or a nameserver change. For a registrar change, use the domain transfer checklist. To point a website to another server, use the DNS guide.
Before you start: Confirm the destination DCHost account email with the recipient. Record the domain's current expiry date, nameservers and automatic renewal preference. The complete domain name, account identifiers and recipient email are redacted in the screenshots.
1. Open Change Ownership for the correct domain
Sign in to the customer portal. Find the domain under Domains & DNS and select the blue arrow at the end of its row. If you manage several domains, check the name rather than identifying it only by its status or date.
Check the domain, then use Change Ownership.
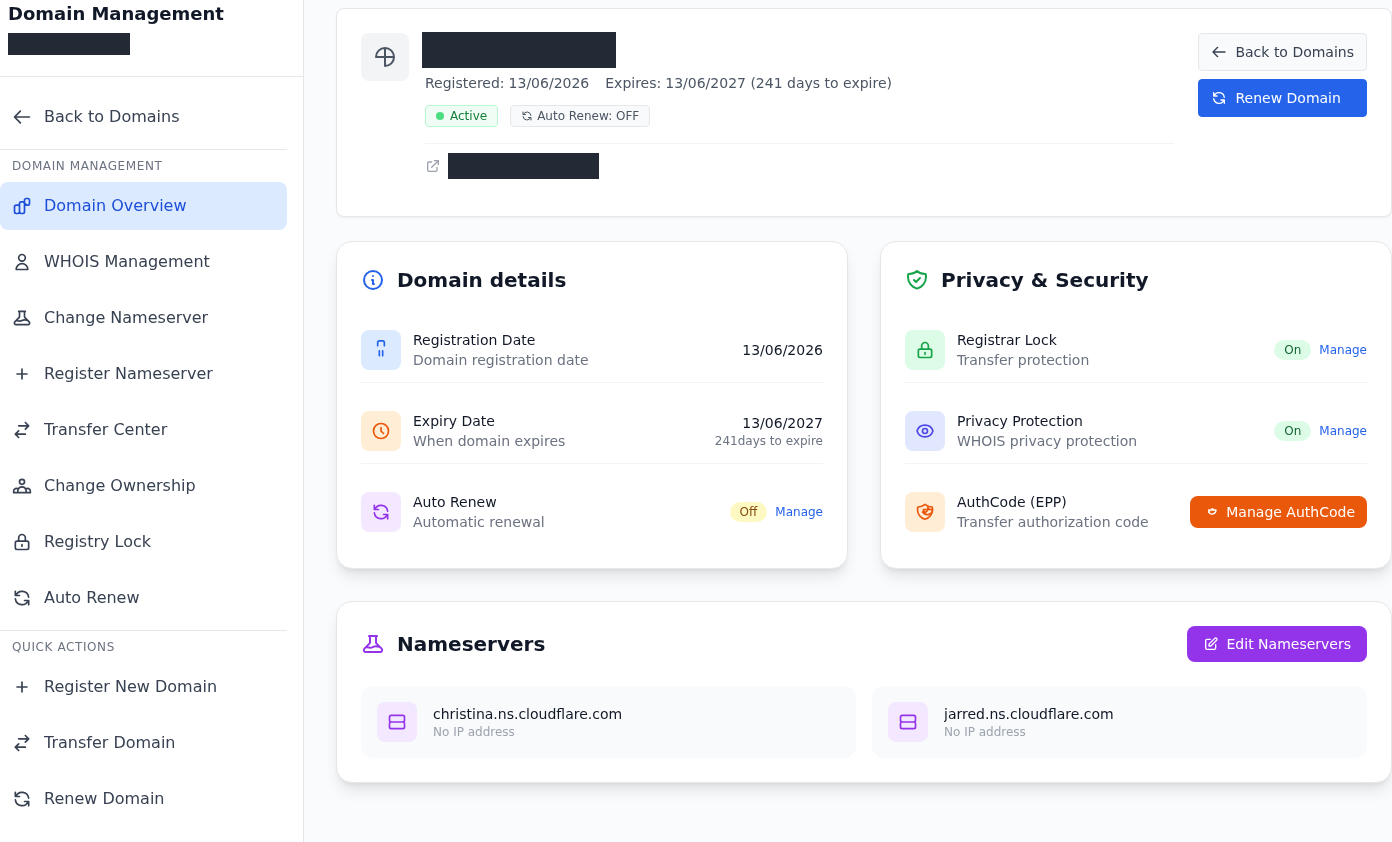
Step 1: Verify the domain before continuing
- Verify the domain before continuing
The domain at the top must be the record you intend to move. Its complete name is redacted here; read the full name on your own screen.
- Open Change Ownership
Select Change Ownership in the left menu. Transfer Center is a separate section for moving to another registrar.
This operation changes the domain’s DCHost customer account; it is not an EPP/AuthCode request.
Check the domain at the top, then select Change Ownership in the left menu. It opens the Change Owner form. Transfer Center, directly above it, is a separate section for registrar transfers and EPP operations.
If the menu is unavailable for your service, contact support with the domain and your intended account transfer. Moving between DCHost accounts is not a reason to request an EPP code or change nameservers.
2. Identify the recipient's existing account
The Change Owner explanation states that the service can move to another account already in the system. This form does not create a customer account.
The recipient must already have an account; this form does not create a new customer account.
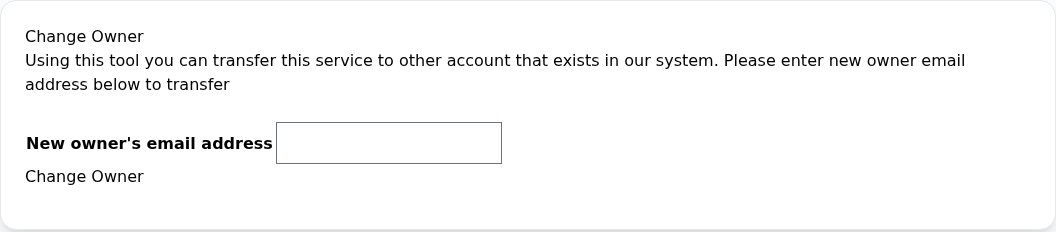
Step 1: Use the recipient’s existing account
- Use the recipient’s existing account
The explanation says the service will move to another account in the system. Confirm the recipient’s correct account email first.
- Locate the email field
New owner’s email address takes the recipient’s DCHost account email. It is not a WHOIS detail or an email forwarding setting.
If you are not ready to submit, leave through the menu. Use Change Owner only after completing and reviewing the details.
Confirm these details with the recipient:
- They already have a DCHost customer account.
- The complete account email to enter in New owner's email address.
- The correct domain to transfer.
This field identifies the recipient's DCHost account. It does not edit WHOIS contact details or forward incoming email to another mailbox.
3. Enter the email and submit the transfer request
- Enter the recipient's complete registered DCHost email in New owner's email address.
- Review the email spelling and domain once more.
- If the details are correct, select Change Owner below the form once.
- If the browser displays Are you sure?, confirm once you have checked the domain and recipient.
- Wait for the response. Returning to the dashboard or seeing a notification does not by itself establish recipient acceptance; check transfer status in the next step.
Change Owner asks for the email address of a recipient account that already exists in the system.
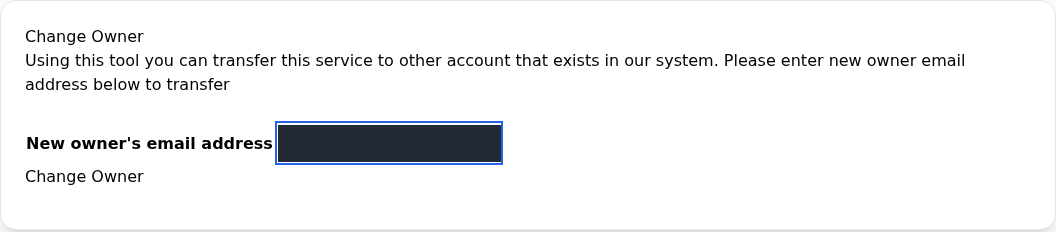
Step 1: Verify the destination account address
- Verify the destination account address
Enter the recipient’s registered DCHost email in New owner’s email address. Confirm the spelling and intended account with the recipient.
- Submit once after reviewing
Once the details are correct, select Change Owner once and wait for the response. The recipient address in this screenshot is redacted.
You are selecting the account that will manage the domain. Do not enter a password or EPP code in this field.
This form does not request a password or EPP code. Confirm the destination address with the recipient rather than guessing it.
4. Check the pending request
Reopen the same domain and return to Change Ownership. After submission, this screen replaces the form with:
- This service is pending transfer approval to: The destination account awaiting transfer approval.
- submitted on: The request's submission date and time.
- Cancel transfer process: The control for withdrawing the pending request.
After submission, the same Change Ownership page shows the pending request and submission time.

Step 1: Read the pending transfer approval message
- Read the pending transfer approval message
This message means transfer approval is still outstanding. Active domain status in the list does not mean that the recipient has approved the move.
- Check the recipient and submission time
Check the recipient email and submitted on time in your own screen. The complete recipient address is redacted here.
- Understand the cancellation control
Cancel transfer process withdraws the pending transfer request. To check progress, reopen this page rather than selecting cancellation.
This screenshot shows a request awaiting approval, not a completed account transfer. Recipient acceptance and final account access are checked separately.
Pending transfer approval means approval is still outstanding. Check the destination email and submission time in your own screen. The recipient can follow the transfer notification sent to their registered email to the Transfers page. See recipient approval below. Do not submit another request for the same domain.
Why is the domain Active while transfer is pending?
The two labels describe different states:
| Displayed information | Meaning |
|---|---|
| Active in the domain list | The domain registration is active. |
| pending transfer approval in Change Ownership | Approval of the account transfer is still outstanding. |
Active domain status does not establish that the recipient accepted the transfer. The screenshot above shows a request awaiting approval in the sender’s account.
Withdrawing a pending request
Cancel transfer process cancels a request that is still pending. To check progress, reopen the page rather than selecting cancellation. If you choose to cancel, check the result in the same section. Cancelling a pending request is different from reversing a completed transfer.
5. Accept the incoming request in the recipient account
The customer receiving the domain completes this step in their own account. The transfer notification sent to their registered email links to Transfers. You can also open Transfers in the DCHost customer portal. If prompted to sign in, use the account registered to the email address the sender entered.
The recipient account shows the incoming request and its decision buttons. Verify the record before choosing an action.
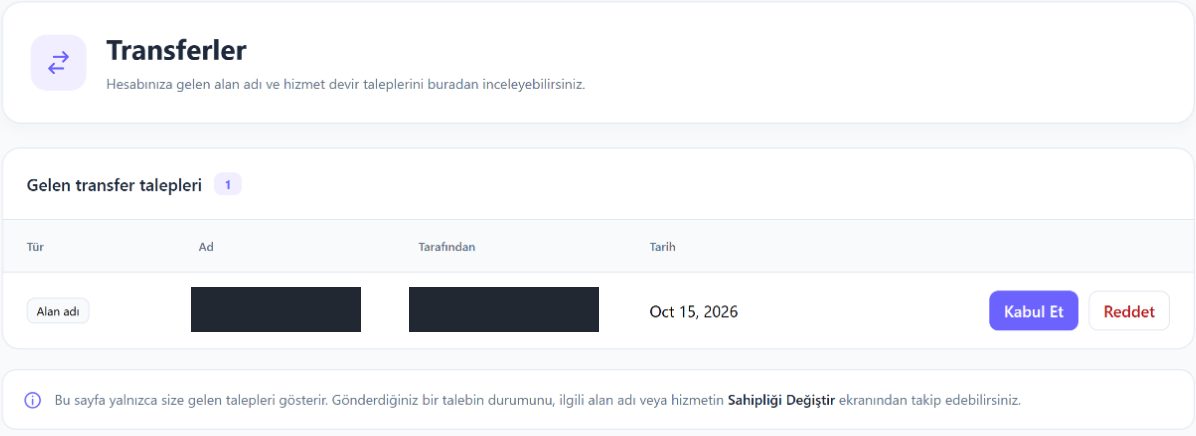
Step 1: Find the incoming request
- Find the incoming request
On Transferler, look under Gelen transfer talepleri. Find the relevant row with Alan adı in the Tür column. This list shows transfer requests sent to your account.
- Verify the domain and sender
Check the Ad and Tarafından columns. Read the full domain on your own screen and confirm that the request comes from the expected account. Private values are hidden in this image.
- Choose acceptance or rejection
Use Kabul Et to accept the transfer or Reddet to reject it. Choose only one action for the request. Afterwards, verify the outcome separately in your domain or service list.
- Separate incoming and outgoing requests
The note below the table says this page only shows incoming requests. If you sent a request, follow its status in the relevant domain or service’s Sahipliği Değiştir screen.
After accepting, open the domain from your own account’s domain list and check its expiry date and nameservers.
The recipient screenshot uses the Turkish portal interface. Follow the labels shown below:
- Find the request in Gelen transfer talepleri (incoming transfer requests). Check that Tür (type) is Alan adı (domain).
- Review the domain and sender details. They are redacted in the screenshot; read the complete values in your own account.
- To receive the domain, select Kabul Et (Accept) on that row. Reddet (Reject) declines the request; it is not a continue button.
- Read the operation result, then open your domain list and verify the transferred record.
If the request is missing: Check that you are signed in to the recipient account and confirm the destination email with the sender. This page lists incoming requests only. Track requests you sent from the domain’s Change Ownership / Sahipliği Değiştir screen instead.
6. Check the recipient account after approval
Once the transfer completes, the recipient should open the domain in their own DCHost account and review:
- The complete domain name and registration status.
- Expiry Date.
- The assigned nameservers.
- WHOIS contact details and any required verification.
- Auto Renew and the payment method intended for renewal.
Follow the domain management guide for these checks. DNS or hosting may have separate service or account access. Seeing the domain record does not establish that website files and every related service have moved.
If a request takes longer than expected or there is a problem with the destination account, send the operation date and displayed message to support. Keep passwords, EPP codes and approval links out of public messages.