DCHost domain management: DNS, renewals, WHOIS and transfer locks
Your domain page in the DCHost customer portal shows when the domain expires, which service handles its DNS and how renewal is configured. This guide explains the available settings for a registered domain and where to find each one.
Starting point: Sign in to the customer portal → Domains & DNS → select your domain. The complete domain name and account identifiers are redacted in the screenshots. Dates, prices and enabled or disabled settings belong to the example; use the current details for your own domain.
1. Find your domain in the list
Under Domains & DNS, All shows every status, while Active, Pending and Cancelled filter the list by status. If a domain is missing, start by selecting All and checking any other filters.
Identify the correct record and status before opening its details.
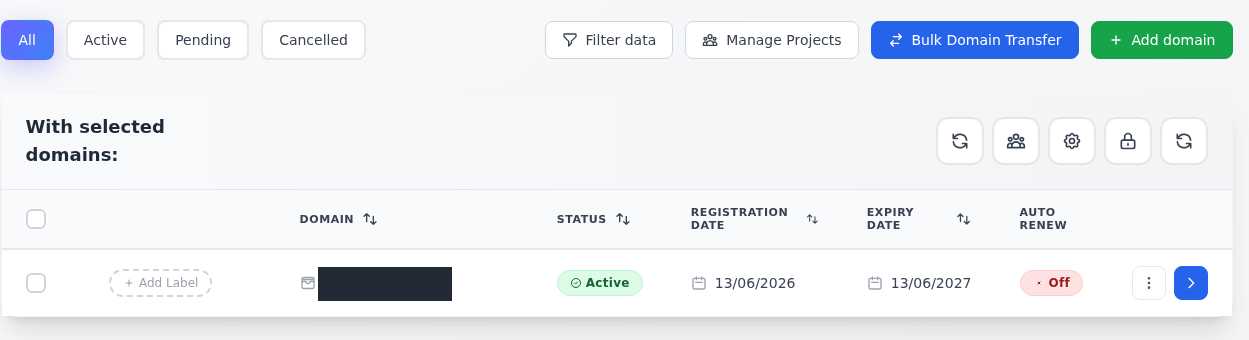
Step 1: Use the All filter when needed
- Use the All filter when needed
If the domain is missing, select All to include every status and check other filters.
- Read the status and expiry date
Check Status, Expiry Date and Auto Renew together. Off means automatic renewal is disabled.
- Select the blue arrow in the same row
The blue arrow at the far right opens domain management. Recheck the domain name on your own screen.
The complete domain name is redacted. New-registration buttons are separate from the existing domain’s management arrow.
- Find the correct name in the Domain column.
- Read its Status, Expiry Date and Auto Renew values.
- Select the blue arrow at the far right of the same row to open its details.
If the domain is missing, check the customer account and any project permissions before starting a new registration. Register Domain / Add domain starts a new registration; bulk selection tools act on the records you select.
2. Review status and expiry dates
Domain Overview brings dates and security settings together. The domain and Active status appear at the top, followed by Domain details, Privacy & Security and Nameservers.
Domain Overview groups dates, renewal, security and nameserver details.
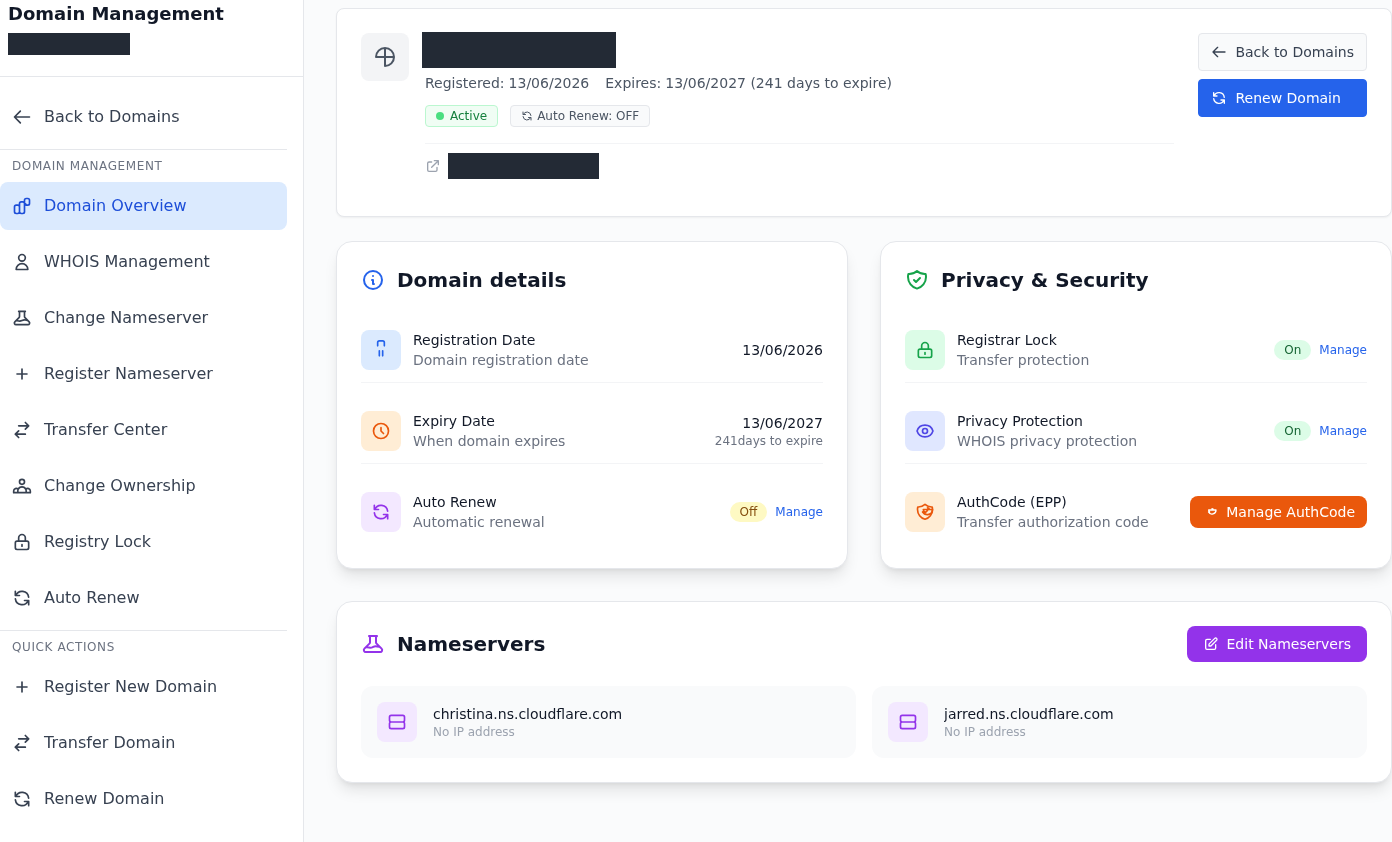
Step 1: Check registration status and dates
- Check registration status and dates
Read Active status and Expiry Date. Domain registration and a working website require separate checks.
- Distinguish transfer lock from privacy
Registrar Lock protects against registrar transfers. Privacy Protection is the WHOIS privacy status reported by the portal.
- Find the nameserver editing link
Edit Nameservers opens the form selecting your DNS provider. Records such as A and MX are edited with that provider.
The On and Off values shown belong to this domain; check the status of your own record.
| Field | What it means |
|---|---|
| Registration Date | The domain registration date. |
| Expiry Date | The end of the current registration period. Check the updated date after renewal. |
| Auto Renew | The automatic renewal preference: Off is disabled and On is enabled. |
| Registrar Lock | A lock used to protect the domain against transfer to another registrar. |
| Privacy Protection | The WHOIS privacy status reported by the portal. This preference does not remove the need for accurate registrant details. |
| Nameservers | The name servers providing DNS for the domain. |
Active describes the domain registration status. Website availability, hosting readiness and email delivery require separate checks. If your website does not open, inspect its DNS records and hosting service instead of purchasing the domain again.
3. Change nameservers in the right place
Open Change Nameserver in the left menu or Edit Nameservers on the overview page. This displays Manage Nameservers.
Use the nameservers assigned by your DNS provider and prepare the new DNS zone first.
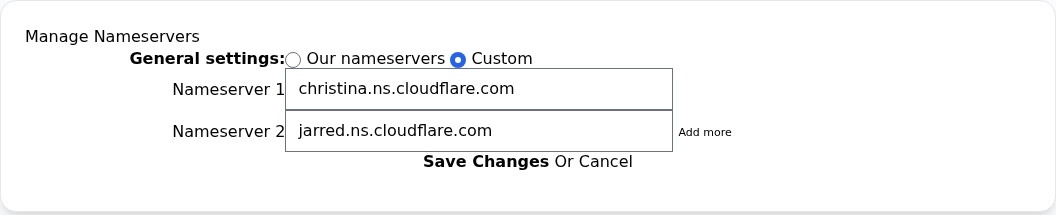
Step 1: Check the DNS provider option
- Check the DNS provider option
Use Custom for external nameservers. Our nameservers selects DCHost DNS.
- Enter your assigned addresses
Enter the nameservers assigned to your service in Nameserver 1 and Nameserver 2. Use Add more for extra addresses.
- Save and check the result
Save Changes saves the setting; Cancel exits. Verify the saved addresses in Domain Overview and with DNS queries.
Do not copy the Cloudflare nameservers in this screenshot. In this example, DNS records are managed at Cloudflare; changing nameservers does not copy them automatically.
- Before changing DNS providers, prepare the website and email records with the new provider. The nameserver migration guide covers MX/TXT records and DNSSEC checks.
- Select Custom to use the addresses supplied by your DNS provider.
- Enter those addresses in Nameserver 1 and Nameserver 2. If the provider supplies more addresses, use Add more. These fields take nameserver hostnames, not your web server IP address or an
https://URL. - Compare the addresses and select Save Changes. Use Cancel to leave without making a change.
- Return to Domain Overview → Nameservers. Check the saved addresses, then follow the DNS queries and website/email checks.
The screenshot shows Custom selected with Cloudflare nameservers. In this example, A, AAAA, CNAME, MX and TXT records are managed in the corresponding Cloudflare DNS zone. Your domain may use a different provider. Use the nameservers assigned to your own account, rather than copying the screenshot.
Consider Our nameservers only when you intend to use DCHost DNS and the required records are ready there. Changing nameservers does not automatically copy existing DNS records to the new provider.
Change Nameserver versus Register Nameserver
- Change Nameserver selects which DNS servers your domain uses.
- Register Nameserver registers a nameserver under your own domain, such as
ns1.example.com, with an IP address. Its form contains Nameserver and IP Address fields.
You do not need to register your own nameserver just to point a website to hosting or use Cloudflare. These are separate tasks; the latter is relevant when you operate your own DNS infrastructure.
4. Manage WHOIS contact details
Open WHOIS Management in the left menu. Registrant contact under Contact Information identifies the domain registrant's contact details.
- Select Custom for specific details or Use one of following contacts to choose an appropriate contact from your account.
- Check the name, company, email, address, country and phone fields. Make sure you can access the email address that receives domain notices.
- If needed, select Create new, re-usable contact to prepare a contact you can use again.
- When making a change, enter accurate registrant details, save the form and follow any required verification steps.
Domain contact details are separate from your customer account's billing preferences. Registrant changes can trigger additional confirmation or transfer restrictions for some extensions. If you plan to transfer soon, review the transfer requirements first.
5. Check the transfer lock
Select Registry Lock in the left menu. The setting inside Domain Lock Settings is labelled Registrar Lock.
The Registry Lock link in the left menu opens this transfer-lock form.
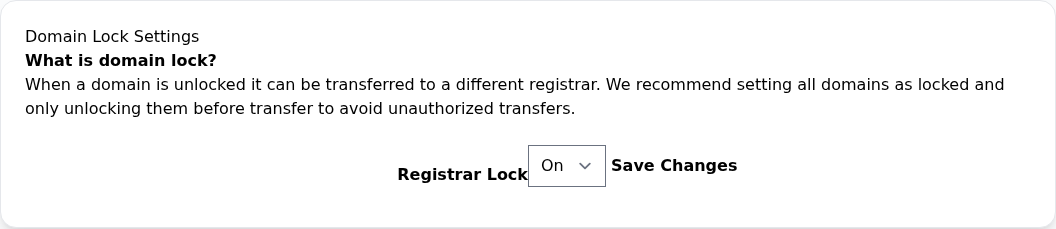
Step 1: Understand the On and Off options
- Understand the On and Off options
On keeps transfer protection enabled. Keep the lock enabled unless preparing a transfer to another registrar.
- Recheck the overview after a change
Save Changes saves the selection. Then check Registrar Lock on Domain Overview.
The screenshot shows the lock set to On. Disabling it does not start a transfer or remove other transfer requirements.
- On: Registrar transfer protection is enabled.
- Off: This lock is disabled; other transfer requirements may still apply.
- Save Changes: Saves the selected value.
Keep the lock enabled unless you are preparing a transfer to another registrar. Disabling it does not start a transfer or remove every possible restriction. After making a change, recheck Domain Overview → Registrar Lock.
6. Configure automatic renewal and payment preferences
Open Auto Renew from the left menu or its Manage link on the overview page.
Review Auto Renew and the payment method together, then verify the actual renewal result separately.
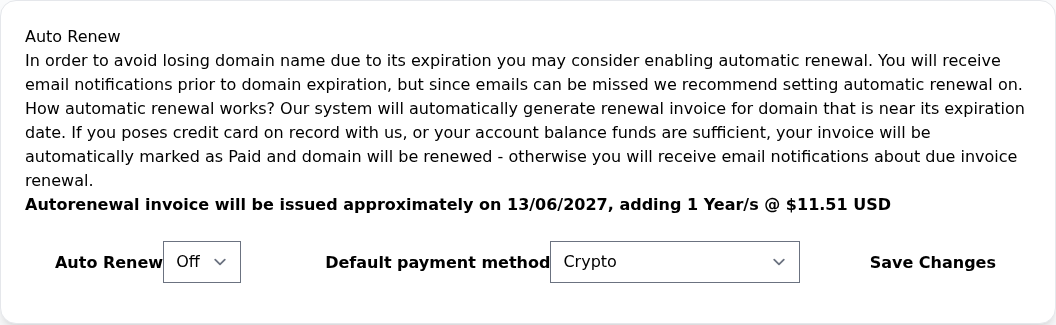
Step 1: Read the period and price
- Read the period and price
The renewal period, estimated invoice date and price apply to this domain. Use the current information shown for your own domain.
- Choose renewal and payment preferences
Review Auto Renew and Default payment method. If using account credit, make sure sufficient funds are available.
- Distinguish a saved preference from renewal
Save Changes saves preferences. A completed renewal also requires checking the paid invoice and the updated Expiry Date.
Enabling automatic renewal does not prove an immediate renewal. The price shown is an example; verify payment and the new expiry date separately.
- Read the renewal period and amount shown above the form. The screenshot price does not apply to every domain.
- Select On or Off under Auto Renew according to your preference.
- Review Default payment method. If you intend to use account credit, check that your available balance covers the renewal amount.
- Select Save Changes to save the preference.
- Return to the overview and check Auto Renew. When renewal is due, also verify that its invoice is paid and Expiry Date advances.
Enabling automatic renewal does not renew the domain immediately. The payment method, available funds and resulting invoice status matter. If credit is insufficient or payment does not complete, follow the invoice payment guide.
Renew Domain opens a renewal order. Check the period and total before confirming; merely opening the order does not extend the registration. See renewals and invoices for the follow-up checks.
7. Understand EPP/AuthCode requests
Domain Overview → Manage AuthCode opens Auth Info / EPP Key. Request Auth Info / Epp code requests a transfer authorization code.
This form requests a code for moving the domain to another registrar.

Step 1: Check that this is a registrar-transfer task
- Check that this is a registrar-transfer task
Request Auth Info / Epp code requests an authorization code. Use it for your intended registrar transfer.
- Use Cancel to leave
Cancel leaves without requesting a code. Requesting an EPP code is separate from moving a domain to another DCHost customer account.
The code is private authorization information. Protect it like a password and keep it out of public screenshots.
EPP/AuthCode is authorization information used to move a domain to another registrar. Use it only for your intended transfer, and keep it out of public messages, guides and screenshots. This image shows the form before a code is requested.
Transfer Center also groups lock, eligibility and code options for registrar transfers. Buttons such as Generate Transfer Code / Get Transfer Code are separate from moving a domain to another customer account within DCHost. For a registrar change, follow the domain transfer checklist.
To move the domain to another customer account within DCHost, use Change Ownership in the left menu. See move a domain between DCHost accounts for the recipient email, submission and pending approval steps.
Common situations
| What you see | What to check first |
|---|---|
| The domain is Active, but the website does not open | A/AAAA records, assigned nameservers, hosting status and HTTPS. |
| A nameserver shows No IP address | This overview message alone does not prove that the nameserver is unavailable. Check the assigned hostname and actual DNS responses. |
| Auto Renew is On, but the expiry date has not changed | Distinguish the saved preference from a completed renewal; check the relevant invoice and renewal result. |
| Transfer status is Restricted | Check the lock, extension rules and any recent registration or transfer changes. The lock is only one part of eligibility. |
If you need help, include the domain, the time of the operation and the displayed message in a customer portal support ticket. Keep EPP codes and passwords out of the ticket.