How to order DCHost hosting: domain, plan and credit checks
This guide follows a Mercury Web Hosting order for an existing domain. The example used a 0.99 USD monthly plan, an included shared IP and the Istanbul location, with the amount covered by account credit.
Before you start: Sign in to the customer portal. Make sure you control the domain or subdomain you intend to use. Domain names, account details and order references are hidden in the screenshots. Plans and prices are those shown at capture; use the current options for your own order.
1. Choose a hosting plan
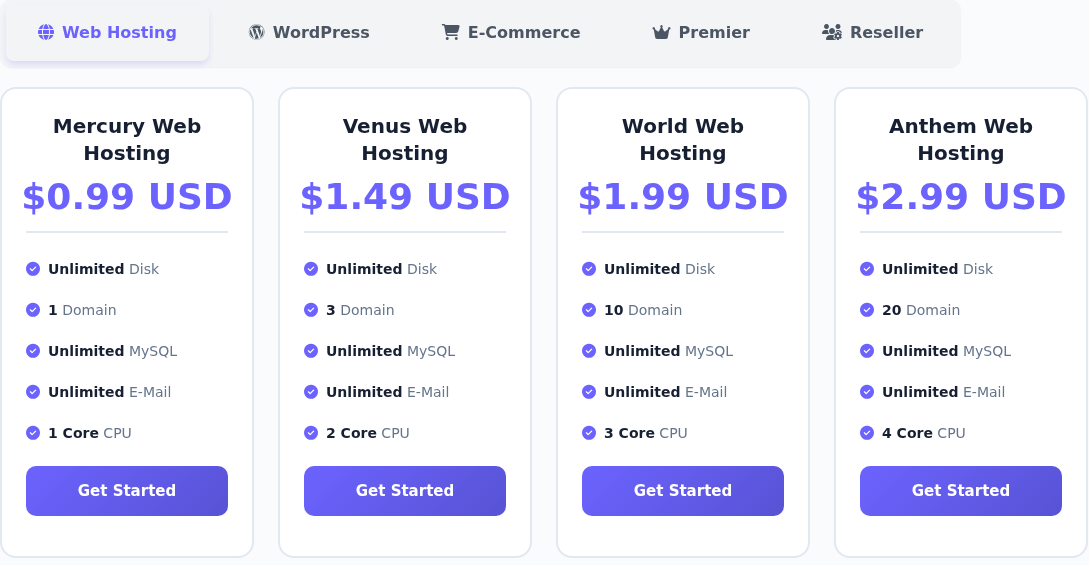
Open the hosting catalogue, labelled Create Websites in the top menu. Find a suitable plan under Web Hosting.
Compare plans in the Create Websites catalogue and continue with the one you need.
Step 1: Read the plan name and scope
- Read the plan name and scope
The Mercury Web Hosting card shows 0.99 USD, 1 Domain and 1 Core CPU. Compare the resources your site needs as well as the price.
- Continue with Get Started
Select Get Started on the intended plan. The next screen asks for a domain; the order is not complete yet.
Mercury Web Hosting was selected for this example. Prices and resources are those shown at capture; check current plan terms and the billing period for your order.
Compare the number of sites, CPU and other resources, then select Get Started on the intended plan. This example used Mercury Web Hosting. Get Started opens the domain step; it does not complete the order.
2. Enter your existing domain
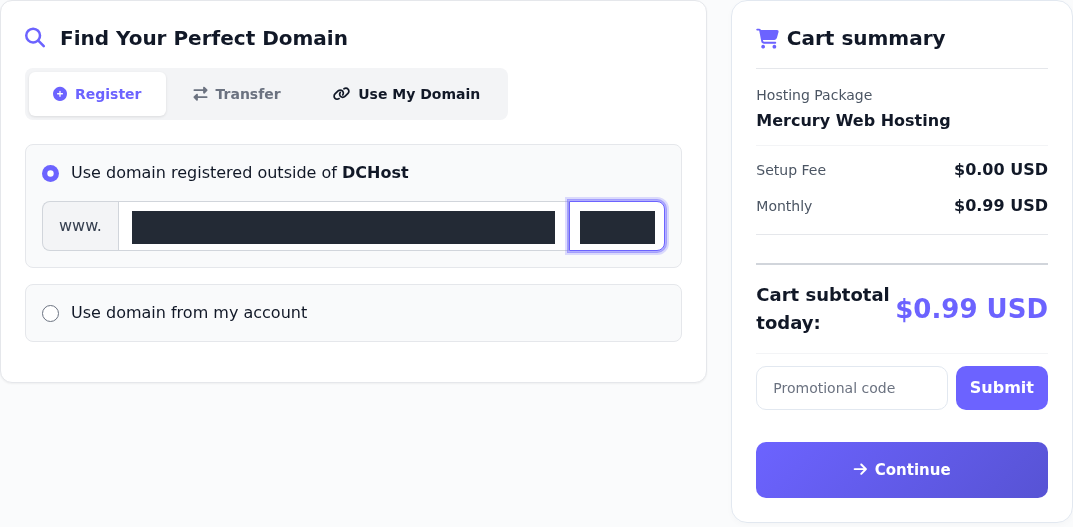
On Choose Your Domain, open Use My Domain. Register is for a new registration and Transfer is a separate transfer process.
Use My Domain lets you continue with hosting without registering or transferring a domain.
Step 1: Choose Use My Domain
- Choose Use My Domain
Open Use My Domain for an existing domain. Register is for a new registration and Transfer is for a transfer.
- Choose where the domain is registered
This flow selected Use domain registered outside of DCHost. For a domain in your account, review Use domain from my account.
- Enter the name and suffix separately
Use the left field for the name and the right field for the suffix. For site.example.com, enter site.example and .com. The entered values in the screenshot are hidden.
- Continue to hosting configuration
After checking the domain, select Continue in Cart summary. Submit beside Promotional code belongs to the discount-code field.
This example used an existing subdomain under our control. Continue opened Configure Your Hosting; no new domain was registered or transferred.
- This flow selected Use domain registered outside of DCHost. For a domain already in your account, review Use domain from my account.
- Enter the name before the suffix in the left field and the suffix in the right field. For
site.example.com, entersite.exampleon the left and.comon the right. Do not copy the fixed www. prefix into the input field. - Check the spelling and confirm that you are using the correct domain.
- Select Cart summary → Continue. Submit beside Promotional code belongs to the discount-code field.
The example used an existing subdomain under our control. This selection opened Configure Your Hosting. No separate registration settings were needed because no new domain was being registered or transferred. Ordering hosting does not establish that DNS is configured or that the website is live.
3. Check the period, IP option and location
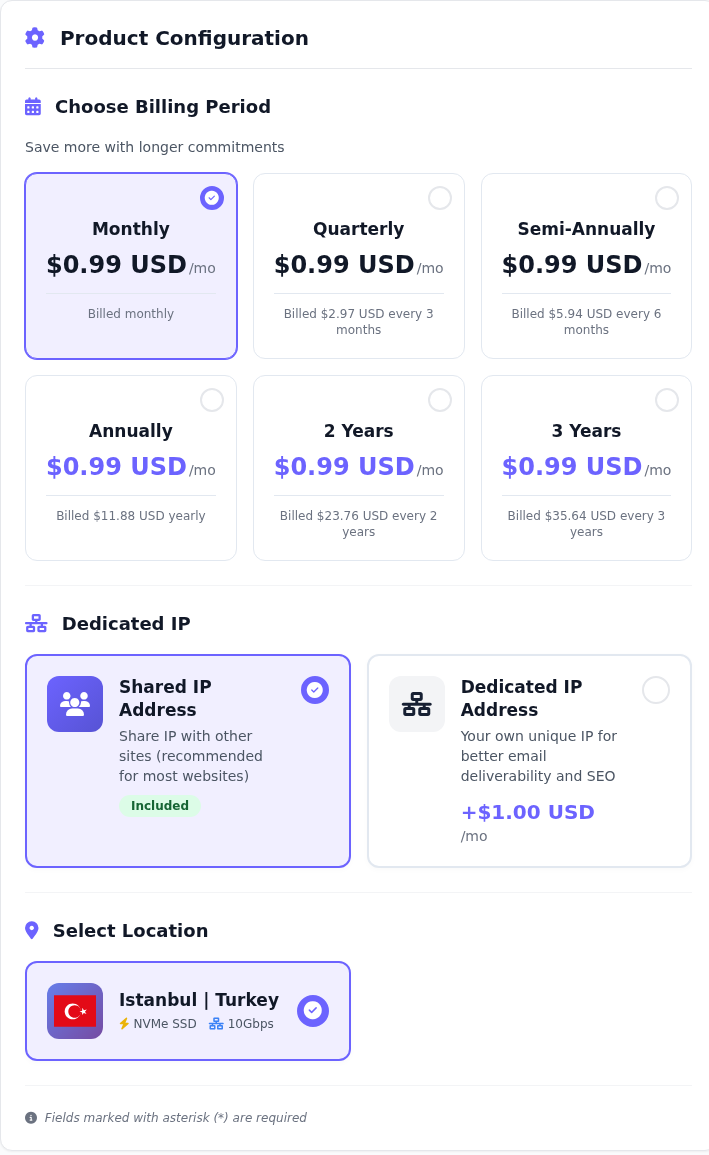
Go to Configure Your Hosting → Product Configuration.
Review price-related options and the selected location in Configure Your Hosting.
Step 1: Read the Monthly option
- Read the Monthly option
Monthly shows 0.99 USD/mo and Billed monthly. For longer terms, distinguish the monthly comparison price from the full amount billed for the period.
- Confirm Shared IP Address
Shared IP Address shows Included and a selection mark. The separately priced Dedicated IP was not selected in this example.
- Check the server location
Istanbul | Turkey is selected under Select Location. After checking the location and period, continue using the cart summary.
This order used Monthly, the included Shared IP Address and Istanbul | Turkey. Choose for your own requirements and recheck the cart total.
- Choose Billing Period: The example selected Monthly, showing 0.99 USD/mo and Billed monthly. For longer terms, also read the full amount billed for that period beneath the monthly comparison price.
- Dedicated IP: In this section, Shared IP Address → Included was selected. The shared IP was included in the plan; the separately priced Dedicated IP was not added.
- Select Location: Istanbul | Turkey was selected. Check the selection mark and the location suitable for your needs.
Recheck the plan, setup fee, period and total in Cart summary on the right. Here, Setup Fee was 0.00 USD, and both the monthly price and cart subtotal were 0.99 USD. Select Continue when the details are correct.
4. Review applied credit and the checkout total
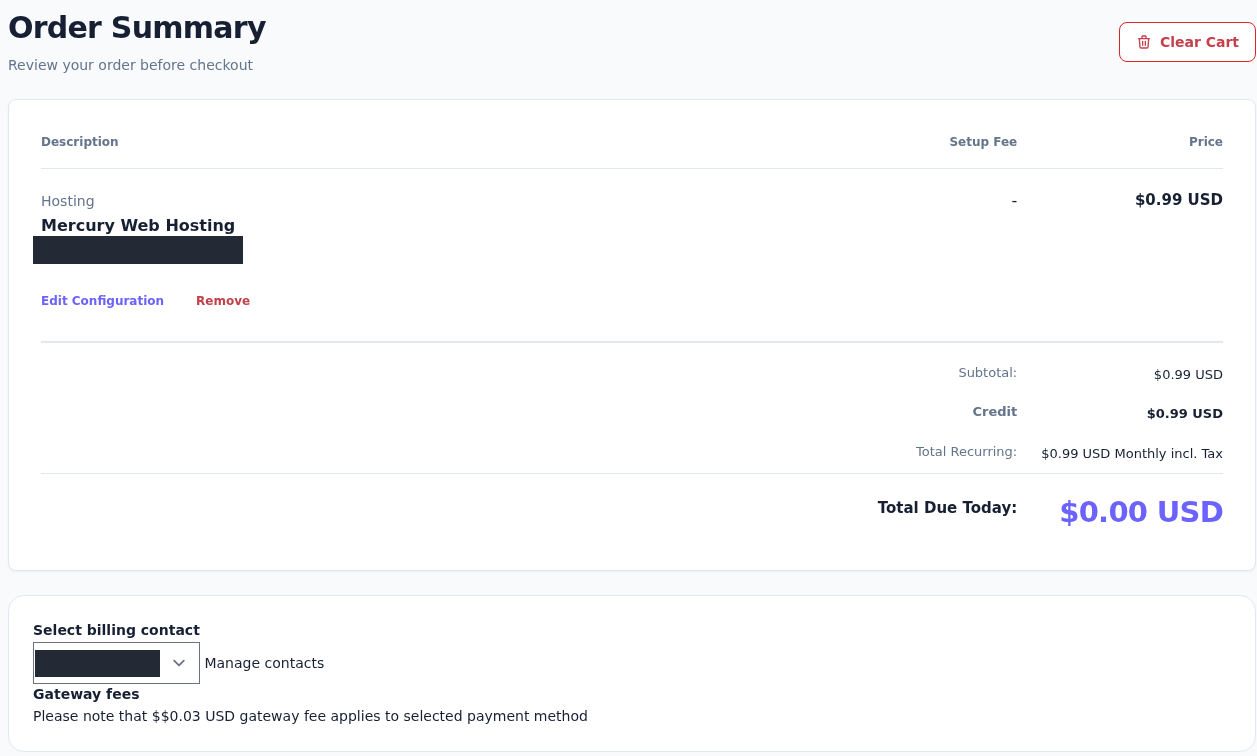
On Order Summary, check the plan and domain. Use Edit Configuration to correct an option or Remove to take the product out of the cart.
Order Summary shows the plan, applied account credit, recurring price and amount still due today.
Step 1: Verify the plan and domain
- Verify the plan and domain
Check the plan and your own domain under Description. Use Edit Configuration before Check Out if either is wrong.
- Read Credit and Total Due Today
Credit covers the entire 0.99 USD subtotal here. Total Due Today is 0.00 USD, while Total Recurring remains 0.99 USD monthly.
- Check the billing contact and fee notice
Select the correct billing contact. If a Gateway fees notice appears, check the final total and resulting balance; ask support about any amount you cannot explain.
0.00 USD does not make the order free: 0.99 USD of account credit is being used. This screen also had a 0.03 USD method-fee notice; the balance decreased by only 0.99 USD afterwards.
| Field | Value in this example |
|---|---|
| Subtotal | 0.99 USD |
| Credit | 0.99 USD of account credit |
| Total Recurring | 0.99 USD Monthly incl. Tax |
| Total Due Today | 0.00 USD |
A zero Total Due Today does not make the hosting free. Existing credit covers this order's 0.99 USD charge, while the monthly recurring price is shown separately.
This screen also displayed a 0.03 USD Gateway fees notice. After the order, the balance changed from 95.21 USD to 94.22 USD; no additional 0.03 USD decrease was observed for this transaction. Check the final total and resulting balance for your own order. If an amount is unexpected, ask support to explain it before repeating the transaction.
Choose the correct person under Select billing contact and review Client Information. Do not copy the example account's details into your order.
5. Read the agreements and submit with Check Out
Once the order details are correct, read Legal Agreements and select the checkbox if you accept them.
Once the details and amount are correct, review the legal agreements before final confirmation.

Step 1: Read Legal Agreements
- Read Legal Agreements
Read the agreements and select the checkbox if you accept them. Check the plan, domain and billing information once more before proceeding.
- Select Check Out once
Use Check Out to submit the order. Do not submit it again while waiting for the response.
This is the confirmation step before submission. Check the following Order Confirmation screen to verify that the order was received.
Select Check Out once and wait for the response. If you need Notes / Additional Information, include only relevant order details, without passwords or card information.
6. Check the order confirmation
This transaction opened Order Confirmation and displayed an order number.
Order Confirmation opened after Check Out.
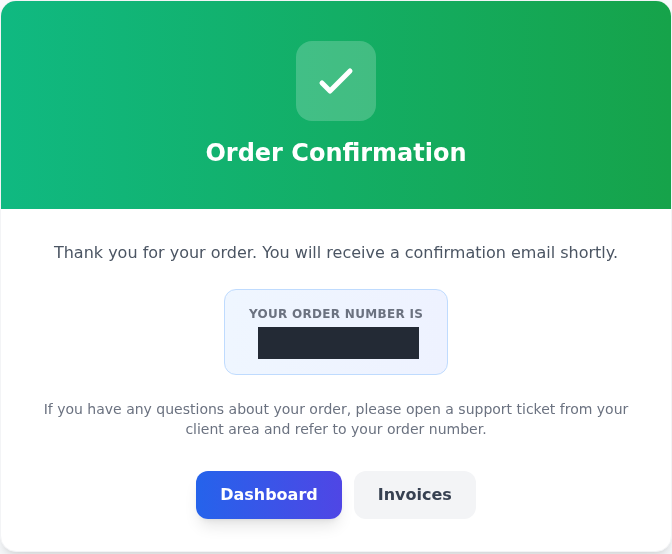
Step 1: Keep your order number
- Keep your order number
Keep the reference shown under Your order number is. You can use it when contacting support.
- Continue to invoice and service checks
Invoices opens the invoice list; Dashboard returns to the main screen. Check payment and hosting status separately.
An order confirmation alone does not establish that the service is ready. The screen says an email will be sent; it does not separately confirm delivery.
Keep your order number for any support enquiry. Invoices opens the invoice list and Dashboard returns to the main screen. Confirmation shows that the order was received; check separately whether the hosting is ready.
7. Verify the remaining credit
Return to Billing → Account Balance Overview.
The Billing Center account summary shows the credit remaining after the order.

Step 1: Compare Available Credit
- Compare Available Credit
The remaining credit is 94.22 USD. Compare your own before-and-after balances and read the difference alongside the order total.
- Read the account balance due
Outstanding Balance is 0.00 USD here. This field does not establish that hosting provisioning or cPanel access is complete.
The balance changed from 95.21 USD to 94.22 USD, a decrease of 0.99 USD. No additional 0.03 USD decrease was observed despite the checkout notice.
The example showed Available Credit 94.22 USD and Outstanding Balance 0.00 USD. Compared with the previous 95.21 USD balance, 0.99 USD of credit was used. To pay an outstanding invoice later, see the Credit Balance guide; to inspect movements, use credit history.
8. Track the hosting service status
Open Hosting in the main menu or your project's Websites list. Locate the correct plan and domain.
The new Mercury Web Hosting entry appeared in the Hosting list after the order.

Step 1: Read the Pending label
- Read the Pending label
Pending means the service was still pending in this capture. Track the existing entry instead of ordering the same product again.
- Check the period and date
Compare Monthly and Expiry Date with your order. A displayed date alone does not prove that control-panel access is ready.
This capture shows Pending after the order. Payment or order confirmation must not be treated as active hosting or a successful cPanel login.
The Mercury Web Hosting row was Pending in this capture taken after the order. Payment and order confirmation do not mean active hosting or a successful cPanel login. Track the status. If the entry is missing, check the account, project and filters. Contact support with your order number instead of ordering the same service again.
Confirm Active on the next check
The same service showed Active when it was checked again later. Distinguish the initial pending entry from this later check, and follow the same plan and domain for your own order.
The same Mercury Web Hosting entry showed Active when it was checked again later.

Step 1: Find Active on the same service
- Find Active on the same service
Confirm the plan and your domain, then read Active. Follow the same service entry that was previously pending.
- Open the service details
The blue arrow on the right opens the service details. Verify control-panel access and your website separately using this service's information.
This is a real follow-up check after the earlier Pending capture. Active alone does not show that a cPanel session has opened or that the website is live.
The blue arrow on the right opens the service details. Active alone does not show that a cPanel session has opened or that the website is live. Use your service information to follow first checks and the control panel guide. Use the DNS records guide to point your domain to the service.
To continue with the tools in service details, open the hosting management guide.