How to create a hosting database: users and FTP settings
A database stores an application's content and records. A database user is the identity the application uses to connect to that data. An FTP account handles site file transfers. When moving a site, plan its files, database and application connection settings together; see the migration guide.
Open your hosting service page and select the correct service. This guide shows one database being created and appearing in the list on a real, active hosting service. No database user or FTP account was created, and no connection was tested. Service-specific information is masked in the images.
Database List: create a database and check the list
Open Database Manager on the service page, then select Database List.
Open Database List in Database Manager first.
Step 1: Check existing databases
- Check existing databases
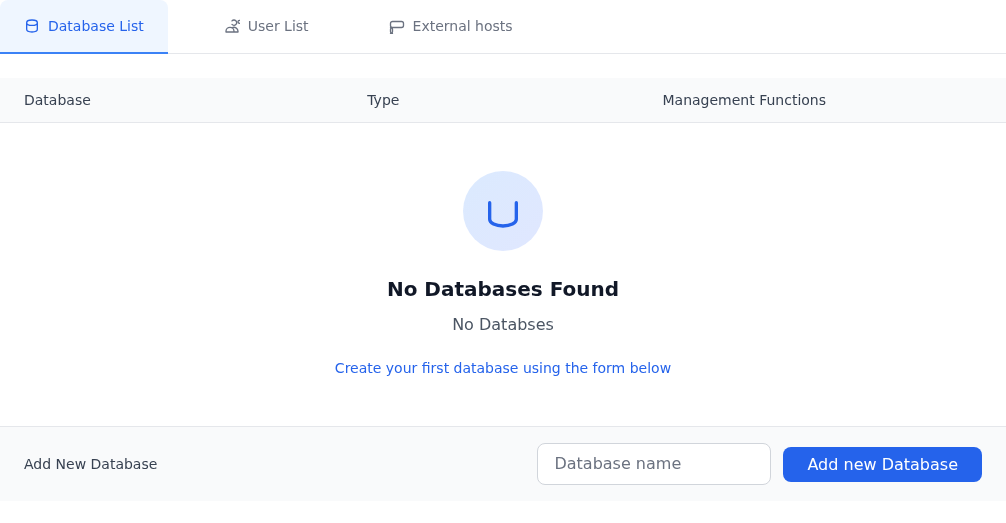
Database List shows databases. This new hosting account displays No Databases Found.
- Enter a new database name
The Database name field accepts the new name. Add new Database submits it; use the resulting full name in your application settings.
This first image was captured before creation. The following image shows the resulting database.
This capture from before creation shows No Databases Found. Database name and Add new Database at the bottom form the creation controls.
- Choose a database name that identifies the application. This field asks for a name, rather than a file path or password.
- Check the name and submit the request with Add new Database. Exactly one database was created this way in the example.
- After your own submission, check the list and any error message. Use the complete database name shown by the portal in the application's connection settings.
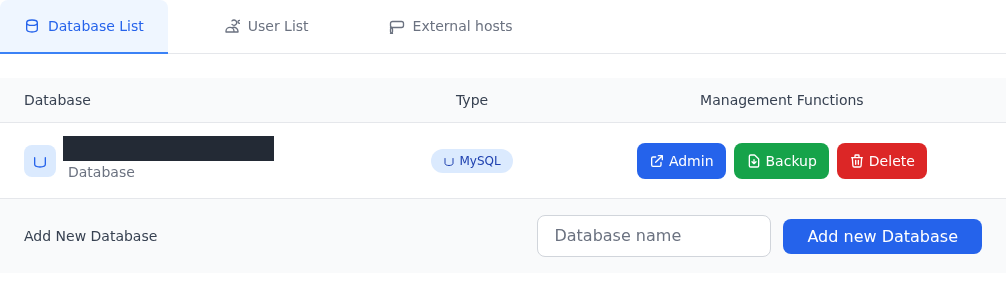
After creation, Database List displayed one MySQL row. Use the complete name from that row in your application, including the prefix added by the portal. The example account's name is masked in the image.
After the actual creation request, Database List showed one MySQL database.
Step 1: Check the new record and type
- Check the new record and type
Check that the new row is listed as MySQL. Use the complete name generated by the portal in your application, not just the short name you entered.
- Continue to user creation
Open User List again. Creating a database does not also create the user your application needs.
One database was created in this step. User creation, permission assignment and an SQL connection were not verified.
The row also shows Admin, Backup and Delete controls; they were not used in this step. The new row confirms database creation. User authentication and the application connection still require separate checks. Follow the backup guide before working with existing data.
User List: open the user form after creating a database
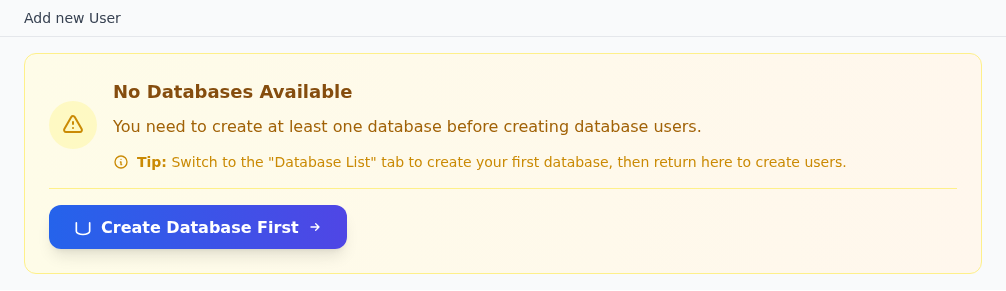
The User List view from before database creation appears below. No Databases Available explains that at least one database is required before database users can be created.
On an empty account, User List asks you to create a database first.
Step 1: Complete the prerequisite
- Complete the prerequisite
No Databases Available indicates there is no database available for a user yet.
- Return to Database List
Create Database First returns to database creation. Do not invent connection details before the user and permissions are configured.
This image shows the state before the first database was created; the following image shows the available user form.
In this initial state, Create Database First returns to Database List. After the example database was created, User List was reopened and displayed Add new User; the user list was still empty.
After the first database was created, Add new User became available under User List.

Step 1: Choose a username
- Choose a username
Username identifies the user connecting to the database. It is separate from the database name, portal account and FTP account.
- Select the related database
Choose the related database from Database. Verify the complete name of the newly created database in your own screen.
- Enter the password twice
Enter the same strong password in Password and Confirm Password. The form asks for at least 8 characters; use a longer unique password.
- Review the selections before saving
Save submits user creation. Afterwards, check the user list, database association and the permissions required by your application.
The form was viewed only. No user was created; permission selection and a connection test were not performed.
- Username: Enter the database user's name.
- Database: Select the database the user will connect to, checking its complete name against the new database row.
- Password and Confirm Password: Enter the same strong password. The form specifies at least 8 characters.
- Save: Submits the user creation request. No password was entered and this control was not used in the example.
No separate privilege selector was visible in this form. Selecting Database does not establish verified user privileges or a working connection; no database user has been created yet.
Enter the database name and database user credentials separately in the application. Creating an FTP account does not verify those database settings or the connection.
External hosts: review remote connection sources
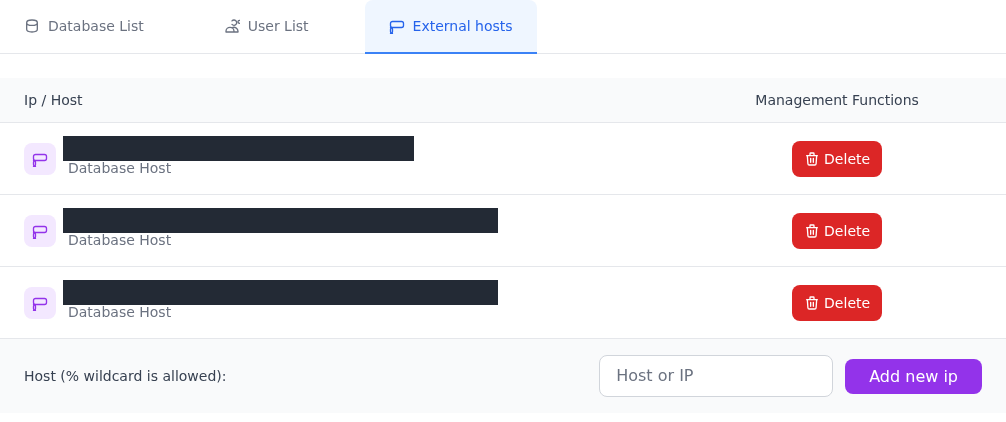
External hosts shows an Ip / Host list and a Host or IP field. The example account contains existing entries, each with a Delete control.
External hosts manages hosts allowed to connect.
Step 1: Allow only the required source
- Allow only the required source
If remote access is needed, use the relevant source IP or hostname. The % wildcard broadens access; do not add it as a general fix.
- Preserve existing entries
Delete removes an existing access entry. Keep provider entries unless you have confirmed why they exist and that removal is required.
Existing records were viewed only; remote access settings were not changed.
Do not delete existing entries without understanding what uses them. If a remote application needs access, identify the IP address from which it will connect. % wildcard is allowed means the field accepts a wildcard; do not use the broader % scope by default.
Add new ip is the add control; it was not used for this guide. A listed source address does not verify the database user or password. Check the database server address, user credentials and permissions together.
FTP Manager: file transfer account fields
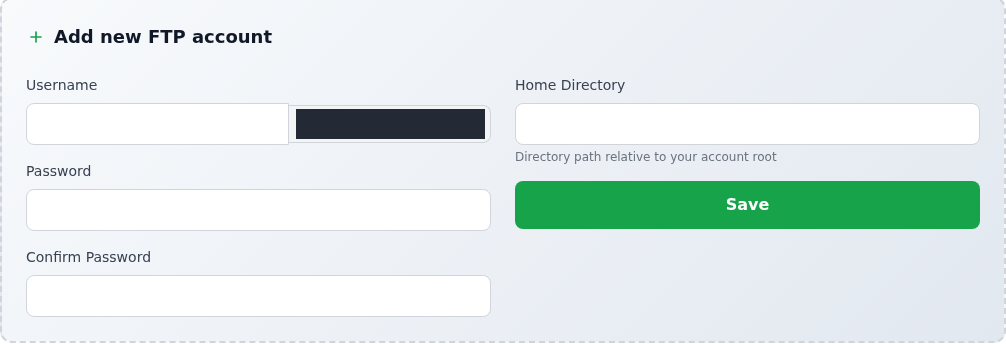
Open FTP Manager on the hosting service page. The Add new FTP account form contains these fields:
Add new FTP account in FTP Manager lets you set the accessible directory.
Step 1: Set an FTP username and password
- Set an FTP username and password
Username is for the new FTP user. Password and Confirm Password must match; use a password separate from your portal login.
- Restrict access to the required directory
Home Directory is relative to the account root. Limit access to the folder needed for file transfer; Save submits the account.
No FTP account was created; this image does not verify protocol, hostname or a connection test.
- Username: The account name for file transfers.
- Password and Confirm Password: Enter the same strong password in both fields. Keep it out of support messages and screenshots.
- Home Directory: A directory path relative to your account root. Limit access to the required site or project folder.
- Save: Submits the form. It was not used in this capture; FTP account creation and file transfer were not verified.
The service page's phpMyAdmin card also opens an access page containing Click here to open phpMyAdmin. A phpMyAdmin session was not verified in this capture. FTP file transfers and phpMyAdmin database operations require separate checks.