How to create and manage a hosting email account
To use an address such as info@example.com with your domain, create a mailbox first. A mailbox has its own password and storage. An email forwarder sends incoming messages to another address; it does not create a separate mailbox.
Starting path: Sign in to the customer portal → your project → Websites → your active hosting → Email Accounts. The sidebar calls this section Email Management. See hosting management to find your service.
Before starting, check that you have opened the correct hosting service and domain. Mailbox counts and available storage depend on your hosting plan.
1. Create the email account
Complete Add new Email account near the bottom of the page:
| Field | What to enter |
|---|---|
| Username | The part before @. For info@example.com, enter only info and check the adjacent domain. |
| Password | A strong password used only for this mailbox. Do not reuse your customer portal password. |
| Confirm Password | The same password entered above. |
| Quota | Storage for this mailbox, appropriate for your needs and hosting limits. |
Set the address, password and quota under Add new Email account.
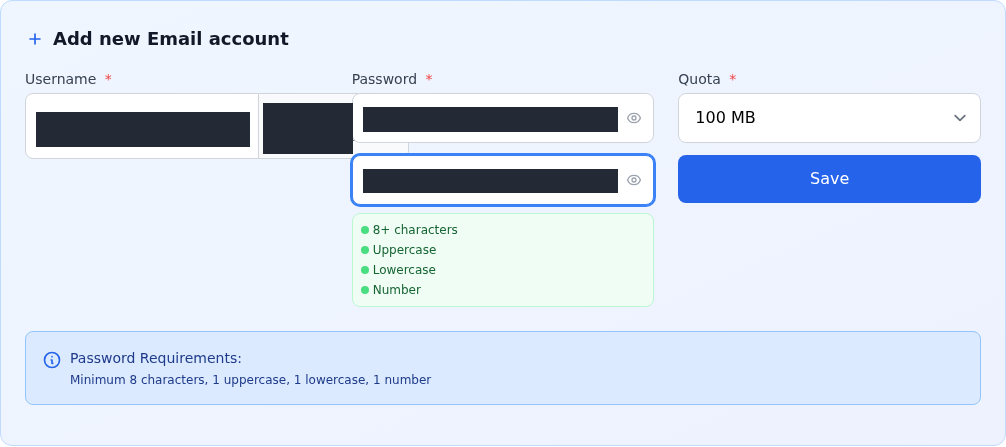
Step 1: Enter the mailbox name
- Enter the mailbox name
Use the part before @ in Username. Check the adjacent domain; do not enter the complete email address in this field.
- Enter the password twice
Use the same strong password in Password and Confirm Password. Check the requirement indicators below the fields.
- Choose mailbox storage
Quota is this mailbox’s storage limit. The image uses 100 MB; consider your needs and your plan’s total storage.
- Create with Save
Review the fields and select Save once. Then verify the new address and quota in Current Email Accounts.
Address and password fields are masked. 100 MB is the example selection; choose a quota appropriate for your usage and hosting limits.
The form requires at least 8 characters, one uppercase letter, one lowercase letter and one number. Prefer a longer, randomly generated password and store it in your password manager. The example uses 100 MB; this is not a required or recommended quota for every mailbox.
Review the fields and select Save once. Wait for the page to update, then verify the result below.
2. Verify the address and quota
Find the new mailbox in Current Email Accounts:
- Check its full email address, including the username and domain after
@. - Confirm that Domain identifies the correct domain.
- Read the used storage and total quota under Usage. In the example, 0/100.00 MB (0%) shows no reported usage in a mailbox with a 100 MB quota.
- Reload the page and confirm that the address remains listed.
This record was captured after mailbox creation and a page reload.
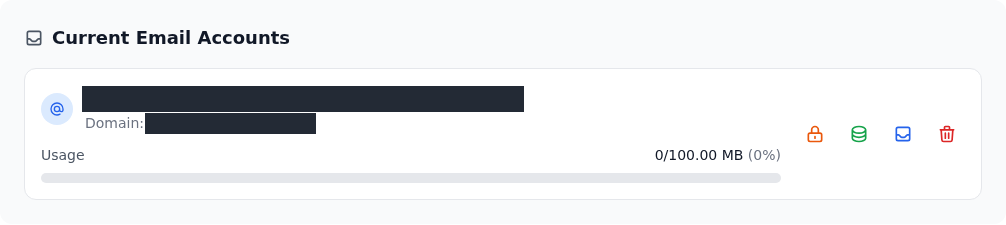
Step 1: Check the full address
- Check the full address
The row should identify your complete email address, including username and domain. Check the Domain value underneath.
- Read the Usage row
0/100.00 MB (0%) indicates a 100 MB quota and no reported usage for this record. It is separate from the default in the new-account form below.
- Find webmail access
The envelope is labelled Access Webmail. Follow the Webmail section below for the cPanel → Email Accounts → Check Email route to your mailbox.
This screen verifies the recorded address and quota. A webmail session and message delivery require separate checks.
This screenshot shows the actual mailbox record after creation and a page reload. The email address and domain are masked. The new-account form returning to 20 MB does not change an existing mailbox's quota; use its own Usage row.
If the address is missing or its row is empty, refresh before attempting to create the account again. If it remains unavailable, contact support with the hosting service and displayed message. An Active Account counter alone does not identify which address was created.
Open your inbox with webmail
Webmail lets you use email in your browser without installing a separate email app. Open cPanel from your hosting service, then follow these steps.
1. Find your mailbox. From the cPanel Tools page, open Email Accounts. Find your full email address under Account @ Domain, then select Check Email on that same row.
Find the email address you want to use in the cPanel Email Accounts list.
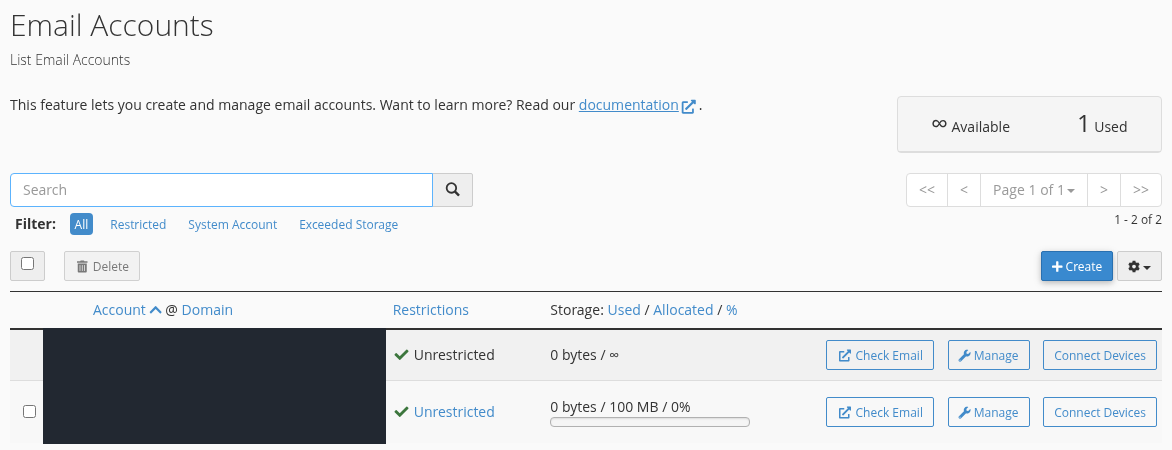
Step 1: Find your full email address
- Find your full email address
Locate the address you want to open in the Account @ Domain column. Check both the username and the domain after @.
- Select Check Email on the same row
Check Email opens the webmail entry page for that mailbox. If you have several addresses, make sure you use the button on the correct row.
Both account names are masked in this screenshot. Identify your mailbox by its full address, not by the example quota or row order.
2. Open Roundcube. On the webmail page, find Open your inbox and select Open. Open my inbox when I log in is optional; you do not need to select it to open your inbox now.
Find Open your inbox on the webmail entry page.
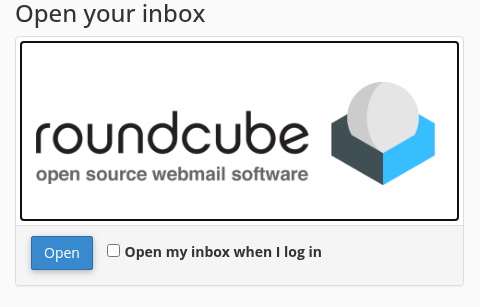
Step 1: Select Open
- Select Open
The Open button below the Roundcube logo opens your mailbox. Wait for the inbox screen to load.
Open my inbox when I log in opens the inbox directly on future visits. You do not need to select this checkbox to continue now.
3. Check your account and inbox. Your email address should appear at the upper left. Inbox is the folder for incoming messages. The list is empty. means there are no messages to display in that folder; this is normal for a new mailbox.
When Roundcube opens, check your account first, then the folder for incoming messages.
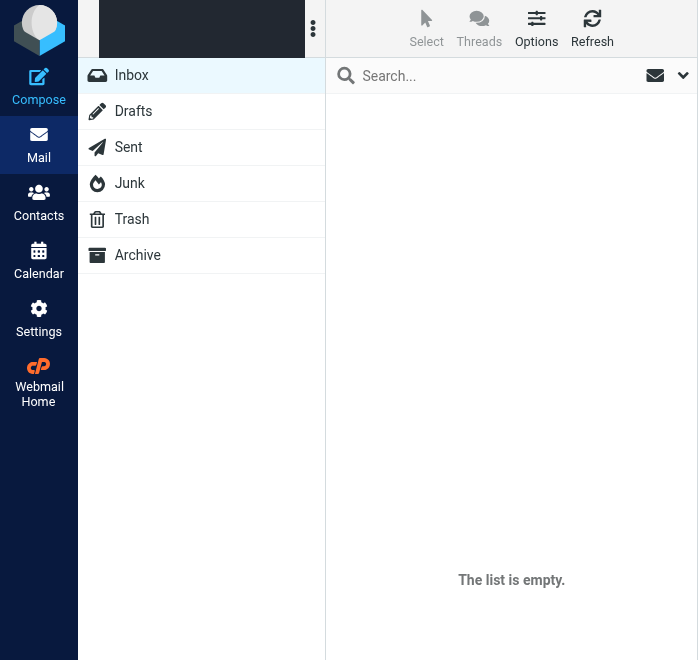
Step 1: Check the account name
- Check the account name
The account name at the upper left should be the full email address you intended to open. It is masked in this screenshot.
- Select Inbox
Inbox lists incoming messages. If you have opened another folder, select Inbox to return to incoming mail.
- Understand the empty list
The list is empty. means there are no messages to display in the selected folder. This is normal for a new mailbox that has not received any mail.
Opening the inbox alone does not verify that sending and receiving work. Test both directions separately using the connection checks later in this guide.
Opening the inbox alone does not verify your sending and receiving settings. Test both directions separately using the connection checks, which also explain what you need for a phone or desktop email app. If webmail does not open, contact support with your hosting service and the message displayed. Do not include your password or session link.
3. Manage mailbox storage
Select Change Quota on the relevant address's row. Current shows the existing quota and Used shows storage already consumed.
Change Quota edits storage for the selected mailbox.
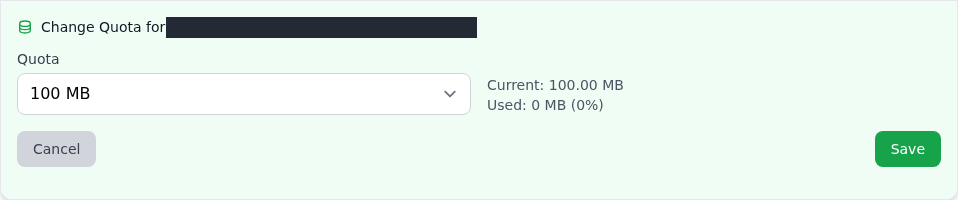
Step 1: Select the required quota
- Select the required quota
Choose an appropriate limit under Quota. Check that the address at the top identifies the intended mailbox.
- Check existing usage
Current is the existing quota; Used is the storage consumed. Do not select a limit below current usage.
- Save or cancel
Save applies the new quota; Cancel closes without saving. Check the mailbox’s Usage row afterwards.
The image shows the edit form for the existing 100 MB quota. Use this form’s Save for a new value; do not confuse it with the new-account form below.
- Check that the form names the mailbox you intend to change.
- Select an appropriate value under Quota. Avoid setting a limit below current usage.
- Select this form's Save button to apply it. Cancel closes the form without saving.
- Check the new total in the mailbox's Usage row afterwards.
An Unlimited option does not make your hosting plan's total disk space unlimited. Check the remaining hosting storage when planning for large attachments and retained messages. The screenshot shows the edit form for the existing 100 MB quota.
4. Change the mailbox password
Select Change password on the relevant mailbox row. This changes the email password, not your customer portal password.
Change password is for email access; your customer portal password is separate.
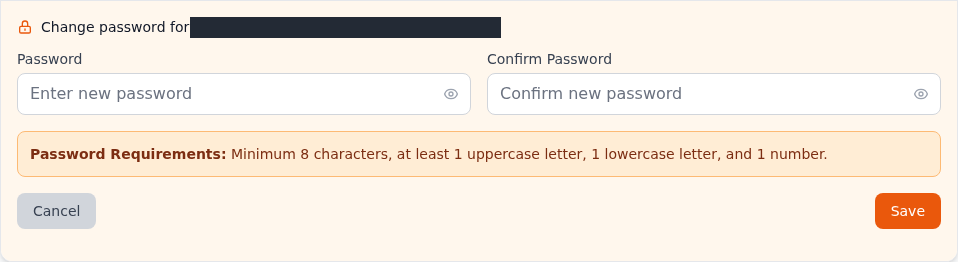
Step 1: Enter the new password
- Enter the new password
Check the address above the form. Enter a strong new password used only for this mailbox in Password.
- Repeat the same password
Repeat the new password in Confirm Password. Both fields must match and meet the Password Requirements.
- Save the change
Use Save to apply it, or Cancel to leave. After the change is accepted, check access using the new password.
The image shows the password-change fields. After saving, update the password stored in your email apps too.
- Check the email address above the form.
- Enter the new password in Password and repeat it in Confirm Password.
- Meet the Password Requirements, then select this form's Save button. Use Cancel to leave without saving.
- After the change is accepted, update the saved password in Outlook, your phone and other email apps. Check access using the new password.
The screenshot shows the password form, not a completed password change. Do not delete and recreate a mailbox to change its password. The Delete icon is for deletion; check your backup first if you need to retain existing messages.
5. Forward one address to another mailbox
Open Email Forwarding from your hosting service. Use Add Forwarder for a single address.
Email Forwarding provides two different add buttons.
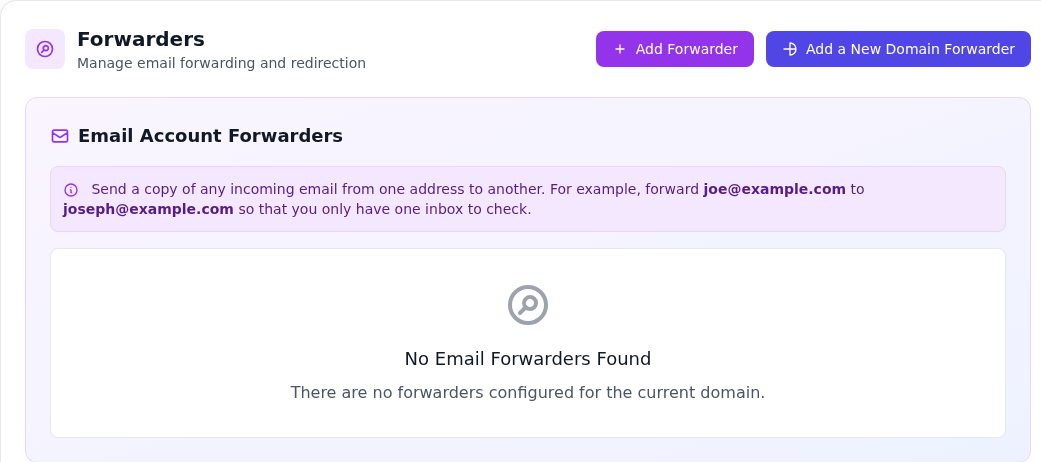
Step 1: Choose Add Forwarder for one address
- Choose Add Forwarder for one address
For example, open Add Forwarder to send mail addressed to info@example.com to another mailbox.
- Use the separate form for a domain
Add a New Domain Forwarder is for domain-to-domain forwarding; it is different from collecting all mail in one mailbox.
No Email Forwarders Found means this list has no forwarding records. Use Add Forwarder for a single address.
- Select Add Forwarder.
- Enter the source username in Address to Forward and its domain in Domain. For
info@example.com, useinfoandexample.com. - Select Forward to email address and enter the full destination email address.
- Review both addresses. Add Forwarder saves; Cancel closes the form.
- Find the forwarder in the list. Send a test message to the source address and separately confirm that it reaches the destination mailbox.
Add Forwarder opens this form below the lists.
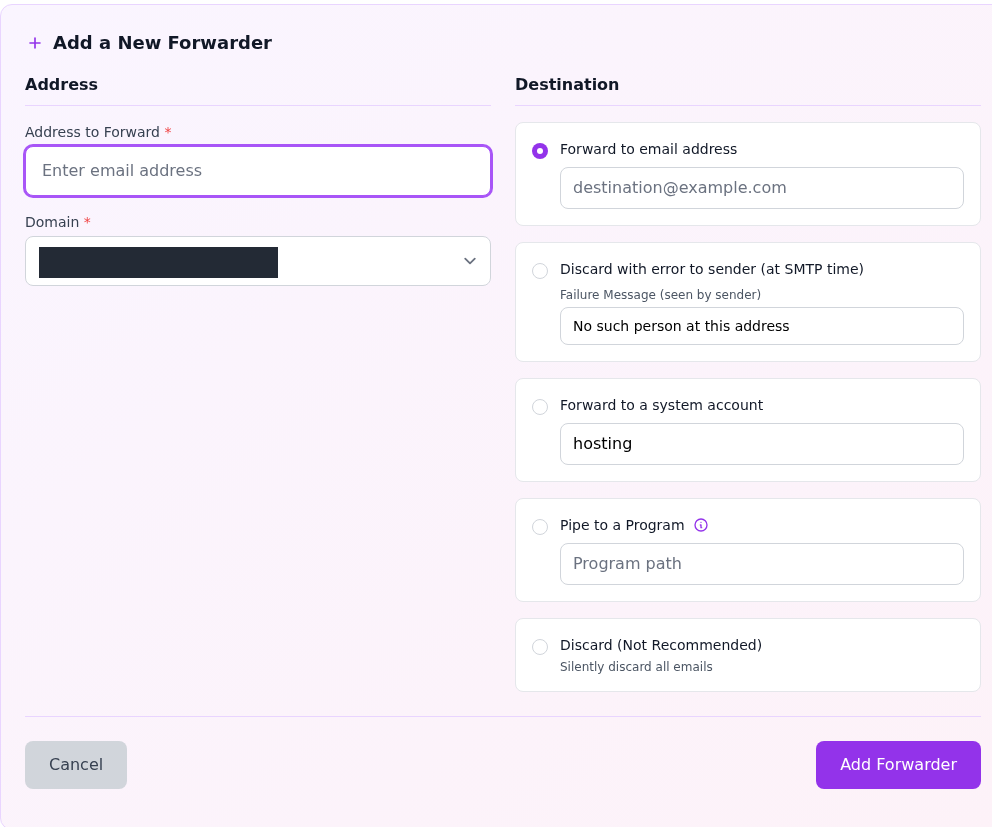
Step 1: Specify the source address
- Specify the source address
Enter the local part of the address in Address to Forward and select the correct Domain.
- Enter the destination mailbox
Select Forward to email address and enter the full destination address. Avoid the same source and destination or a chain that forwards back to the source.
- Review the delivery option before saving
Add Forwarder saves; Cancel closes the form. Discard options reject or delete messages instead of forwarding them.
A forwarder does not create the destination mailbox. Separately check that the destination works and receives a test message.
Do not forward an address to itself or create a loop between two addresses. The destination mailbox must work already. Discard with error to sender rejects messages; Discard (Not Recommended) silently deletes them. Forward to a system account and Pipe to a Program are not needed for ordinary forwarding to another mailbox.
6. Distinguish domain forwarding
Add a New Domain Forwarder forwards email between domains. Domain is the source and Forward To is the destination domain. To forward to a person's complete email address, use Add Forwarder in the previous section.
This form forwards between two domains.
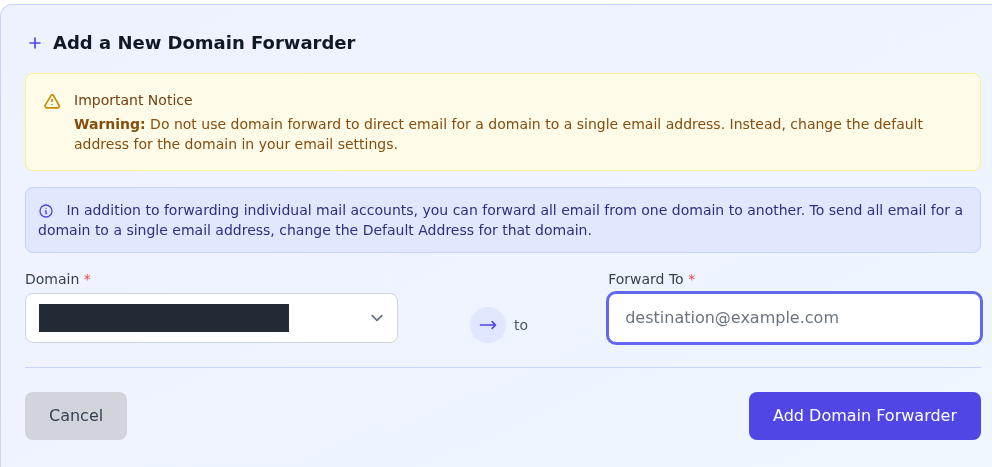
Step 1: Use a domain as the destination
- Use a domain as the destination
Domain is the source and Forward To is the destination domain. Despite the email-like placeholder, this is not single-address forwarding.
- Do not confuse this with catch-all delivery
The on-screen notice directs you to Default Address, rather than Domain Forwarder, to collect all mail in a single email address.
Domain forwarding, single-address forwarding and Default Address serve different purposes. Choose the form that matches your task.
Collecting messages addressed to undefined recipients in one mailbox is a separate setting. Review the scope of Default Address, as indicated on the screen; it serves a different purpose from a normal mailbox or domain forwarder.
7. Check the settings for a phone or desktop app
Creating a mailbox does not automatically configure DNS or your email app. You will need:
| Detail | What to check |
|---|---|
| Username | Your full email address, such as info@example.com. |
| Password | The current password for this mailbox. |
| Incoming server | Your service's IMAP or POP hostname, port and encryption setting. |
| Outgoing server | Your service's SMTP hostname, port, encryption and authentication setting. |
| Domain records | MX and the required sender-authentication records for your email provider. |
Do not guess mail server names from your website address. Follow email setup and the SPF, DKIM and DMARC guide. Test sending and receiving separately after setup; a message appearing in Sent does not by itself confirm delivery to the recipient.
If delivery still fails, record the source, destination, time and error message, then contact support without sharing the password.