How to pay and download a DCHost invoice
Before paying, check which service the invoice covers, its status and the amount remaining. Use Pay Now on that invoice. To add account credit instead, follow the separate top-up guide.
1. Find the invoice
Open the portal invoice list, scroll to Invoice Management and select View on the required row.
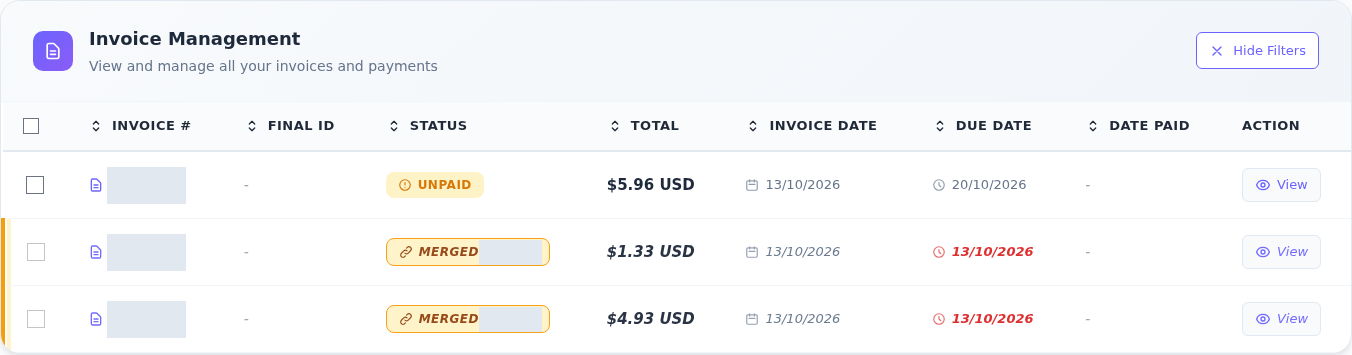
In Invoice Management, distinguish the current invoice, earlier merges and the amount due.
Step 1: Find the current unpaid invoice
- Find the current unpaid invoice
Unpaid means the invoice is awaiting payment. Read Total, its currency and Due Date on that row.
- Do not read Merged as paid
Merged means an earlier invoice was combined into another invoice. Check payment status on the new invoice rather than paying the old row again.
- Open the details with View
Select View on the right of the relevant row. Review the items, any payment-method fee and the remaining amount on the invoice page.
In this example, the bulk-payment link merged two invoices into a new Unpaid invoice; no payment was made. Merged does not mean Paid. Invoice numbers are hidden; use the current total on your own invoice.
| Field | What to check |
|---|---|
| Invoice # | The invoice you are acting on |
| Status | Its current state |
| Total | Amount and currency |
| Invoice Date | Creation date |
| Due Date | Payment deadline |
| Date Paid | Payment date, when recorded |
Unpaid means payment is outstanding. Merged means the invoice was combined into another invoice; it is not payment confirmation. Follow the new invoice number to check the current state and total.
If you cannot find it
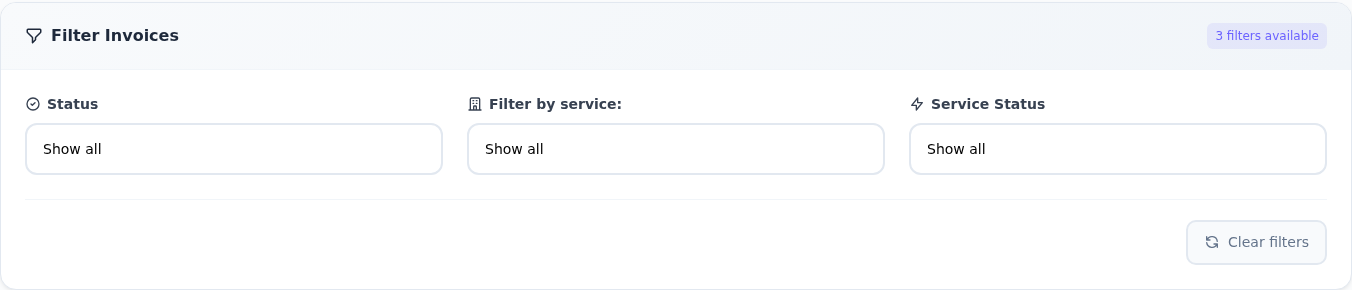
Open Filters. Status filters invoices, Filter by service selects the associated service, and Service Status filters service states. A service marked Pending and an invoice marked Unpaid are different facts. Use Clear filters to remove the filters.
The three fields in Filter Invoices filter different information.
Step 1: Filter invoice status with Status
- Filter invoice status with Status
Select the invoice status in Status. Show all does not limit this field to one invoice state.
- Find invoices for a specific service
Choose your service in Filter by service. Match it to the service name and number in your account, or leave Show all to include every service.
- Keep Service Status separate from payment status
Service Status filters by the service state. A Pending service and an Unpaid invoice describe different records; check them separately.
The service dropdown is closed and set to Show all, so no service number or hostname is visible. If you cannot find an expected invoice, remove restrictions with Clear filters.
2. Review lines and the remaining amount
Check the service name, billing period, extras, tax and any payment-method fee. Paid is the amount already paid; Left to pay is the amount remaining.
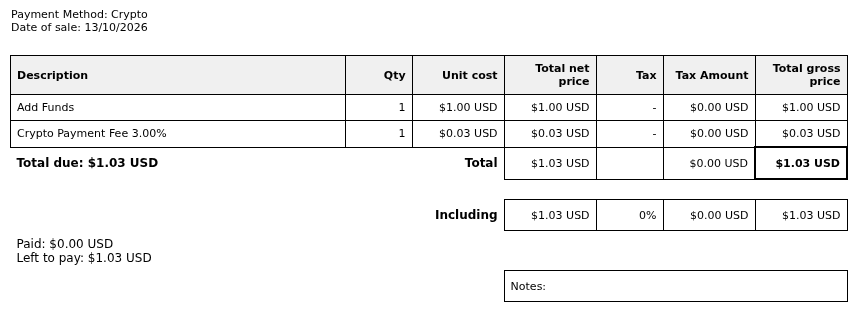
The proforma itemizes the credit amount and the payment-method fee.
Step 1: Distinguish Add Funds from the payment fee
- Distinguish Add Funds from the payment fee
In Description, Add Funds is the credit top-up and Crypto Payment Fee is the payment-method charge. They appear as separate items.
- Read the item amounts and total
Total gross price shows $1.00 USD for the top-up, $0.03 USD for the fee and $1.03 USD in total. Read your own invoice amounts together with their currency.
- Check Paid and Left to pay
Paid is the amount already paid; Left to pay is the outstanding amount. Paid is $0.00 USD here, so payment has not been completed.
This is a crop of the actual demo top-up invoice; customer details are outside the frame. Fees and amounts belong to this example transaction only.
This screenshot is an account-credit top-up invoice, not a hosting or server price example. For VPS/VDS line items, see the order guide.
If you see an unexpected service or charge, ask support about the invoice before paying. Use the profile guide for company and address details; do not assume a profile edit automatically rewrites previously issued documents.
3. Select a method with Pay Now
Select Pay Now at the top of the invoice and review the methods offered in the window.
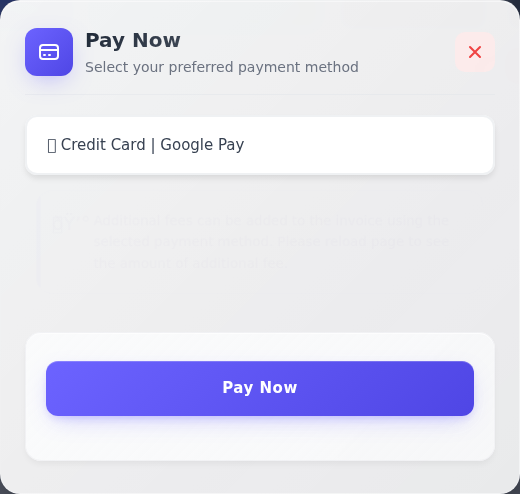
Pay Now on the invoice opens this payment-method dialog.
Step 1: Read the selected method
- Read the selected method
Check that the selection reads Credit Card | Google Pay. To use another method, change it here and review the updated invoice total.
- Continue to the payment page with Pay Now
When the method is correct, select Pay Now at the bottom of the dialog. On the next screen, review the merchant, currency and total.
Changing the method may change the processing fee and total. Pay Now here opens the payment screen; it does not confirm a card charge.
The example offered Crypto, Credit Balance and Credit Card | Google Pay. After changing the method, allow the fees to recalculate and read the final total. Credit Balance requires usable account credit; the option's presence does not prove a sufficient balance.
For the card example, the window's Pay Now button opened external checkout. Opening a payment window does not establish that a card was charged.
4. Complete card checkout
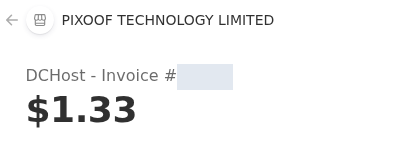
Check the merchant, invoice description, amount and currency. The screenshot preserves the provider's actual merchant name; personal details and the invoice number are concealed.
Review the header of the actual payment page opened by the portal.
Step 1: Check the merchant name
- Check the merchant name
Read the merchant name at the top. The actual Stripe screen in this example shows PIXOOF TECHNOLOGY LIMITED.
- Compare the invoice and amount with your transaction
Read the total below DCHost - Invoice and confirm that it matches your own transaction. Do not copy an example invoice number or amount.
The merchant name is preserved exactly as shown; the demo invoice number is hidden. This card-payment example shows $1.33 USD, which differs from the earlier Crypto total. No payment was made.
This 1.33 USD checkout is a separate top-up example opened at an earlier stage. It is not the combined-invoice total shown above. Method-specific fees can change the final amount, so check checkout's total independently.
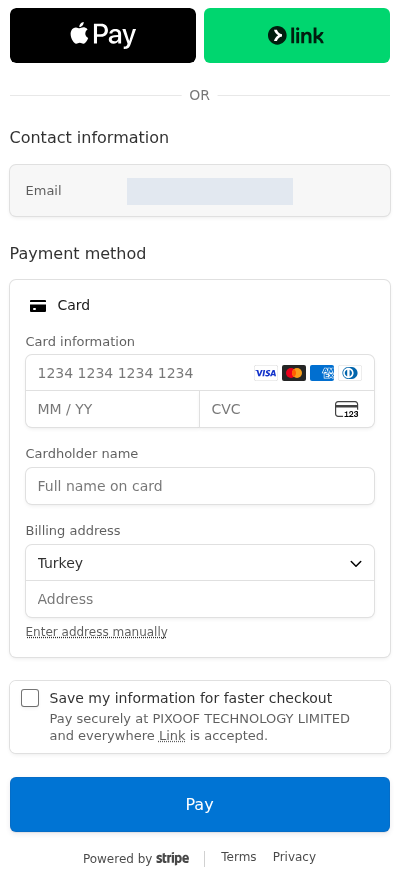
The card fields in this actual payment form are empty; the example email address is hidden.
Step 1: Enter card and cardholder details
- Enter card and cardholder details
Card information asks for the card number, MM / YY for its expiry and CVC for its security code. Enter the name printed on the card in Cardholder name.
- Check the billing address
Use your own country and address under Billing address. Turkey is selected in this example. Open Enter address manually if you need to type the address fields yourself.
- Separate the save preference from the payment
Save my information for faster checkout is an optional Stripe Link preference; it does not enable automatic payment in the portal. Pay submits the payment when the details and total are correct. Wait for the result and avoid retrying while the outcome is unclear.
No card number, expiry or CVC was entered; Pay was not selected and no charge was made. The 1234… text is a placeholder. After your own payment, also verify the invoice status in the portal.
- Card information: Enter the card number, expiry and security code.
- Cardholder name: Enter the name on the card.
- Country or region: Select the actual billing-address country. The example selects Turkey.
- Billing address: Enter your address. If suggestions do not help, use Enter address manually to open manual fields and complete the city and postal code. Fields may vary by country.
- Read the optional Link save-information choice; it is separate from the portal's automatic-payment setting.
- If the total is correct, use the final Pay button to authorize payment. Complete bank verification if requested.
Google Pay in a method's name does not guarantee a separate Google Pay button on every device; use the options actually offered. For crypto, check the asset, network, amount and destination on that transaction's payment screen. Do not use an address copied from an old guide or message.
These are genuine pre-payment screens. No card details were entered and the final Pay button was not selected in this demo.
5. Verify payment in the portal
- Return to the invoice in the customer portal.
- Check that its status reflects the result and review Left to pay.
- For renewals, also verify the new service expiry date.
- For top-ups, review Available Credit and Credit Logs.
If the bank reports success while the invoice remains open, do not pay again. Contact support with the invoice number, date, amount and transaction reference. Conceal card and account details in receipts you share.
Download a PDF or print an invoice
Use Download PDF on the invoice to download the document, or Print Invoice to open the printing flow. Check the browser's download or print window.
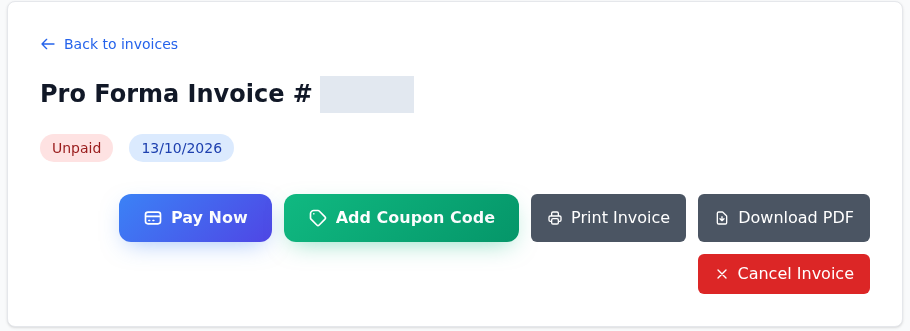
Submitting the form opened a Pro Forma Invoice. Check its payment status first.
Step 1: Check the Unpaid status
- Check the Unpaid status
Unpaid beneath the title means the invoice has not been paid. Creating an invoice does not make the credit available.
- Open Pay Now to continue to payment
After reviewing the invoice items and total, use Pay Now. Check the payment method and the result on the payment screen that opens.
The demo invoice number is hidden. Unpaid means payment is still due; this screenshot does not confirm a payment or a credited top-up.
For several documents, select the relevant row checkboxes in the invoice list and use Bulk Downloads → Download Selected. Verify both the selected rows and the downloaded files. Downloading a PDF does not pay it: check the status on the document too.
For an account-level summary, use Account Statement.
Apply a discount code
On the invoice, open Add Coupon Code, enter the code and select Submit.
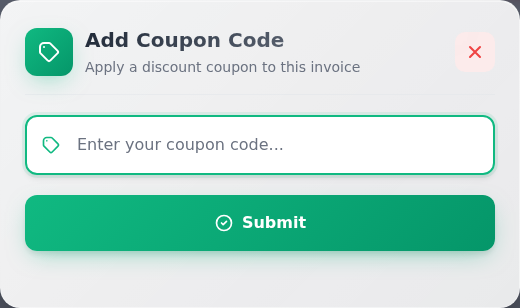
This dialog applies a discount coupon to the open invoice.
Step 1: Enter your coupon code
- Enter your coupon code
Enter a coupon valid for this transaction in Enter your coupon code.... Check for spaces at either end; no actual code is shown in the screenshot.
- Review the invoice total after Submit
Select Submit and read the acceptance or error message. If the coupon is accepted, check the discount and final invoice total before paying.
No code was entered and Submit was not selected; no discount was applied. This form differs from Redeem Voucher, which concerns account credit.
Check the result message and updated total. Entering a code is not proof that a discount was applied. Expiry, eligible services and new-order or renewal conditions may differ. This is separate from Redeem Voucher for account credit.
Pay multiple outstanding invoices
Pay all due invoices in Account Balance Overview starts the bulk-payment flow. It may combine invoices into a new invoice. In the observed account, the previous invoices became Merged and the new one remained Unpaid; no money was charged.
Reopen the list afterward. Review the combined services, processing fee, total and deadline again. Do not assume the old sum or old payment links remain current. To pay just one service invoice, use its own View → Pay Now route.
Does cancelling an invoice cancel a service?
Some unpaid invoices show Cancel Invoice. Acting on an invoice and closing a service are different operations. Do not assume this link stops renewal or creates a refund. If the scope is unclear, ask support with the service and invoice numbers and review the renewal and cancellation guidance.