DCHost credit history, payment records and account statements
An invoice records an amount due; a credit log records an increase or decrease in account credit. In this portal, Payment History opens Credit Logs. It is not a bank statement covering every card transaction.
Open credit history
Use Billing → Payment History or open Credit Logs. The account-history Credit Logs tab opens the same section.
Credit Transaction History records increases and decreases in account credit; it is separate from the invoice list.
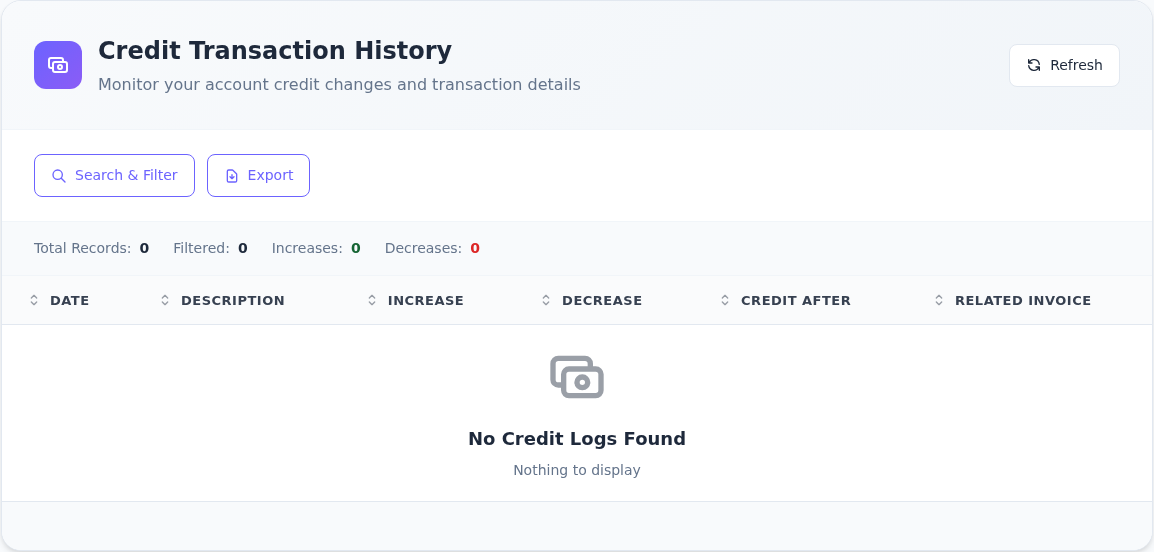
Step 1: Open Search & Filter to find an entry
- Open Search & Filter to find an entry
Select Search & Filter to open description, amount-type and date filters.
- Distinguish the credit columns
Increase is credit added; Decrease is credit deducted. Credit After is the balance after the entry, and Related Invoice identifies its associated invoice.
- Do not treat an empty list as payment confirmation
No Credit Logs Found means there is no entry to display. If you expect one, clear the filters and check the relevant invoice status separately.
The demo account has no credit activity, so the list is empty. Creating an unpaid invoice does not confirm that credit was added or that an entry exists here.
| Column | Meaning |
|---|---|
| Date | Transaction date |
| Description | Explanation of the balance movement |
| Increase | Credit added to the account |
| Decrease | Credit deducted from the account |
| Credit After | Balance after that transaction |
| Related Invoice | An associated invoice, when present |
To investigate an invoice paid with credit, read Decrease together with Related Invoice. Credit After alone does not identify the service that was paid.
No Credit Logs Found means there are no credit movements to show. The demo has no completed charge, so the section is empty. This does not prove there are no invoices or bank transactions.
Search and filter
Select Search & Filter.
Check which filters are active when narrowing the list.

Step 1: Search by description or amount
- Search by description or amount
Enter the description or amount you want to find in Search Transactions. Replace the placeholder with your own search text.
- Choose the entry type and date range
All Transactions under Amount Type includes every entry; Credit Increase and Credit Decrease select additions or deductions. From Date is the start and To Date is the end.
- Apply the filters or clear them
Select Apply Filters to run the search. Use Clear Filters or Reset Filter to remove restrictions, then review the result list again.
The mm/dd/yyyy text is a format hint, not an entered date. If no result appears, remove the restrictions and confirm you are in the correct account.
- Search Transactions: Search descriptions or amounts.
- Amount Type: Choose All Transactions, Credit Increase or Credit Decrease.
- From Date / To Date: Set the beginning and end of the period.
- Select Apply Filters.
- If a record is missing, use Clear Filters or Reset Filter, then Refresh to reload the list.
Total Records and Filtered need not match. Widen the date range before repeating a payment or top-up. For long lists, also review the Records per page preference.
Export records
Export opens Export to Excel, Export to PDF and Export to CSV.
Export offers Excel, PDF and CSV formats.
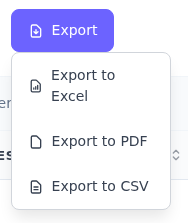
Step 1: Open Export
- Open Export
Select Export on the credit-activity page. The small menu lets you choose a file format.
- Choose the format you need
Use Excel to work with a spreadsheet, PDF to review a document, or CSV for compatible spreadsheet or accounting tools. After downloading, check that the records cover the period you intended.
The screenshot shows the export menu, not a file or confirmation of a successful download. Keep exported account records out of public spaces.
Choose a format for your accounting task. Open the file and check its columns, dates and record count; verify that an export made while filters are active covers the required period. A CSV is a data table, not proof of a paid invoice. No populated export is shown because the example account has no credit transactions.
Download an account statement
Select Billing Center → Account Balance Overview → Account Statement.
Account Balance Overview shows outstanding charges and usable account credit separately.

Step 1: Read the outstanding balance
- Read the outstanding balance
Outstanding Balance shows the amount due. Review the invoice list below to identify the invoices behind it.
- Check the available credit
Available Credit is the credit available in your account. It is $0.00 USD in this example and is separate from the outstanding balance.
The amounts describe the demo account at capture time. Submitting an add-funds form alone does not confirm that Available Credit has increased.
The observed action downloaded Account Statement.pdf instead of opening a separate page. If the page seems unchanged, check your browser's downloads. Compare the statement period and amounts with your own invoices. For one invoice's PDF, use the invoice download steps.
Reconcile a payment
- Find the invoice under Invoice Management; check its status, total and any amount paid.
- If account credit was used, locate the corresponding Credit Logs entry.
- For an external payment, compare the bank or provider's date, amount, currency and reference.
- If records are missing or inconsistent, contact support before repeating the transaction.
Invoice date, payment deadline and payment date are different fields. Merged does not mean paid; check the new combined invoice. For separate accounting access, use contacts and permissions instead of sharing the main account password.
For sign-in events, sent emails and portal notices, continue to the account-history guide.