Manage DCHost email and Telegram notification preferences
Manage billing, support, login and domain expiry emails under Settings → Notifications. Telegram is a separate option on Edit Details. The screenshots below show both locations.
Before you start: Sign in to the customer portal. Turning off a notification does not cancel a service, remove an invoice or remove your responsibility to renew a domain. Consider how you will track billing and domain expiry dates before disabling those emails.
1. Choose email notifications
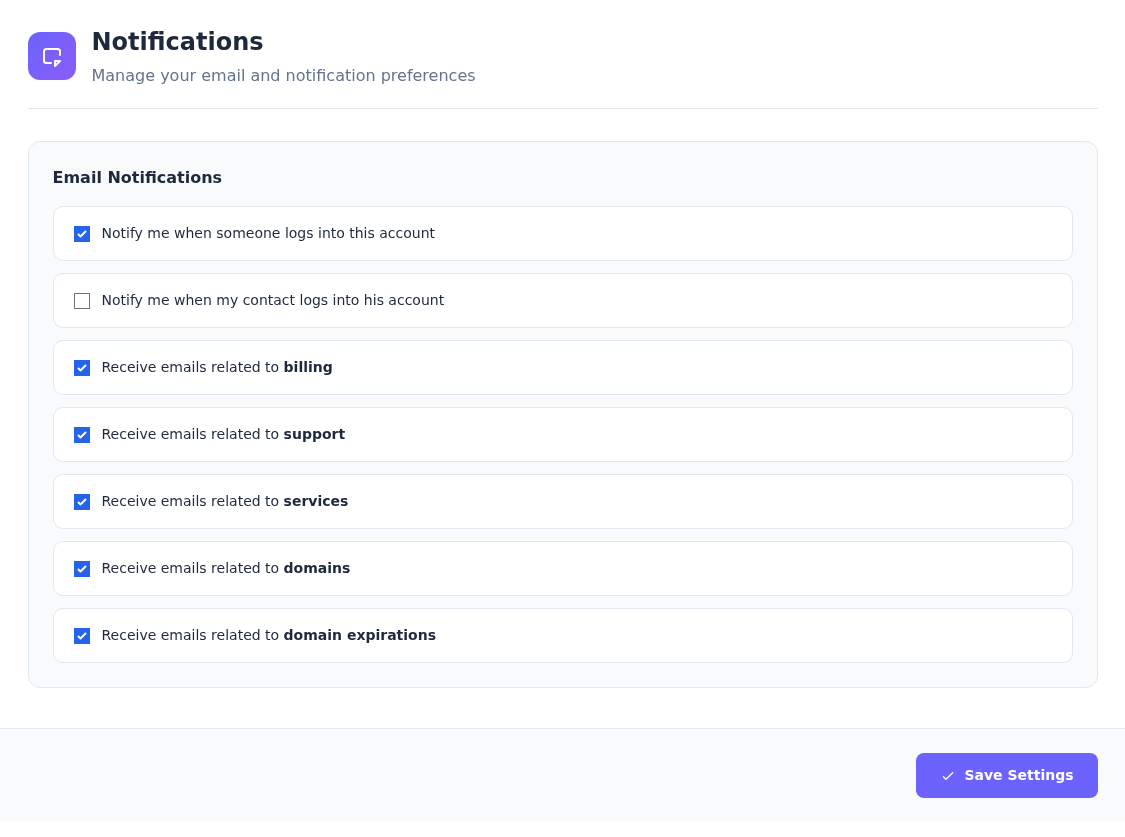
Open Settings in the top navigation. On Account Settings, go to Settings → Notifications. There are seven checkboxes under Email Notifications.
Checkboxes in Notifications separate login alerts from service topics.
Step 1: Choose login alerts
- Choose login alerts
The first checkbox concerns logins to this account; the second concerns a linked contact logging in to their own account. Review them separately.
- Choose billing, support and service emails
Billing is for billing emails, support for support emails and services for service emails. Select the checkbox at the start of each relevant row.
- Review domain and expiry messages separately
Domains covers domain-related emails; domain expirations covers expiry emails. Check the latter separately when tracking renewals.
- Save the preferences
Select Save Settings. Reopen Notifications afterwards and check that the boxes match your choices.
Turning off a checkbox does not cancel a service, remove an invoice or remove domain renewal obligations. Do not assume this screen suppresses every mandatory message.
| Option shown | Notification topic |
|---|---|
| Notify me when someone logs into this account | A login to this customer account. |
| Notify me when my contact logs into his account | A linked contact logging in to their own account. This is separate from the first option. |
| Receive emails related to billing | Billing-related emails. |
| Receive emails related to support | Support-related emails. |
| Receive emails related to services | Service-related emails. |
| Receive emails related to domains | Domain-related emails. |
| Receive emails related to domain expirations | Domain expiry emails. |
Select the checkbox for each category you want, or clear it if you do not want that category. Select Save Settings. Reopen Notifications afterwards and check that the boxes match your intended choices.
To restore a choice: Re-select the checkbox or return it to the previous state and save again. Do not assume these settings suppress every mandatory or security message.
2. Open Telegram setup
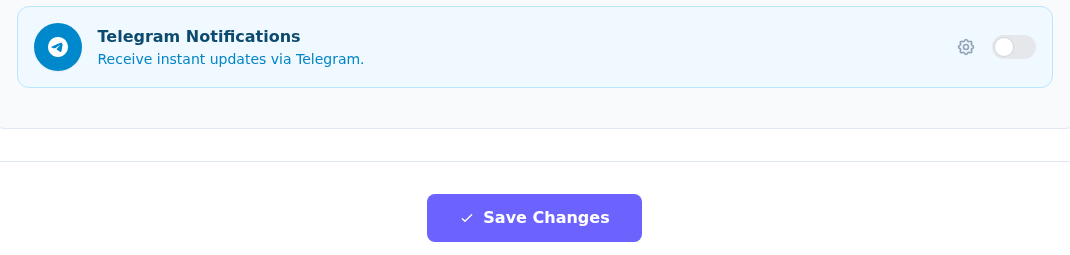
Open Edit Details and scroll to Additional Information near the bottom. There is a gear icon and an on/off switch at the right of Telegram Notifications. Select the gear icon to open setup.
Telegram is under Additional Information near the bottom of Edit Details.
Step 1: Open setup with the gear icon
- Open setup with the gear icon
Select the gear at the right of Telegram Notifications to open Telegram Setup.
- Check the preference after setup
After completing Telegram setup, check that the switch is in the state you want. Save profile changes with Save Changes.
The switch is off in this screenshot. Opening setup does not by itself enable Telegram notifications.
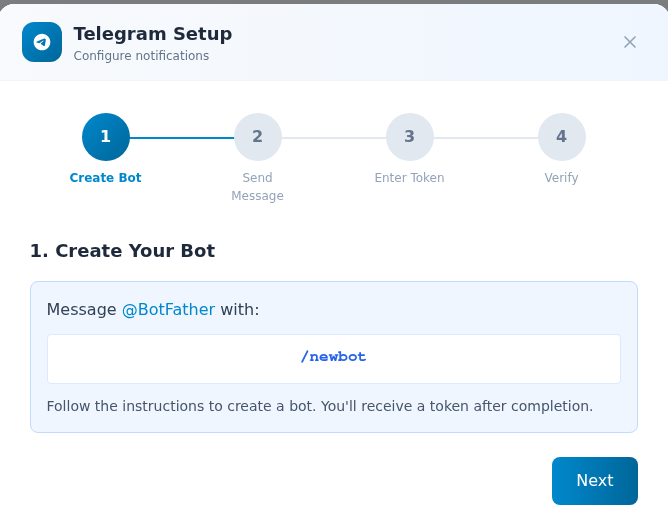
Telegram Setup shows four stages: Create Bot, Send Message, Enter Token and Verify. Make sure you can access your Telegram account before starting. Opening this window does not by itself enable notifications.
3. Create a bot and send it a message
The first screen asks you to send /newbot to the official @BotFather account in Telegram. Complete the bot name and username steps requested by BotFather. The resulting token is a secret used by the portal to connect to that bot; do not share it publicly.
The first setup stage is Create Bot.
Step 1: Follow the BotFather instructions
- Follow the BotFather instructions
Open the official @BotFather account in Telegram and send /newbot. Complete the bot name and username steps requested by BotFather.
- Continue with Next when the bot is ready
BotFather provides a token for the new bot. Keep it private and select Next to continue.
No Telegram bot was created and no message was sent for this guide. The screenshot shows the portal’s actual setup instructions.
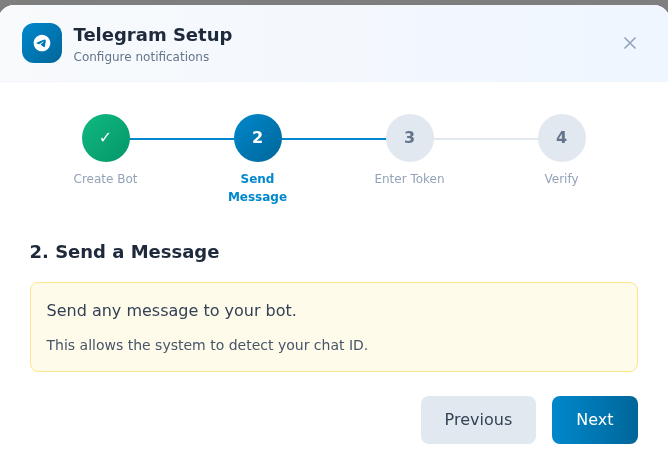
Once the bot is created, select Next in the portal. Send a Message asks you to message your bot. Open your new bot in Telegram and send a short message. The portal explains that this allows it to detect the chat ID, the identifier for your conversation.
Send Message asks you to message the bot so your chat can be identified.
Step 1: Send a message to your own bot
- Send a message to your own bot
Open the bot you just created in Telegram and send a short message. The portal explains that this lets it detect your chat ID.
- Go to the token step with Next
After messaging the bot, use Next. Choose Previous to review the preceding instructions.
Send the message to the bot you created. This step is not a support ticket or an email from the portal.
After sending the message, select Next in the portal. Use Previous if you need to review the preceding instructions.
4. Enter the token and check verification
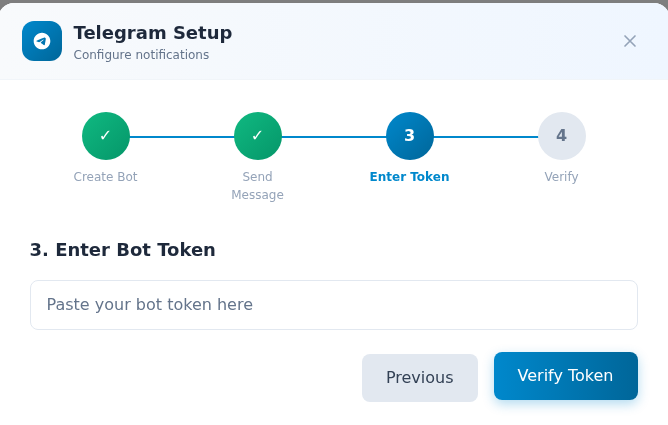
On Enter Bot Token, paste the token from BotFather into Paste your bot token here. Select Verify Token and read the result displayed by the portal.
Enter Bot Token asks for the token from BotFather.
Step 1: Paste the token for your own bot
- Paste the token for your own bot
Paste the token from BotFather into Paste your bot token here. Do not include it in screenshots or support messages.
- Check it with Verify Token
Select Verify Token and read the verification result displayed by the portal. If an error appears, check the bot and token again.
No token was entered and Verify Token was not run. Complete the later verification prompts shown in your own setup; this empty form is not a success confirmation.
Complete the subsequent instructions as they appear on screen. Then check the Telegram Notifications switch on the profile page. Make sure the preference is in the state you want; use Save Changes for profile changes.
What these screenshots cover: The first three stages of the actual portal setup window were explored. No Telegram bot was created, no external message was sent, no token was entered and Verify Token was not run for this guide. These images therefore do not show a successful Telegram connection or a delivered test notification.
To turn off Telegram notifications: Switch off Telegram Notifications on the profile and select Save Changes. This preference does not delete the Telegram bot. If the token needs to be replaced, check bot management in Telegram separately.
If a notification does not arrive
| Check | What to do |
|---|---|
| Is the right category enabled? | Check the relevant box in Notifications. Domains and domain expirations are separate categories. |
| Was the preference saved? | Use Save Settings for email choices and Save Changes for profile/Telegram preferences. |
| Is the account email correct? | Check the address in Edit Details. Use the Change Email guide if it needs updating. |
| Could the email be filtered? | Check spam, junk and mailbox rules. |
| Does Telegram token verification fail? | Check that the token belongs to the intended bot and that you sent that bot a message. Read the error shown. |
| Setup opened but notifications are still off? | Opening the wizard is not completing setup. Check both the verification result and the profile switch. |
If the issue continues, create a support request. Include the expected notification category, approximate time and any error message. Do not share your password or bot token.