Organize services into projects and follow the project creation steps
A project helps you follow services belonging to the same piece of work, such as a company website's domain and server. Creating a project is separate from purchasing a service or provisioning a server.
Open project management
Open VPS in the top menu. Manage Projects leads to Project Management; Create Project opens the creation steps.
Project Management lists projects and service-management links.
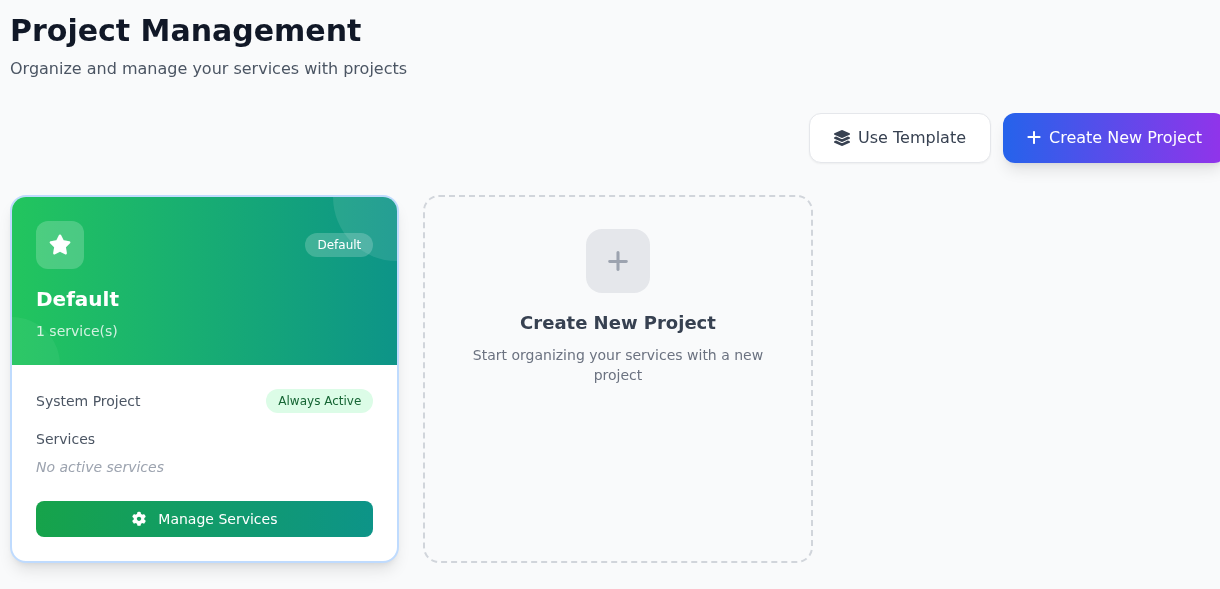
Step 1: Open new-project steps
- Open new-project steps
Create New Project begins with name and type. Use Template opened the same wizard during inspection.
- Read the system project status
Read System Project, Always Active and No active services together on Default.
- Open the project dashboard
Manage Services opens the dashboard for that project.
A counted service record is not necessarily active. This example says No active services.
Default is labelled System Project and Always Active. Read its service count alongside No active services: a counted service may still be Pending. This example has no active server, so it does not present a server control screen.
Manage Services opens the project's dashboard. Use Create New Project for a new project. The inspected Use Template link also opened the creation wizard; no separate template gallery was displayed.
1. Enter the project name and type
Project Information is the first step of the creation wizard.
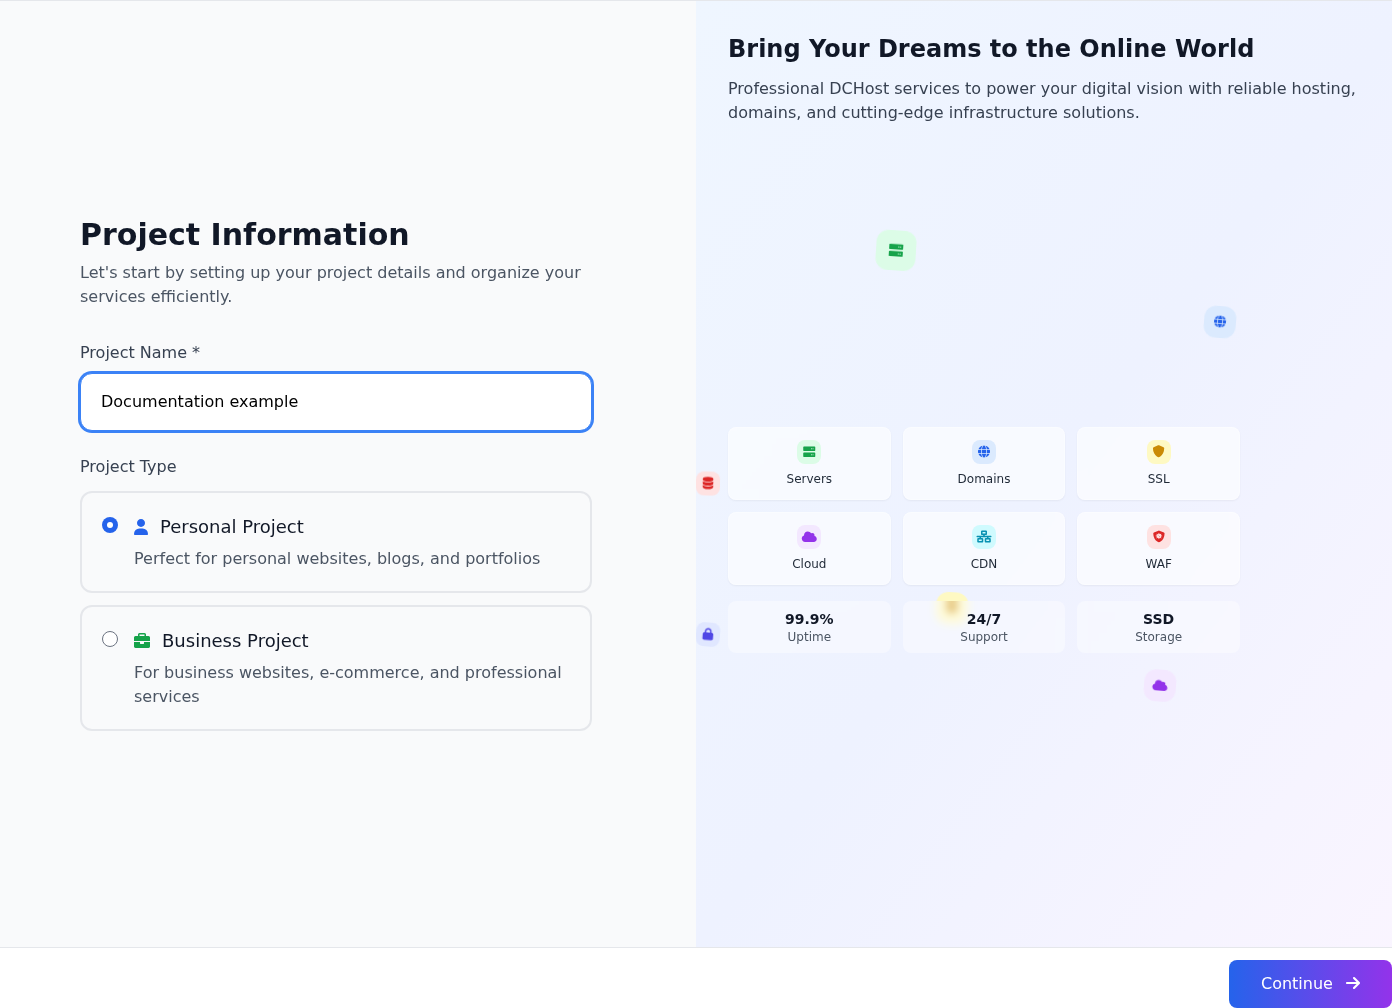
Step 1: Enter a descriptive project name
- Enter a descriptive project name
Use Project Name to identify the work, without passwords or private keys.
- Review the Business Project option
Choose Personal Project or Business Project. Company details on the main profile are a separate setting.
- Continue to the next step
Continue goes to service selection; it does not finalize the project at this step.
Documentation example is an unsaved sample name. Project type does not replace account billing details.
Under Project Information, enter a descriptive Project Name, such as “Company website.” Do not put a server password, email password or private key here. Choose Personal Project or Business Project, then select Continue.
Do not assume the project type updates the main account's company or billing details. Review those separately in account settings.
2. Choose whether to add a service
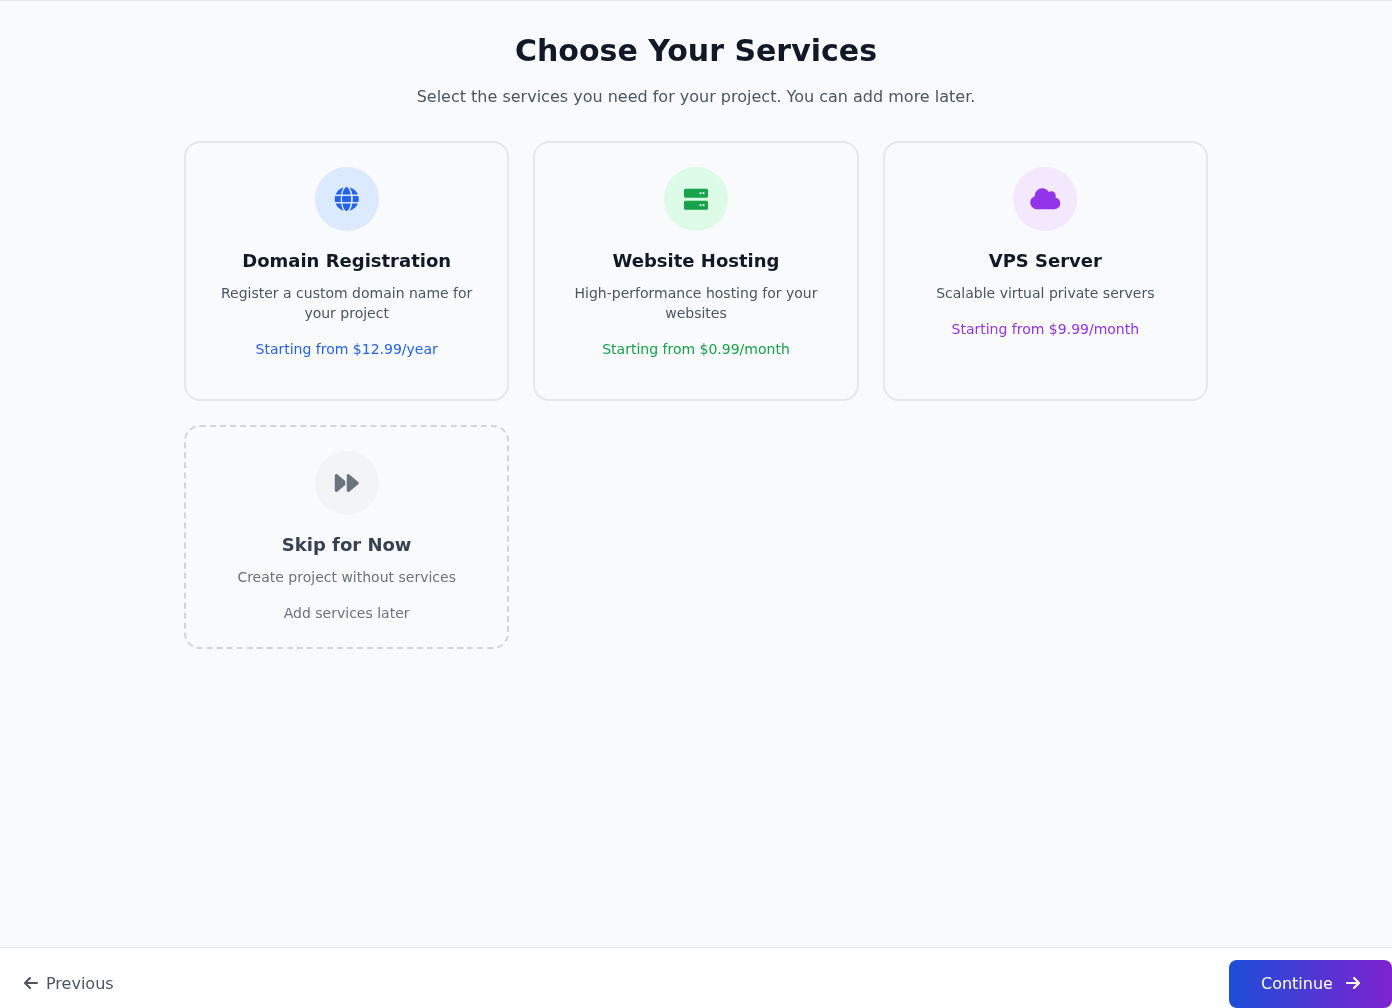
Choose Your Services sets the starting route for the project.
Step 1: Review the VPS Server option
- Review the VPS Server option
Domain Registration continues with domains, Website Hosting with hosting and VPS Server with servers.
- You can prepare only the project first
Choose Skip for Now if you are not adding a service. Use the project dashboard for later service actions.
- Continue after selecting
Continue moves forward; Previous returns to the preceding step.
Starting card prices are not a confirmed order total. Skip for Now was used in this example.
Choose Your Services offers three service routes and a skip option:
| Choice | Use it when |
|---|---|
| Domain Registration | You want to proceed to domain registration selection |
| Website Hosting | You want to continue with hosting selection |
| VPS Server | You want to continue with server selection |
| Skip for Now | You want to prepare a project and add services later |
Choose an option and use Continue. Previous returns to the preceding step. Starting prices on cards are not a confirmed order total; the service, term and options can affect the total later.
Choosing Domain Registration shows Choose Your Domain, where you enter a domain and use Search. Searching does not register the domain. Check the subsequent selection and order result separately.
3. Review before creating
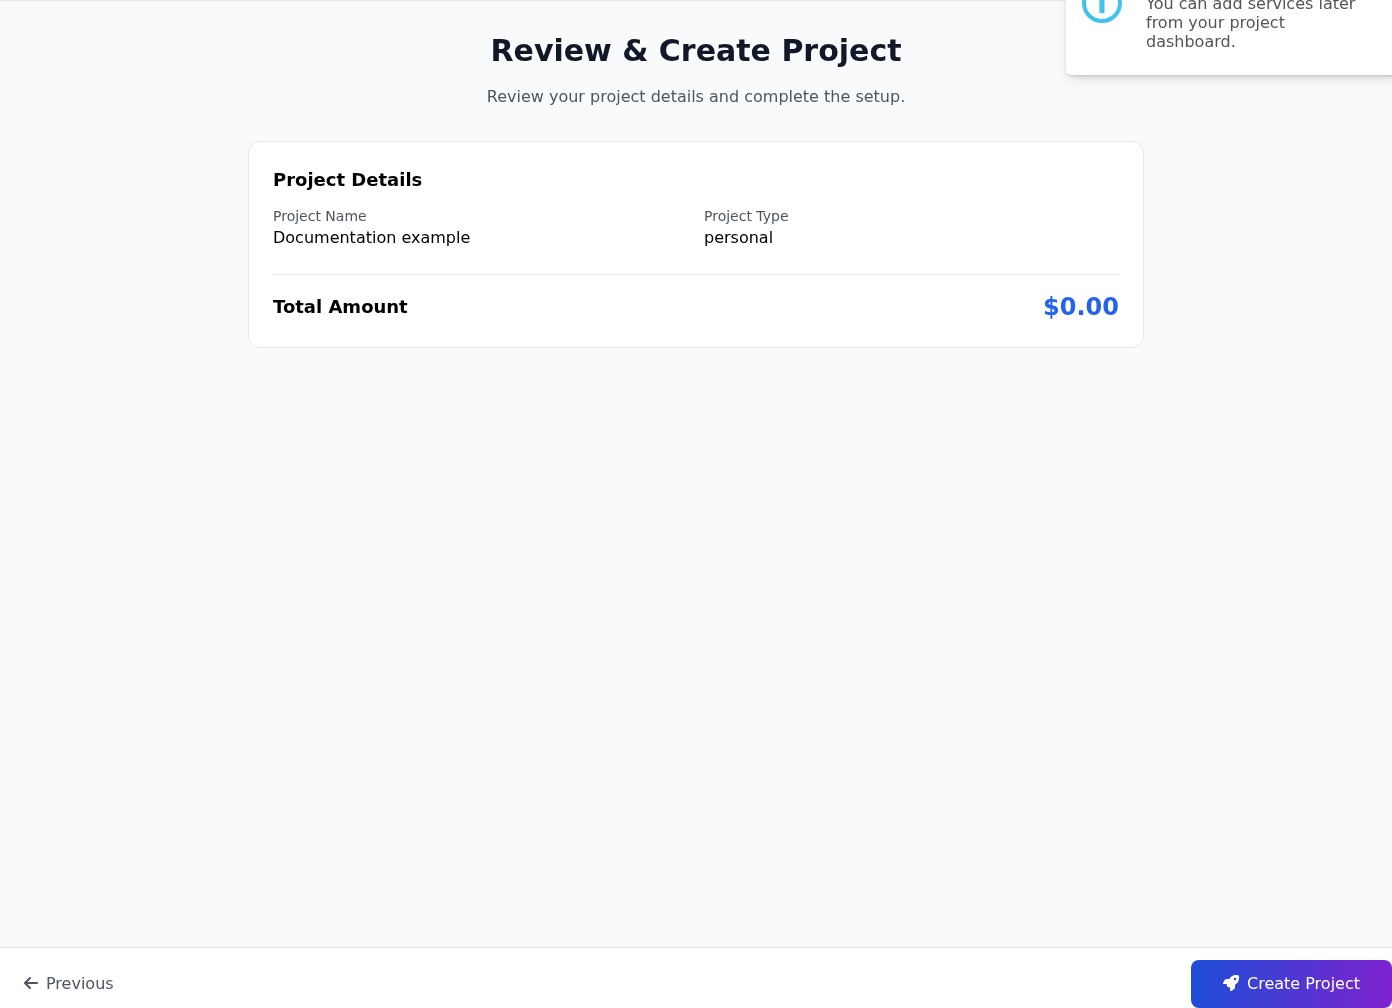
Skip for Now led to Review & Create Project.
Step 1: Check the project name
- Check the project name
Check Project Name and Project Type under Project Details. Read Total Amount in the context of your choices.
- Identify the final submit button
Create Project submits creation. Use Previous first if you need to correct the details.
Create Project was not clicked. The zero total belongs only to this example with no services selected.
In this example, Skip for Now led to Review & Create Project. Project Details shows the name and type, followed by the total. With no service selected, the example total is zero. This does not mean hosting or servers are free.
If the details are correct, Create Project submits creation. Use Previous to correct them. The final button was not pressed for this guide, and no new project was created. After your own submission, check the response and project list. If an error appears, read it before repeatedly submitting the same project.
Read the project dashboard counts correctly
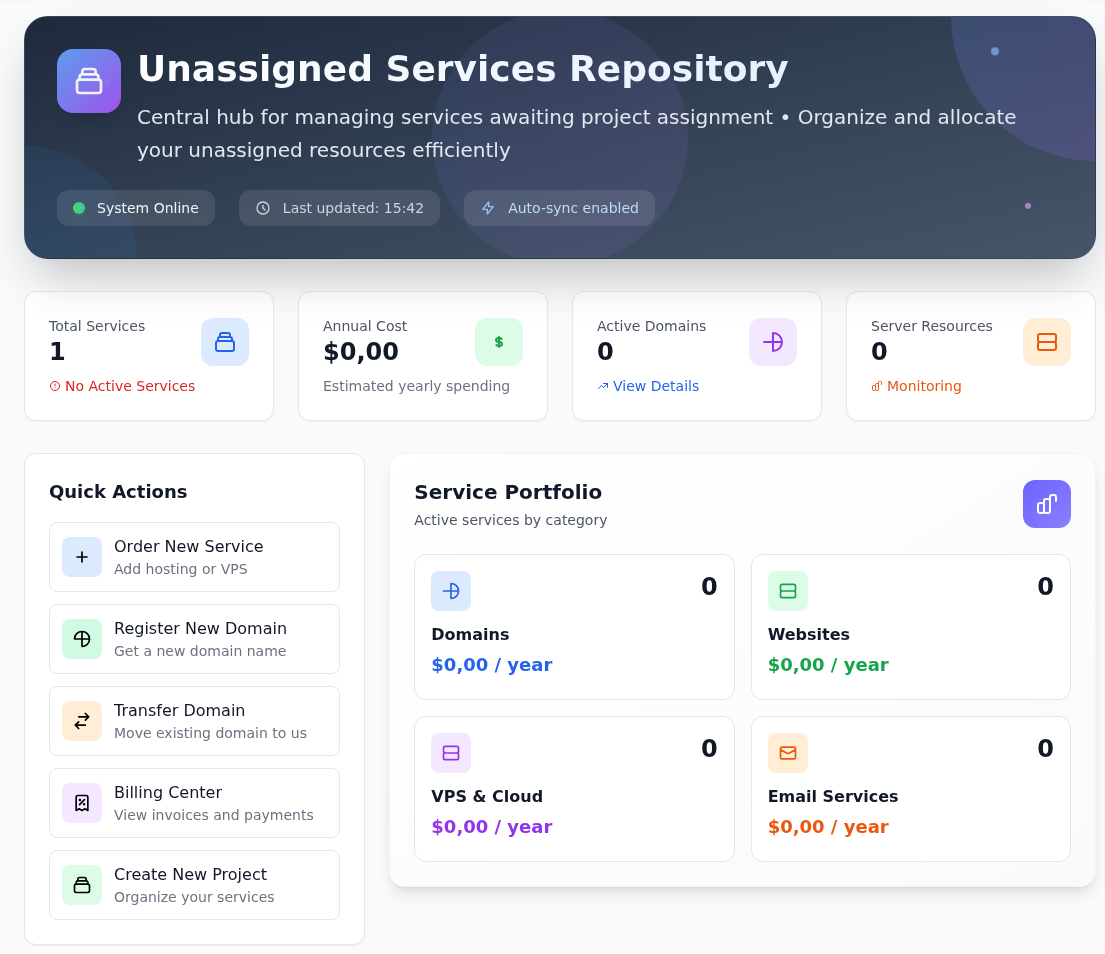
For the inspected Default project, Project Management → Manage Services opens Project Dashboard.
Manage Services opens this dashboard for Default.
Step 1: Distinguish total records from active services
- Distinguish total records from active services
Read Total Services together with No Active Services. A pending record is not an active resource.
- Choose the shortcut for your task
Quick Actions contains service ordering, domain registration/transfer, billing and new-project links.
- Check the portfolio counts
Service Portfolio shows separate summaries for Domains, Websites, VPS & Cloud and Email Services.
The account header is outside the crop. Do not assume a server is running when No Active Services is shown.
- Unassigned Services Repository: The main section title in the Default dashboard.
- Total Services and No Active Services: Total records and active services are different. A pending order is not a ready-to-use server.
- Active Domains, Server Resources and Service Portfolio: Review these summaries together.
- Quick Actions: Contains Order New Service, Register New Domain, Transfer Domain, Billing Center and Create New Project.
The sidebar includes Domains & DNS, Websites, VPS, Container, Bare Metal, Email Services and Marketing. A visible category is not proof that you own an active service in it.
Use the ordering guide to purchase a service, or review Manage service groups before granting project management access to a colleague. If the service status is unclear after payment, include the displayed status in a support ticket.