How to install Plesk on a VPS or VDS server
Plesk is a server control panel for managing websites, databases and email through a browser. This guide is for a new, empty Linux VPS/VDS server. Do not apply it directly to a server that already hosts working websites.
If your hosting plan already includes cPanel, you do not need to install Plesk; continue with the hosting control panel guide.
1. Check the server and requirements
Open the intended server in the DCHost customer portal. Check its operating system, IP address and SSH details. Your customer portal and server root logins are separate accounts.
Choose an operating system supported by Plesk. AlmaLinux 9 appears on the official list; do not assume every Linux version or architecture is supported.
| Resource | Plesk's Linux minimum | Starting recommendation for one demo website |
|---|---|---|
| Memory | 1 GB RAM + 1 GB swap | 4 GB RAM; check existing swap separately |
| Disk | 20 GB | 60 GB SSD |
| Operating system | Linux matching the official support list | Clean AlmaLinux 9 x86_64 |
This recommendation does not guarantee production capacity. Website count, traffic, backups and email change the resource requirements. Check the current Plesk system requirements before installation.
The new DCHost VDS used for this guide has 3 vCPU, 4 GB RAM, 60 GB disk and AlmaLinux 9.8 x86_64. Its operating system was updated, 2 GB swap was prepared, and the server was restarted into the new kernel. These are the resources of this example installation; your plan may differ.
Verify the operating system and resources in the SSH output.
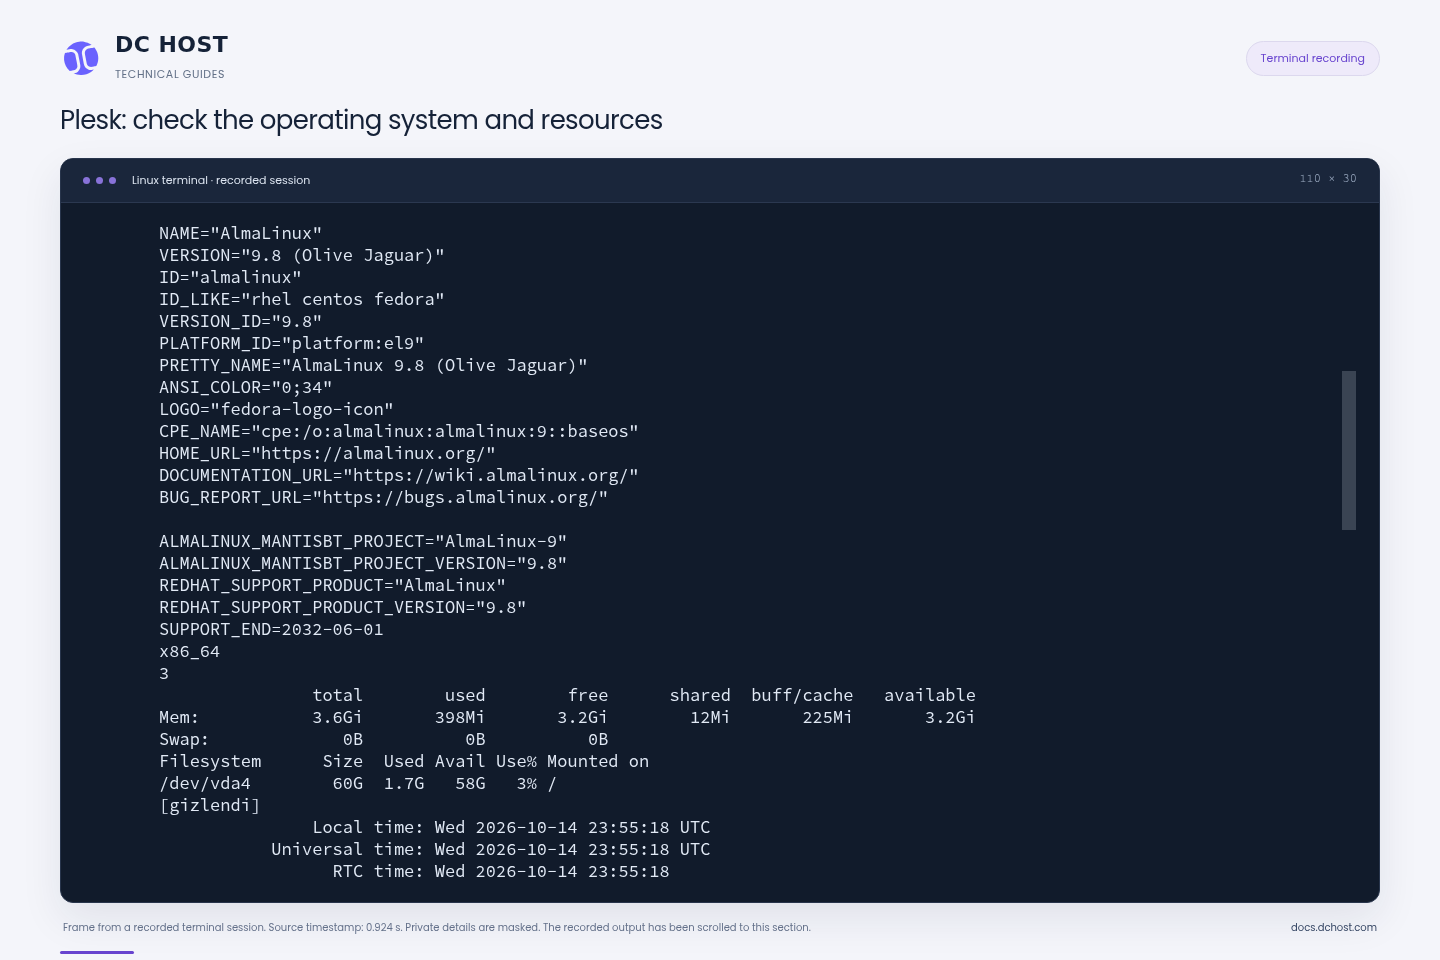
Step 1: Check the version
- Check the version
VERSION and VERSION_ID identify the installed distribution. This example uses AlmaLinux 9.8.
- Read architecture and memory
x86_64 is the architecture; the following value 3 is the CPU count. Mem total is the memory visible to the operating system.
- Compare disk size and free space
Size is disk capacity and Avail is free space. Swap has not been added at this initial check.
A frame scrolled to the operating-system section of the actual SSH session. Private server details are masked.
2. Prepare SSH access, hostname and DNS
Follow first login to a Linux server. Run the following commands after connecting to the correct new server, not on your own computer:
cat /etc/os-release
uname -m
free -h
swapon --show
df -h /
hostname -f
Compare the operating system, memory and disk results with your service. If another control panel or working web/database service is present, do not begin installation. Prepare a separate clean server instead of removing packages at random.
Choose a fully qualified hostname such as plesk.example.com. Its A record must point to the server's public IPv4 address. Do not add a nonworking AAAA record if the server is not using IPv6. example.com is only an example.
Create the record at the domain's authoritative DNS provider. Preserve existing website and email records. A correct hostname and reachable HTTP service help prepare the panel's HTTPS certificate.
After creating the DNS record, set the server's hostname. Replace every occurrence of plesk.example.com below with your own hostname:
hostnamectl set-hostname plesk.example.com
hostname -f
getent ahostsv4 plesk.example.com
hostname -f should show the name you selected, and the DNS lookup should return this server's IPv4 address. If it does not, correct the A record before installing.
Update the operating system
After confirming that you are connected to the correct new server, review the AlmaLinux update plan first. This command lists the proposed transaction and declines it automatically; it does not change packages:
dnf upgrade --assumeno
If the proposed installations, updates and disk requirements are appropriate, start the update:
dnf -y upgrade
dnf -y install firewalld curl ca-certificates
Wait for the package manager to finish and show its result. If the kernel was updated, restart the server, reconnect over SSH and check the running version with uname -r. Do not start the Plesk installer before the restart has finished. These commands are for AlmaLinux. For Ubuntu/Debian, use the APT update guide; do not mix package commands between distributions.
In this example, swapon --show was initially empty. We added 2 GB swap to the new server with 4 GB RAM. If your server already has swap, check the existing configuration and free disk space instead of blindly adding a second file.
3. Prepare access rules
Preserve the current SSH session and your available console access. Do not disable the entire firewall to resolve an access problem.
| Port | Use in this basic installation |
|---|---|
| TCP 22 (default) | SSH; preserve your existing SSH port and restrict it to authorized administration IPs where possible |
| TCP 8443 | Plesk HTTPS administration; authorized administration IPs only |
| TCP 80 and 443 | Website access and certificate validation |
| Outbound TCP 443 | Plesk licensing, downloads and updates |
A console installation does not require exposing installer port TCP 8447 to everyone. Do not expose database ports such as MySQL/MariaDB 3306 merely because Plesk uses the database. Mail, FTP or authoritative DNS require their own port plans if you intend to provide those services.
The Plesk installer can change firewalld rules. Prepare the method that preserves your management access before installation. Do not use firewalld and the Plesk Firewall extension as competing rule managers.
This demo uses a dedicated firewalld zone: SSH and panel access are limited to the administration IP, while TCP 80/443 allow website access. The rules were checked again after restart. Your administration IP and network will differ; do not copy an example IP without replacing it.
Check the kernel, swap and access rules again in a new SSH connection.
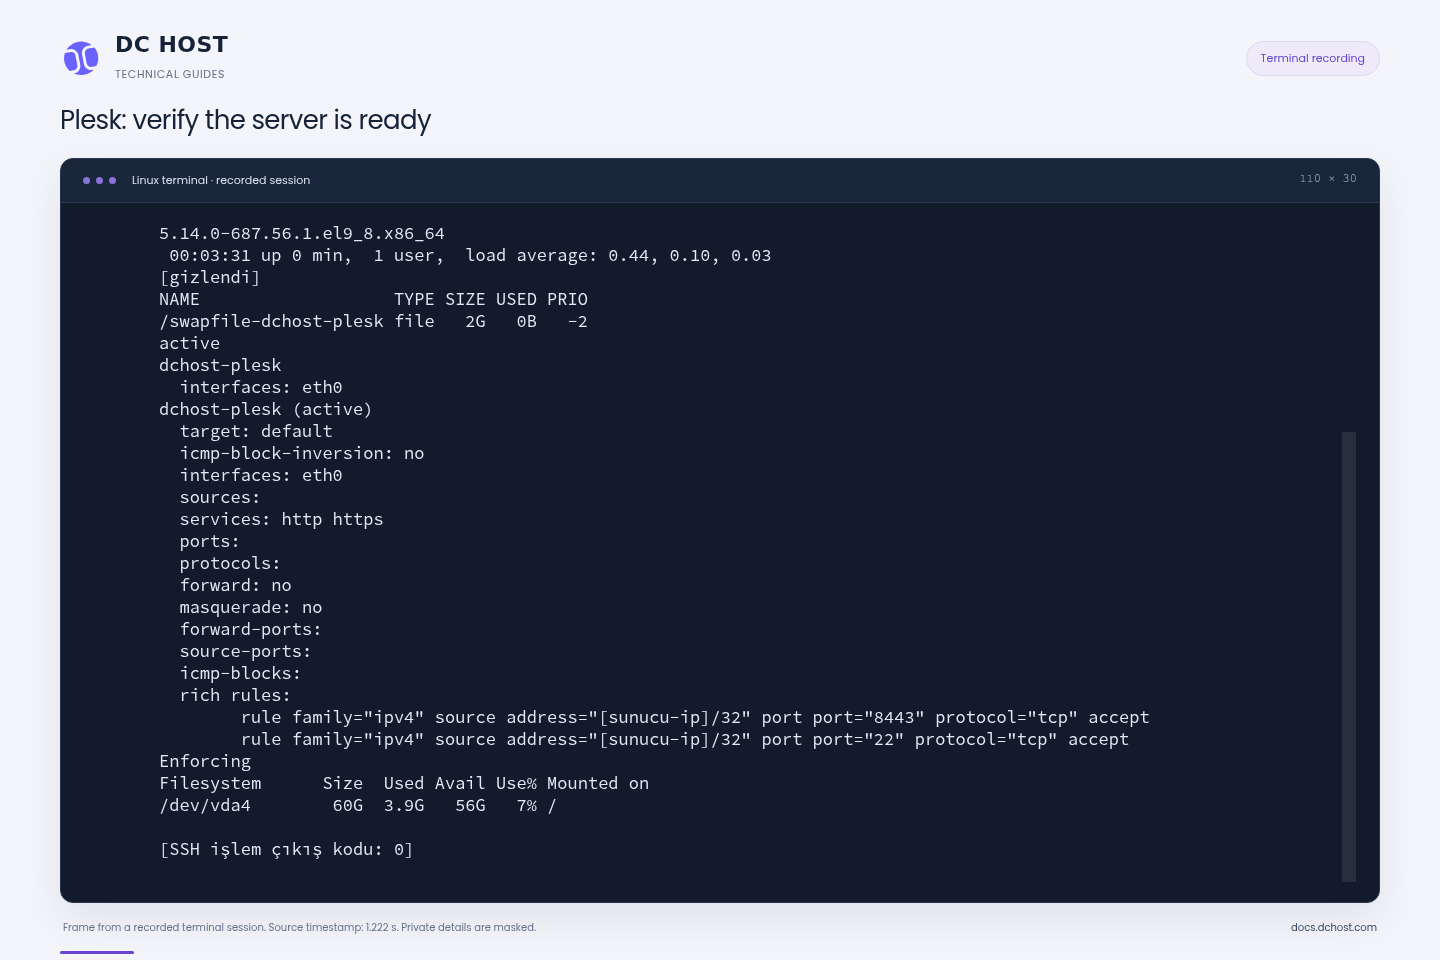
Step 1: Check the new kernel and connection
- Check the new kernel and connection
The first line is the running kernel version. Opening a new SSH connection verifies access after restart.
- Confirm swap remains enabled
The 2G swap entry shows that the prepared swap file is active after restart.
- Restrict administration access
The 22 and 8443 rules are restricted to the administration source. Its address is masked; use your own administration IP. http and https allow website access.
SELinux Enforcing is preserved in this example. No competing firewall manager was enabled during installation.
4. Run the official Plesk installer
The installer adds required components, including the web and database services. Continue with root privileges only on a supported clean server.
mkdir -p /root/plesk-install
cd /root/plesk-install
umask 077
curl --fail --show-error --location --proto '=https' \
  -o plesk-installer https://autoinstall.plesk.com/plesk-installer
chmod 700 plesk-installer
# Only if you prepared the firewalld rules in the previous step:
export PLESK_INSTALLER_SKIP_FIREWALLD=1
./plesk-installer install plesk
If the download fails, do not run the next command. install plesk is the official unattended installation method. It installs the latest generally available release with the Recommended components. Wait for all download and package installation steps to finish. Keep the session open and do not start a second installation while it is running.
PLESK_INSTALLER_SKIP_FIREWALLD=1 prevents the installer from replacing your prepared firewalld configuration. It does not configure the firewall for you; the required access rules must already work.
This actual installation completed with Plesk Obsidian 18.0.81.3. The installer finished successfully in 19 minutes 6 seconds. Panel services were then checked, firewalld rules remained in place and SELinux remained Enforcing. Installation time depends on the server and download speed.
74-second summary: active output runs at 3× speed and idle gaps longer than 2 seconds are shortened. The original installation took 19 minutes 6 seconds. First login and licensing are shown separately below.
What does the recording show?
- The official installer starts and downloads the required packages and Plesk components.
- It prepares the web server, database, PHP and panel components. A pause in output is not a reason to start another installer.
- The installer finishes with a success message. That message does not establish that a license is active.
- The version, panel services, firewall and SELinux state are checked. The next step is the first browser login.
Starting the command does not prove completion. If an error appears, record the exact message and time; check the existing state before attempting installation again.
5. Log in to Plesk for the first time
Open the administration address shown by the installer. The standard form is https://plesk.example.com:8443/. Replace the example with your hostname. If the browser shows a certificate warning, resolve the DNS or certificate issue before entering a password.
For the first login, enter root in Username and this server's root password in Password, then click Log in. Your DCHost customer portal password is a separate credential.
Open onboarding with the new server’s root account.
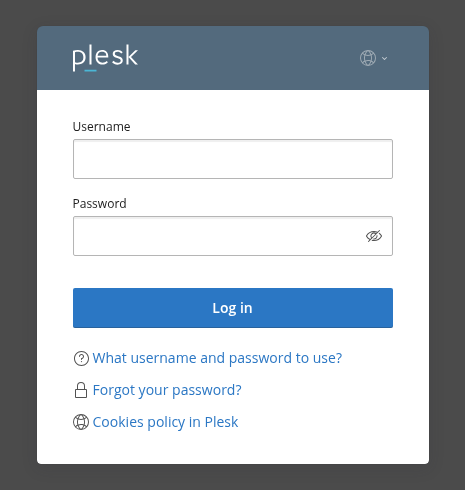
Step 1: Use the server account
- Use the server account
Enter root for the first login. This is not the DCHost customer portal account.
- Enter the password and log in
Enter this server’s root password in Password and click Log in.
Resolve a certificate warning before entering credentials.
On the initial setup screen, complete Your Contact Name and Email with contact details you can use for notifications. Set a separate strong Plesk administrator password in Password and save it in your password manager. Subsequent Plesk logins use admin and this new password.
Set contact details and the password for subsequent logins here.
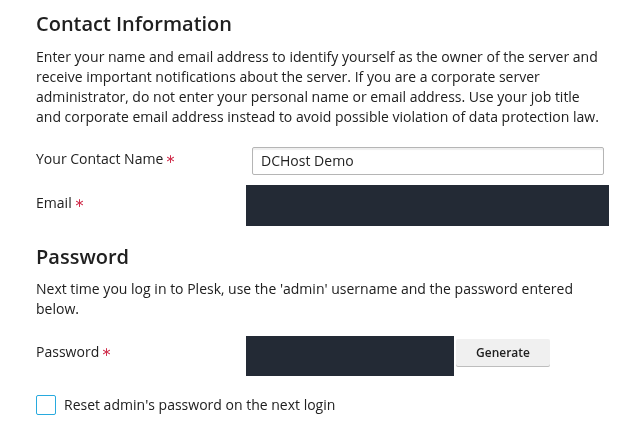
Step 1: Use an accessible email
- Use an accessible email
Complete Contact Name and Email. Use an address where you can read notifications.
- Set a separate admin password
Subsequent Plesk logins use admin and this new password.
The actual email and password are permanently masked.
Select the trial and verify the license
The Plesk license is separate from the server resources. If the screen offers Proceed with a full-featured trial license, select it. Read and accept the terms, then click Enter Plesk >>. If you already have a paid license, use the corresponding option and activation code.
Read the terms and check your selection before completing onboarding.
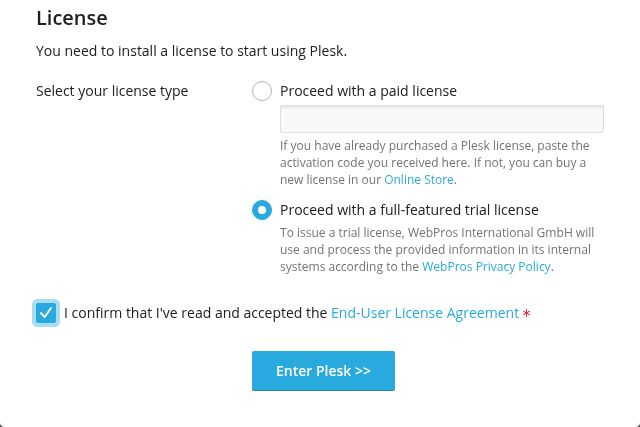
Step 1: Check the trial option
- Check the trial option
This example selected Proceed with a full-featured trial license. Availability depends on eligibility and current terms.
- Accept the terms and continue
Read the EULA. If you accept it, select the checkbox and click Enter Plesk.
No paid license was purchased in this demo; the activated license was verified on the next screen.
The official trial is 14 days with up to 3 domains; availability and terms can change. The free trial activated on this demo. Tools & Settings → License Information showed Web Admin Se Edition, an expiry date of 29 October 2026, and Domains: 3. The remaining-day counter at the top may differ; check your actual edition, expiry and limit on this detail page.
Check the details under Tools & Settings → License Information.
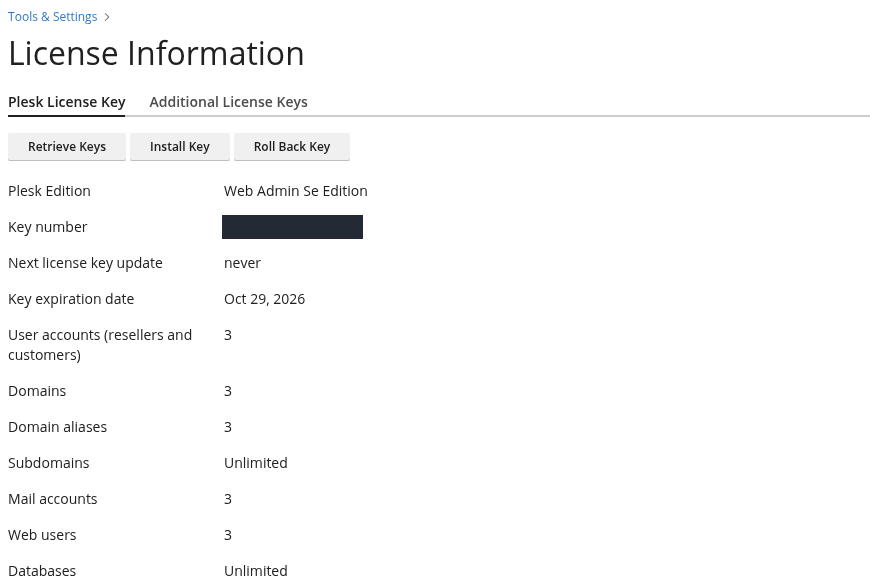
Step 1: Verify the edition
- Verify the edition
This example shows Web Admin Se Edition. Check the edition on your own screen.
- Track the expiry
Key expiration date is this trial’s expiry. Check this date as well as the remaining-day counter.
- Check the domain limit
Domains shows 3 for this trial. The license key itself is masked.
This is the actual license state on 15 October 2026; later terms may change.
6. Add the first website and prepare HTTPS
Open Websites & Domains → Add Domain. This example uses WordPress. Adding a domain in Plesk creates a website space on the server. It does not buy a domain or start a registrar transfer. You can use an existing domain or a subdomain whose DNS you control.
Websites & Domains → Add Domain opens this chooser.
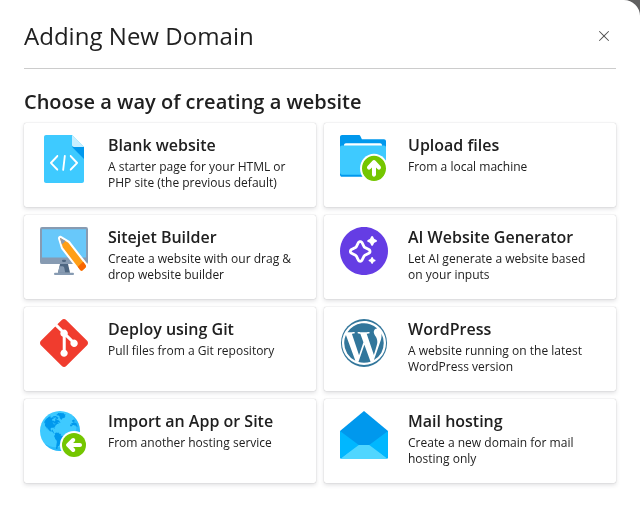
Step 1: Find the WordPress option
- Find the WordPress option
This example selected WordPress. The next form sets the domain and webspace details.
- Understand the scope
This creates a site on the server. It does not register a domain or start a registrar transfer.
You need access to the DNS of the domain or subdomain you will use.
Enter the full name in Domain name. Expand Webspace settings and confirm the IP address belongs to this server. Under System user credentials, create a username and strong password for this webspace. This account is separate from Plesk admin and the WordPress administrator you will create later. Click Add Domain at the bottom of the page.
Expand Webspace settings and check the server IP address.
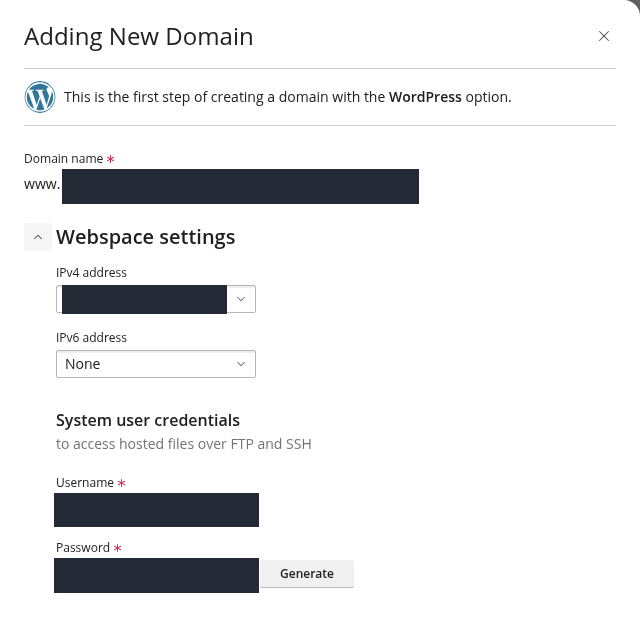
Step 1: Enter the full domain name
- Enter the full domain name
Enter the name you will use in Domain name. Its A record must point to the correct server.
- Select the correct IP address
Compare the IPv4 address with your DCHost service details. Leave IPv6 as None if it is unused.
- Create a webspace-specific account
Username and Password belong to this webspace. Save with Add Domain at the bottom of the form.
The screenshot is cropped to the relevant upper form. Domain, IP, username and password are masked.
The domain's A record must point to the correct server. This demo used an existing subdomain we control; no new domain was registered.
Install a free website certificate
A valid panel certificate on port 8443 does not establish that the website has a valid certificate on port 443. Check both addresses. If the WordPress installer opens automatically before website HTTPS is ready, use Cancel to close the form. This does not remove the webspace you added.
In Websites & Domains, open the site's SSL/TLS Certificates card. Under More options near the bottom, choose Install a free basic certificate provided by Let's Encrypt → Install.
This example requests a certificate for the primary domain only:
- Keep Secure the domain name selected.
- Clear unused wildcard, www, webmail and mail options. Include those names only when their DNS and relevant services are ready.
- Select HTTP — a file on the website (http-01). The A record must point to this server and inbound TCP 80 must be reachable.
- Click Get it free once and wait for the result.
This example validates only the primary domain in use.
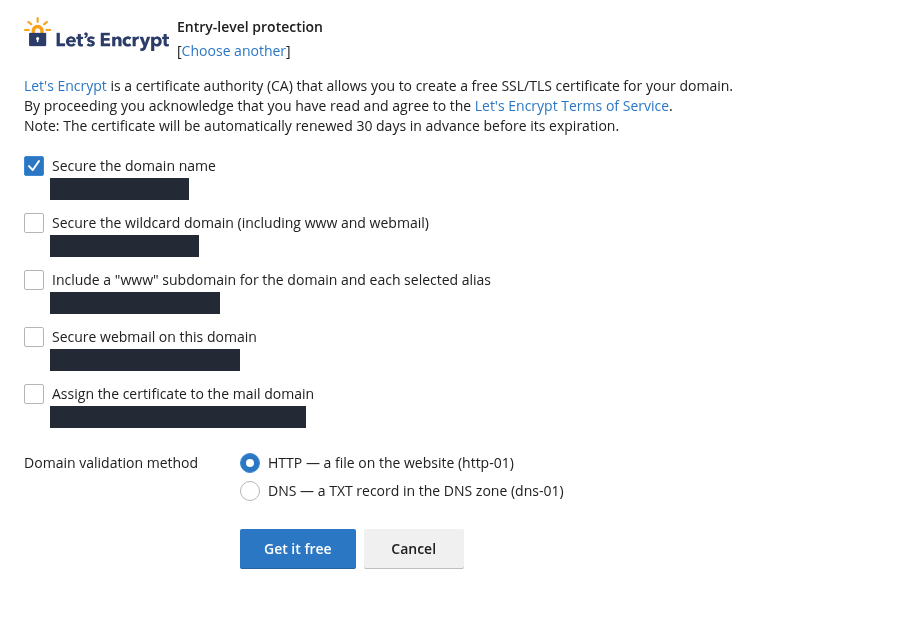
Step 1: Keep the primary name selected
- Keep the primary name selected
Secure the domain name is selected. Do not include unused www, wildcard or mail names.
- Check HTTP validation
HTTP validation requires correct DNS and inbound TCP 80 access.
- Submit the free request once
Click Get it free and wait for the result. Do not repeatedly submit the same request.
A wildcard certificate requires DNS validation; this example did not request a wildcard.
Check that the primary domain says Secured and inspect the certificate expiry. Unused additional names marked Not Secured do not invalidate the primary domain's certificate. This demo installed the primary-domain certificate and also passed a separate HTTPS check with normal certificate validation.
The certificate date and secured names are shown separately.
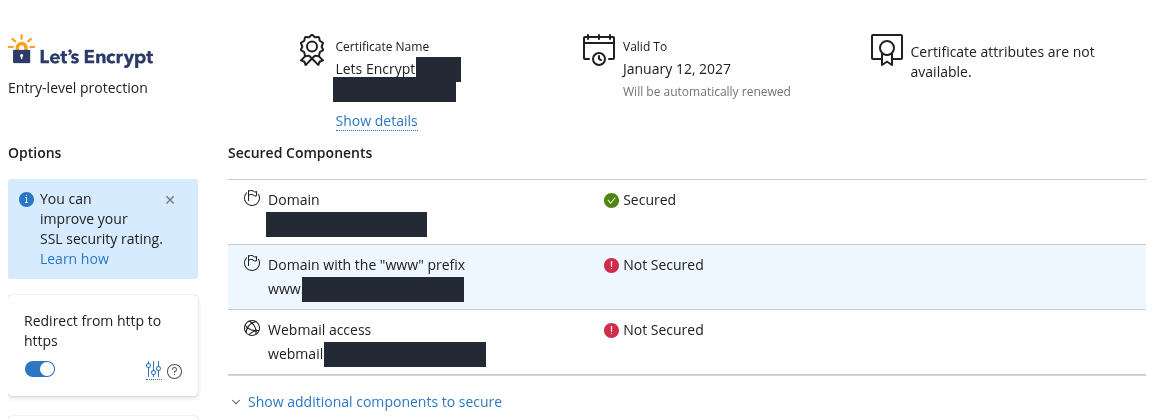
Step 1: Read the validity date
- Read the validity date
Valid To is the certificate expiry. DNS and validation access must keep working for renewal.
- Check the primary domain result
The Domain row shows Secured. The excluded www and webmail names have separate rows.
Website HTTPS on port 443 was also checked separately with normal certificate validation.
7. Install WordPress
Open WordPress in the left navigation. On an empty WP Toolkit screen, click Install WordPress. If installations already exist, use the Install button at the top.
| Field | What to enter |
|---|---|
| Installation path | With a valid certificate ready, select https and the correct domain. Leave the directory field empty to install at the root of a new, empty webspace. |
| Website title | The public site title; this example uses DCHost Plesk Demo. |
| Plugin/theme set | None for this basic installation; choose suitable themes and plugins later. |
| Website language | The language you want to use. The shared screenshots use English (United States). |
| Version | Check the current version offered by the installer. This example offered 7.1.3; do not deliberately seek an older screenshot's version. |
| WordPress Administrator | A username, strong password and accessible email for this WordPress site. Do not reuse the Plesk or root password. |
Check the destination and administrator account on the new, empty webspace.
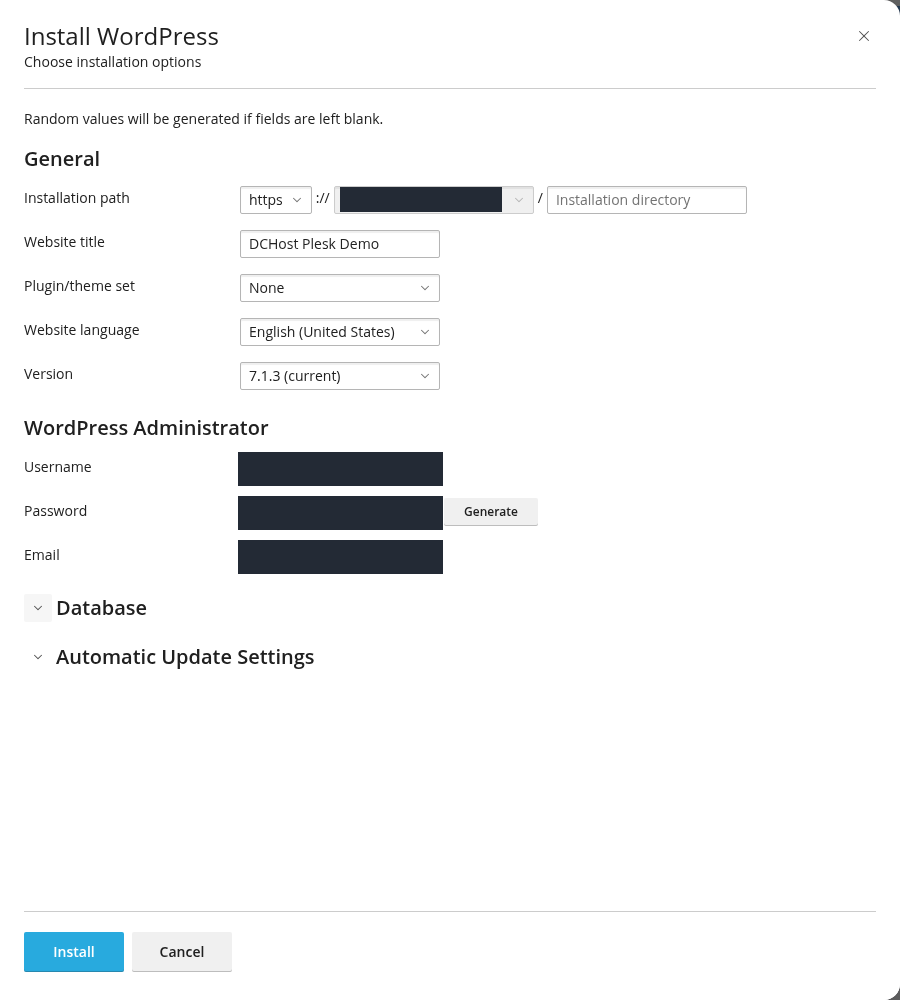
Step 1: Check HTTPS and the destination
- Check HTTPS and the destination
The directory box is empty for the root of this new webspace. Do not install over an existing site.
- Use separate WordPress credentials
These credentials belong to WordPress administration. Do not reuse the server or Plesk password.
- Review settings and start installation
Review Database and Automatic Update Settings, then click Install once.
Private domain and administrator details are masked; the offered version belongs to this installation date.
Expand Database and check the database and username. WP Toolkit prepares the database for this installation. Do not paste the database password into a web page or support message. Expand Automatic Update Settings and review the policy. This demo selected all major/minor WordPress updates, with individual settings for themes and plugins. For a live site, account for compatibility, backups and recovery.
Click Install once. Wait for the download, database creation, configuration and security steps to finish. WordPress was installed or Installation Complete confirms that the basic installation finished. You can choose No, thanks to consider the additional plugin suggestions later.
The site was installed, the PHP version showed 8.4.26, and the Let's Encrypt card became active. These versions describe this example and may differ in later installations.
Keep a demo site out of search results
For test content, turn off Search engine indexing on the WP Toolkit card. This demo disabled it and its noindex, nofollow tag was verified. The setting does not password-protect access. When your real site is ready to launch, enable indexing if it should appear in search engines.
The WP Toolkit card shows the version, certificate and indexing state.
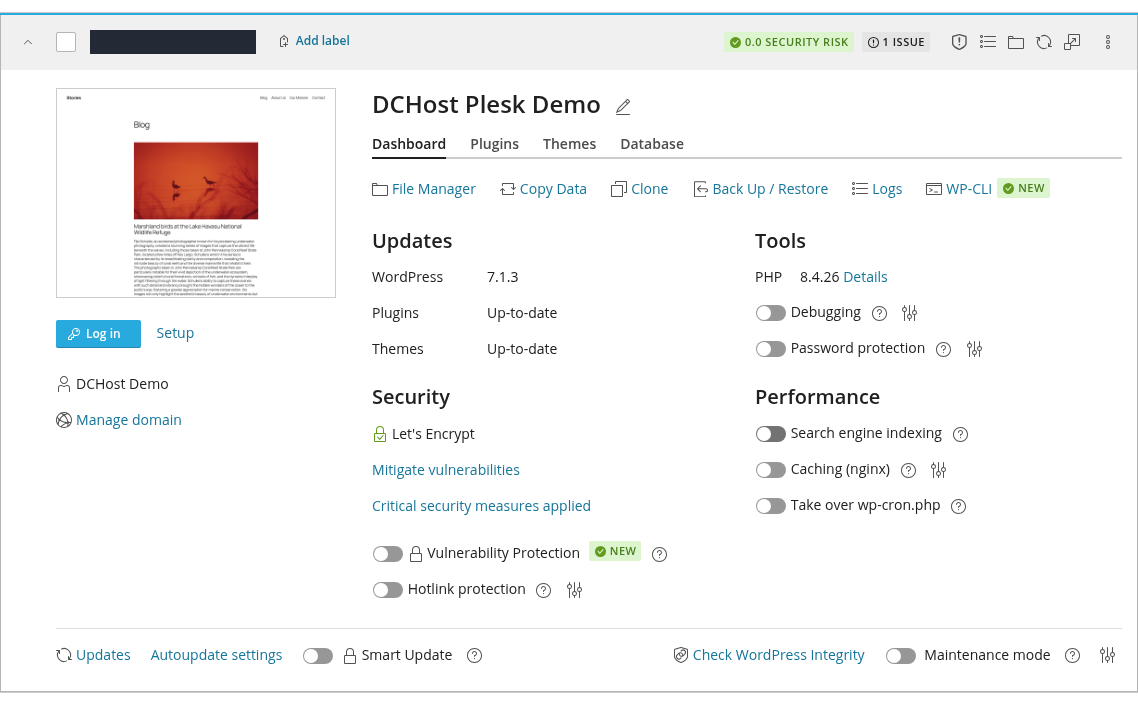
Step 1: Read the version and PHP details
- Read the version and PHP details
This example shows WordPress 7.1.3 and PHP 8.4.26. A version number alone is not a full security check.
- Check the certificate card
Let’s Encrypt is listed. Also open the website itself and verify its certificate.
- Disable indexing for the demo
Search engine indexing is off in this demo. Enable it for a launch-ready site that should appear in search results.
Open the actual site rather than relying only on the small preview. The demo’s noindex,nofollow tag was separately verified.
8. Open the website and WordPress administration
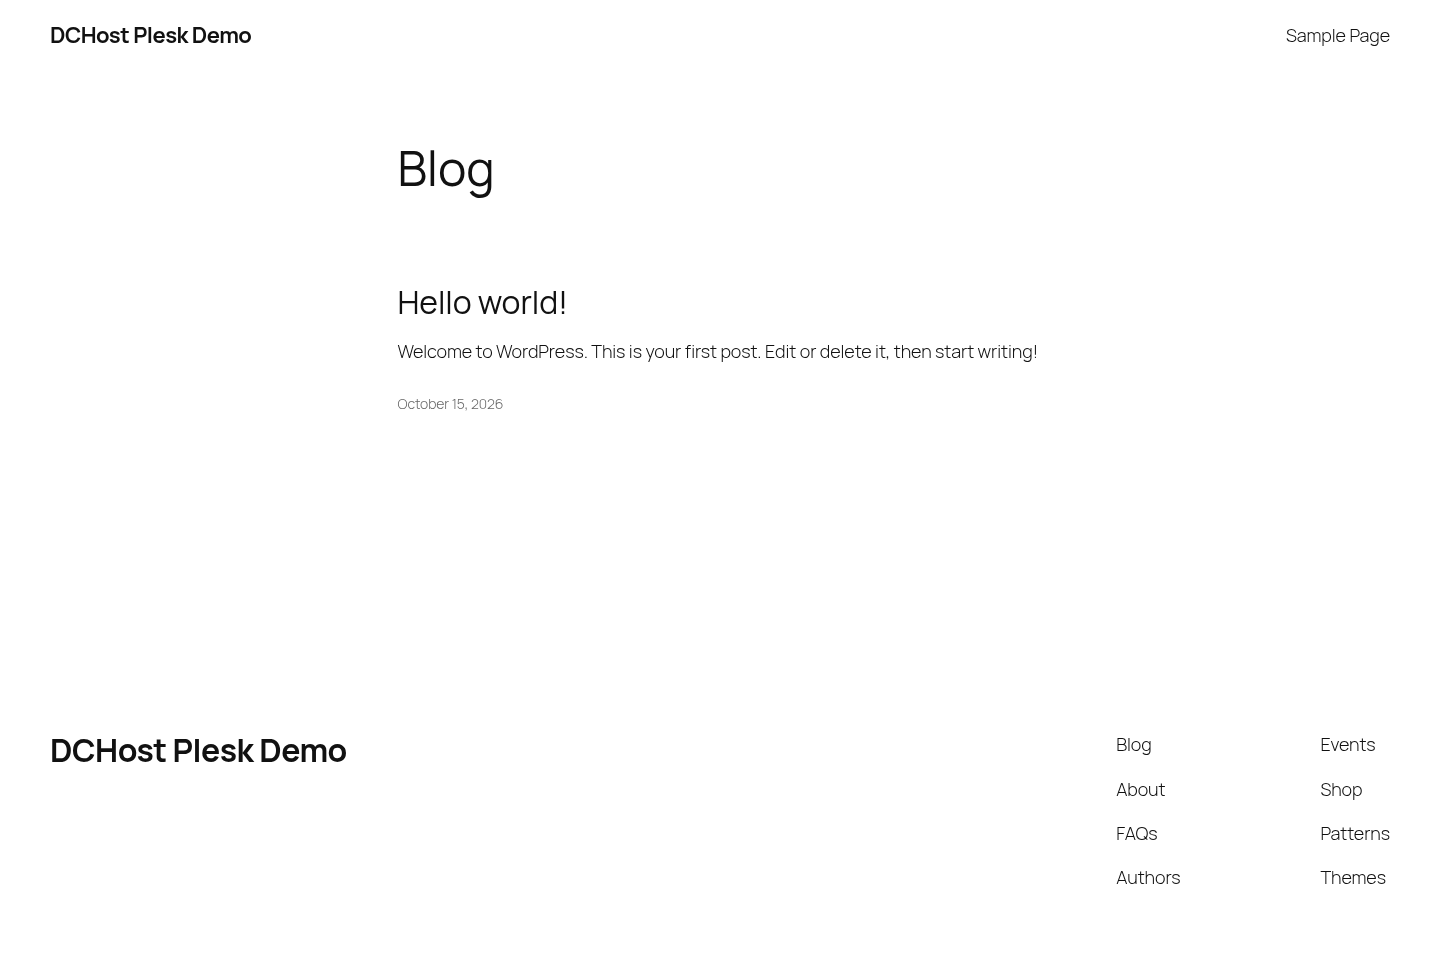
Open the site's https:// address in a browser. There should be no certificate warning and the WordPress page should load. The small WP Toolkit preview alone is not sufficient. The screenshot below shows the actual initial page served by this server.
Check the visitor-facing page as well as the Plesk panel.
Step 1: Confirm this is the correct site
- Confirm this is the correct site
The site title should match the one you set during installation.
- Check that content loads
The initial WordPress post is visible here. Complete the login and backup checks before adding your content.
This is an actual browser screenshot. HTTPS 200 and a valid certificate were separately verified; the address bar is not included.
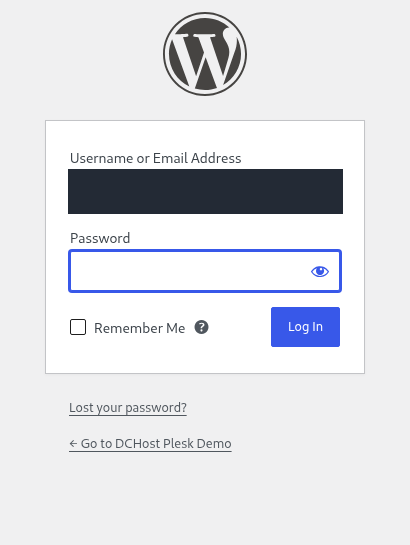
For administration, add /wp-admin/ to your website address. Without a session, WordPress redirects you to its login screen. Enter the WordPress credentials from step 7 in Username or Email Address and Password, then click Log In.
Add /wp-admin/ to the site address; the login form opens if you have no session.
Step 1: Use the WordPress credentials
- Use the WordPress credentials
Enter the WordPress username and password you set during installation.
- Open administration
Click Log In. Do not leave Remember Me enabled on a shared computer.
Plesk admin, server root and WordPress accounts are separate.
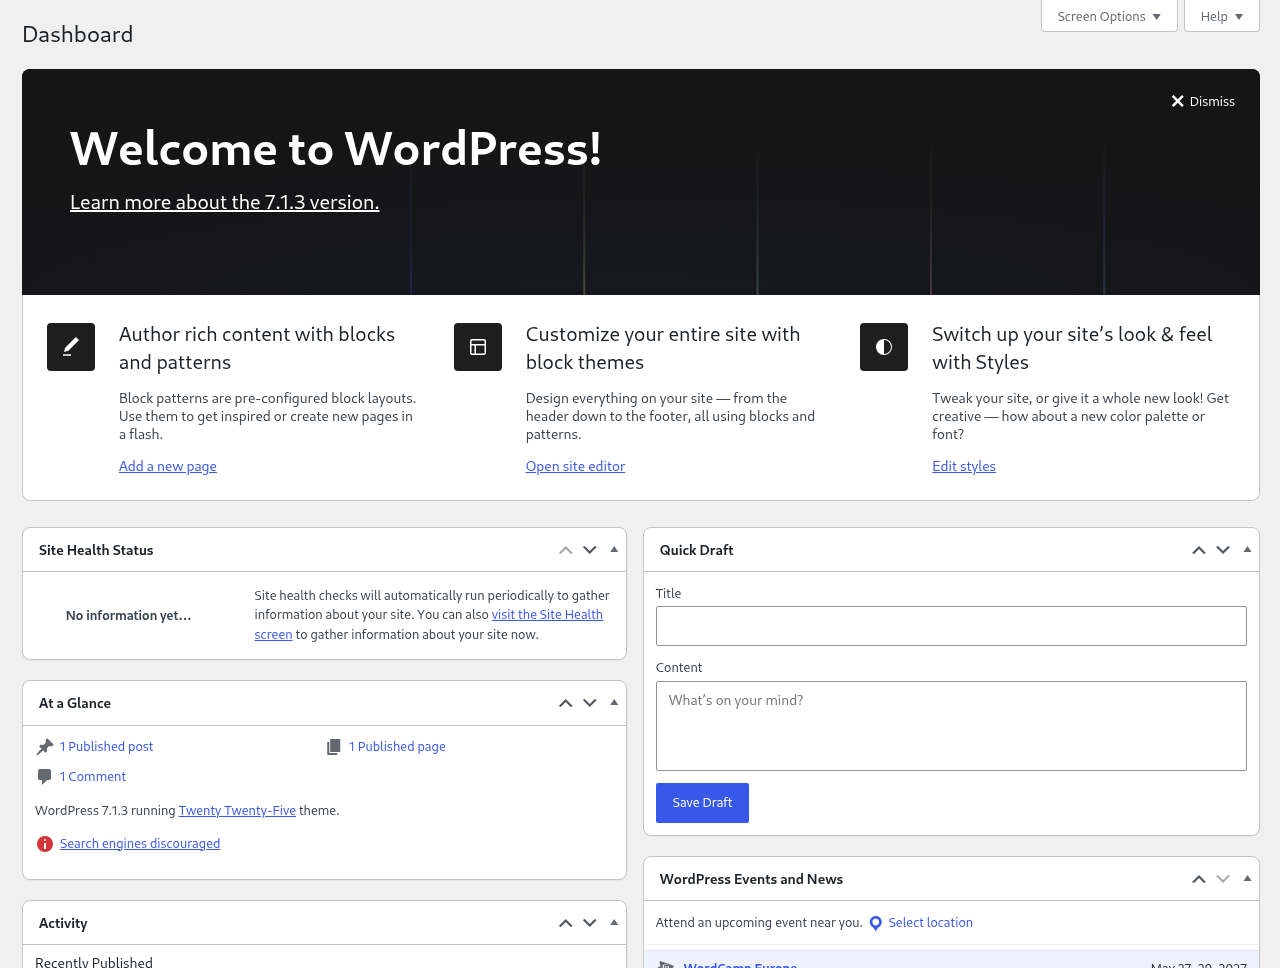
The Dashboard should open. This demo passed a username/password login, and both the site and administration responded. This verifies the database-backed application as well as the completed Plesk installer. Search engines discouraged reflects the demo indexing choice.
A successful login opens the application’s administration screen.
Step 1: Check that Dashboard opens
- Check that Dashboard opens
This screen was captured after a real username/password login.
- Check the demo indexing state
Search engines discouraged is the chosen demo setting. Review it before launching a site intended for search.
The responding site and administration verify that the database-backed application is working.
Your final checks are Plesk access, license expiry, correct DNS, website HTTPS, WordPress login and an update/backup plan. Before adding live content, verify that your backup can be restored.
Frequently asked questions
Do I need to buy a new domain to install Plesk?
No. You can use a subdomain of a domain you already own. Its DNS must point to your server. Plesk's Add Domain does not transfer a registration. You can prepare a separate demo name while preserving your existing website's DNS records.
Which password belongs to which screen?
| Account | Where it is used |
|---|---|
| DCHost customer account | Orders, services, invoices and support |
| Server root account | SSH and the first Plesk login |
| Plesk admin | Subsequent panel logins with the password set during onboarding |
| Webspace system user | File access for that webspace through permitted protocols |
| WordPress administrator | That site's /wp-admin/ area |
What should I do before the trial expires?
Track the expiry in License Information. If you plan to continue, arrange a suitable license before it expires. Do not assume the trial is permanent or that every new server will qualify for one.
Troubleshooting
| Symptom | Check first |
|---|---|
| SSH does not connect | IP, user, actual SSH port and the exact SSH error |
| Operating system is unsupported | Distribution/version/architecture against the current Plesk list; do not bypass version checks |
| Download or package error | Internet/DNS access, system time, disk space and the package manager's original error |
| Insufficient memory or disk | Actual RAM/swap/disk usage; do not remove a working workload to make room |
| Panel does not open on TCP 8443 | Correct hostname/IP, listening service and both server/provider access rules |
| Certificate warning or HTTPS error | A/AAAA destination, certificate coverage, expiry and SSL validation |
| Trial or activation fails | Eligibility shown in the account, the actual activation message and outbound HTTPS access |
| Database connection error | Time, service state and the application's real connection error; do not reinstall the server solely for this symptom |
Include the service number, time and complete error in a support request. Do not share root/admin passwords, license keys or one-time login links.
Sources and related guides
Official sources were checked on 15 October 2026. Versions and license terms may change.