Linux out of memory: diagnose OOM kills and configure swap
Your Linux server shows high RAM usage, a command ends with Killed, or a service stops unexpectedly. First establish whether the server ran short of memory or the application reached its own limit. Linux normally uses RAM for file caches; a high usage percentage alone does not establish a fault.
This guide covers Linux out-of-memory errors, OOM killer investigation and creating swap on Ubuntu as one recovery workflow. You will confirm the event in logs, identify the application using memory, then choose an appropriate workload or swap change. For general CPU and disk checks, see server resource checks.
Access required: An SSH connection and sudo privileges where indicated. Commands run on the Linux server you connected to. You can omit sudo when logged in as root. Initial checks are read-only; the swap sections create a disk file and change system configuration. Shared hosting users cannot apply these changes to the whole server; use cPanel resource checks instead.
If SSH is unresponsive too: Try the console in the DCHost customer portal. If the console is also unavailable, open a support ticket with the service number and incident time; do not repeatedly power-cycle the server based only on an assumption of high RAM usage.
The screenshots come from a real demo VPS running Ubuntu 24.04 LTS. The OOM example was confined to a small memory limit assigned to a test application; the server's entire RAM was not exhausted. Swap management is a separate example. You do not need to fill your own server's RAM to investigate an incident. Demo service and file names belong to this example, and private server details are hidden.
1. Is RAM running out, or is it being used for cache?
Record when the problem happened. If an application has already been killed by the time you connect, its memory may have been released. Healthy current figures do not rule out an earlier OOM event.
date -Is
free -h
vmstat 1 5
vmstat takes several seconds to collect samples. CPU and I/O rates in the first report cover the time since boot; subsequent reports cover one-second intervals. Process and memory fields show the current state in either case.
| Field | How to read it |
|---|---|
available | An estimate of RAM that new applications can use without swapping. It is more useful than free alone, but is not a guarantee that every allocation will succeed. |
buff/cache | File and system caches. Linux can reclaim suitable parts when needed; not all of it is immediately disposable memory. |
Swap used | Data currently stored in swap. This alone does not prove slowness or active memory pressure. |
vmstat si / so | Data moving from disk to RAM and from RAM to swap. Assess sustained activity together with low available memory and application latency. |
Do not rely on the free column alone. Linux uses cache; available is a more useful starting point.
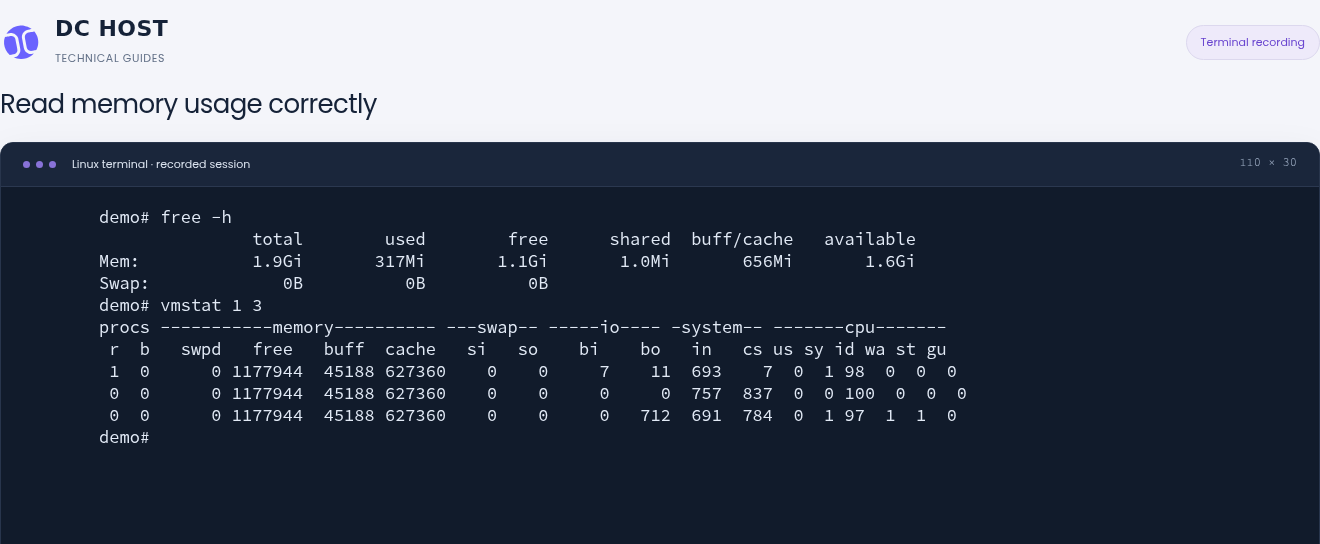
Step 1: Read available memory
- Read available memory
This recording shows 1.6 GiB available. Do not treat buff/cache alone as a memory shortage.
- Assess swap activity separately
The vmstat si and so values are zero. Rates in the first row are since-boot averages; later rates cover each sampling interval.
The server is not running out of overall memory at this point. No swap is configured.
The baseline showed roughly 1.9 GiB total RAM, 1.6 GiB available and no active swap. The later demo OOM event occurred at the test service's own limit, not because all server RAM was full.
Next: If available is low or an application stops unexpectedly, check the event logs. If available memory is adequate, there are no symptoms and only buff/cache is high, do not force the cache to clear. drop_caches does not fix an application's memory demand and can make the system read the same data from disk again.
2. Confirm whether the service was killed by OOM
OOM means “Out of memory”. When the kernel cannot satisfy memory needs in certain circumstances, it can terminate one or more processes. However, Killed, exit code 137 or a stopped service alone is not proof of OOM. Common shells associate 137 with SIGKILL; a manual kill, another management tool or a program returning that code must also be considered.
Start with kernel messages from the last 30 minutes. Adjust the interval if the event happened earlier:
sudo journalctl -k -b --since "30 minutes ago" --no-pager \
  --grep='oom-kill|out of memory|killed process|memory cgroup' \
  --case-sensitive=no
-k selects kernel messages and -b selects the current boot. If the incident happened before a restart, use sudo journalctl --list-boots to find retained boots; use -b -1 if the previous boot is available. Missing retained logs or the wrong time interval can produce no matching output.
If you know which service stopped, replace my-app.service with its actual unit name on the first line:
APP_UNIT=my-app.service
sudo journalctl -u "$APP_UNIT" -b --since "30 minutes ago" --no-pager
systemctl show "$APP_UNIT" \
  --property=Id,LoadState,ActiveState,SubState,Result,ExecMainCode,ExecMainStatus
LoadState=not-found means the service name was not found; correct it before interpreting other fields. Result=oom-kill is a useful clue. Match it with logs for the same time, process and service. If the service has restarted, its current Result may no longer represent the earlier failure.
The test service failed to start. Its result fields help identify why the process stopped.
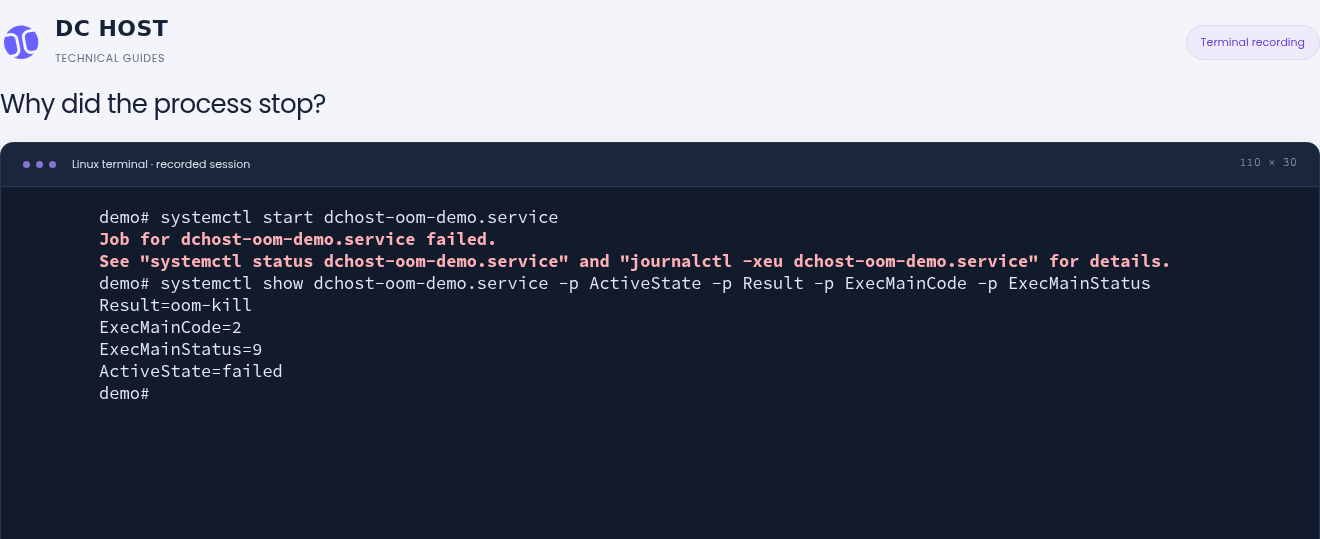
Step 1: Find Result=oom-kill
- Find Result=oom-kill
The service result reports an OOM kill. Next, use the logs to identify which memory boundary was reached.
- Read the signal and state together
ExecMainCode=2 with ExecMainStatus=9 indicates termination by SIGKILL; failed is the failed state. These fields alone do not prove OOM.
This failure was created only in the memory-limited demo service; the server’s overall RAM was not exhausted.
Read the service log, then the kernel record for the same event. This separates an overall memory shortage from a service boundary.
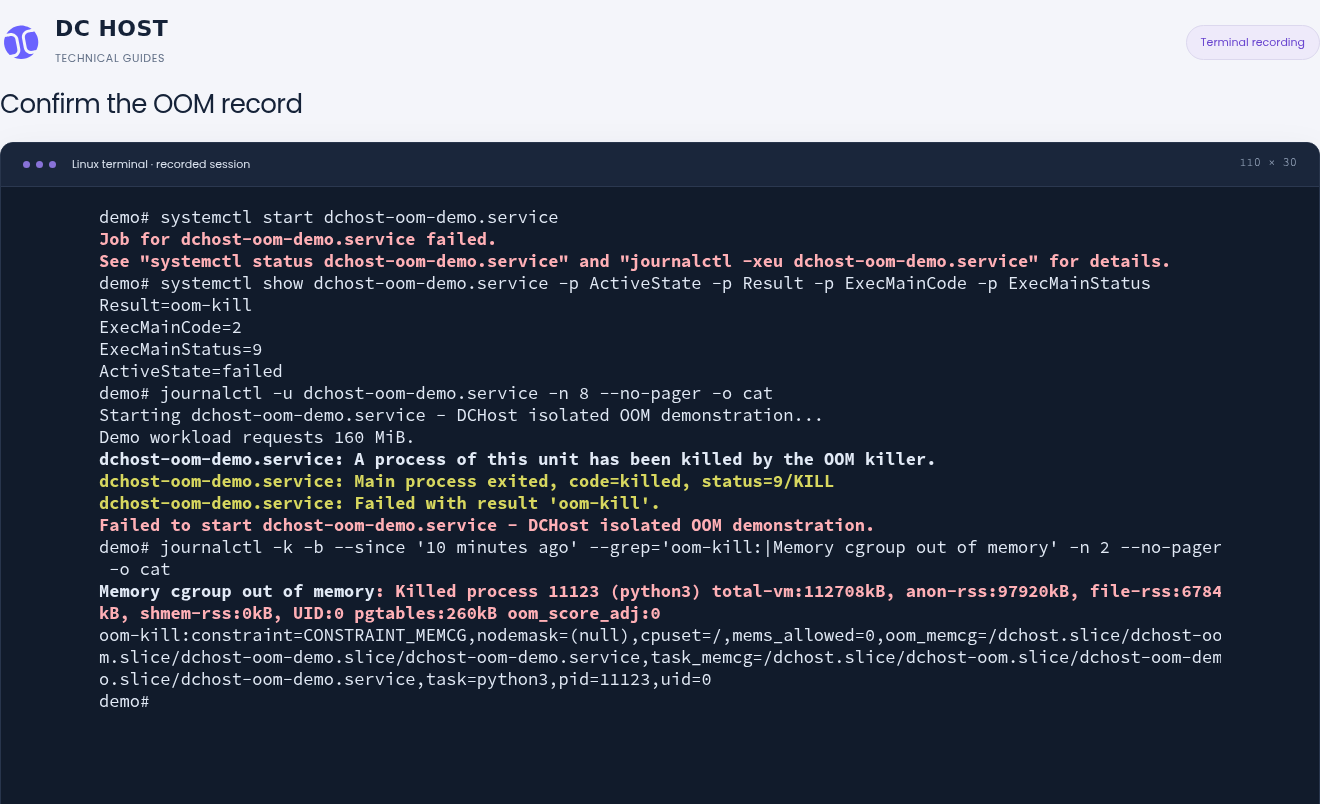
Step 1: Check the OOM killer message
- Check the OOM killer message
The service journal says a process in this unit was killed by the OOM killer. Match the process identity and event time in your own logs.
- Recognize the cgroup constraint
CONSTRAINT_MEMCG in the kernel record explains that this test reached a service-group memory boundary.
CONSTRAINT_MEMCG identifies a cgroup memory constraint in this event. It does not show that the entire server ran out of RAM.
In the real demo, dchost-oom-demo.service had a 96 MiB memory limit and MemorySwapMax=0. Only the test program attempted to allocate 160 MiB. The result was Result=oom-kill, ExecMainCode=2, ExecMainStatus=9 and ActiveState=failed. CONSTRAINT_MEMCG in the kernel log confirmed that the event happened at the service group's memory limit; this was not an example of exhausting the whole server's RAM.
Three situations that need different responses
| Finding | Meaning and next action |
|---|---|
| Kernel OOM messages associated with system-wide memory pressure | Check application load, available RAM and swap at the time. A Killed process line alone does not establish scope; read the surrounding OOM messages. |
Memory cgroup out of memory, CONSTRAINT_MEMCG or matching group limits and event counters | An application or container may have reached its own limit even while the server has free RAM. Check the service limit. |
A termination recorded in the systemd-oomd journal | This service can react to memory pressure before kernel OOM occurs. Inspect its own logs and the configuration of monitored units. |
systemd-oomd is not installed or enabled everywhere. Check its status and, where present, its logs for the same event interval:
systemctl is-active systemd-oomd.service
sudo journalctl -u systemd-oomd.service -b --since "30 minutes ago" --no-pager
inactive describes its current state only. If you see Cannot allocate memory, Python MemoryError or an application's own “memory limit” error, investigate application and process limits too; these messages do not necessarily mean that an OOM kill occurred. Disabling OOM protection or systemd-oomd is not a general fix.
3. Find which application is using memory
Sort running processes by resident memory use:
ps -eo pid,comm,rss,%mem --sort=-rss | head -n 11
PID is the process ID, COMMAND is the program name and RSS is an approximate size of its memory resident in RAM. The RSS figures here are in KiB; for example, 32768 means 32 MiB. The list shows up to 11 lines including the heading. It omits full command-line arguments, which can contain passwords or access keys.
Read the process name, PID and memory use together. Being first in this list does not automatically make a process faulty.
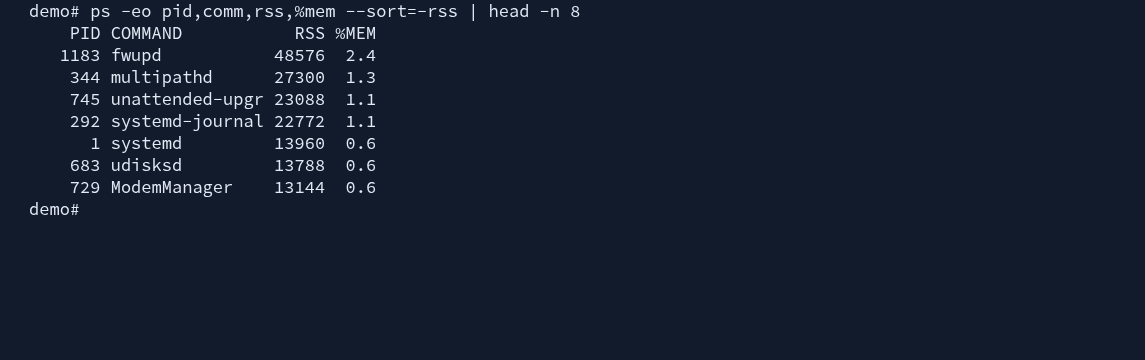
Step 1: Identify the process and PID
- Identify the process and PID
COMMAND names the process and PID identifies this instance. fwupd is first here; do not stop it based only on this ranking.
- Read the RSS unit correctly
RSS in ps is measured in KiB. 48576 KiB is about 47.4 MiB; %MEM shows the share of physical memory.
This screenshot was captured before the OOM test. It demonstrates how to read live processes; it does not show the process killed during the test.
This screenshot is the process list from before the OOM test. The failed demo workload was investigated through its logs; a system service in this list has not been identified as the cause of OOM.
The first process is not necessarily faulty. A database, antivirus scan or backup can legitimately use significant memory. One application can also have several worker processes, which handle its jobs. An OOM victim will no longer be running, which is why the previous step checks logs as well.
Do not add every RSS value and treat the result as total server RAM usage. Shared pages can appear in more than one process. If needed, inspect a single process's PSS, which divides shared memory proportionally among the processes that map it.
Replace 1234 with the actual PID you want to inspect:
CHECK_PID=1234
sudo awk '/^(Rss|Pss|Swap):/ {print}' "/proc/$CHECK_PID/smaps_rollup"
This file may not be accessible in every environment. It disappears when the process exits, and a PID can later be reused by another process, so check the process identity again. PSS improves process comparisons; it is not a complete account of all memory used by the server and kernel.
4. Why can a service stop while the server has free RAM?
A cgroup can limit the resources used by a service or container group. For a systemd service, read these values. APP_UNIT must still refer to your actual service:
systemctl show "$APP_UNIT" \
  --property=ControlGroup,MemoryCurrent,MemoryHigh,MemoryMax,MemorySwapMax
| Setting | What it means |
|---|---|
MemoryCurrent | Current memory usage of the service group. Its accounting differs from a single process's RSS. |
MemoryHigh | A threshold that can trigger reclaim and throttling. Exceeding it alone is not an instruction to perform an OOM kill. |
MemoryMax | The group's hard memory limit. OOM can occur inside the group if usage cannot be reduced below it. |
MemorySwapMax | The group's swap limit. 0 does not allow the group to make new use of swap. |
infinity | No finite limit at that particular setting. A parent cgroup, container or the server's capacity can still impose a limit. |
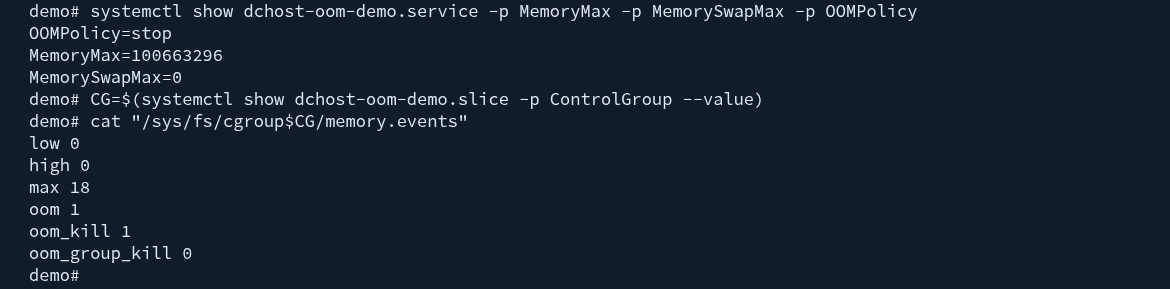
A service can have a much smaller memory limit even while the server has available RAM.
Step 1: Confirm the 96 MiB boundary
- Confirm the 96 MiB boundary
100663296 bytes equals 96 MiB. MemorySwapMax=0 means this service cannot use swap.
- Record the oom_kill counter
oom_kill 1 records one OOM kill in this demo group. Compare it after the next run to see whether it increased.
memory.events is read from the dedicated demo parent group. These counters describe that group, not the server’s complete history.
On cgroup v2 systems, the group's memory.events file includes counters such as max, oom and oom_kill. oom and oom_kill are different: not every failed memory request results in a killed process. Counters accumulate over the group's lifetime, and memory.events can include descendant events. The demo showed max=18, oom=1 and oom_kill=1; max=18 does not mean 18 processes were killed. Compare before and after values for the correct group and log interval. Once the group has been removed, its file may no longer exist.
Choose a fix: First consider running fewer concurrent jobs or processing data in smaller batches. If a limit was set incorrectly, adjust it through the relevant application or container configuration while allowing for the needs of other services. Blindly setting a limit to infinity can move the problem to the whole server. Adding swap does not automatically increase MemoryMax or remove a group's MemorySwapMax=0 restriction.
Real example: complete a smaller workload under the same limit
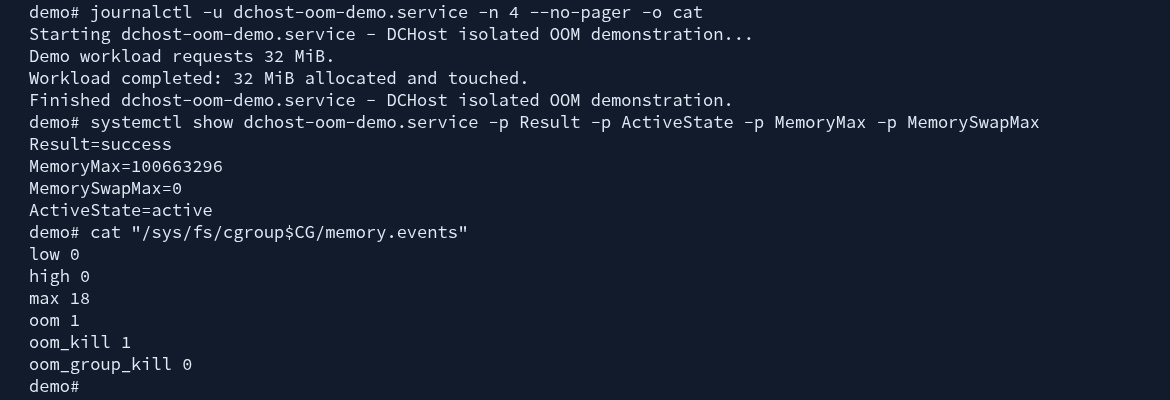
The test allocation was reduced from 160 MiB to 32 MiB. The service memory and swap limits remained unchanged.
Step 1: Confirm the 32 MiB workload completed
- Confirm the 32 MiB workload completed
The log records a 32 MiB request and Workload completed. In a real application, investigate concurrency or batch size for a comparable reduction.
- Verify success alongside the limits
Result=success is shown; MemoryMax is unchanged and MemorySwapMax is still 0. The oom_kill counter below also remains at 1.
This result came from reducing the test workload. It does not claim that enabling swap fixed the OOM failure.
The demo program's individual memory request was reduced from 160 MiB to 32 MiB. It ran again under the same 96 MiB MemoryMax and MemorySwapMax=0. The journal recorded Workload completed: 32 MiB allocated and touched and the service reported Result=success. Reducing the workload produced the success; swap had not been added at this point.
The parent group containing only the demo service retained oom=1 and oom_kill=1 after the successful run. These counters still record the earlier event and do not need to return to zero. The recording's reset-failed command clears the unit's failed state; it does not fix memory demand or reset the cgroup event counter.
Here, ActiveState=active does not mean the program is still running. The demo is a oneshot service that completes once; RemainAfterExit keeps the unit active after successful exit. For a real web service, verify that it responds as well as checking its process result.
The example shows a smaller memory request completing under the same limit; it does not test processing the original 160 MiB of data in batches. In a real application this might mean fewer concurrent workers, reading a large file in chunks or scheduling backups and antivirus scans at different times. These settings depend on the application; one worker count or memory value does not suit every PHP, database and queue service.
A 160 MiB request failed in the demo service under a 96 MiB limit; a 32 MiB retry completed within the same limit. About 20 seconds of actual recording, played at 1× with idle gaps preserved.
Recording transcript
- Only the demo service is started. Its 160 MiB request stops with OOM at the 96 MiB service limit.
- The unit result and kernel log are read together;
oom-killandCONSTRAINT_MEMCGidentify the same event. MemoryMax,MemorySwapMaxand event counters for the group containing only the demo service are checked.- The demo workload request is reduced to 32 MiB and run again under the same memory limit.
- The workload completes with
Result=success; the earlieroom_kill=1counter remains as history.
5. Do you need swap, and how much?
Swap is disk space used to support memory management. It allows some less-used memory pages to move to disk. It can provide headroom for temporary demand, but does not by itself fix a persistent RAM shortage or an application defect. Disk access is slower than RAM. A large swap file is not equivalent to adding the same amount of RAM to a busy application.
Do not apply “swap must be twice RAM” to every VPS. Consider available memory under normal and peak load, temporary application demand, existing swap usage, disk capacity and acceptable latency together.
| Situation | Appropriate approach |
|---|---|
| Occasional demand spikes, enough disk capacity and an application suited to swapping | Consider a measured amount of swap and monitor application latency. |
Persistently low available RAM, sustained si / so and delays | Improve workload and memory settings, and consider increasing RAM capacity if needed. |
A service-specific memory limit or MemorySwapMax=0 | Address that limit and the application's requirements first. |
| cPanel/WHM or another control panel | Check the panel's supported OS, RAM and swap guidance alongside database, mail and antivirus needs. |
cPanel's OS-specific swap recommendations are panel requirements and guidance, not a universal sizing rule for Linux. Swap does not replace the physical RAM required by cPanel or the application. Review the preparations in the cPanel installation guide too.
6. Create a swap file on Ubuntu
The method below is for a local ext4 filesystem. Your KVM VPS may use another filesystem. Check first; do not transfer these commands unchanged to Btrfs, NFS, overlay or a restricted container.
Check existing swap and available disk space
swapon --show
free -h
findmnt --target / --output SOURCE,FSTYPE,TARGET
findmnt --fstab --types swap --output SOURCE,TARGET,FSTYPE,OPTIONS
df -h -- /
swapon --show lists active swap areas; no entries means none are active. /etc/fstab can separately contain an area that has not been activated. When no swap entry exists, findmnt --fstab --types swap may find no match and return exit code 1; that alone does not mean /etc/fstab is malformed. Do not overwrite an existing swap file or run mkswap on an active area.
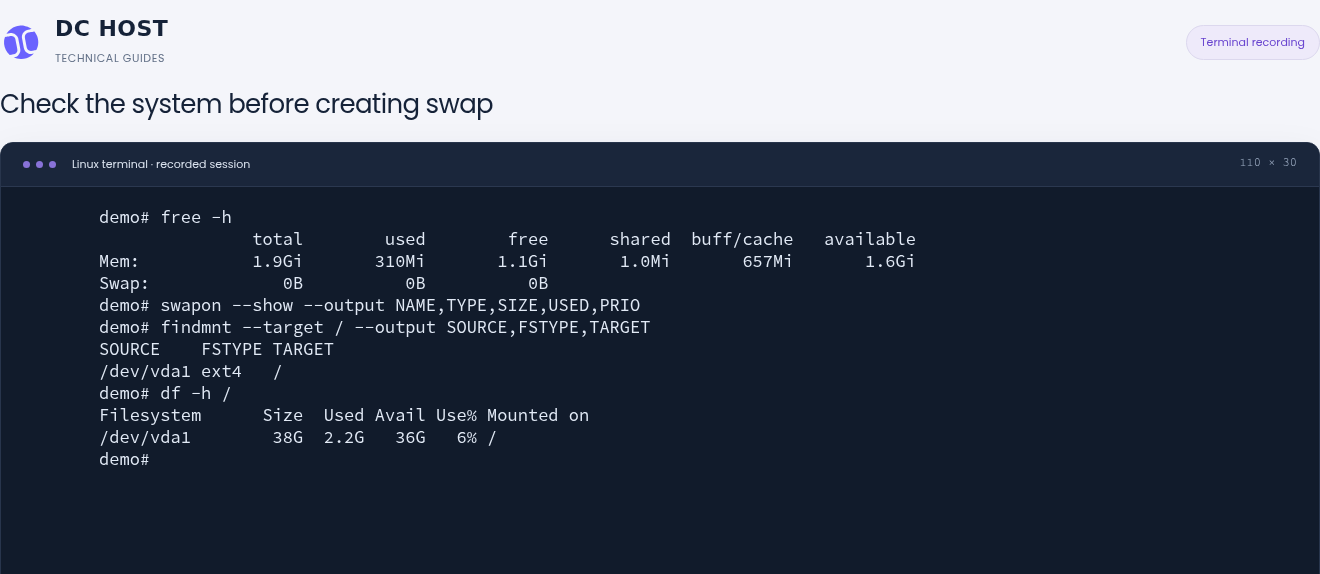
Start by checking active swap, the filesystem and free disk space.
Step 1: Identify existing swap
- Identify existing swap
The free output shows total Swap of 0 B. The swapon list is empty too; this demo has no active swap yet.
- Read the filesystem and available space
The root filesystem is ext4 and df shows 36 GiB available. A swap file consumes disk space; leave sufficient headroom.
This procedure is for the ext4 filesystem used in this demo. Do not apply it unchanged to Btrfs, network filesystems or provider-restricted environments.
The demo root filesystem was ext4, and no swap was active initially. Its approximately 38 GiB root filesystem had 36 GiB available; this was checked before creating the example file.
The example uses a new 1 GiB file named /swap-dchost-demo. This size demonstrates creation and removal; it is not a capacity recommendation for your server. Leave enough disk space for the file, applications and logs. Resolve a full disk first.
Create the new file
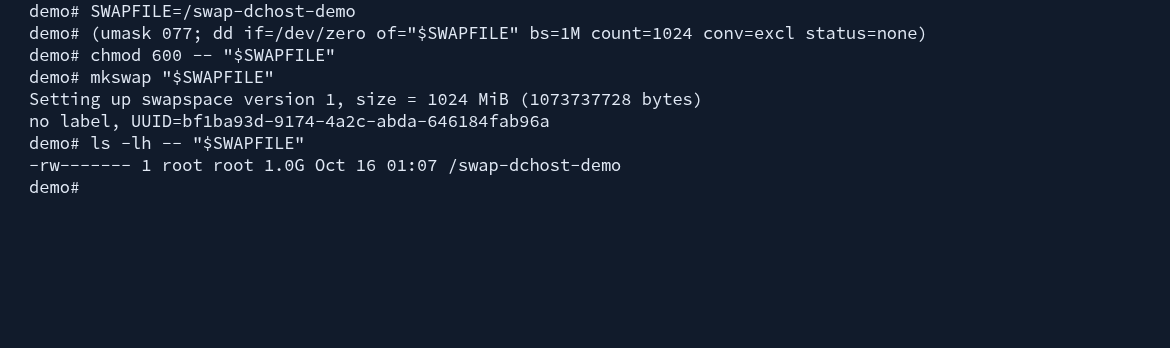
The command uses conv=excl to refuse overwriting an existing file. File access is restricted to root:
sudo sh -c 'umask 077; dd if=/dev/zero of=/swap-dchost-demo bs=1M count=1024 conv=excl status=progress'
If you see File exists, stop; do not remove the existing file just to continue. If writing fails or reports No space left on device, do not proceed to mkswap. After successful completion, check the size and permissions:
sudo stat -c '%n | %s bytes | permissions=%a | owner=%U' /swap-dchost-demo
For the 1 GiB example, the size should be 1073741824 bytes, permissions 600 and owner root. Swap can contain sensitive data from memory, so the file must not be readable by everyone.
This demo creates a 1 GiB file, restricts access to root and writes the swap format.
Step 1: Prevent overwriting an existing file
- Prevent overwriting an existing file
conv=excl makes dd stop if the file already exists. count=1024 with bs=1M creates 1 GiB in this example.
- Verify the size and access mode
1.0G is the file size; -rw------- gives read and write access only to its owner. This file is owned by root.
conv=excl prevents overwriting an existing file. Run mkswap only on the new file created specifically for this purpose.
dd writes actual data to the file in this example. Using truncate to set only its length can leave holes that swapon rejects. Btrfs has NOCOW, compression, data placement and snapshot constraints; using dd alone does not meet them. For Btrfs, follow the Btrfs swap file documentation.
Initialize and activate swap
Run these commands in order, only against the new file you just created:
sudo mkswap /swap-dchost-demo && sudo swapon /swap-dchost-demo
swapon --show=NAME,TYPE,SIZE,USED,PRIO
free -h
&& proceeds to activation only if the first command succeeds. mkswap writes swap structures; do not run it on your data disk, an arbitrary /dev/... device or an existing swap area. Investigate any swapon error, and do not assume activation succeeded until the file appears in the active list.
A file appearing in the swap list confirms it is active. Read available RAM separately.
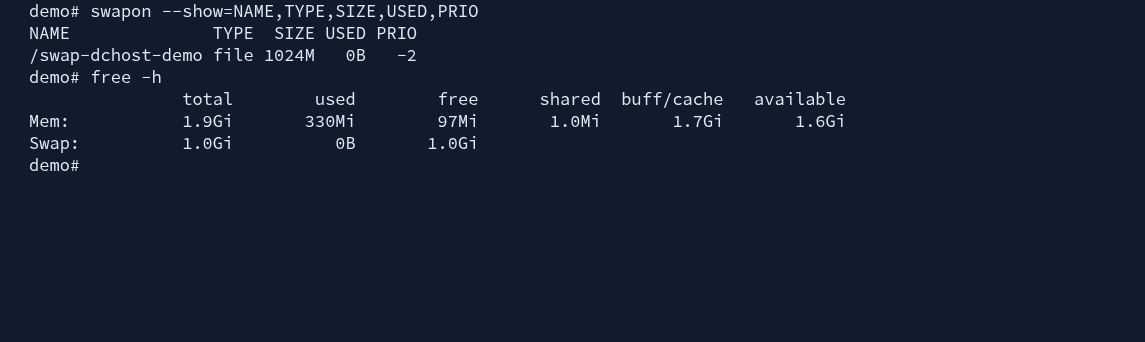
Step 1: Find the active swap area
- Find the active swap area
1024M represents about 1 GiB. USED of 0B means no swap is in use at this instant; this is not an error.
- Read available memory again
Here free has fallen to 97 MiB while available remains 1.6 GiB. Do not confuse cache growth during file creation with exhausted RAM.
An active swap area does not let the test service use swap when MemorySwapMax=0.
The actual activation listed 1.0 GiB capacity, USED=0B and PRIO=-2. Usable swap was 1073737728 bytes, one page smaller than the 1 GiB file because space is reserved for the swap header.
Check: The full file path must appear in swapon --show, and the new capacity should appear on the Swap line in free -h. USED=0B means no pages are currently using it; it does not mean activation failed. This step alone does not configure activation after the next boot.
7. Verify the configuration for the next boot
To keep using the swap area, add it to /etc/fstab. This file also contains system disk entries; preserve the existing lines. First make a backup and record its path:
FSTAB_BACKUP="/etc/fstab.before-swap-$(date +%Y%m%d-%H%M%S)"
sudo cp --archive --no-clobber -- /etc/fstab "$FSTAB_BACKUP" &&
  sudo cmp -- /etc/fstab "$FSTAB_BACKUP" &&
  printf 'Backup: %s\n' "$FSTAB_BACKUP"
Do not continue if backup creation or comparison fails. cmp produces no output when files match; the final Backup: line appears only when both checks succeed. Record that path, then open the configuration:
sudoedit /etc/fstab
Add and save the following line only if an entry for this swap file does not already exist. /swap-dchost-demo is the example path in this guide:
/swap-dchost-demo none swap sw 0 0
Then check that the configuration can be read and inspect the entries:
sudo findmnt --verify --verbose && sudo systemctl daemon-reload
findmnt --fstab --types swap --output SOURCE,TARGET,FSTYPE,OPTIONS
swapon --show=NAME,TYPE,SIZE,USED,PRIO
If there is an error, do not reboot. Correct the line you added or undo only that change, then repeat the check. Distinguish pre-existing warnings from errors introduced by your entry. daemon-reload makes systemd reread configuration; it does not restart the server or its application services.
Check that the fstab entry points to the intended file and has been read by systemd.
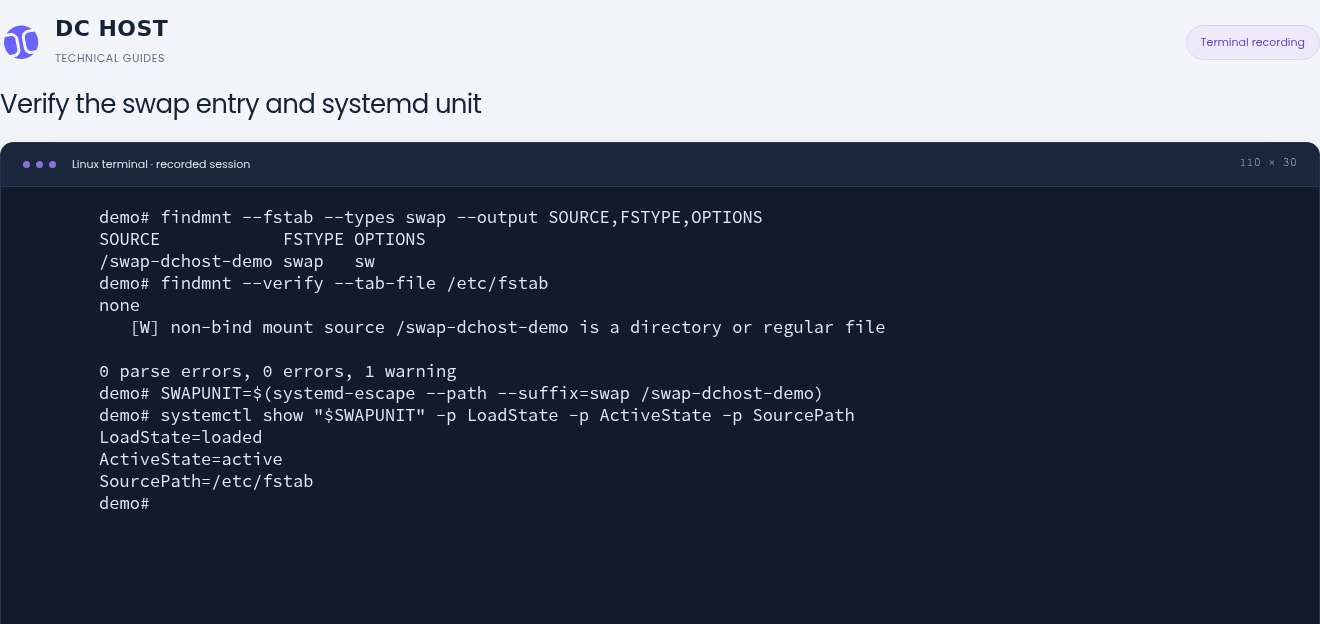
Step 1: Match the fstab entry to the intended file
- Match the fstab entry to the intended file
SOURCE points to /swap-dchost-demo and FSTYPE is swap. Verify that it matches the path of your own file.
- Check the systemd unit source
LoadState=loaded, ActiveState=active and SourcePath=/etc/fstab appear together. These are current-session checks, not a verified successful reboot.
This recording includes a findmnt warning for the regular swap file; see the explanation in the guide. No reboot test was performed.
In the real demo, the /etc/fstab backup and contents were checked first. Only /swap-dchost-demo none swap sw 0 0 was then added, preserving the existing disk entries.
Why does the screenshot contain a warning? This Ubuntu system's findmnt 2.39.3 reported 0 parse errors, 0 errors, 1 warning. The single warning was non-bind mount source /swap-dchost-demo is a directory or regular file. This version's general source check can produce that warning for a valid swap area backed by a regular file. We therefore checked the correct swap entry and actual activation independently instead of relying on the exit code alone. Do not assume the same explanation applies to a different warning or error.
You can also inspect the swap unit generated by systemd without changing it:
SWAP_UNIT=$(systemd-escape --path --suffix=swap /swap-dchost-demo)
systemctl show "$SWAP_UNIT" --property=Id,LoadState,ActiveState,What,SourcePath
The generated demo unit showed LoadState=loaded, ActiveState=active and SourcePath=/etc/fstab. swapon also listed the same file as active. The configuration entry, generated systemd unit and active swap area were therefore checked together.
Limit of this check: findmnt --verify and the active swap list are not a reboot test. To verify persistence end to end, check that the same file appears in swapon --show after a suitable planned restart. Do not reboot a working server immediately just to follow this guide.
8. Remove a swap file safely
Disabling swap requires its memory pages to be relocated. Do not run swapoff while RAM is already under pressure. Reduce load first, and check both the amount used in the specific swap area and available memory:
swapon --show=NAME,SIZE,USED,PRIO --bytes
free -m
vmstat 1 5
Available RAM should comfortably cover the contents of the area being removed and the continuing needs of applications. A single reading cannot guarantee this. If the server is busy, postpone the change or arrange appropriate capacity. Do not use swapoff -a, which also disables other swap areas.
Disable only the file used in this guide:
sudo swapoff /swap-dchost-demo
swapon --show=NAME,TYPE,SIZE,USED,PRIO
If swapoff fails, do not delete the file. It can fail when memory is insufficient; do not repeatedly retry without resolving the reason. On success, /swap-dchost-demo must no longer appear in the active list.
- If you added a persistent entry, use
sudoedit /etc/fstabto remove only that file's line. Preserve other swap and disk entries. - Run
sudo findmnt --verify --verbose, thensudo systemctl daemon-reload. - Once the file is inactive and has no boot entry, remove only this example file:
sudo rm -- /swap-dchost-demo
After checking available RAM and swap use, only the demo swap area was disabled and its file removed.
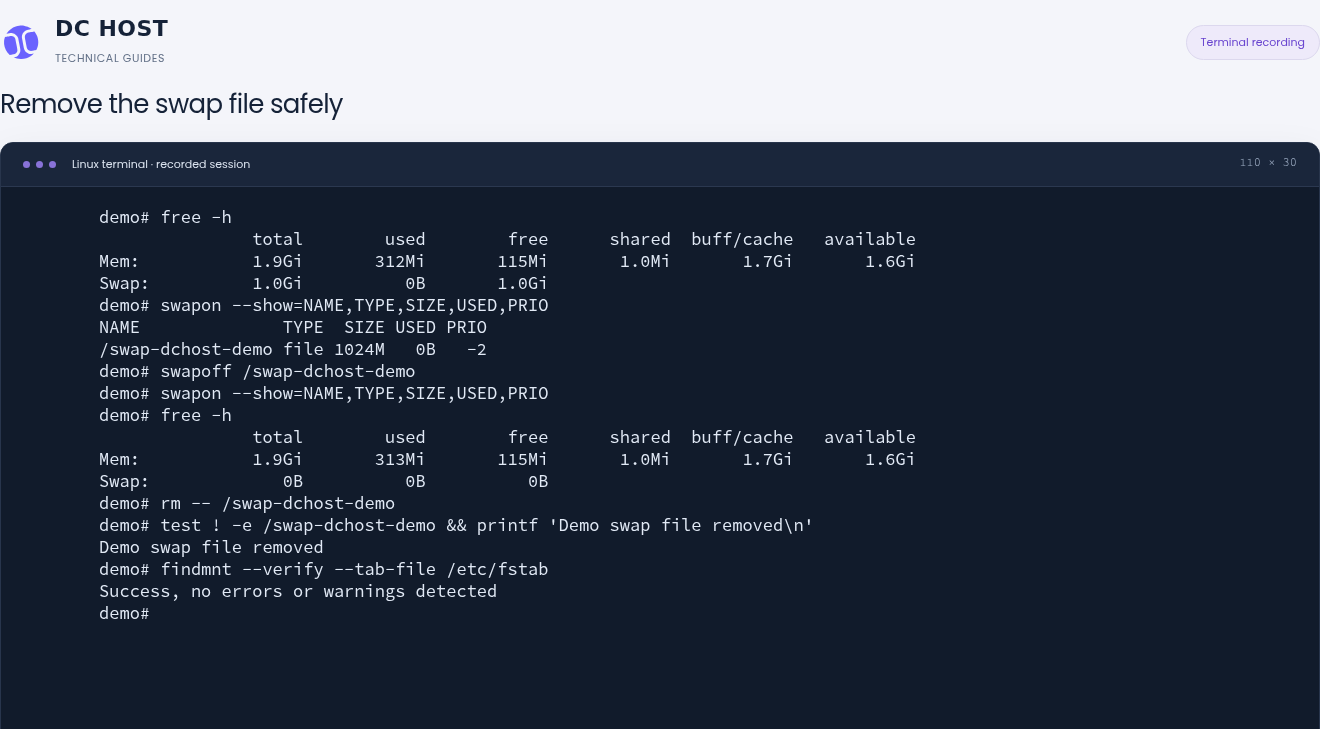
Step 1: Confirm that swap is disabled
- Confirm that swap is disabled
The swapon list is empty and free reports total Swap of 0 B. This demo has no other active swap area.
- Check the file and fstab result
The demo file no longer exists. After reverting its fstab entry, validation reports no errors or warnings.
Do not delete the file unless swapoff succeeds. In your own fstab, change only the entry for the swap area you are removing.
Restoring an old backup over the entire /etc/fstab can discard unrelated disk changes made since the backup. Removing only the line you added is usually a more controlled rollback.
9. Verify that the original problem is resolved
Retry the failed application operation in a way appropriate for that workload. Do not stop a real web or database service simply for this test. Recovery should mean more than a lower RAM percentage:
- Does the operation produce its expected result, and does the application or service respond?
- Are there new OOM or unexpected termination messages for the same interval?
- Under comparable load, how do
available, application memory usage andsi/sochange? - If keeping swap, is the file active, are its permissions correct and has the boot entry been checked?
RAM, disk, fstab and SSH were checked again after cleaning up the demo.
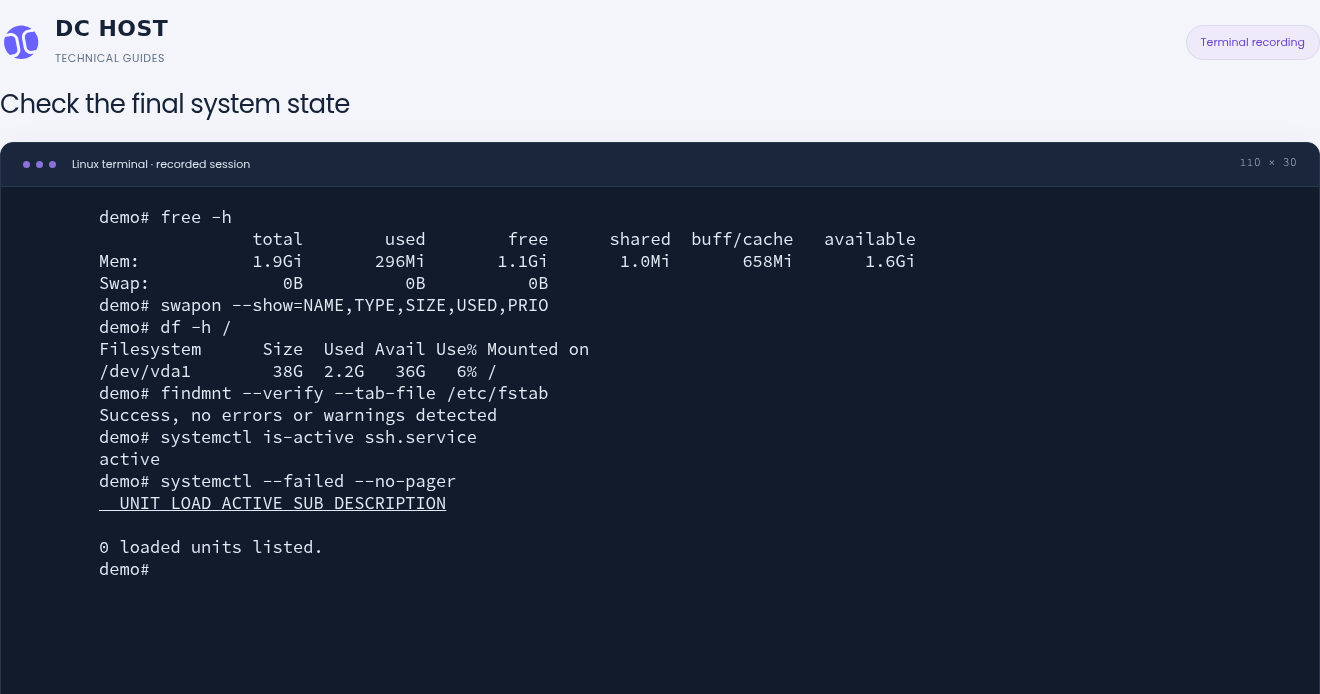
Step 1: Read the memory state again
- Read the memory state again
Available memory is 1.6 GiB. Total swap is 0 B; the demo swap area is no longer active.
- Check SSH and failed units
SSH reports active. The systemctl --failed list is empty; this check finds no failed systemd units.
Temporary test files and services were removed and the demo fstab entry reverted. This screen is a point-in-time measurement.
At the end of the demo, only the swap area created for this work was successfully disabled and its file removed. /etc/fstab was restored and checked byte for byte against its initial contents; the final verification reported no errors or warnings. The test service, group and helper files were also removed.
The final screen showed 1.6 GiB available RAM, no active swap, 6% root filesystem use, active SSH and zero failed systemd units. This verifies the controlled demo's final state; logs from the earlier OOM event remain. For your own application, the meaningful recovery test is completion of the affected operation under comparable load.
Should you change swappiness?
Read the current value with sysctl vm.swappiness. This setting is not a percentage of RAM usage at which swapping starts; it influences how the kernel evaluates swap I/O costs against reclaiming file-backed pages. The appropriate value depends on workload and storage. Do not automatically set every VPS to 10, 60 or 0. This guide does not make a blanket swappiness change as part of recovery.
Frequently asked questions
Is high Linux RAM usage normal?
It can be normal when memory is used for file caches. Check available, application latency and logs from the incident together. Do not clear caches merely because free is low. If an application stopped, investigate that event separately.
Why do I get OOM errors while my VPS has free RAM?
A service or container may have reached its own MemoryMax. A parent group's limit or an application-specific memory limit can also matter. Free RAM on the server does not mean every application is permitted to use it.
Does creating swap on Ubuntu completely fix a RAM shortage?
No. Swap can provide headroom for temporary demand in some workloads, but it does not fix persistent insufficient RAM or a memory leak. If an application is restricted from using swap, adding a file does not lift the restriction. Heavy swapping can also increase latency.
Does Killed or exit code 137 always mean OOM?
No. Match kernel, service and, where applicable, systemd-oomd logs for the same time. A manual SIGKILL, another management tool or a program returning that exit code can produce similar symptoms.
Should I turn swap off and on to reset its usage?
Do not do this merely to zero the counter. Data in swap alone is not a fault. Under memory pressure, swapoff can make conditions worse. Monitor activity over time and application latency instead.
When should I upgrade VPS RAM?
Consider it when normal workloads leave consistently low available memory, OOM events recur and demand remains after application settings have been improved. Confirm that the new plan adds the RAM you need; service or container limits may require separate changes. See upgrade preparation.
What to include in a support request
When opening a ticket in the DCHost customer portal, include the service number, incident time with timezone, affected application, recent changes and short log excerpts from the same interval. free output, relevant service limits and a few surrounding OOM messages help the investigation. Do not include passwords, private keys, session details or complete configuration files; mask IP addresses and private server names in public screenshots.
If the server remains slow after memory pressure subsides, continue with the high CPU and load average checks. A busy backup job, CPU quota or I/O wait requires a different investigation; adding swap is not a general solution for those conditions.
Sources and related guides
- Linux kernel: cgroup v2 memory limits and events
- Linux kernel: process memory, PSS and MemAvailable
- Linux kernel: swappiness and drop_caches
- systemd: service resource controls
- systemd: systemd-oomd
- util-linux: swapon and swapoff manual
- util-linux: mkswap manual
- cPanel: Ubuntu system requirements
- Recover from a full Linux disk
- Plan Linux updates
- Server backup planning