WHM hosting accounts: Create packages, assign plans and check quotas
Creating a hosting account in WHM involves three separate decisions: which resource limits to assign, which tools to make available in cPanel, and which user will own the account. Set up the package, feature list and hosting account in that order to keep customers' settings clear.
This guide is for administrators with authorized WHM access on their own VPS/VDS. If you use DCHost hosting, start with the hosting management guide for files, email and databases. To expand a purchased service, review the customer portal package-change process.
Docs Demo, shown in the screenshots, is an example WHM package created earlier for these guides. It is not the name or resource specification of a DCHost product for sale.
1. Identify the access level
| Access | What it manages |
|---|---|
| DCHost customer portal | Purchased services, invoices, support and the access details supplied with a service |
| cPanel hosting user | Websites, files, email and other permitted tools within that account |
| WHM reseller | The reseller's hosting accounts within the permissions and resources granted by the server owner |
| WHM server administrator | The server's hosting accounts, packages, feature lists and shared configuration |
Some menus may be unavailable to resellers; this does not necessarily indicate an incomplete installation. Give customers their own cPanel username and password. Do not share the server's root account as a customer login.
2. Separate packages, feature lists, accounts and quotas
| Item | Purpose | Example |
|---|---|---|
| Package | A reusable definition of resource limits and options | 5120 MB disk, 10 email accounts, 10 SQL databases |
| Feature List | Determines which cPanel tools the user can access | File Manager, Backup Manager, MultiPHP Manager |
| cPanel Account | Holds a user's primary domain and account data | A customer's websites, mailboxes and databases |
| Account Quota | Sets a particular hosting account's disk limit; operating-system quota support must also work | 5120 MB shown in List Accounts |
Increasing Max SQL Databases does not create a database. Enabling a tool in a Feature List does not automatically install its required software or license. A WHM package change does not increase the VPS's allocated disk capacity, RAM or CPU allocation.
3. Open the new-package form
Open WHM → Packages → Add a Package. Choose a clear Package Name that will still make sense later. Package names cannot be renamed, so avoid including a price that may change.
Package naming and resource limits are separate parts of the form.
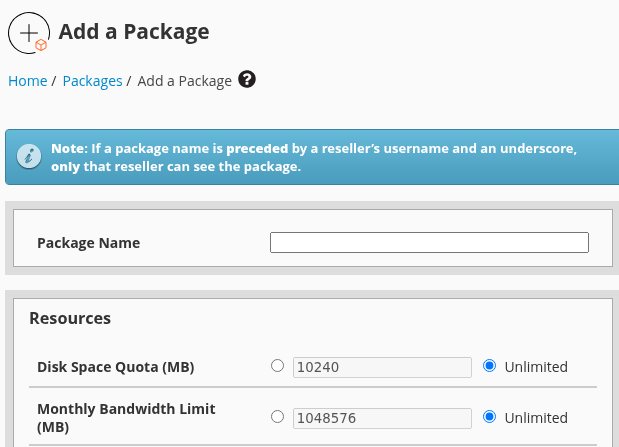
Step 1: Choose a package name
- Choose a package name
Package Name identifies the package inside WHM.
What you should see: Distinguish package names from customer accounts.
- Read the selected disk option
Use the numeric option when setting a quota. The grey 10240 value is not the active limit in this image.
What you should see: Separate the selected radio option from an inactive number.
- Assess traffic separately
Monthly Bandwidth Limit is separate from disk capacity.
What you should see: Plan transfer and storage independently.
The actual WHM screen was inspected without saving package or feature changes during capture. Private information is permanently masked.
- For each resource, check the numeric limit or the corresponding Unlimited option. A number in an unselected, greyed-out input may not be the active limit.
- Under Settings, choose the access options, theme, feature list and language.
- When you intend to create your planned package, use Add at the end of the form.
- Open the resulting package through Edit a Package and check the saved values.
This capture shows an inspection of the blank form; no second demo package was created. The following screenshots show the actual settings of the existing Docs Demo package.
4. Read the existing package limits
Under WHM → Packages → Edit a Package, select the package and click Edit. This first button opens the editor; Save Changes inside the editor saves changes.
The existing Docs Demo package appears in the editor selection.
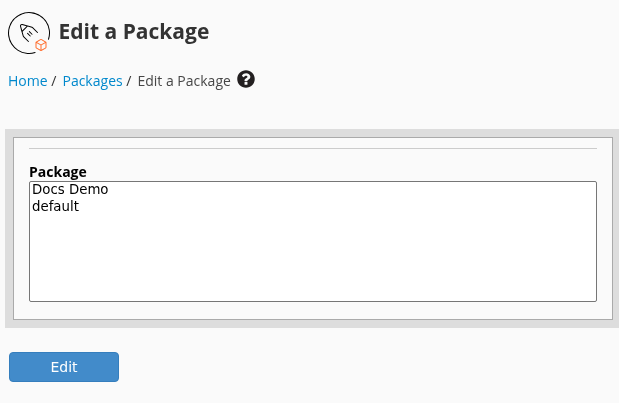
Step 1: Find the intended package
- Find the intended package
Select the package you intend to inspect.
What you should see: Avoid opening another package by mistake.
- Open the editor
The initial Edit button opens the package form.
What you should see: Inspect settings; this is not the later Save Changes action.
The actual WHM screen was inspected without saving package or feature changes during capture. Private information is permanently masked.
These saved package values were not changed during inspection.
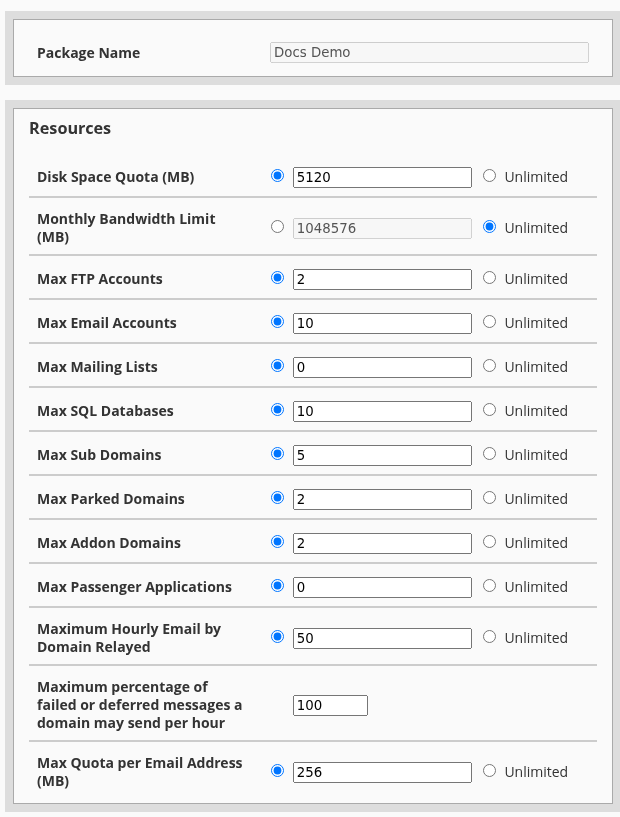
Step 1: Match the package and disk limit
- Match the package and disk limit
Docs Demo has 5120 selected for Disk Space Quota.
What you should see: Read the example package’s 5 GB allocation.
- Check the active traffic option
Unlimited is selected for Monthly Bandwidth; the grey number is inactive.
What you should see: Distinguish the panel label from Unmetered (Fair Usage) service terms.
- Separate counts from capacity
FTP, email, SQL and domain fields set object counts; the bottom mailbox quota sets MB.
What you should see: Ten mailboxes does not mean ten GB of storage.
The actual WHM screen was inspected without saving package or feature changes during capture. Private information is permanently masked.
| Field | Meaning | This example |
|---|---|---|
| Disk Space Quota (MB) | The hosting account's disk-space limit | 5120 MB, or 5 GB |
| Monthly Bandwidth Limit (MB) | The account's monthly data-transfer limit in WHM | Unlimited selected in the interface |
| Max FTP Accounts | Number of FTP accounts that can be created | 2 |
| Max Email Accounts | Number of mailboxes | 10 |
| Max Mailing Lists | Number of mailing lists | 0 |
| Max SQL Databases | Number of databases for each available SQL database type | 10 |
| Max Sub Domains | Subdomain limit | 5 |
| Max Parked Domains / Max Addon Domains | Domain-alias and additional-domain limits | 2 / 2 |
| Max Passenger Applications | Number of Passenger applications | 0 |
| Maximum Hourly Email by Domain Relayed | Outgoing messages per domain per hour | 50 |
| Maximum percentage of failed or deferred messages… | Temporary sending restriction based on the failed/deferred message percentage | 100 |
| Max Quota per Email Address (MB) | Largest quota that can be assigned when creating a new mailbox | 256 MB |
These are saved example settings, not recommendations for every website. In particular, assess sending limits alongside the email-service terms and server-wide limits. A value of 0 in the hourly-email field behaves as Unlimited rather than disabling sending; zero does not mean the same thing in every field.
Traffic terminology: WHM's Unlimited label means that the panel does not set a numeric limit for this field. DCHost service traffic is described as Unmetered (Fair Usage). The panel label does not promise unlimited network capacity or remove the fair-usage conditions.
Mailbox quota: Changing Max Quota per Email Address does not retroactively change existing mailboxes' quotas. Check those mailboxes separately in cPanel. Disk capacity, database count and mailbox count are also separate limits.
5. Check access options and their scope
Access and cPanel interface options appear below the resource table.
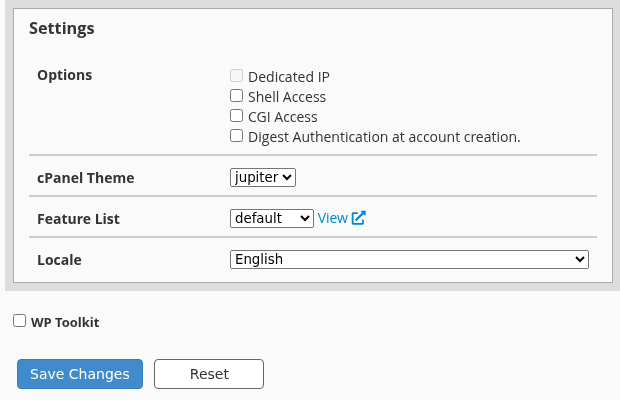
Step 1: Grant only needed access
- Grant only needed access
Assess Shell Access and CGI Access against actual needs; neither is selected here.
What you should see: Avoid unnecessary access for customer accounts.
- Read the feature-list assignment
The Feature List value default selects this package’s cPanel tool list.
What you should see: Inspect the correct list in Feature Manager.
- Identify the save action
Save Changes saves edits; Reset returns unsaved edits to the existing values.
What you should see: Do not treat Reset as a rollback of previously saved history.
The actual WHM screen was inspected without saving package or feature changes during capture. Private information is permanently masked.
| Option | What to check |
|---|---|
| Dedicated IP | Whether a separate IP is needed and available. This option cannot be edited after package creation. |
| Shell Access | Whether the hosting user needs command-line access. This does not grant root privileges. |
| CGI Access | Whether the application needs CGI execution |
| cPanel Theme | The customer's theme; jupiter in this example |
| Feature List | The list assigned to this package; default here |
| Locale | The initial panel language; English here, with Turkish also available |
| Package Extensions | Options supplied by installed extensions; their presence does not establish that every paid feature is licensed |
Shell Access, CGI Access and Dedicated IP are not selected in Docs Demo. No settings were saved during this inspection. Before changing a shared package, identify its accounts; if only one customer needs different limits, a separate package assigned to that account is easier to track.
6. Manage cPanel tools with Feature Manager
Open WHM → Packages → Feature Manager. Choose a list under Manage feature list and click Edit. A separate Add a new feature list field creates a new list.
default and disabled have different scopes.
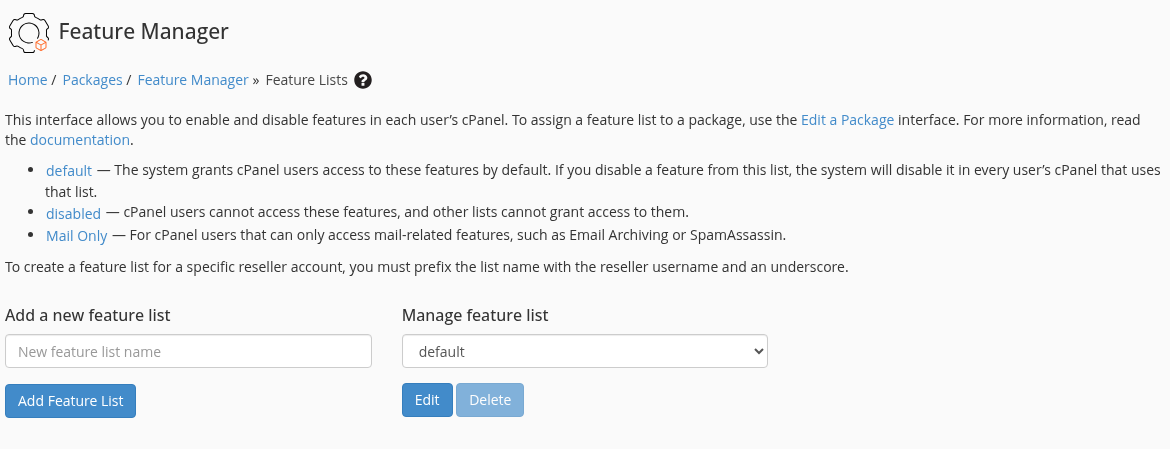
Step 1: Read the scope explanation
- Read the scope explanation
default affects users assigned to it; disabled blocks features across the server.
What you should see: Separate a package-specific change from a server-wide block.
- Select an existing list
Manage feature list opens a list that already exists.
What you should see: Distinguish this from creating a new list.
- Inspect with Edit
Edit opens the list. Delete and Add Feature List are different operations.
What you should see: Reach the intended list’s checkboxes.
The actual WHM screen was inspected without saving package or feature changes during capture. Private information is permanently masked.
| List | Scope |
|---|---|
| default | Controls default tools for accounts using this list. Disabling a feature here also affects other users assigned to the list. |
| Mail Only | A list intended for email-focused accounts. |
| disabled | Defines features unavailable server-wide; other lists cannot override it. It is not a normal list to assign to a package. |
Checked boxes in this normal feature list indicate permitted tools.
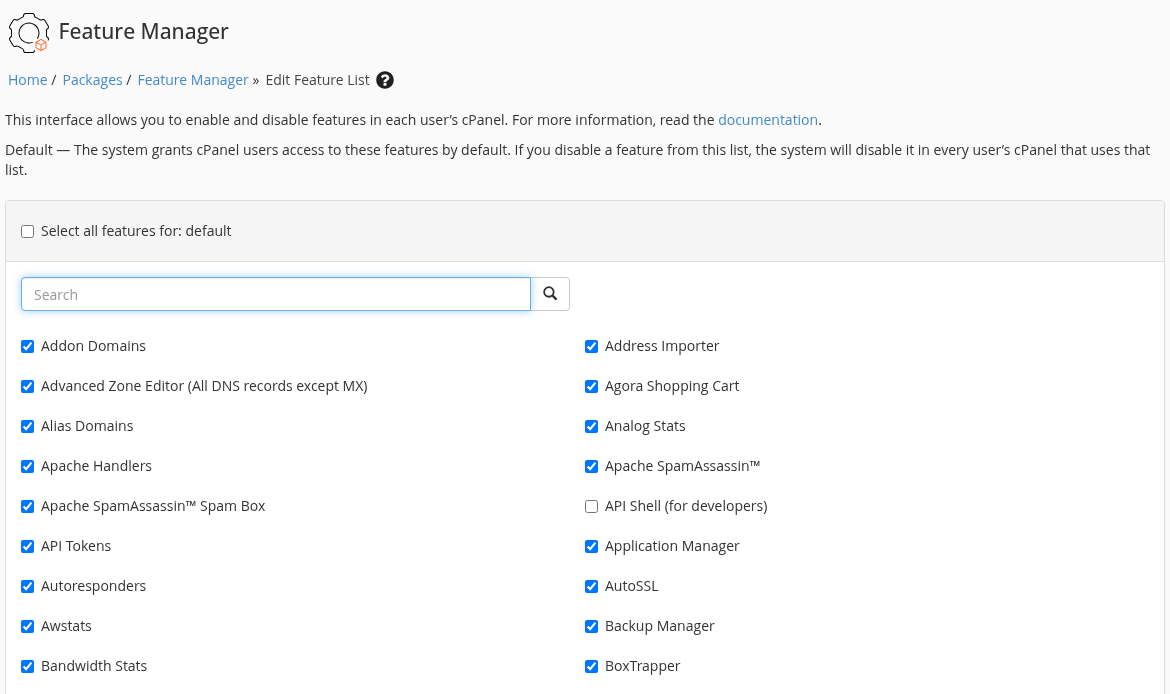
Step 1: Check the affected users
- Check the affected users
The explanation states that changes affect every account using default.
What you should see: Recognize that this is not a single-user setting.
- Read the tool permission
AutoSSL and Backup Manager are checked here. This alone does not mean a certificate was issued or a backup completed.
What you should see: Separate permission from a completed operation.
The actual WHM screen was inspected without saving package or feature changes during capture. Private information is permanently masked.
In a normal feature list, selecting a checkbox grants access to that tool. disabled works differently: selecting a feature there disables it server-wide. To remove a tool from only one hosting package, prepare an appropriate separate list instead of changing the server-wide disabled list.
After deliberately saving changes with Save, check the package's Feature List assignment and the customer's cPanel screen. Interface permission, installed services and service/license conditions must all be suitable. This guide's capture only inspected default; no checkboxes or list settings were changed.
7. Assign the package to a hosting account
For a new account, open WHM → Account Functions → Create a New Account. Enter the primary domain, hosting username, strong password and notification email. Choose your prepared package under Choose a Package.
Prepare a new cPanel user in Create a New Account.
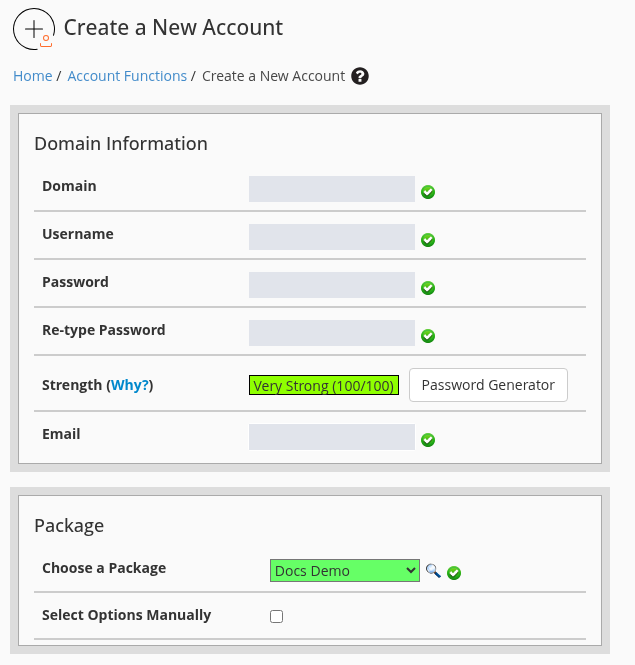
Step 1: Choose a domain and username
- Choose a domain and username
Enter the website name in Domain and this hosting account’s username in Username.
What you should see: The account is prepared separately from the server’s root user.
- Create a separate password
Enter a strong account-specific password in Password and Re-type Password.
What you should see: Both entries match; the root password is not shared.
- Add contact details
Enter the hosting account’s notification address in Email.
What you should see: The account contact is defined.
- Select the intended package
Review Choose a Package. Docs Demo is an example package created for this walkthrough.
What you should see: The selected package appears in the form.
Five private input values are masked. The real validation indicators and package selection are preserved; this form alone does not prove account creation.
This creates a hosting account inside WHM; it does not purchase a domain or change nameservers at the registrar. The complete creation and separate customer-login steps are in the cPanel installation guide.
After creation, compare your domain, username, package and quota in WHM → Account Information → List Accounts. The actual demo account below shows Docs Demo and 5120 MB.
The actual account list shows one hosting account, the example package and the final saved 5120 MB disk quota.
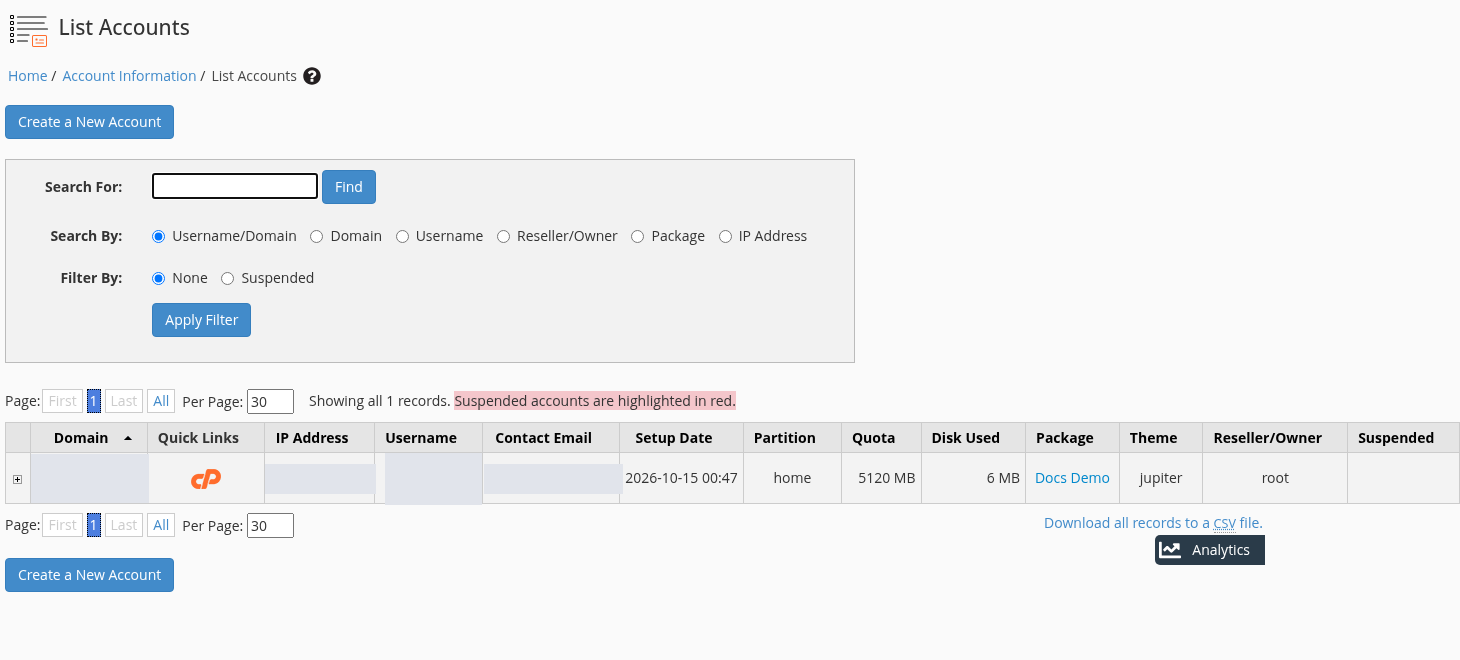
Step 1: Read the list and record count
- Read the list and record count
Open WHM → Account Information → List Accounts and find the new account.
What you should see: The example shows Showing all 1 records.
- Match the account and package
Compare Domain, Username and Package with the account you created on your own screen.
What you should see: The account and package match; there is no need to recreate it.
- Compare the quota with the package
The Quota column shows 5120 MB, the 5 GB disk limit saved for this example. Compare your own account’s value with its package.
What you should see: The quota column shows the final configured limit; the package name is not the only check.
- Verify cPanel access separately
The cPanel icon in Quick Links opens the account; also check normal username/password login in the next step.
What you should see: The account list and a customer login are separate checks.
Private account details are masked; other column values are unchanged. This screen does not prove website, DNS or email delivery operation.
Then test a normal login as the hosting user. Opening cPanel from WHM's shortcut alone does not verify the customer's own password.
8. Change one account's package
Open WHM → Account Functions → Upgrade/Downgrade an Account. If there are several accounts, select the account and click Modify. With only one account on this demo server, the package-selection screen opened directly.
With one demo account, WHM opened package selection directly.
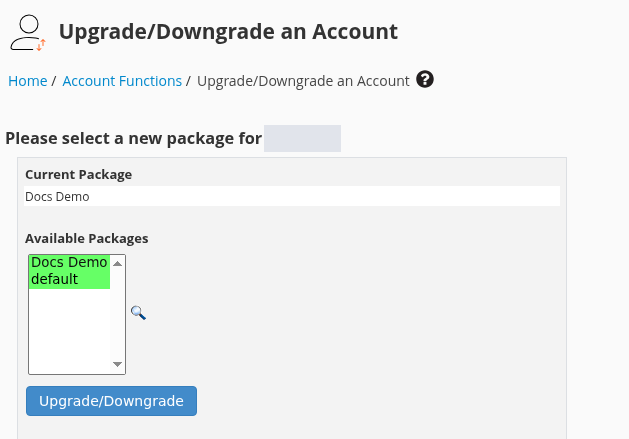
Step 1: Verify the current package
- Verify the current package
Current Package shows the account’s existing plan.
What you should see: Read the starting state for the correct account.
- Inspect the intended package
Select it under Available Packages and compare limits using the adjacent magnifier.
What you should see: Review the target plan before saving.
- Identify the apply action
Upgrade/Downgrade changes the package. It was not clicked in this capture.
What you should see: A preview is not represented as a completed package change.
The actual WHM screen was inspected without saving package or feature changes during capture. Private information is permanently masked.
- Read the existing plan under Current Package.
- Select the intended plan under Available Packages.
- Hover over the adjacent magnifying-glass icon to compare package details. In this version, the preview opens while the pointer is over the icon.
- After checking the intended change, save it with Upgrade/Downgrade.
Hovering over the magnifier opens the selected package’s actual summary.
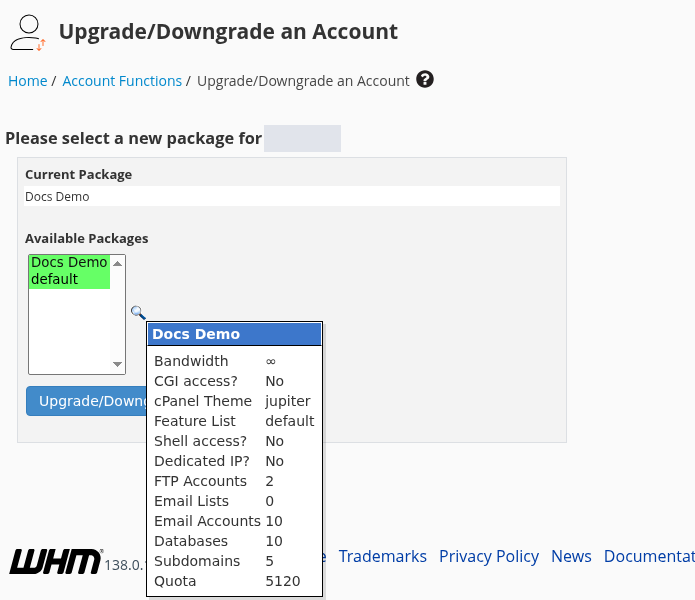
Step 1: Check the previewed package name
- Check the previewed package name
Docs Demo appears at the top of the small table.
What you should see: Know which package’s details you are reading.
- Compare tools and access
Feature List, Shell access and Dedicated IP show differences beyond storage.
What you should see: Assess access that a change might remove or enable.
- Read the quota and object counts
Quota shows 5120; email and database limits are 10.
What you should see: Compare existing usage with the intended package.
The actual WHM screen was inspected without saving package or feature changes during capture. Private information is permanently masked.
Only the selection and preview are demonstrated here; the example account's package was not changed. Before a downgrade, compare used disk space, mailboxes, databases and enabled features with the new limits. Plan the transition first if current usage exceeds them.
This WHM operation does not change the account's IP address. A paid DCHost product upgrade, invoicing and VPS resource changes are separate processes; selecting a WHM package does not complete those processes.
9. When the package and account quotas differ
Start with List Accounts → Quota. Compare it with the package's Disk Space Quota and, when needed, the account under WHM → Account Functions → Quota Modification. If only the disk allowance needs changing, verify the selected account and save the intended value in MB.
In this demo, the package specified 5 GB while the initial account list showed unlimited. Initial Quota Setup, XFS quota support and the required reboot were completed, then the account's limit was saved again as 5120 MB through Quota Modification. Both the WHM display and native 5 GB soft/hard quota values were subsequently verified. No disk-filling limit test was performed.
| Situation | Next check |
|---|---|
A limited package shows unlimited or an incorrect account value | Account quota, package assignment and operating-system quota support |
| Quota setup requests a reboot | Maintenance timing, server recovery access and the quota state after startup |
| Disk use exceeds expectations | Files owned by the account elsewhere, email and backups |
| Backups fail when the quota is full | Free space for the backup process to write temporary files |
A disk quota is not a separate database quota that automatically stops every MySQL/MariaDB write. Follow cPanel's quota documentation rather than making arbitrary changes to quota files or filesystem settings.
10. Distinguish suspension from deletion
Manage Account Suspension temporarily suspends or reopens an account. Terminate Accounts permanently removes the account and its data from the server. Suspension, bandwidth limiting and account termination are separate operations.
Do not delete and recreate an account to fix a quota or change its package. When permanent removal is needed, first confirm the account, data to retain, domain/DNS effects and a recoverable backup. No account was suspended or terminated for this guide.
What should you verify afterward?
- WHM: The correct account, expected package, quota and feature list.
- Customer login: cPanel access with that account's own username and password.
- Website: HTTPS at its normal address, important pages and a controlled write operation.
- Dependent services: Database connection, mailboxes in use and scheduled tasks.
- Recovery: A restore check in a separate environment, in addition to having a backup file.
Frequently asked questions
Can I create WHM hosting packages from cPanel?
A standard hosting user cannot create WHM packages. You need authorized WHM access on your own VPS/VDS or a reseller account granted that permission.
Does a larger package increase VPS RAM and CPU?
No. A WHM package controls the hosting account's limits and available tools. Server-resource changes require the relevant DCHost service-upgrade process.
Why is an enabled Feature Manager tool missing from cPanel?
Check that the account actually uses that list, review disabled, and verify the required service/software and licenses. Selecting one checkbox does not satisfy all of those requirements.
Can I rename an existing package?
WHM does not rename packages. Create a package with the intended name and assign accounts to it through a controlled change. You do not need to delete the accounts.
Official sources
Menu paths and explanations were checked on 15 October 2026 against actual WHM 138.0.15 screens and current vendor documentation.