Install cPanel on a VPS: AlmaLinux, WHM and first login
cPanel and WHM provide a graphical interface for websites, email accounts and databases. WHM manages the server and its hosting accounts. cPanel manages one hosting account. They are installed together but use different login ports and permissions.
This guide is for a clean AlmaLinux 9 VPS. Do not apply it to a server with live websites, Plesk or another control panel. cPanel has no uninstaller; removing it requires rebuilding the operating system. Use a separate server for Plesk installation.
1. Prepare the server and license
| Requirement | What to check |
|---|---|
| Clean, supported operating system | Select AlmaLinux 9 in the DCHost customer portal and verify it again over SSH. |
| x86_64 virtual machine | DCHost VPS/VDS services use Proxmox KVM. uname -m should show x86_64. |
| Sufficient resources | Official minimum: 2 GB RAM and 20 GB disk. Recommended: 4 GB RAM and 40 GB disk. Allow more for websites, mail and backups. |
| Administrator access | You need root access to the VPS. A shared hosting cPanel password is a different credential. |
| Static public IPv4 | The license is associated with the server's public IP. IPv6-only servers are not supported. |
| Hostname and DNS | Prepare a separate hostname such as panel.example.com and an A record pointing to this VPS. |
| cPanel license | Downloading the installer does not provide a license. You need an active paid license or an eligible, activated trial. |
The official trial lasts 15 days and requires a cPanel Store account with a verified email address. Trial availability depends on eligibility; do not assume every IP qualifies. Check whether your server order includes a panel license.
Resources used in this example: 3 vCPUs, 4 GB RAM and a 60 GB disk. These are demonstration resources, not a capacity guarantee for your workload. In the DCHost customer portal, open VPS → New VPS, choose a suitable plan, billing period and AlmaLinux 9 template. The service order guide covers checkout and activation.
The actual demo VPS screen separates status, resources and SSH access details.
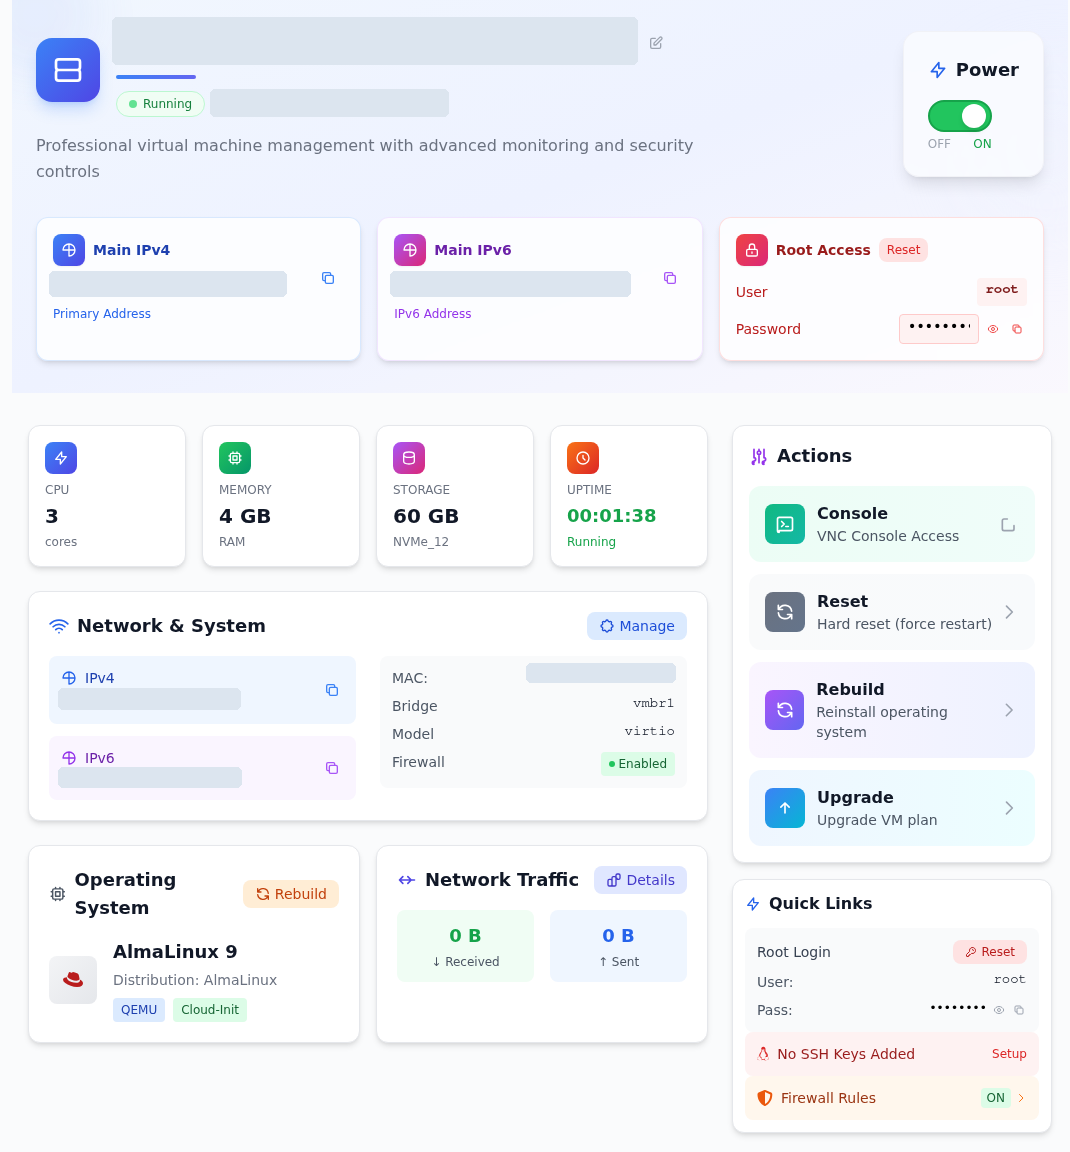
Step 1: Check the Running status
- Check the Running status
Running shows the virtual machine is powered on. Confirm operating-system access separately with a new SSH connection.
- Read the CPU, RAM and disk values
This example uses 3 vCPUs, 4 GB RAM and a 60 GB disk. Leave enough free space for the panel and applications.
- Confirm AlmaLinux 9
Operating System shows the template selected at checkout. Compare it with /etc/os-release on the server.
Keep the root password private. Run installation commands only after connecting to this service’s server over SSH.
The dnf commands on this page are for AlmaLinux. For Ubuntu/Debian, use the Linux update guide. Recheck current vendor support before following an old CentOS or Rocky Linux tutorial.
2. Connect over SSH and check the server
Open SSH from your own computer. Run the following commands on the connected VPS. See first SSH login or SSH connection errors if you need help connecting.
cat /etc/os-release
uname -m
free -m
df -h /
df -i /
swapon --show
systemctl get-default
Confirm AlmaLinux 9 and x86_64. Leave room for updates and customer data: cPanel updates need at least 5 GB of additional working space under /usr/local/cpanel. df -i checks inode capacity, which can run out when a filesystem contains many small files.
This example also prepares 4 GB of swap. swapon --show lists active swap, while systemctl get-default checks the boot target; cPanel requires multi-user.target. If swap is absent, prepare appropriate space before installation. Swap does not increase your plan’s physical RAM.
Stop here if the server contains live websites, databases or another panel. Choose a clean server. Do not install Apache, PHP or MySQL independently before cPanel; its installer prepares the required components.
The actual terminal screenshot after preparation appears in the next section.
3. Prepare DNS, updates and SELinux
Point the hostname to the VPS
At your domain's authoritative DNS provider, create an A record for your chosen hostname pointing to this VPS's IPv4 address. With Cloudflare, select DNS only for the management hostname. This does not require changing your existing website or nameservers.
Replace panel.example.com below with your hostname:
hostnamectl set-hostname panel.example.com
hostname -f
getent ahostsv4 panel.example.com
The hostname and DNS record are separate settings. hostnamectl does not create a DNS record. Check that the lookup returns the correct VPS address before continuing. Use a management hostname different from a domain you intend to create as a hosting account.
Update the operating system
On the new, empty server, review the proposed changes:
dnf check-update
dnf upgrade --assumeno
dnf check-update may return exit code 100 when updates are available; that alone is not an error. --assumeno displays the transaction and declines it. If the plan contains no unexpected removals or repository changes, run:
dnf upgrade
Read the summary and confirm with y. Do not shut down the server or start another package manager during the transaction. A server with existing applications also needs a maintenance window and a backup plan.
Apply cPanel's SELinux requirement
cPanel requires SELinux to be disabled on AlmaLinux. This is a cPanel compatibility requirement, not a general recommendation for every Linux server.
Keep a backup, change the active SELINUX= line in /etc/selinux/config, and read it back:
cp -an /etc/selinux/config /etc/selinux/config.before-cpanel
sed -i 's/^SELINUX=.*/SELINUX=disabled/' /etc/selinux/config
grep '^SELINUX=' /etc/selinux/config
The output must be SELINUX=disabled. If no line appears, inspect the file before continuing. Restart the new, empty server with reboot. SSH disconnects during the reboot; reconnect and check:
getenforce
uname -r
hostname -f
getenforce must report Disabled. Resolve Enforcing or Permissive results before running the installer. Do not apply old instructions that disable NetworkManager on AlmaLinux 9.
AlmaLinux, the updated kernel, SELinux and free space were checked in the same SSH session.
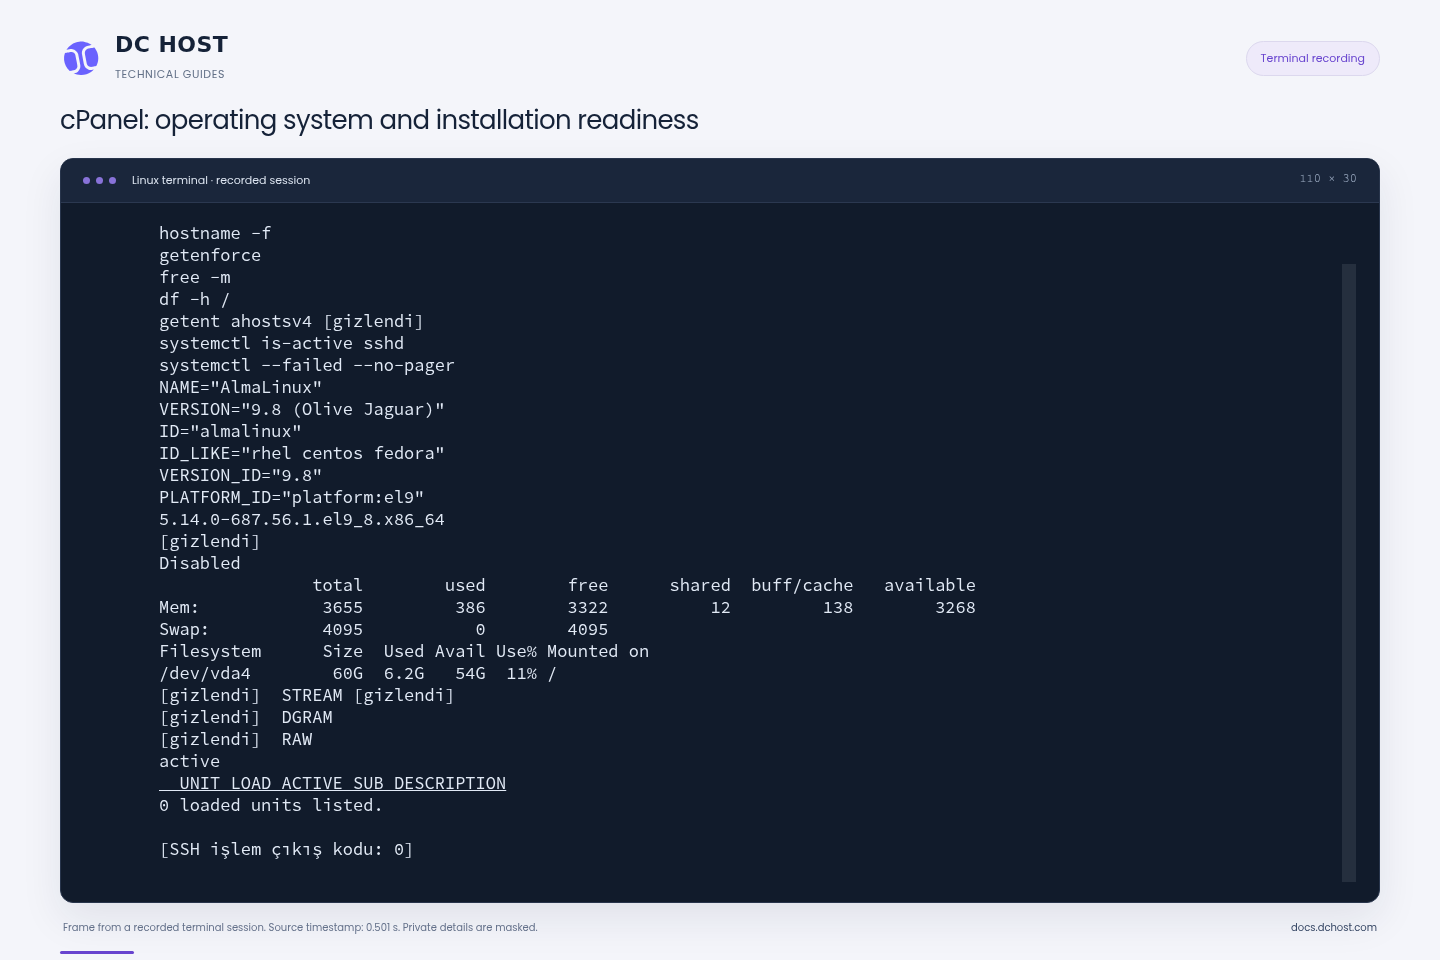
Step 1: Read the OS and kernel versions
- Read the OS and kernel versions
AlmaLinux 9.8 and the kernel version after reboot are shown.
- Check the SELinux result
The Disabled result required by cPanel is visible here.
- Review memory and disk capacity
The swap row shows 4 GB; the disk row shows 54 GB free before installation.
The hostname and IP addresses are permanently masked.
Check firewall access before installation
Review both the DCHost portal’s network rules and the operating-system firewall. Preserve SSH and console recovery access, and keep a copy of existing rules. cPanel’s installation requirements call for preparing the OS firewall before installation. On this empty demo server, the OS firewall was initially inactive; provider rules were checked separately. Do not assume your server has the same configuration. After installation, allow only the web and management services you use and verify access again. In this walkthrough, SSH and WHM were restricted to the management IP; web ports 80/443 and cPanel port 2083 remained open. A new SSH connection and normal HTTPS access were verified after applying the rules. This is a web-focused demo policy; mail, DNS and FTP need separate planning.
4. Run the official cPanel installer
Use a persistent terminal session such as tmux to keep the installation running if SSH disconnects. Install the tools from the operating system's official repository:
dnf install perl curl tmux
tmux new -s cpanel-kurulum
Download the official installer. Continue only after the download succeeds.
cd /home
curl -fL -o latest https://securedownloads.cpanel.net/latest
sh latest
The installer prepares many packages; duration varies with resources and connectivity. Do not start a second installer. If SSH disconnects, reconnect and use tmux attach -t cpanel-kurulum. To detach without stopping the session, press Ctrl+B, then D.
If installation fails, review the error and the relevant final lines of /var/log/cpanel-install.log. Mask IP addresses, hostnames, email addresses and access information before sharing logs with support.
The completion line in the actual installer output. Licensing and account setup follow this step.
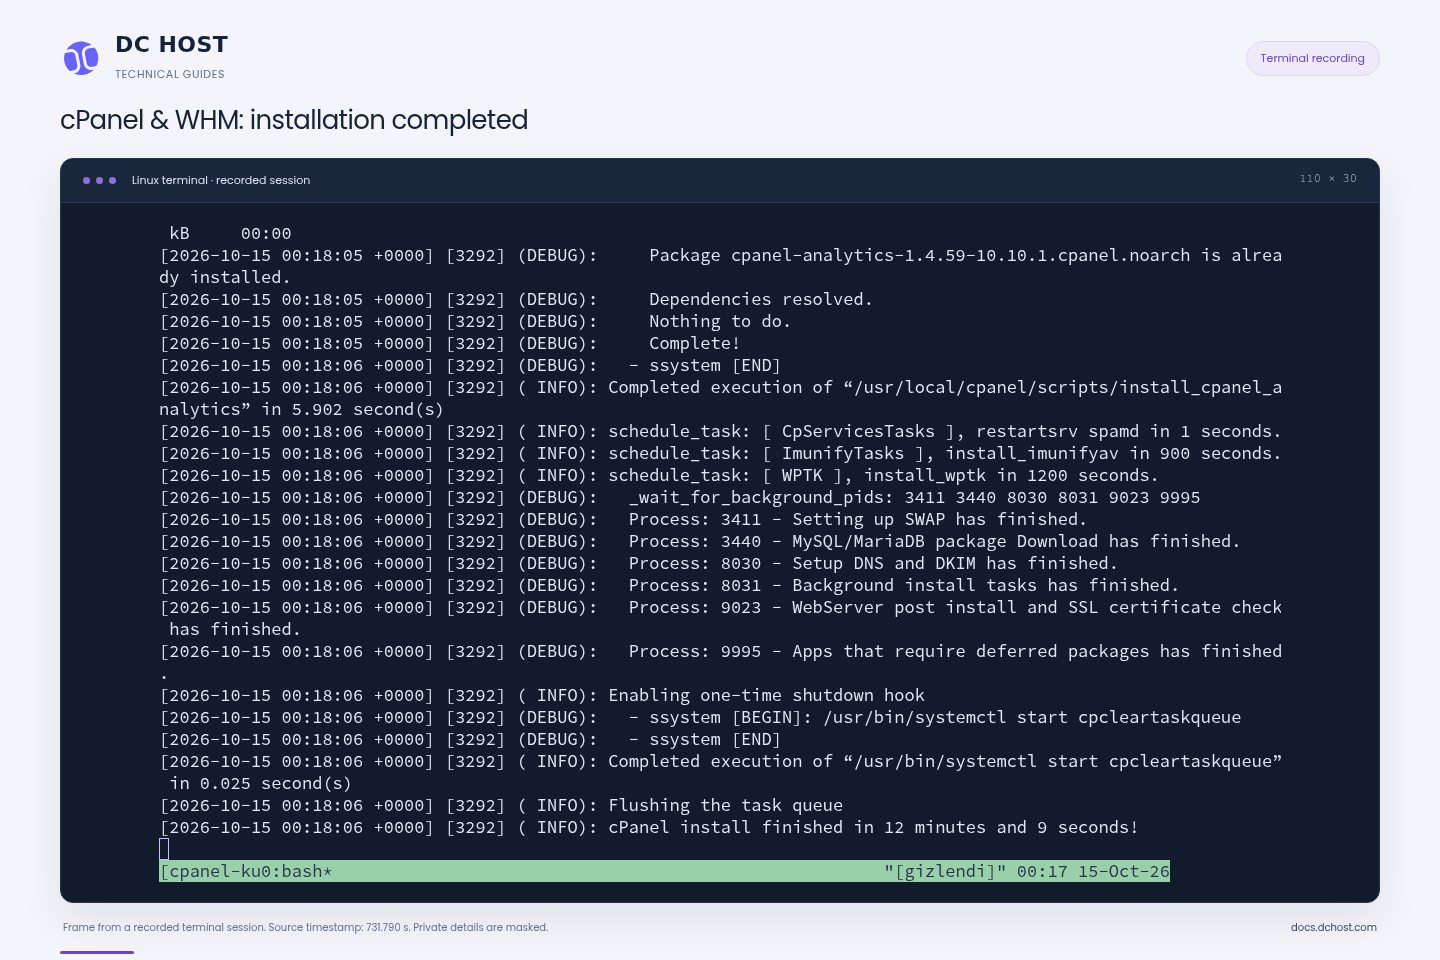
Step 1: Find the completion line
- Find the completion line
The cPanel install finished message reported 12 minutes and 9 seconds in this run. Duration varies by server.
- Continue with initial WHM setup
Installer completion does not mean the license or hosting account is ready. Complete the sign-in and licensing steps below.
Access details are permanently masked; the source output order is preserved.
The silent terminal recording plays at 5× speed; idle gaps over 2 seconds are shortened. Event order is preserved. The approximately 12-minute session plays in 80 seconds.
What does the video show?
- The previously downloaded official installer starts inside a persistent terminal session on the server.
- cPanel downloads and installs packages, then prepares service configuration. A second installer is not started.
- Package and background tasks finish. The screen shows cPanel install finished in 12 minutes and 9 seconds!.
- The installer finishes with exit code 0. Licensing, initial WHM settings and a cPanel account are separate steps after this recording.
The installed version in this walkthrough was verified as 138.0.15. Versions and installation times can differ in later runs.
5. Sign in to WHM and complete licensing
Open your management address, such as https://panel.example.com:2087, replacing the example with your server hostname. Use the VPS root username and password for WHM. Your DCHost customer portal password belongs to a different account.
Port 2087 opens WHM for the server administrator.
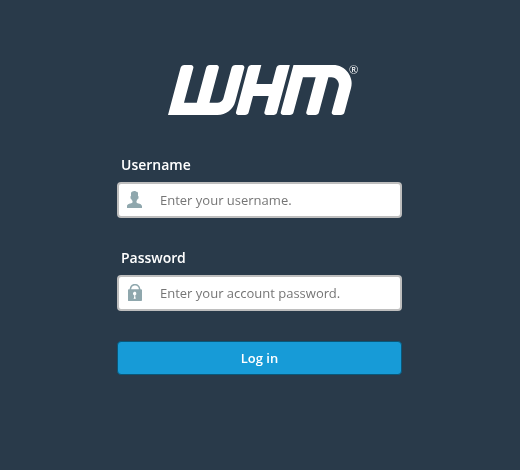
Step 1: Enter the username
- Enter the username
Use root for this new VPS, rather than the customer-portal email.
- Enter the VPS password
Use this server’s root password. Keep it out of screenshots and recordings.
- Continue with Log in
Successful login opens the initial setup or licensing step.
WHM uses port 2087; a separate hosting account signs in to cPanel on port 2083.
Select Log in. The first-run flow may include agreements, licensing and initial settings. Read the terms and continue with a suitable license. If a license already exists, check that it is assigned to the correct public IP.
The initial certificate may not yet be trusted, depending on hostname DNS and licensing. Do not use a certificate bypass as the normal login procedure. Complete the hostname, DNS and service certificate setup, then verify a normal HTTPS login. Keep one-time administration links private.
Activate the trial through your WebPros account
If a trial is offered, follow Log in to cPanel Store → Continue with WebPros Account. Existing cPanelID credentials can be used on the WebPros sign-in page. A new account may require email verification; enter the delivered code in your own sign-in screen.
This screen starts the free-trial flow; the license is not active yet.
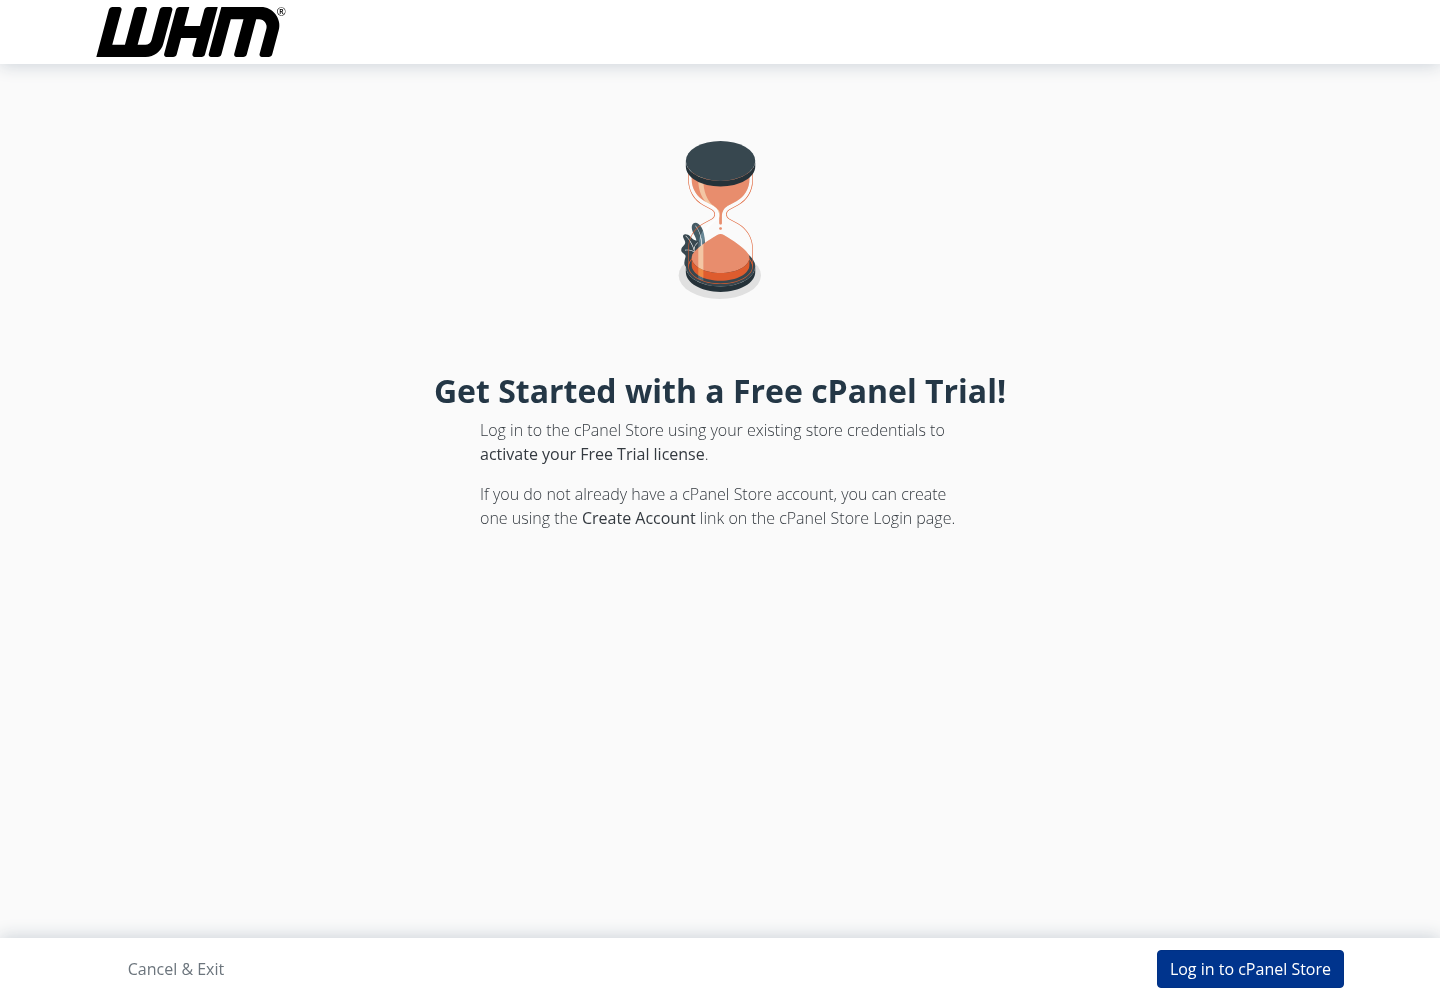
Step 1: Read the trial details
- Read the trial details
Account and IP eligibility are checked in the following steps.
- Continue to the cPanel Store login
Log in to cPanel Store leads to the WebPros account sign-in flow.
If you already have an account, sign in instead of registering again.
If you see “An account with this email already exists”, sign in with that account instead of registering another one. Reaching the license page does not prove activation has completed.
In this walkthrough, WebPros email verification completed and WHM displayed 15-day free Trial License Activated. Next continued to initial setup. The trial lasts 15 days; it is not a permanent free license. Plan suitable licensing before it expires.
WHM displayed this actual confirmation after the WebPros account flow completed.
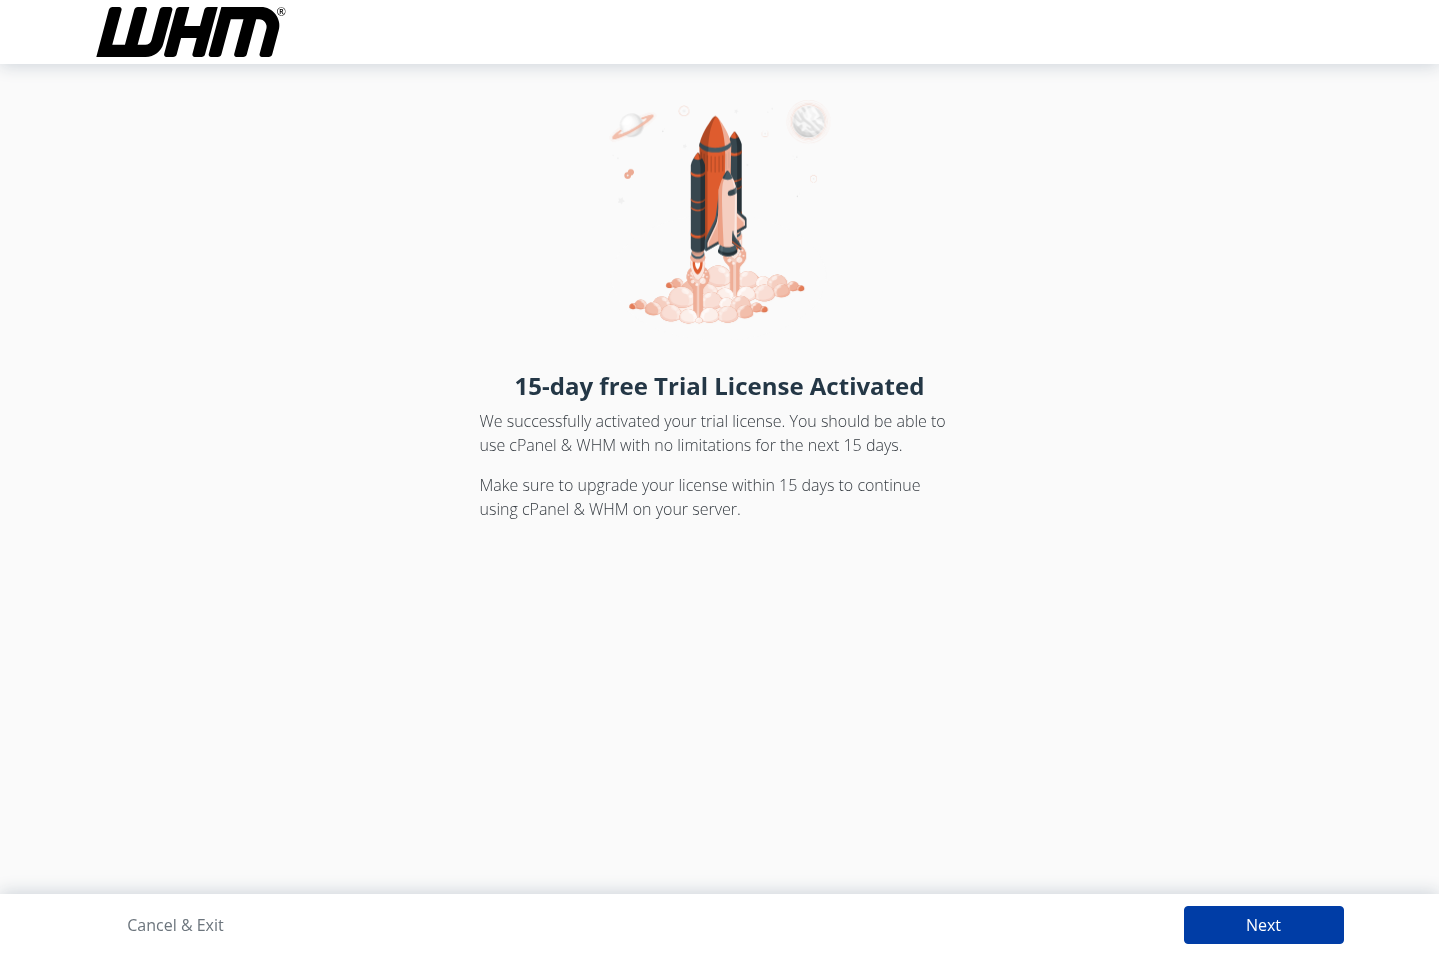
Step 1: Read the confirmation
- Read the confirmation
Find 15-day free Trial License Activated. Distinguish an activation result from merely opening the license screen.
What you should see: The page confirms activation for a 15-day trial.
- Continue to initial settings
Select Next.
What you should see: WHM opens contact and nameserver setup.
A trial license expires. Plan a suitable paid license before expiry if you intend to continue.
6. Review WHM contact and initial DNS settings
In Email Address, enter an address where you can read server status and error notifications. Compare the Nameservers fields with your intended DNS arrangement.
This example preserved the existing ns1.dchost.com and ns2.dchost.com values. No registrar nameserver change was made. Do not copy these values on the assumption that DNS service is already configured for your VPS. If you operate your own DNS servers, plan authoritative DNS and glue records separately.
Check the notification address and the DNS arrangement you intend to use.
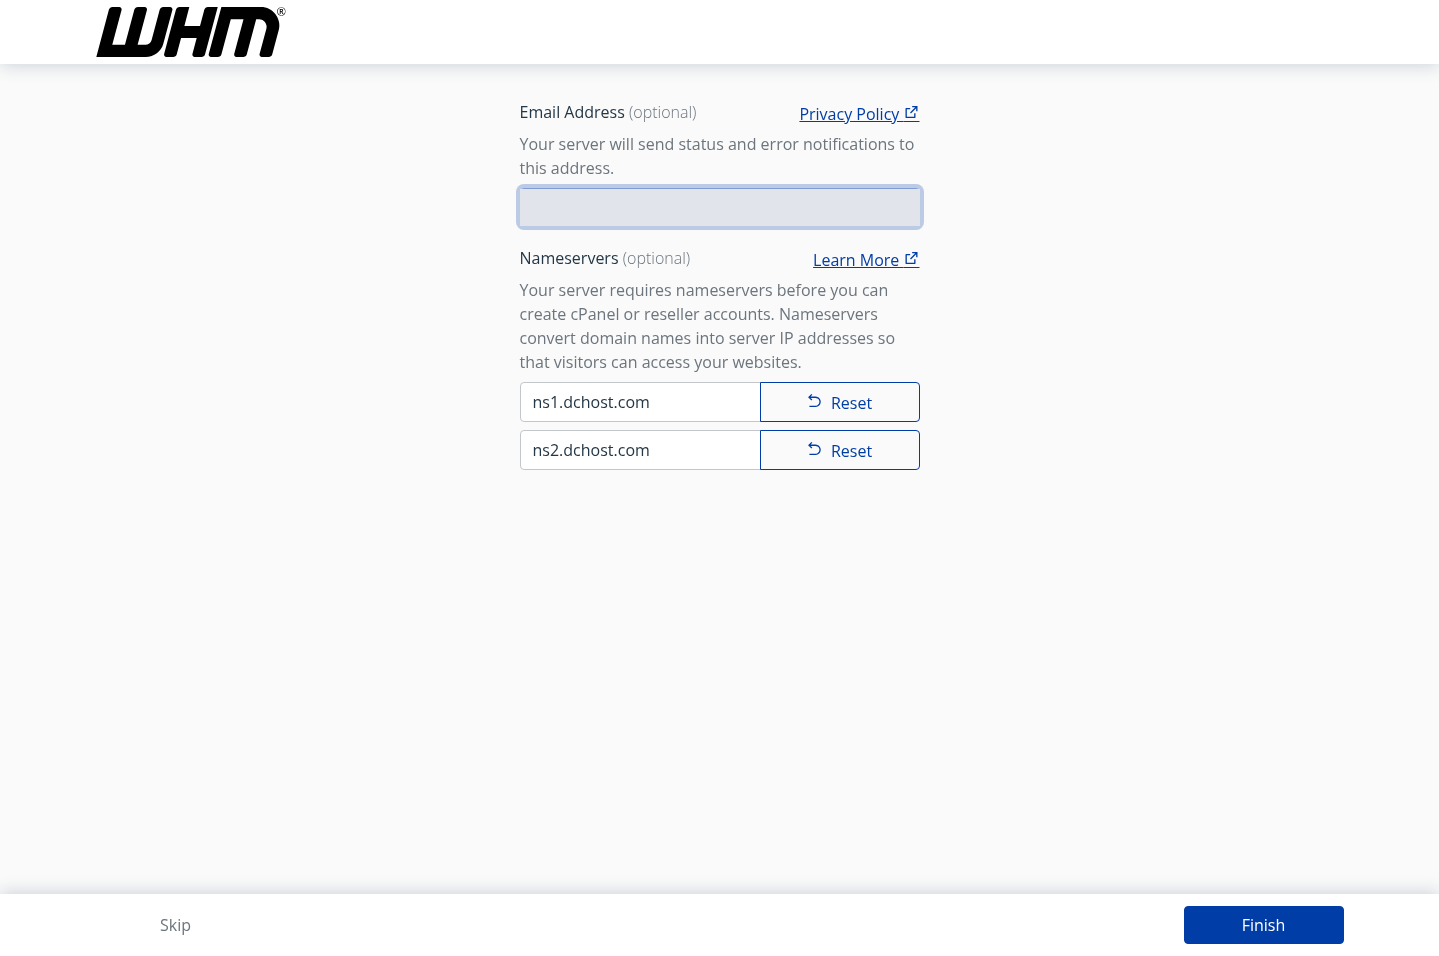
Step 1: Enter the notification address
- Enter the notification address
Use an address where you can read server notifications in Email Address.
What you should see: The destination for status and error notices is set.
- Check nameservers against your plan
This example preserved the existing ns1.dchost.com and ns2.dchost.com values. Verify your own DNS arrangement.
What you should see: The fields are reviewed; this form does not change registrar delegation.
- Save the settings
After reviewing the information, select Finish.
What you should see: Initial setup is completed.
The email address is permanently masked. Do not assume the example nameservers provide configured DNS service for every VPS.
After reviewing the details, select Finish. Entering nameservers in WHM does not change a domain's registrar delegation; the website's A/AAAA records also need their own checks.
7. Create the first hosting account
Open WHM → Account Functions → Create a New Account. This creates a cPanel hosting account inside the VPS. It does not buy a domain or order another VPS through the DCHost customer portal.
| Field | What to enter |
|---|---|
| Domain | A domain or suitable subdomain you control for this hosting account. Keep the server hostname separate from the website address. |
| Username | The new cPanel hosting account username. Do not use root as the customer account. |
| Password / Re-type Password | Enter a strong password unique to this hosting account twice and save it in your password manager. |
| An accessible notification address for the hosting account. | |
| Choose a Package | The appropriate package you prepared. This example selected Docs Demo, an example package created for this walkthrough. |
Prepare a new cPanel user in Create a New Account.
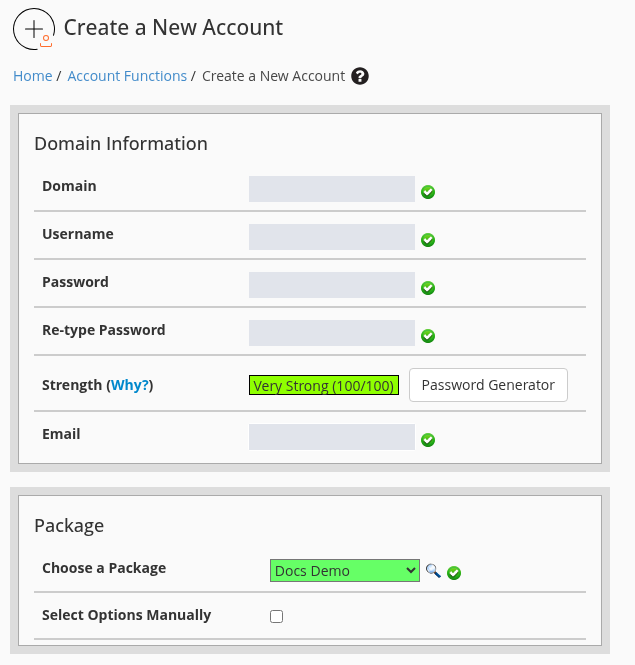
Step 1: Choose a domain and username
- Choose a domain and username
Enter the website name in Domain and this hosting account’s username in Username.
What you should see: The account is prepared separately from the server’s root user.
- Create a separate password
Enter a strong account-specific password in Password and Re-type Password.
What you should see: Both entries match; the root password is not shared.
- Add contact details
Enter the hosting account’s notification address in Email.
What you should see: The account contact is defined.
- Select the intended package
Review Choose a Package. Docs Demo is an example package created for this walkthrough.
What you should see: The selected package appears in the form.
Five private input values are masked. The real validation indicators and package selection are preserved; this form alone does not prove account creation.
Review cPanel Theme and Locale in the lower form. This walkthrough selected the jupiter theme and English. Evaluate Mail Routing, Reseller and DNS sections according to the service; do not give a new website account unnecessary administration privileges.
Check the account options in the lower form before submitting creation.
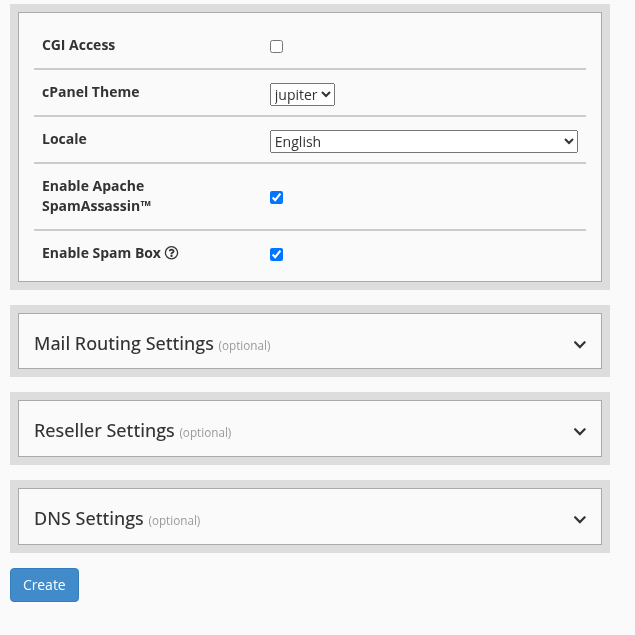
Step 1: Check theme and language
- Check theme and language
Read cPanel Theme and Locale. The example selects jupiter and English.
What you should see: Interface preferences are defined for the new account.
- Review optional sections
Change Mail Routing, Reseller and DNS settings only according to the service plan.
What you should see: Avoid unnecessary privileges or incorrect DNS and mail routing.
- Submit account creation once
After reviewing the form, select Create once and wait.
What you should see: Creation starts; verify its result in the account list.
These selections belong to this demo. Do not submit another creation request for the same account while it is running.
After reviewing the fields, select Create once. Do not submit another creation request while it is running. The result page may show account details or a password; do not share that page publicly.
Verify the account in the list
Open WHM → Account Information → List Accounts. Compare Domain, Username and Package with the account you created. This walkthrough created one demo hosting account and confirmed it in the list.
The actual account list shows one hosting account, the example package and the final saved 5120 MB disk quota.
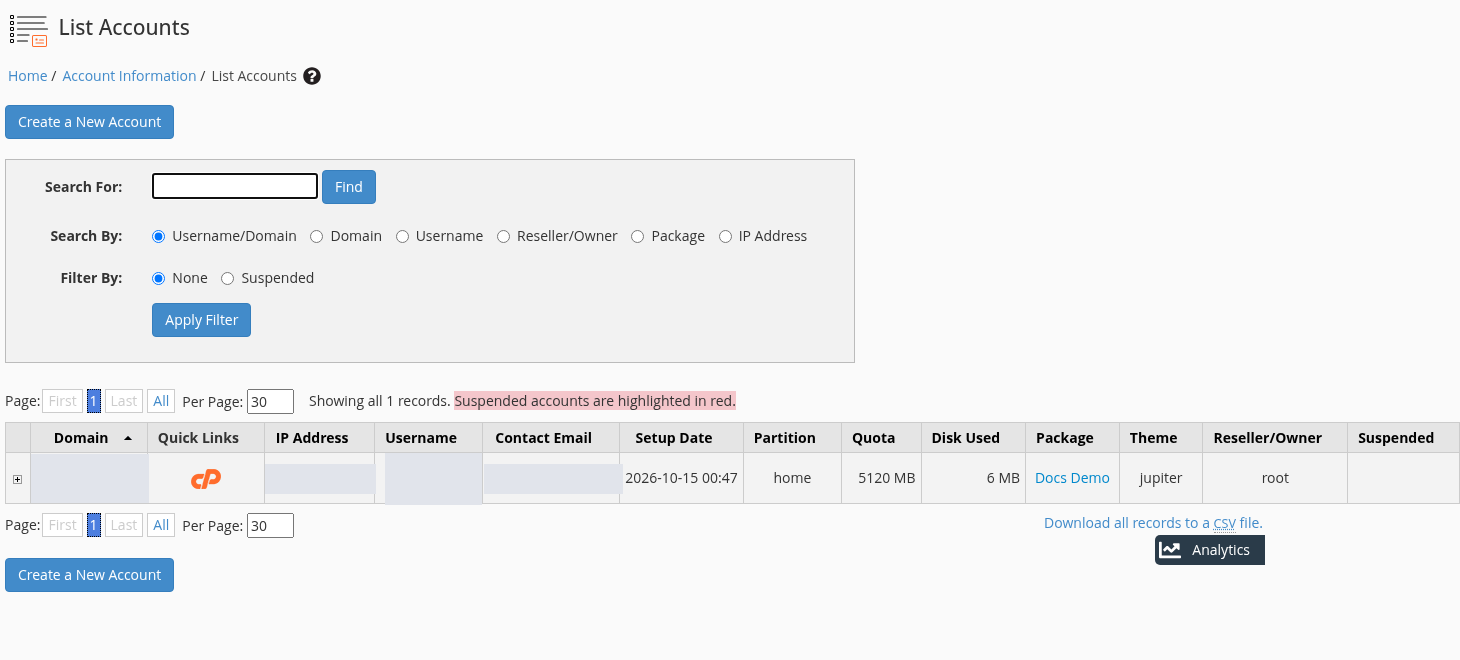
Step 1: Read the list and record count
- Read the list and record count
Open WHM → Account Information → List Accounts and find the new account.
What you should see: The example shows Showing all 1 records.
- Match the account and package
Compare Domain, Username and Package with the account you created on your own screen.
What you should see: The account and package match; there is no need to recreate it.
- Compare the quota with the package
The Quota column shows 5120 MB, the 5 GB disk limit saved for this example. Compare your own account’s value with its package.
What you should see: The quota column shows the final configured limit; the package name is not the only check.
- Verify cPanel access separately
The cPanel icon in Quick Links opens the account; also check normal username/password login in the next step.
What you should see: The account list and a customer login are separate checks.
Private account details are masked; other column values are unchanged. This screen does not prove website, DNS or email delivery operation.
Compare the disk quota as well
Compare List Accounts → Quota with the disk allowance of the selected package. The final value for this demo account was verified as 5120 MB (5 GB). A package name alone does not establish that the operating system can enforce the disk limit.
If a package with a disk limit shows unlimited, first check quota support under WHM → Server Configuration → Initial Quota Setup. If the tool requests a reboot on an XFS filesystem, complete it during a maintenance window and check the quota state after startup. If needed, save the correct account limit again under WHM → Account Functions → Quota Modification.
In this run, XFS quota support was checked after reboot, the account limit was saved as 5120 MB through WHM, and native soft/hard limits were verified as 5 GB. No disk-filling limit test was performed. A disk quota is not a separate database quota that automatically blocks every MySQL/MariaDB database write.
The cPanel icon in Quick Links opens the account. Also verify the customer's normal sign-in: switching from a root session does not by itself prove that the customer can sign in with their own password.
8. Sign in to cPanel with the customer account
Open https://panel.example.com:2083, replacing the example hostname with your server name. Enter the hosting account credentials created in step 7 in Username and Password, then select Log in. Do not use root or DCHost customer portal credentials here.
This login on port 2083 is separate from WHM root access.
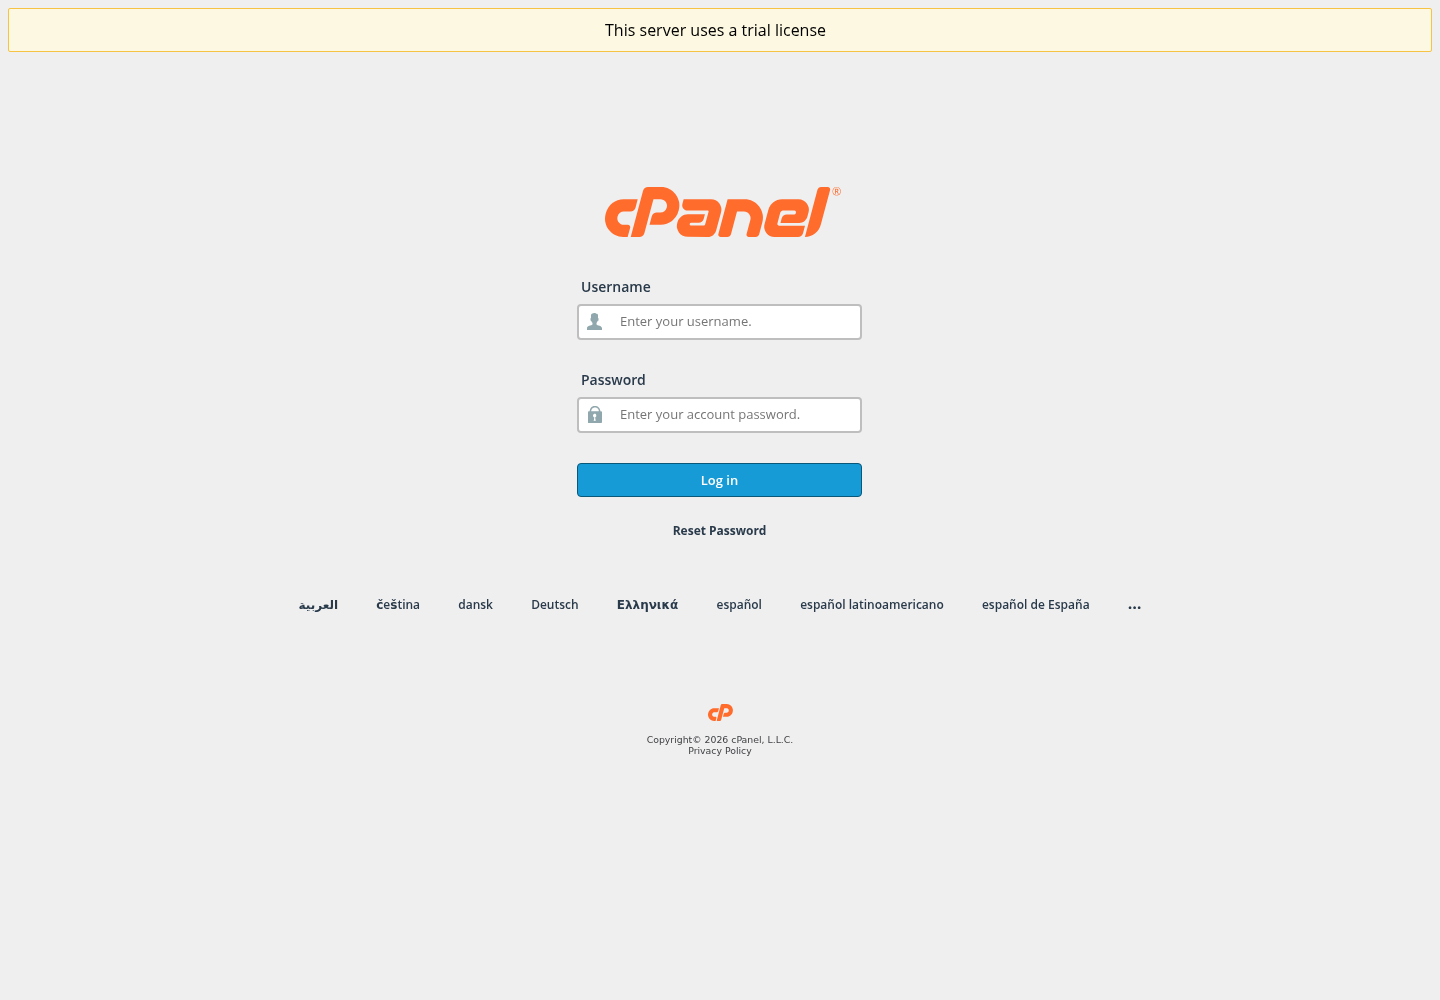
Step 1: Enter the hosting username
- Enter the hosting username
Use the hosting account username created in WHM in Username.
What you should see: Do not use the server’s root account.
- Use that account’s password
Enter the password for the new hosting account in Password.
What you should see: Keep customer portal, root and hosting credentials distinct.
- Sign in
Select Log in and check that the account’s tools open.
What you should see: A successful login verifies separate customer-account access.
The screenshot was captured with empty login fields. The trial-license notice is not a hosting-password error.
This walkthrough successfully verified a normal username/password login for the separate hosting user on port 2083.
Review the first-login privacy choice
A Consent and Privacy dialog may appear on first login. Read the explanation and privacy policy link. Leave the checkbox unchecked if you do not want to share optional usage statistics, then save your preference with Save and Continue.
Consent and Privacy explains the choice to share usage statistics with WebPros.
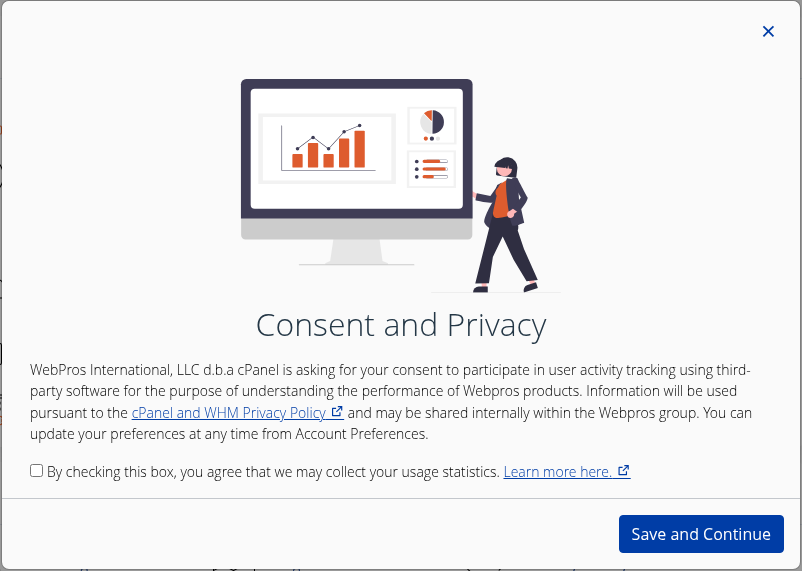
Step 1: Read the explanation and policy
- Read the explanation and policy
Review the text and cPanel and WHM Privacy Policy link.
What you should see: Understand why usage data is requested.
- Choose your preference
Leave the checkbox unchecked if you do not want to share usage statistics.
What you should see: Optional sharing is the user’s decision.
- Continue with the preference
Review the choice and select Save and Continue.
What you should see: The preference is saved and you can continue to the tools.
The image shows the actual dialog before saving. Its first-login appearance can vary by account or version.
The Tools screen then shows the features available to the account. Files contains file and backup tools, Databases contains database tools, and Email contains mailbox and forwarding tools. Appearance and available features can vary by account.
If a separate optional survey appears, close it with × (Close) in the upper-right corner. The survey may appear again on a later visit.
After a customer login, tools are grouped by purpose. Match the labels on the screen to the explanations below.
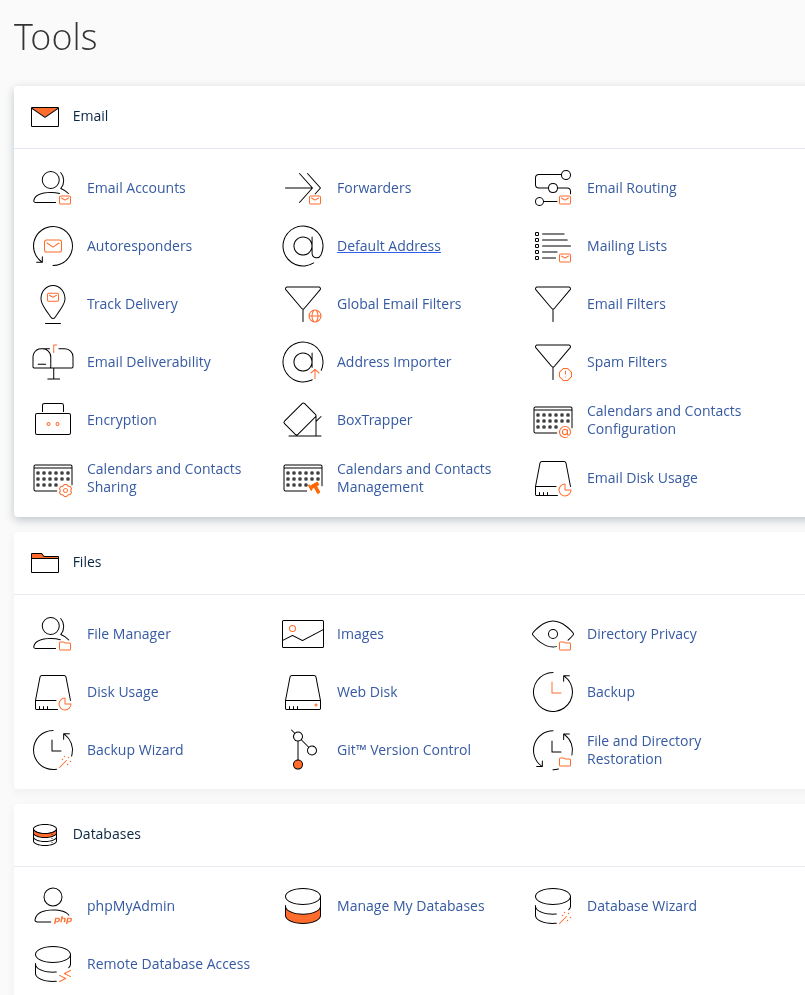
Step 1: Recognize the Tools screen
- Recognize the Tools screen
Email, Files and Databases group the different management tasks.
What you should see: Find the section that matches the task you need.
- Use File Manager for website files
File Manager in the Files section opens the hosting account’s files and folders.
What you should see: Reach the tool for working with website files.
- Use Backup Wizard for backups
Backup Wizard walks through the supported backup and restore options. You cannot restore a full account backup yourself from this tool.
What you should see: Identify the route for file and database backups.
- Separate the database tools
Manage My Databases manages databases and database-user permissions. phpMyAdmin is for tables and import/export operations.
What you should see: Separate database and permission management from data operations.
Captured after saving the optional analytics preference and closing the separate survey with its native close control. Available tools can vary by hosting account.
9. Verify the website, PHP and database after panel access
A working panel login does not establish that the website's components work. Check the website domain's A/AAAA destination at its authoritative DNS provider; do not publish a nonworking IPv6 target. Website HTTPS and WHM/cPanel login certificates apply to separate addresses and service connections.
| Check | What it verifies |
|---|---|
/usr/local/cpanel/cpanel -V | The installed cPanel software version |
| Normal HTTPS login to WHM | Access to server administration |
| Actual activation confirmation | Completion of licensing or trial activation |
| List Accounts and a separate user login on 2083 | Creation of the hosting account and customer access |
| The sample website and PHP page at their own address | DNS, web access and PHP request handling |
| An application connection using a separate database/user | Permitted database read/write operations |
Verified in this walkthrough: WHM and the separate customer cPanel login opened over trusted HTTPS. The initial sample website check confirmed PHP 8.3.35, PHP-FPM, enabled OPcache and a successful database read through a read-only user. That first check used HTTP with a local address mapping to the correct server. Continue with the PHP and OPcache checks and database workflow.
Final HTTPS check: Let's Encrypt Certificate was selected for the main website domain through SSL/TLS Certificates → Wizard in the customer's cPanel account. After the certificate was issued, the site opened over HTTPS using normal DNS resolution without a local override. The PHP page returned 200 without bypassing certificate warnings, and the database read succeeded. Follow the certificate and HTTPS verification steps for your own domain.
On your own website, test the homepage, administrator login and a controlled write operation. Do not leave diagnostic files that expose configuration or credentials accessible to visitors. Mail delivery and backup restoration are separate checks; complete actual delivery and recovery tests when required.
This image focuses on the certificate row for the selected main domain.
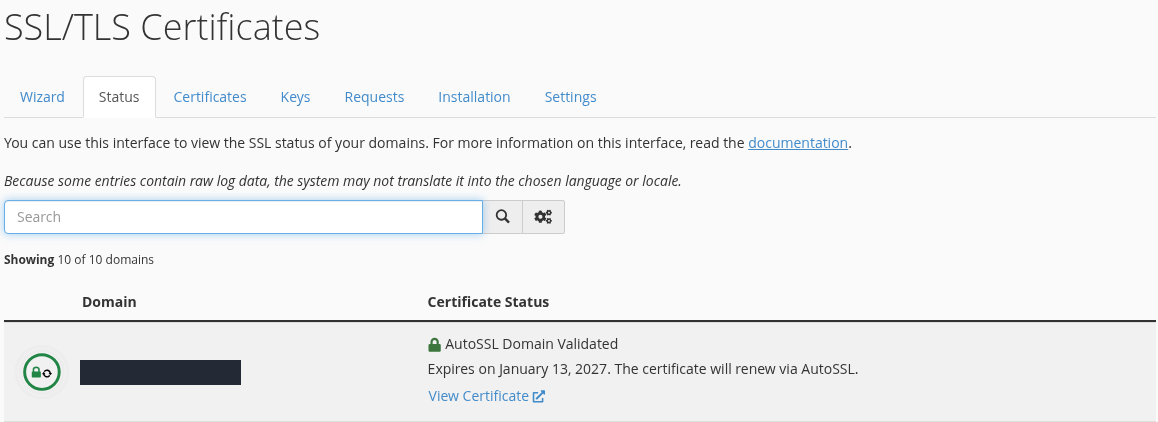
Step 1: Open the Status tab
- Open the Status tab
After the certificate request, open Status inside SSL/TLS Certificates.
- Read the status and expiry date together
This example shows AutoSSL Domain Validated and an expiry date of 13 January 2027. Later installations will have different dates.
- Check the certificate coverage separately
Use View Certificate to inspect the names and details. This certificate covers only the selected main address; www and other subdomains require separate preparation.
A trusted HTTPS connection and PHP/database read were separately verified using normal DNS. Future automatic certificate renewal has not yet been tested.
Troubleshoot installation and login errors
| Symptom | First check | Next step |
|---|---|---|
SSH Permission denied or connection failure | VPS IP, SSH username and port | Follow the SSH error guide. Reinstalling cPanel does not fix SSH authentication. |
| Unsupported operating system | /etc/os-release, architecture and current cPanel support | Use a supported clean OS; do not bypass the installer's OS check. |
| SELinux warning | getenforce and /etc/selinux/config | Check the persistent setting and the result after reboot. |
| Download or DNS failure | Hostname, resolver, clock and outbound connectivity | Fix the connection without disabling TLS or signature checks. |
| Insufficient memory or disk | free -m, df -h, df -i | Increase resources. Do not delete arbitrary system files. Swap is not a substitute for physical RAM. |
| Invalid license or license-file error | Public IP, license status, clock and vendor connectivity | Verify the license. /usr/local/cpanel/cpkeyclt can refresh an existing license; it does not buy one. |
| Port 2087 does not open | WHM service and both server/provider firewalls | Permit the required management port according to your access policy, rather than opening all ports. |
| WHM works but cPanel login fails | 2087 versus 2083, account creation and account password | Use the correct hosting account and port. |
| HTTPS certificate warning | Hostname match, A record and service certificate | Complete correct DNS and a trusted service certificate. |
Firewall: Evaluate your actual SSH port, TCP 2087 for WHM and TCP 2083 for cPanel. Web services need TCP 80/443. DNS, mail and FTP need additional ports only when those services are in use. Exposing local MySQL to the internet is not part of basic setup. Review cPanel's official license connectivity and callback requirements, and verify firewall rules again after installation.
Next steps
- WordPress installation, when cPanel and Softaculous are available.
- Server backup planning for files, databases and recovery.
- Resource checks for RAM, disk and CPU usage.
- Preparing a support request with the error time and masked logs.
For an installed cPanel server, use WHM's Upgrade to Latest Version and Update Preferences. Do not independently replace panel-managed Apache, PHP or MySQL packages from other repositories. Operating-system package updates and panel-version updates are different operations.
Official references
Requirements checked on 15 October 2026. Recheck current vendor support before installation.