cPanel and WHM security settings: 2FA, cPHulk and ModSecurity
This guide separates your cPanel account from server-wide WHM security settings. Shared hosting customers manage the options available to their own cPanel account. VPS/VDS administrators with WHM access also manage settings that affect other accounts on the server.
1. Which settings can you manage?
| Task | Hosting customer | WHM administrator |
|---|---|---|
| DCHost customer portal two-factor authentication | Own customer portal account | Customer account separate from WHM |
| cPanel account two-factor authentication | Own cPanel account, when available | Enables the server policy and feature availability first |
| Security Advisor | No access to the server report | Reviews server configuration findings |
| cPHulk | Contacts support with the time and source IP if locked out | Manages login protection, exceptions and lock history |
| ModSecurity | Views the domain setting when available | Manages the module, rule sets, updates and events |
| SSH password policy | Cannot change the server-wide setting | Affects SSH users, including root |
Enabling 2FA in the DCHost customer portal does not automatically configure it for cPanel or WHM. For the portal, use the customer account security guide. To reach cPanel, start with hosting management.
2. Read the Security Advisor report
In WHM, open Security Center → Security Advisor. The configuration check starts when the page opens. Wait for it to finish. Opening a recommendation and applying its suggested change are separate actions.
The completed example report uses Important, Information and Verified headings. The SSH and Apache findings are baseline conditions; the screenshot does not claim that every recommendation has been applied.
Read each finding together with the service it affects after the check finishes.
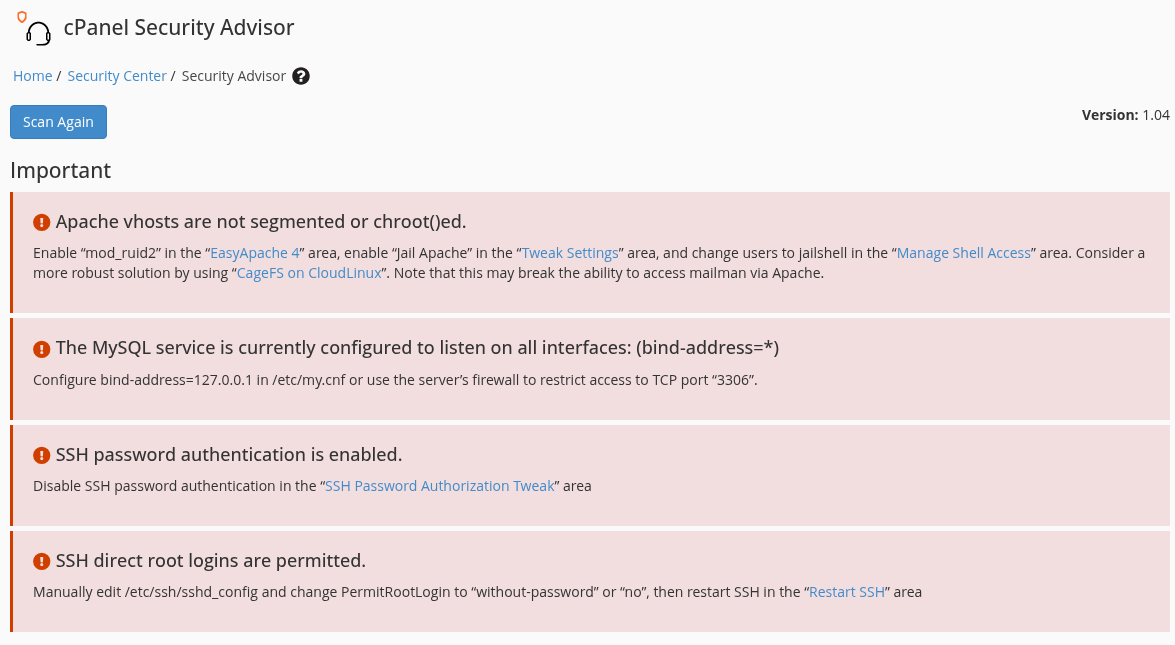
Step 1: Confirm the check has finished
- Confirm the check has finished
Scan Again repeats the completed check. Use it after an appropriate correction.
- Evaluate network access separately
The MySQL bind-address finding concerns the listening configuration. Check actual firewall access to TCP 3306 separately.
- Prepare access before SSH changes
Do not apply password or direct-root login changes without tested key and recovery access.
This shows actual baseline findings. Recommendations are not automatically applied on this screen.
| Color and status | How to interpret it |
|---|---|
| Red — Important / Warning | A serious finding to investigate first. Read the affected service and suggested setting. |
| Yellow — Possible Issue | Check whether the potential problem applies to your installation. |
| Blue — Information | Additional information or an option to improve security. |
| Green — Verified / Resolved | A positive result for the condition checked; not proof that the entire server is secure. |
For each finding, establish which service will be affected, the scope of the change and the recovery path. After an appropriate correction, use Scan Again to repeat the check. This report does not replace application code review, update tracking or backup testing.
A green result describes only the stated check.
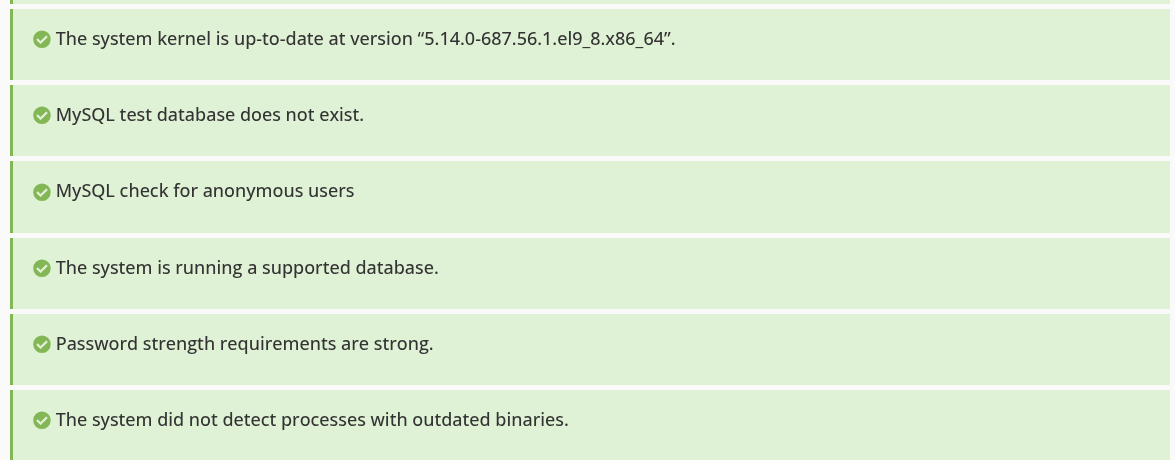
Step 1: Understand version checks
- Understand version checks
The example reports an up-to-date kernel. This does not inspect every application, theme or plugin.
- Read each positive result separately
Database and password conditions have separate rows. Green rows are not a server-wide security guarantee.
An actual crop from the completed report’s Verified section.
MySQL listening on all interfaces and TCP 3306 being reachable from the internet are different findings; verify network access rules separately. Prepare key and recovery access before acting on SSH findings. CageFS, mentioned in the report, is a CloudLinux feature; do not assume it is available in an AlmaLinux installation. Paid-product suggestions in Information are not automatically mandatory corrections.
3. Review cPHulk login protection
Open Security Center → cPHulk Brute Force Protection. cPHulk monitors repeated login attempts that may be guessing passwords. It is a separate layer from ModSecurity's web request inspection and the firewall's network access rules.
This demo shows cPHulk is Enabled. The account-based and IP-based scopes are reviewed separately below.
The overall switch and account-based settings are separate.
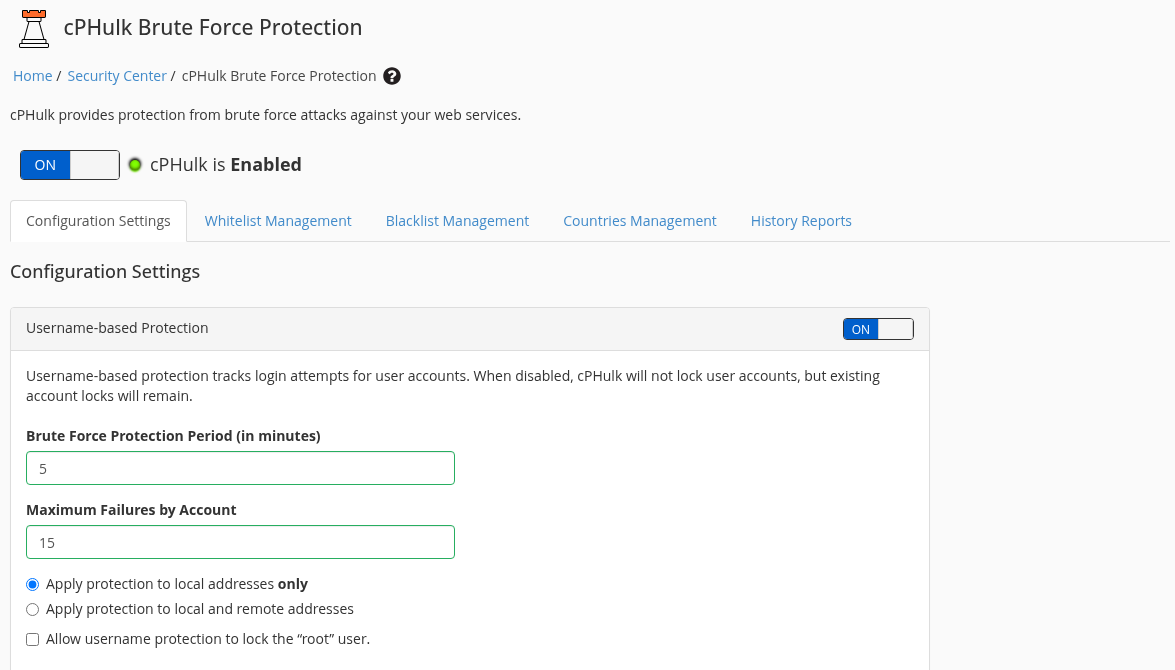
Step 1: Check overall status
- Check overall status
This demo shows cPHulk is Enabled. Review the scope and thresholds below separately.
- Read the interval and count together
Brute Force Protection Period and Maximum Failures by Account work together; the displayed values are not universal recommendations.
- Notice the root-account scope
Allow username protection to lock the root user is a separate option. Verify recovery before changing administrator access.
No thresholds or access settings were changed while capturing this screen.
Configuration Settings contains two different scopes:
- Username-based Protection: evaluates attempts against the same account, including attempts from different addresses.
- IP Address-based Protection: evaluates attempts from the same source IP. It can also affect legitimate users sharing an office or VPN exit address.
Consider legitimate users who share the same source address.
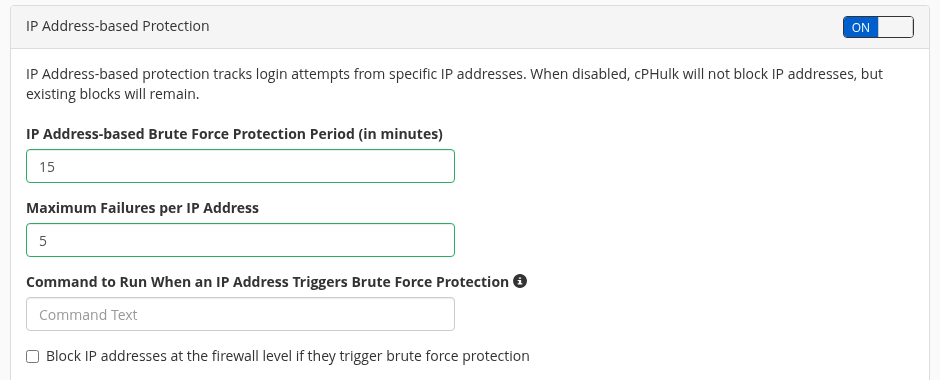
Step 1: Read the IP-based scope
- Read the IP-based scope
IP Address-based Protection monitors logins from a source address. It is enabled here.
- Review the firewall option separately
Automatic firewall-level blocking is a separate setting. Review it alongside the existing network access plan.
Do not add arbitrary scripts to the command execution fields.
The displayed intervals and attempt counts are not a universal security recipe. Consider administrator access, customer login patterns and actual logs before choosing thresholds. Do not set a value to 0 merely to appear stricter; in some fields this can lock all password logins, including root.
Preserve administrator access
Use Whitelist Management only for trusted administration sources. Do not whitelist broad networks or entire countries for convenience. A whitelist entry does not provide a user's password or modify the network firewall rule.
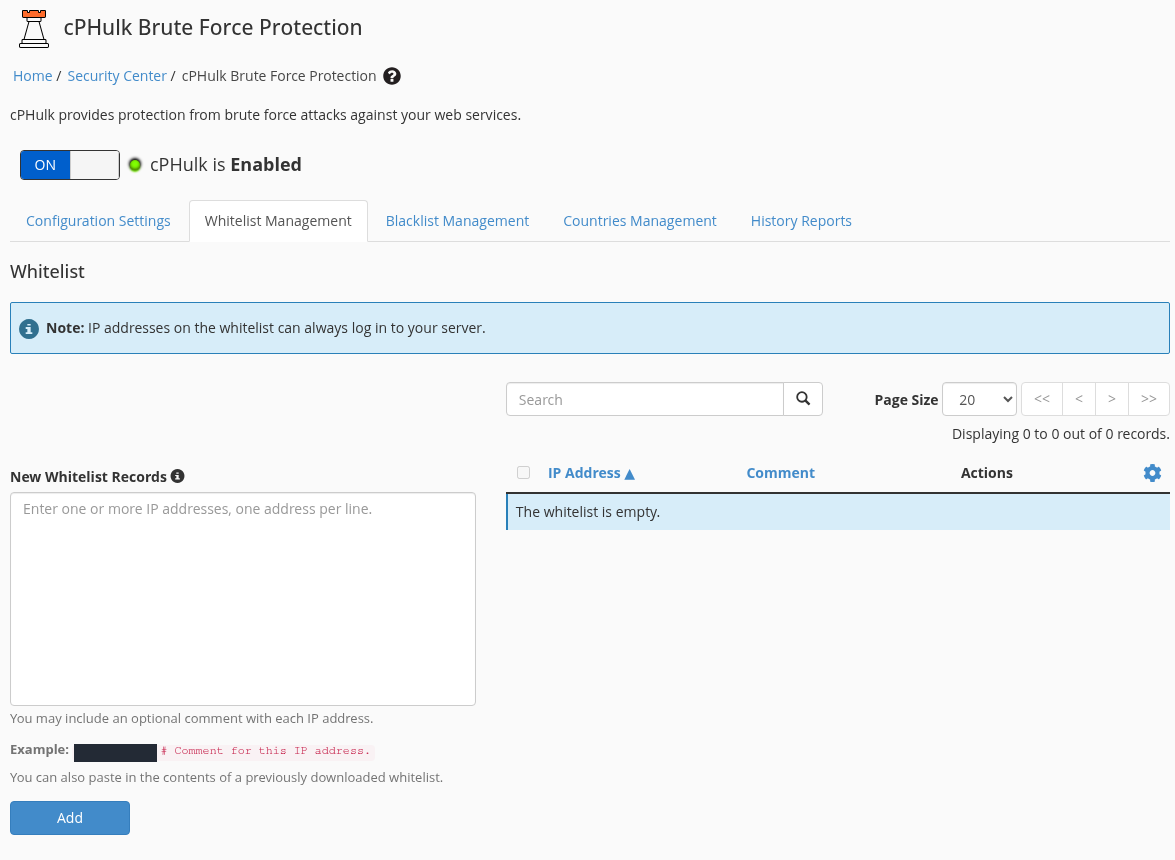
The initial review showed The whitelist is empty. Do not assume the trusted administration source has already been added.
The list should cover only trusted source addresses.
Step 1: Check existing entries
- Check existing entries
This baseline shows The whitelist is empty. Do not assume your source address is already listed.
- Plan narrowly scoped entries
New Whitelist Records is for trusted administration sources. Do not add the whole internet or unnecessarily broad networks.
This screen was inspected only; no entries were added or removed.
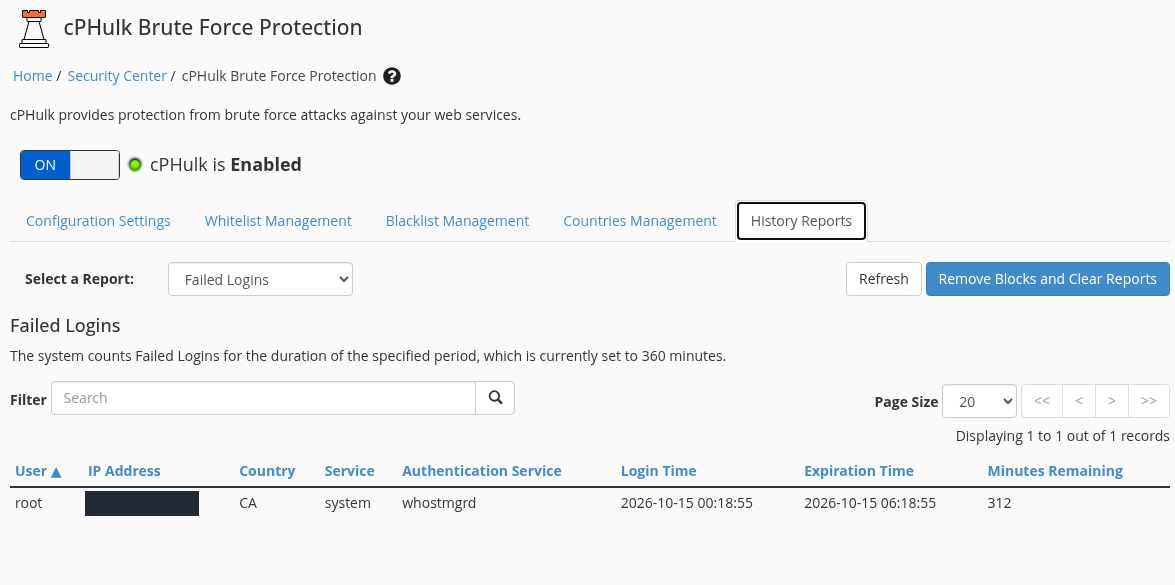
A failed-login entry and an active block are different states.
Step 1: Select the report type
- Select the report type
Failed Logins, Blocked Users and Blocked IP Addresses answer different questions.
- Correlate the row’s details
Match the account, service and time to the real action. One entry alone is not proof of an attack.
- Do not clear history before reviewing it
Remove Blocks and Clear Reports changes blocks and reports; it is not a read-only view.
The source IP is masked. No deliberate failed-login or lockout test was performed.
In History Reports, read the time, account, service, source address and any lock expiry together. A mistyped password can create an entry; not every row is an attack. Do not remove blocks and erase the evidence with Remove Blocks and Clear Reports before understanding the problem. Disabling protection may not automatically clear existing account locks.
If you are a customer who cannot log in, avoid repeatedly trying passwords. Include the service, time and displayed message in a support request. Do not send your password.
4. Separate the ModSecurity module from its rule set
ModSecurity inspects web requests against rules. Seeing a “ModSecurity” heading does not by itself prove that maintained rules are installed and enabled for the relevant domain.
Open Security Center → ModSecurity Vendors. This interface requires the ModSecurity Apache module. If the page reports that the module is missing, verify its package state under Software → EasyApache 4.
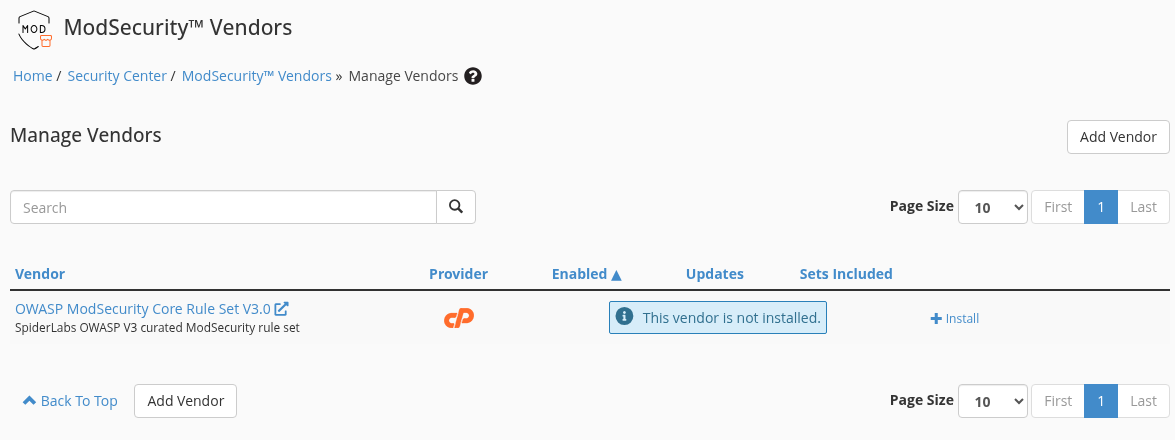
At the baseline check, Apache's mod_security2 module was installed, but the legacy OWASP row in Vendors said This vendor is not installed. The actual screen below illustrates the difference.
A rule set can appear in the list without being installed.
Step 1: Read the installation status
- Read the installation status
This baseline explicitly says This vendor is not installed.
- Identify the legacy OWASP entry
The V3.0 row is the legacy vendor path. Use the guide’s EasyApache 4 instructions for the maintained package.
The legacy Install button was not used. The maintained package path was checked against the official source.
Check these four points separately:
- Is the ModSecurity module installed on this web server?
- Is the intended rule set installed and enabled?
- Is the rule set's update mechanism working?
- Is the domain scope correct?
Do not confuse the old OWASP V3.0 entry with the maintained package. cPanel's official documentation states that the old OWASP ModSecurity Core Rule Set V3.0 entry in Vendors no longer receives updates. The maintained package is available through EasyApache 4 → Additional Packages → ea-modsec2-rules-owasp-crs. Package changes and rule deployment can restart Apache; account for running sites and recovery before applying them.
Install the maintained rule package and verify the result
This section requires the WHM account that administers the server. Record the working configuration and choose an appropriate maintenance window because Apache may restart.
- Open Software → EasyApache 4, then choose Currently Installed Packages → Customize to edit the existing profile.
- Find
ea-modsec2-rules-owasp-crsunder Additional Packages. Ifmod_security2is already installed, there is no need to switch to a different ModSecurity version. - Continue to Review. Read the packages to install, upgrade and remove; stop and investigate any unexpected removal or PHP change.
- Start Provision only for the reviewed change and wait for completion.
- Return to ModSecurity Vendors. Check Enabled, Updates and Sets Included for the package-provided vendor.
- Check rules in ModSecurity Tools → Rules List, the ModSecurity Configuration → Rules Engine mode, and normal operations on your websites again.
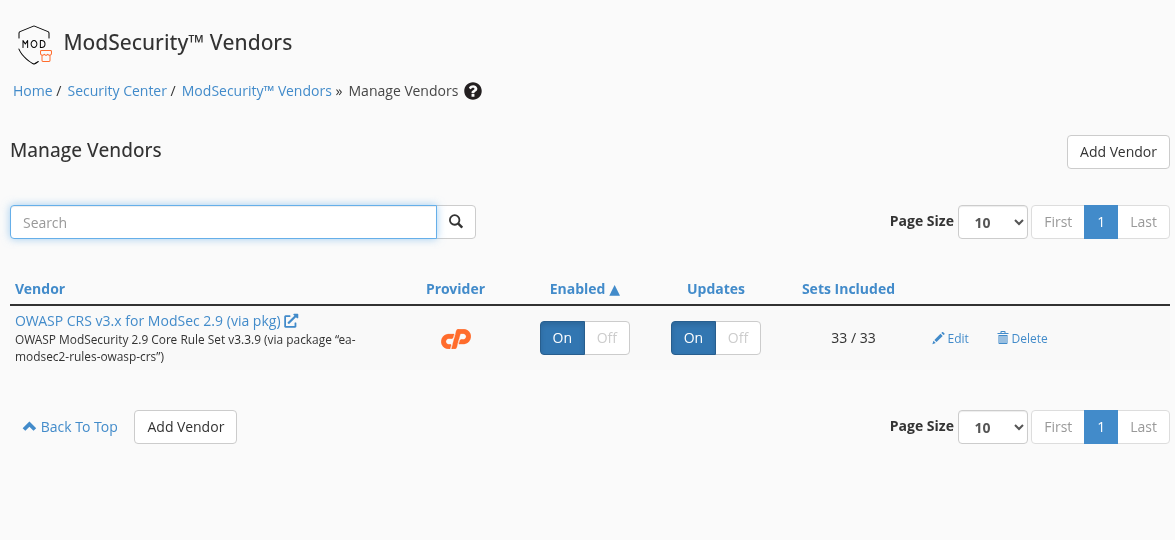
After installation, check both the enable and update switches.
Step 1: Identify the package path
- Identify the package path
OWASP CRS v3.x for ModSec 2.9 (via pkg) is provided through EasyApache 4. It differs from the old V3.0 Install entry.
- Read enable and update states separately
Enabled and Updates are On, with 33 / 33 Sets Included. Do not infer the package version from the description alone.
The vendor description displays v3.3.9, while the installed package and rule content were verified as 3.3.10. Screenshot text was not altered.
After this example installation, the package-provided OWASP vendor showed Enabled: On, Updates: On and Sets Included: 33 / 33. The vendor description displayed v3.3.9, while the installed package and rule content were verified as 3.3.10; do not determine the version from the description alone.
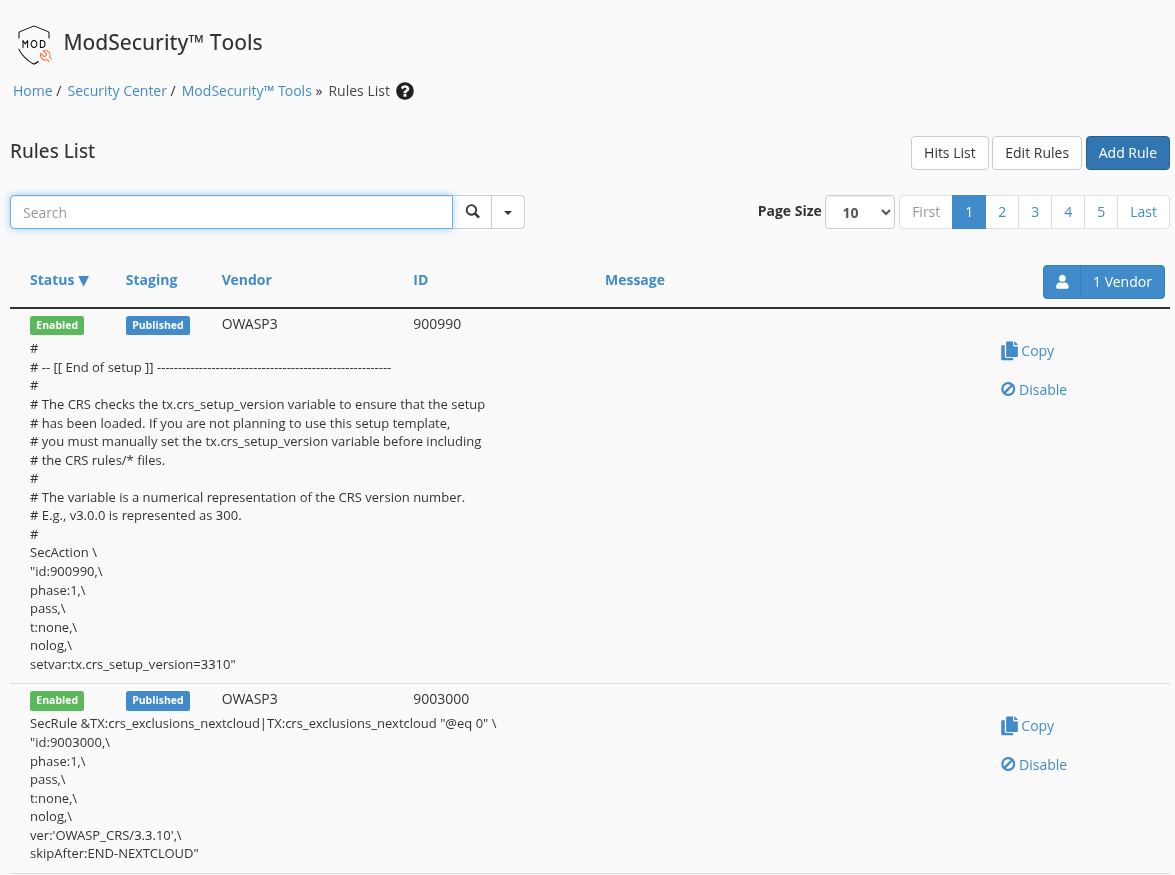
After package installation, the rule list differs from the empty baseline.
Step 1: Read status and scope together
- Read status and scope together
Rules show Enabled and Published. The 1 Vendor badge counts vendors in the list.
- Compare the version in rule content
Rule content shows OWASP_CRS/3.3.10. If the vendor description differs, verify the package and rule versions separately.
No rules were edited or disabled and no attack traffic was generated for this check.
The final Rules List was no longer empty: it showed 1 Vendor and Enabled / Published rules. Rules Engine remained set to Process the rules. The example site's PHP and database-read check returned HTTP 200. This used the server IP with the correct domain Host header; that result does not verify public DNS or an HTTPS certificate for the domain.
Investigate a rule that interferes with a site action
In Security Center → ModSecurity Tools → Hits List, correlate the action's time, domain, request path and Rule ID. The list may show only the most relevant event for a request; inspect the underlying log when necessary.
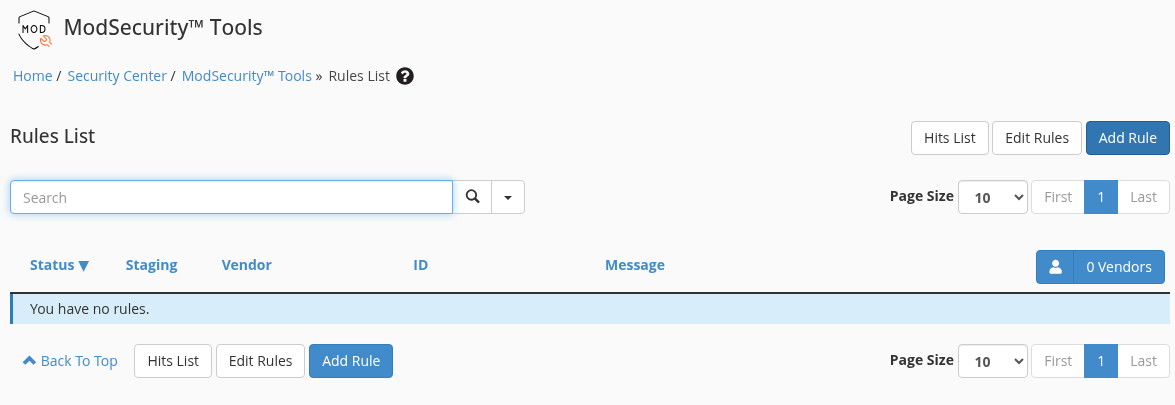
The initial review showed Rules List → You have no rules / 0 Vendors and Hits List → The Hits List is empty. At the same time, Rules Engine → Process the rules was selected. This illustrates why the engine mode and rule-set availability are separate checks.
An installed module does not prove that rules are present.
Step 1: Read the actual result
- Read the actual result
This baseline says You have no rules; it does not establish completed protection.
- Check the vendor count
0 Vendors indicates no vendor rule sets in this list at that time.
This state was captured before the subsequent package installation.
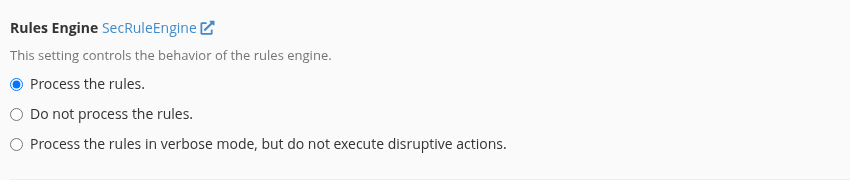
Rule processing and detection-only mode are different.
Step 1: Verify the selected mode
- Verify the selected mode
Process the rules is selected here. The baseline still had no rule set, so the conditions must be checked separately.
- Understand detection-only behavior
The lower option evaluates rules without applying disruptive actions such as blocking.
No global directive was changed. The screenshot is cropped to Rules Engine.
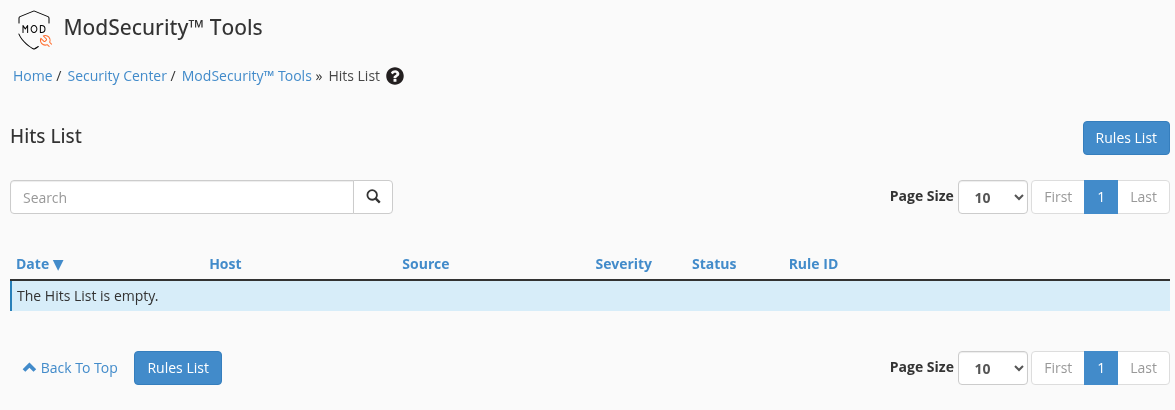
Match the real request by time and rule identifier.
Step 1: Identify the event columns
- Identify the event columns
Date, Host, Source, Status and Rule ID are used together for diagnosis.
- Interpret an empty list correctly
The Hits List is empty means no events appear in this view; it is not a protection guarantee.
No attack traffic was generated or vendor report sent for this capture.
An empty list does not establish that every attack was blocked or that protection is active. If a form fails, match the relevant event to the real request before changing protection. An administrator should evaluate any narrowly scoped exception. Actions such as Deploy and Restart Apache apply changes; they are not read-only views.
5. Configure two-factor authentication for the right account
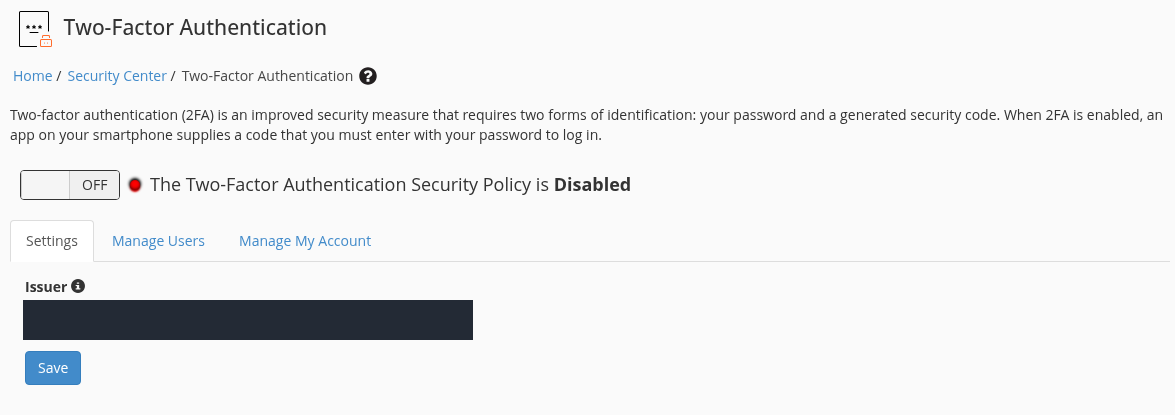
In WHM, open Security Center → Two-Factor Authentication. Enabling the server policy allows users to configure 2FA for their own accounts. It does not automatically finish every user's setup.
The example server's baseline state is Security Policy is Disabled. If the feature is unavailable in a customer's cPanel, the provider must first review the server policy and feature permissions.
The WHM policy is the first layer that allows users to configure 2FA.
Step 1: Read the server policy
- Read the server policy
This baseline says Security Policy is Disabled. Turning it on does not configure every account.
- Understand the Issuer field
Issuer sets the name shown by the authenticator app; it is not a password or security key.
The hostname-based issuer value is masked. The policy was not changed during this capture.
- Settings: manages the service name displayed in the authenticator application. A name change alone does not protect an account.
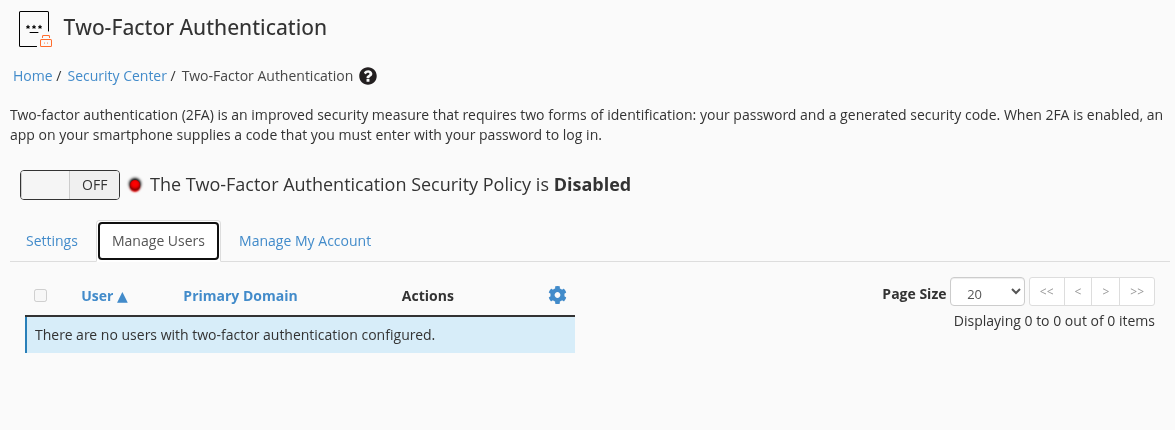
- Manage Users: manages users with configured 2FA. It cannot perform the first setup on behalf of another cPanel user.
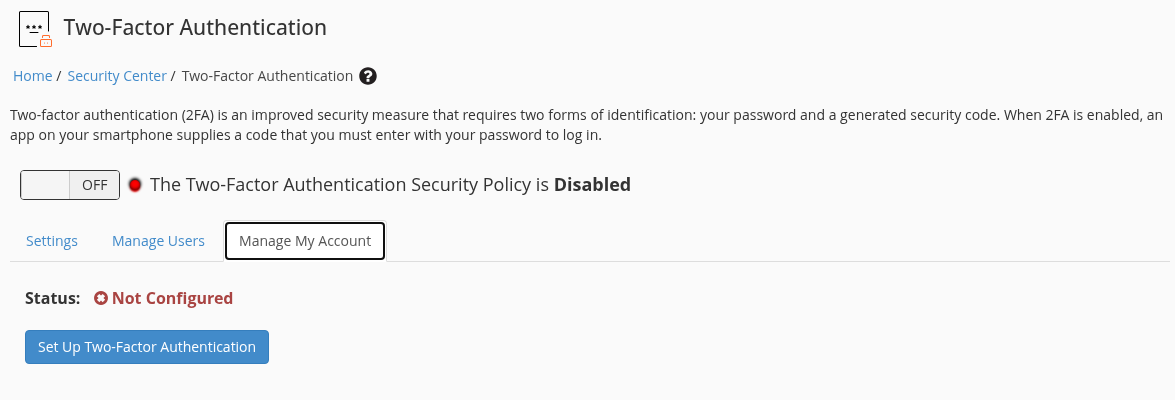
- Manage My Account: configures the root or authorized reseller account in the current WHM session. It is separate from a customer's cPanel account.
A cPanel user opens Security → Two-Factor Authentication in their own panel. The flow is Set Up Two-Factor Authentication, adding the QR/Key to an authenticator app, entering its six-digit code in Security Code, and selecting Configure Two-Factor Authentication. QR codes, keys and live codes are account access information; do not include them in public screenshots or support messages.
In the example, Manage Users is empty and the current WHM account is Not Configured. These screens do not establish completed enrollment or a tested 2FA-protected login.
Manage Users does not replace the user’s own setup.
Step 1: Check the selected tab
- Check the selected tab
Manage Users is the user list; Manage My Account belongs to the current WHM account.
- Read the list result
No users have two-factor authentication configured in this baseline.
This table cannot perform the initial 2FA setup for another cPanel user.
This section manages the account in the current WHM session.
Step 1: Know which account would change
- Know which account would change
In a root WHM session, this tab belongs to root. It is not the customer’s cPanel account.
- Recognize an unconfigured account
Not Configured means setup is not complete for this account. QR/Key values belong only in that account’s secure setup.
Root setup was not started; no QR code or authentication key was generated.
After setup, test a new session with the password and authentication code. Coordinate the timing when others are working in the same account because existing sessions can be affected. If access to the authenticator is lost, start the account recovery process through support.
Review the API scope separately. Do not assume that 2FA on the panel login automatically protects every API request. Configure Security Policies → Security Policy Extensions → API requests and API token permissions are managed separately.
6. Test SSH keys before disabling password access
Security Center → SSH Password Authorization Tweak enables or disables password authentication for SSH on the server. It affects root as well. It does not change the web password of your cPanel account.
The actual baseline screen shows Password Authentication is currently enabled and the Disable Password Auth button. The setting was not changed here.
This change affects SSH users on the server, including root.

Step 1: Check current status
- Check current status
This demo says Password Authentication is currently enabled.
- Test the key before using the button
Disable Password Auth changes a setting. First verify key login in a new SSH session and confirm recovery access.
The password policy was not changed here; the button is shown only.
Before planning to disable SSH password authentication:
- Prepare and authorize an SSH key for the correct account.
- Keep the existing session open and complete a real key-based login in a new, independent SSH connection.
- Verify console/recovery access and the key readiness of other affected users.
- Only then apply Disable Password Auth as a planned change; test the result with another connection.
A key file appearing in a list does not prove that key-based login works. For a connection problem, follow the SSH error guide rather than disabling the firewall or guessing at SSH configuration changes.
When should you contact support?
A missing administrator menu in your cPanel account can be the normal permission boundary. You do not need the root password to find a customer feature. Include the service, action, time and error message in the request. For a WAF issue, the URL path and any Rule ID help; for a login issue, the source IP and time help. Do not send passwords, QR codes, API tokens or SSH private keys.
Plan security settings together with update tracking and restorable backups. Do not run the Ubuntu/Debian commands in the Linux updates guide on an AlmaLinux server.
Official sources
Sources were checked on 15 October 2026. Menu labels can vary by version and permissions.