Linux disk full: how to fix No space left on device
“No space left on device” means the operation could not obtain the space or filesystem resources it needed at its destination. Running out of GB is one possibility. A large number of small files can also exhaust inodes, the records used to describe files. First, identify the affected filesystem and check space and inode usage separately.
This guide covers diagnosing a full Linux VPS or VDS disk, freeing space from an appropriate source, and verifying the result. Deleting database files, reinstalling the server, or formatting a disk is not a first recovery step.
Required access: An SSH connection to the server and sudo privileges where needed. Every command below runs on that server. If you are logged in as root, you do not need the sudo prefix. A shared hosting account has a different scope; check cPanel resource usage instead of applying server-wide commands.
The screenshots come from a real demo VPS running Ubuntu 24.04 LTS. Failures were created on small test filesystems prepared solely for this guide, separate from the main system filesystem. You do not need to fill your own disk or create a test filesystem. Paths beginning with /mnt/dchost-disk-demo- belong to the example; use the location your application writes to. Server-specific information is hidden.
1. Identify the affected filesystem
Record the failing operation, file path, time, and recent changes. Backups, uploads, and database operations may write to different locations. Free space on / does not establish that a separately mounted /var or /backup filesystem also has space.
Choose the existing directory where the operation fails. Replace /var below with your own path. If the new file does not exist yet, use its nearest existing parent directory:
CHECK_PATH=/var
date -Is
findmnt --target "$CHECK_PATH" --output SOURCE,FSTYPE,TARGET
df -hT -- "$CHECK_PATH"
df -i -- "$CHECK_PATH"
Run the commands in order. If a command returns No such file or directory, correct the path before interpreting the following results. These commands do not delete files.
| Output field | How to read it |
|---|---|
TARGET / Mounted on | The filesystem containing the selected directory. Keep subsequent checks on the same filesystem. |
Avail and Use% | Available space and space usage. If Avail is zero, applications may have no space available for writes. |
IFree and IUse% | Free inode count and inode usage. Creating files or directories requires records as well as space. |
FSTYPE / Type | Filesystem type. The screenshots use ext4. |
Find the disk containing the affected directory, then check space and inode usage separately.
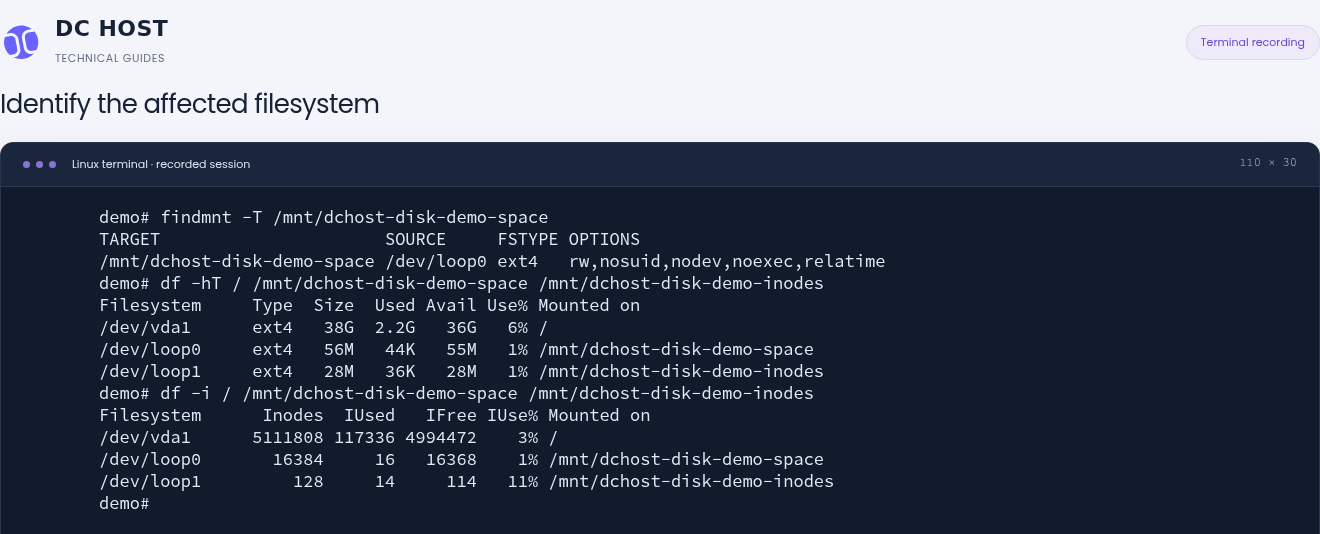
Step 1: Use%: disk space
- Use%: disk space
In df -hT, Size is total space, Avail is available space and Use% is the percentage used. Use Mounted on to choose the affected mount point.
- IUse%: inode usage
IUse% in df -i shows how many file and directory records are used. Even with free disk space, new files may fail when IFree reaches zero.
In this healthy baseline, the root disk uses 6% of its space and 3% of its inodes. /dev/loop0 and /dev/loop1 are small filesystems created only for this guide; the root disk was not filled. The image is cropped from the relevant part of the actual terminal recording.
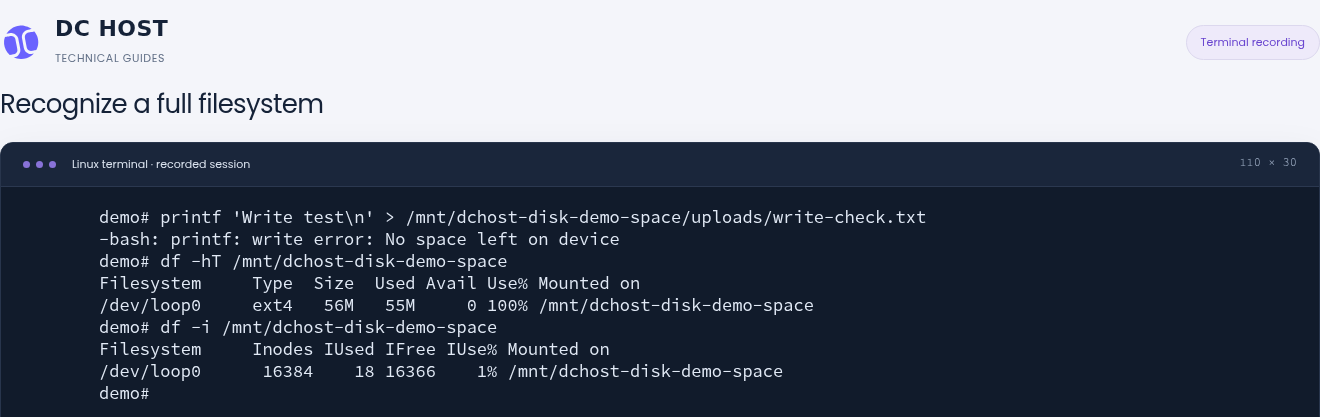
Read the error, then compare df -hT and df -i for the same filesystem.
Step 1: Recognize the error
- Recognize the error
No space left on device means the write did not complete. The message alone does not distinguish exhausted space from exhausted inodes.
- Read Avail and Use%
Avail is 0 and Use% is 100%. The df -i output below still has free inodes, so investigate which files occupy the disk space.
Only the small test filesystem was filled in this controlled demo. Inode usage is 1%, while space usage is 100% and Avail is 0, identifying a disk-space shortage in this example.
In the real example, only the separate test filesystem was filled. It showed 56M capacity, 55M used, zero available space, and 100% usage. Inode usage was 18 of 16384, displayed as 1%. The attempt to write a new file failed with “No space left on device” and an unsuccessful exit status. This demonstrates the difference between space and inode exhaustion without filling the main system filesystem.
| Findings | Next step |
|---|---|
| Space is full, inodes remain available | Find large directories. |
GB remain available, but IFree is zero or IUse% is 100% | Investigate many small files. |
df reports high usage but du reports much less | Check deleted open files and the scope of the measurements. |
| Space and inodes are available, but one user cannot write | Check account/project quotas, filesystem type, and the exact error. Disk quota exceeded, Permission denied, and Read-only file system are different problems. |
Some filesystems do not expose a meaningful fixed inode capacity through df -i; - or zero alone does not mean inode exhaustion. tmpfs is a separate memory-backed filesystem; deleting files from the main disk may not resolve its limit. Containers, network storage, and other storage layers may have additional limits that need separate checks.
2. Find the directory using the most space
Use the TARGET from the previous step. If it is /, start with the command below. If it is a different mount point, replace / with that value:
sudo du -x -h --max-depth=1 -- / | sort -h
du adds up the space used by the files and directories it can read. -x prevents traversal into a different filesystem. --max-depth=1 limits the displayed summary to one directory level. Look for large directories near the end of the output; do not count the total line as another file.
For example, if /var is the largest directory, inspect the next level:
sudo du -x -h --max-depth=1 -- /var | sort -h
Continue into /var/log, /var/cache, or your application's data directory according to the results. A large directory is not necessarily disposable. Do not hide access or read errors: unreadable directories make the total incomplete. Scanning a server with many files can take time and create disk read load, so avoid repeatedly scanning everything.
Compare directories with du, then inspect the candidate file before deciding what to do.

Step 1: Locate the directory using the space
- Locate the directory using the space
Here, the cache directory accounts for most of the usage at 55M. du -x keeps the scan within the same filesystem.
- Confirm the file size
ls -lh shows that the selected disposable-demo.bin file is 55M. Its size alone does not prove it is safe to delete.
This file was created only for the guide and is known to be disposable. On a real server, confirm a large file’s purpose, owner and backup before deleting it. Only the relevant terminal section is cropped from the recording.
In the demo, du showed approximately 55M in the test filesystem’s cache directory. This came from disposable-demo.bin, a file created solely for the guide. A directory named cache or a file ending in .bin is not automatically safe to delete; the purpose and contents of this particular file were known in advance.
Why do df and du disagree?
df reports overall filesystem usage; du reports the files it traverses. Confirm you are comparing the same scope and filesystem. Deleted open files, filesystem metadata, inaccessible directories, and files hidden beneath another mount point can account for differences.
ls -lh reports a file's apparent length. For sparse files, this can be much larger than the space actually allocated on disk. Use du -h -- /full/path/to/file to examine allocated usage. Do not unmount active filesystems simply to make two totals match.
How was space recovered in the demo?
Check the safe cleanup conditions before removing anything. The following operation targeted only one known disposable file created for this exercise.
Only the identified demo file was removed, then a new write was attempted in the same directory.

Step 1: Read the saved content back
- Read the saved content back
cat can read the file created by printf and displays Write test passed. This verifies that writing and reading work again in this directory.
- Confirm free space has returned
The same filesystem now shows Avail 55M and Use% 1%. Finally, retry the operation that failed in your actual application.
The delete command targets one previously identified demo file only. Write test passed is read back from the saved file with cat; it does not replace checking the health of your application. Only the relevant terminal section is cropped from the recording.
In the illustrated example, we removed only the previously created cache/disposable-demo.bin demo file. The next write succeeded, and reading the file displayed Write test passed. Usage on the same test filesystem fell from 100% to 1%. This was not cleanup of a real customer backup or an expired application cache; the removed file belonged solely to the controlled example. Choose an APT, DNF, or journal method from the safe cleanup section according to the cause identified on your server.
A write error, file investigation and successful retry on an isolated test filesystem, without filling the root disk. Playback is 1× with idle gaps preserved.
Written walkthrough of the recording
- A write is attempted in the separate test filesystem; the terminal reports “No space left on device.”
df -hTshows 100% space usage, whiledf -iconfirms that inodes remain available.duidentifies approximately 55M incache.ls -lhis used to inspectdisposable-demo.bin, created solely for this exercise.- Only that known disposable demo file is removed.
- The write is retried in the same location, and
catreads backWrite test passed. The finaldfcheck shows 1% usage.
3. Free GB remain, but the inode count is exhausted
An inode stores information such as a file's owner and permissions. Large numbers of small cache files, session files, or queue records can prevent new files from being created even when their combined size is modest.
Check inode usage by directory at the affected filesystem's mount point. Replace / with your own TARGET:
sudo du --inodes -x --max-depth=1 -- / | sort -n
Repeat the command inside the directory with the highest count. If the result points to /var, for example:
sudo du --inodes -x --max-depth=1 -- /var | sort -n
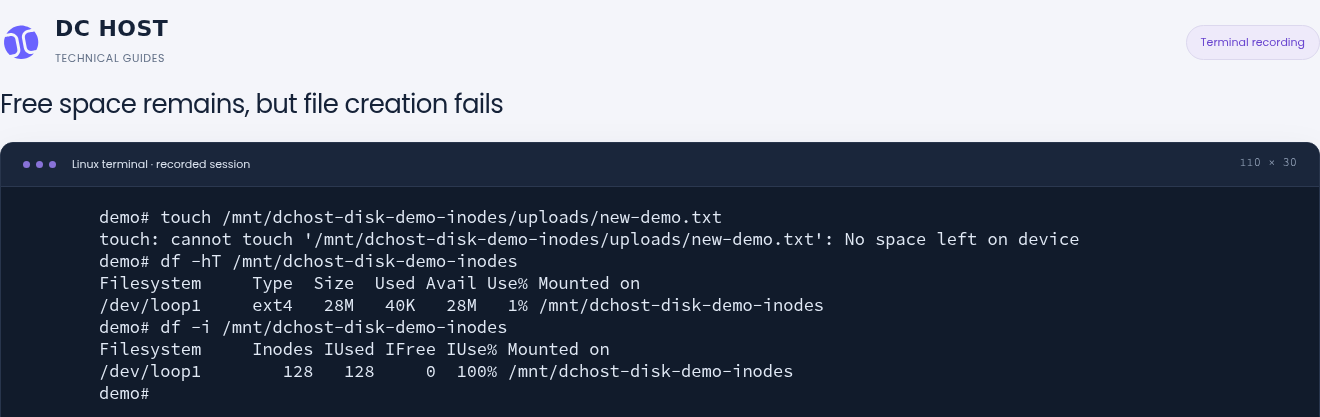
The same No space left on device message appears even though disk space is available.
Step 1: Confirm that space remains
- Confirm that space remains
df -hT shows Avail 28M and Use% 1%. Do not conclude that the filesystem is healthy from this table alone.
- IFree is zero: no inodes remain
df -i shows all 128 records in use, IFree 0 and IUse% 100%. Identify the application that owns the many small files, then establish which files are safe to remove.
Space usage is only 1% in this controlled test. File creation fails because all 128 inodes of the small test filesystem are used. The root disk was not filled.
The actual inode test filesystem had 28M capacity with only about 40K used. Available space was 28M, and space usage was 1%. However, all 128 inodes were allocated: IUse% was 100%. Creating a new file failed with “No space left on device.”
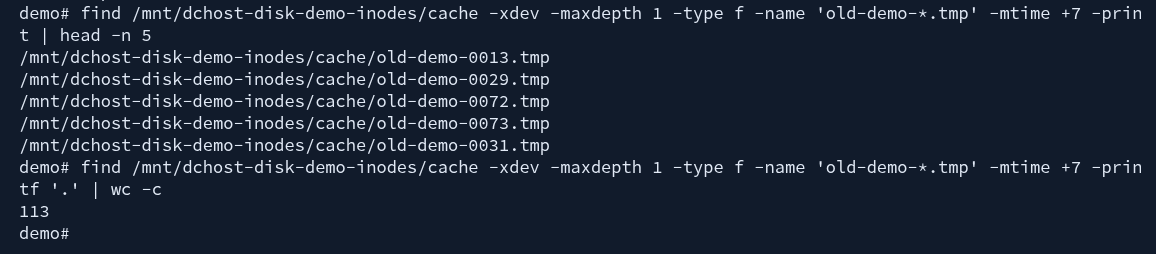
For the demo, 113 old-demo-*.tmp files were created solely for this guide and their modification times were set to eight days earlier. This does not mean a real application had marked them as expired. The following read-only selection lists matching regular files only at the first level of the test directory:
find /mnt/dchost-disk-demo-inodes/cache -xdev -maxdepth 1 -type f -name 'old-demo-*.tmp' -mtime +7 -print
Inspect sample filenames, then count files matching the same criteria before removing anything.
Step 1: Review sample filenames
- Review sample filenames
The first five matches should be the intended old-demo files. An old-looking filename alone is not a reason to delete a real server file.
- Check the matching file count
There are 113 files matching the same conditions. If the count is unexpectedly high, narrow the selection before any deletion.
The selection is limited to old-demo-*.tmp demo files in the cache directory. -mtime +7 selects files modified at least 8×24 hours ago; demo timestamps were deliberately moved back. This does not prove that real application cache entries have expired. Long commands wrap onto the next line.
In GNU find, -mtime +7 matches a rounded-down age in 24-hour periods greater than 7, meaning a modification time at least 8 × 24 hours earlier. It does not mean “anything unused for seven days.” A file’s age, name, or .tmp extension alone does not make it disposable.
In the actual test, the selection was listed and counted before only those known demo files were removed using the same conditions. The current active-demo.tmp and separate uploads/keep-demo.txt are files intended to be preserved in this example. Do not adapt this selector to an arbitrary directory and run bulk deletion on your own server.
The selected old demo files were removed, then file creation was retried in the same directory.
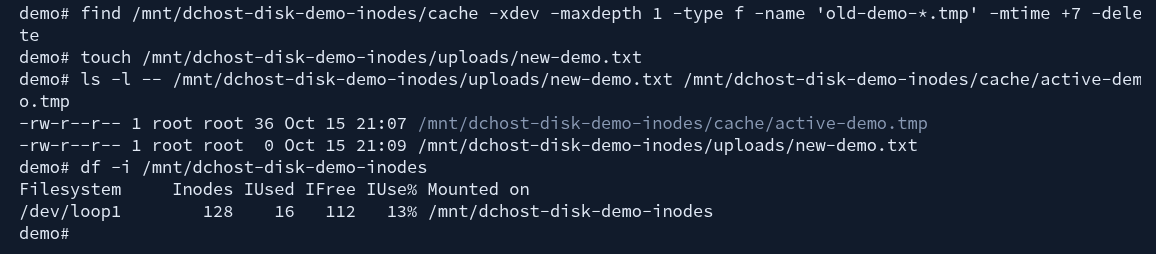
Step 1: Check the preserved file and the new file
- Check the preserved file and the new file
ls still lists active-demo.tmp, alongside the newly created empty new-demo.txt. A zero-byte size is expected for this file created with touch.
- Read IFree and IUse% again
There are now 112 free inodes and usage is 13%. On a real server, also retry the application operation that failed.
Only the 113 previously listed old demo files were removed. The active demo file remains, the new file exists and IFree shows 112. This does not justify deleting application data indiscriminately.
After removing only the 113 selected demo files, the 36-byte active-demo.tmp remained, and new-demo.txt was created successfully. The final inode count was 16 of 128 used (13%), with 112 free. This demonstrates why GB capacity and file record capacity need separate checks.
Identify the application that owns those files. Use its supported expired cache/session cleanup or queue management process. Do not delete a mail queue, sessions, or application data merely because the file count is high: this could remove undelivered mail, active sessions, or pending work.
After cleanup, run the same df -i -- "$CHECK_PATH" command and confirm that IFree has increased. Removing one large file may do little to resolve inode exhaustion. Address the job creating the small files and its retention policy, or the problem can return.
4. A file was deleted, but space did not return
When a program keeps a file open after its name is deleted, it can continue using that file. The file no longer appears in its directory, but its space may remain allocated until the last open reference is closed.
If lsof is already installed, use this read-only command to list such files:
sudo lsof +L1
If the tool is unavailable, do not immediately try installing packages onto a full filesystem. Collect the other measurements first and arrange any required tools as part of controlled maintenance.
A process can keep occupying disk space after a filename has been removed.
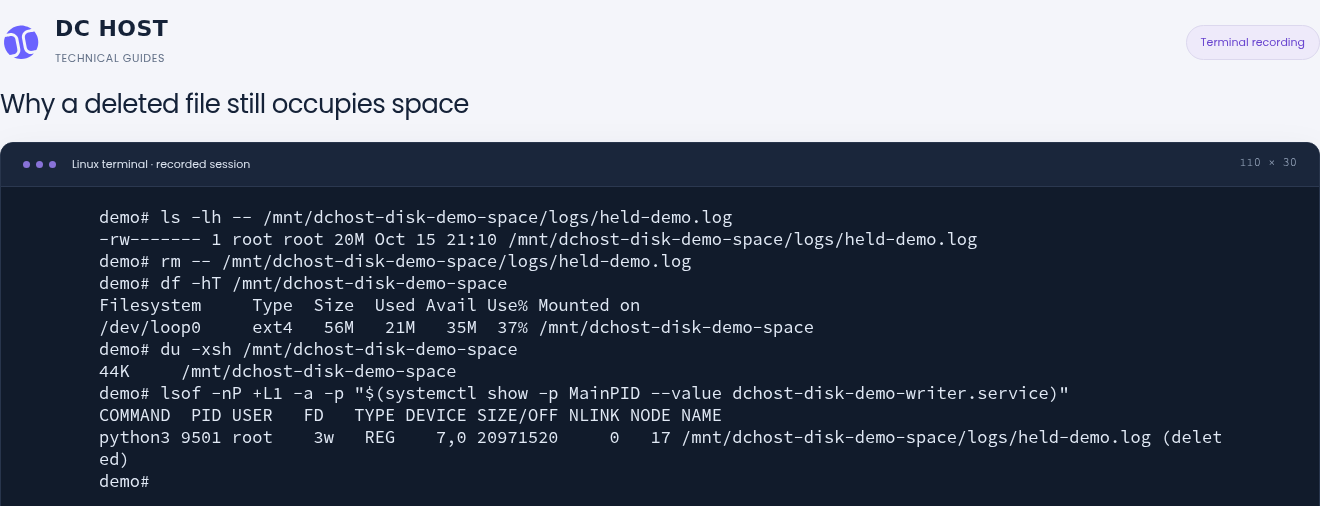
Step 1: df and du measure different things
- df and du measure different things
After deletion, df still reports 21M used, while du totals the visible files at 44K. This difference is a reason to investigate deleted files that remain open.
- Identify the open file and its process
SIZE/OFF is 20,971,520 bytes and NLINK is 0. The demo process still holds the file open; identify the associated service before stopping any process.
In this example, a process created only for the guide holds the file open. lsof shows 20,971,520 bytes with NLINK 0. The deleted label wraps onto the next line; the output has not been altered.
In this demo, a temporary program started solely for the exercise held the 20 MiB held-demo.log file open. After its filename was removed, df still showed approximately 21M used and 37% usage, while du found only 44K on the same test filesystem.
The lsof entry showed SIZE/OFF=20971520, NLINK=0, and (deleted).
| Column | What it tells you |
|---|---|
COMMAND and PID | The program and process ID holding the file open. |
FD | The process's file descriptor; a file can have multiple open references. |
SIZE/OFF | A size or offset, depending on the record. Do not add every row as independent disk usage. |
NLINK / NAME | A zero link count and often a (deleted) marker. Match the entry to the affected filesystem as well. |
- Identify the application or service behind the process.
- For a log file, use the application's supported log reopen or rotation procedure.
reloaddoes not mean the same thing for every service. - If a restart is required, assess its impact and maintenance window; target only the relevant service.
- Confirm that the open-file entry has gone and available space has increased on the same filesystem.
kill -9, rebooting the server, or truncating /proc/.../fd/... is not a general cleanup method. These actions are particularly dangerous for database files. A (deleted) entry is not automatically a problem either: some applications deliberately use temporary files this way.
Only the dedicated test service holding the file open was stopped in this example.

Step 1: Check the service name in the command
- Check the service name in the command
The stopped service is dchost-disk-demo-writer.service, created only for this guide. Do not apply the same command to an unidentified process on your server.
- Confirm that df now reports recovered space
Usage falls to 1% and 55M is available. du remains 44K; the key change is the space released in df when the open file closes.
This is not a restart of a production application. On a real server, follow the service documentation for reopening files or scheduling a restart; do not stop all services.
After stopping only the exercise’s dchost-disk-demo-writer.service, the open file closed. df then showed approximately 48K used, 1% usage, and 55M available, while du remained at 44K. The small difference also illustrates that the two tools do not count exactly the same things. No customer web or database service was stopped. Do not look for the example service name on your own server; identify the application holding your file open.
5. Choose an appropriate cleanup method
First establish which data can be removed. Preserve required records and verify backups on another disk or server. Creating a new ZIP file or backup on the full filesystem can make matters worse. Moving a file to another directory on the same filesystem does not free space.
| Data you found | Suitable approach |
|---|---|
| Downloaded operating system packages | Use the distribution's package cache cleanup command. This does not remove installed software. |
| Old system logs | Confirm retention needs and archives, then use journalctl or the existing logrotate policy. |
| Application cache and session files | Use the application's maintenance method; account for active sessions and queues. |
| Old backup archives | Verify a usable copy elsewhere. Do not remove an individual dependency from a backup chain. |
| Database files, Docker volumes, or customer uploads | Identify ownership and dependencies. Plan maintenance using the relevant software instead of deleting arbitrary files. |
Clean a package cache
Measure it first. On an Ubuntu/Debian server using APT:
sudo du -sh -- /var/cache/apt/archives
If this directory is using significant space, no package installation or update is running, and the downloaded archives are no longer needed:
sudo apt-get clean
This removes downloaded package archives, not installed packages. Reinstallation may require downloading them again. autoremove, upgrade, and dist-upgrade perform different operations; do not run them indiscriminately as disk cleanup.
On DNF-based systems such as AlmaLinux or Rocky Linux, sudo dnf clean packages removes cached packages. Do not run the APT and DNF examples one after the other on the same server; choose the method for your distribution.
Reduce system journal usage
Read the journal's size first:
sudo journalctl --disk-usage
If required event records have been preserved elsewhere and your retention policy allows it, the following example removes archived journal files older than 14 days:
sudo journalctl --vacuum-time=14d
sudo journalctl --disk-usage
This deletes old logs; there is no undo command. 14d is not a universal retention requirement. Vacuum only removes archived journal files, while --disk-usage also includes active files, so the total may remain above zero. It may reclaim nothing if no archive meets the condition. --rotate archives active journals and opens new files; do not treat it as an unconditional fix on a full system either.
For text logs, if logrotate is installed, sudo logrotate --debug /etc/logrotate.conf helps review the plan without changing logs. This is different from --force. Do not delete active logs; reopening them depends on the application. Address repeated growth through the underlying error and retention policy. Journald's SystemMaxUse and SystemKeepFree settings can support capacity planning; they do not clean every file on the server.
Remove one confirmed disposable file
For an independent old archive whose content and path you have verified, and which is not in active use, first check the exact target with ls -lh -- /full/path/to/file. Once any required copy elsewhere has been verified, sudo rm -i -- /full/path/to/file asks about that individual file. Replace the example path. Do not add wildcards (*) or a recursive rm -rf command.
6. Set up disk space alerts
Monitor both space and inode usage before a disk becomes full. An 85% threshold can be a starting point; a small, fast-growing filesystem may need an earlier warning. Include free GB and growth rate in your wider monitoring plan. Cover separate /var, /backup, and application data filesystems as well.
On a server using systemd, the following example checks a selected path every five minutes and writes OK, WARNING, or ERROR to the local system log. It does not send email, SMS, or Telegram messages. For notifications while you are away, forward the events to centralized monitoring or configure alerts in a system that monitors these measurements externally. External monitoring is especially useful if a completely full filesystem can no longer write its own logs.
Create the check script
These steps add one check script and two systemd units. They do not delete data or restart a web/database service. Bash, GNU df, awk, logger, and systemd are required. If a file or unit with the same name already exists, do not overwrite it; coordinate with whoever manages the existing monitoring.
Paste the complete block into the server terminal. The final EOF line ends the file. bash -n normally prints nothing; if it reports an error, correct it before enabling the timer.
Show and copy the check script
sudo tee /usr/local/sbin/dchost-disk-check >/dev/null <<'EOF'
#!/bin/bash
set -eu
export LANG=C LC_ALL=C

check_path=${DCHOST_DISK_CHECK_PATH:-/}
threshold_text=${DCHOST_DISK_THRESHOLD:-85}

report() {
    local priority=$1 message=$2
    printf '%s\n' "$message"
    logger --tag dchost-disk-check --priority "daemon.$priority" -- "$message"
}

if [[ ! $threshold_text =~ ^[0-9]{1,3}$ ]]; then
    report err "ERROR: DCHOST_DISK_THRESHOLD must be an integer from 1 to 100."
    exit 1
fi
threshold=$((10#$threshold_text))
if (( threshold < 1 || threshold > 100 )); then
    report err "ERROR: DCHOST_DISK_THRESHOLD must be an integer from 1 to 100."
    exit 1
fi

if ! disk_values=$(df --output=pcent,ipcent,itotal -- "$check_path"); then
    report err "ERROR: Disk usage could not be read for path=$check_path."
    exit 1
fi
values=$(printf '%s\n' "$disk_values" | awk 'NR == 2 { print $1, $2, $3 }')
read -r blocks_text inodes_text inode_total <<< "$values"
blocks=${blocks_text%%%}
inodes=${inodes_text%%%}

if [[ ! $blocks =~ ^[0-9]+$ ]]; then
    report err "ERROR: Disk usage result is not numeric for path=$check_path."
    exit 1
fi

inode_label=not-reported
inode_warning=0
if [[ $inodes =~ ^[0-9]+$ && $inode_total =~ ^[0-9]+$ ]] && (( inode_total > 0 )); then
    inode_label="$inodes%"
    if (( inodes >= threshold )); then
        inode_warning=1
    fi
elif [[ $inodes != - && $inode_total != 0 ]]; then
    report err "ERROR: Inode usage result is invalid for path=$check_path."
    exit 1
fi

if (( blocks >= threshold || inode_warning == 1 )); then
    report warning "WARNING: path=$check_path space=$blocks% inodes=$inode_label threshold=$threshold%"
else
    report info "OK: path=$check_path space=$blocks% inodes=$inode_label threshold=$threshold%"
fi
EOF
sudo chmod 0755 /usr/local/sbin/dchost-disk-check
sudo bash -n /usr/local/sbin/dchost-disk-check
Set the path and schedule
The example below monitors / with an 85% threshold. For a separate data filesystem, replace the path in DCHOST_DISK_CHECK_PATH=/ with its mount point. This check measures usage of the filesystem containing the selected path; it does not need to be duplicated for every directory on that filesystem. To monitor different filesystems, use separate unit names with the appropriate paths; each timer’s Unit= value must match its service name.
sudo tee /etc/systemd/system/dchost-disk-check.service >/dev/null <<'EOF'
[Unit]
Description=DCHost disk and inode usage check

[Service]
Type=oneshot
Environment="DCHOST_DISK_CHECK_PATH=/"
Environment="DCHOST_DISK_THRESHOLD=85"
ExecStart=/usr/local/sbin/dchost-disk-check
StandardOutput=null
StandardError=journal
EOF
sudo tee /etc/systemd/system/dchost-disk-check.timer >/dev/null <<'EOF'
[Unit]
Description=Check disk and inode usage every five minutes

[Timer]
OnBootSec=2min
OnUnitActiveSec=5min
AccuracySec=30s
Unit=dchost-disk-check.service

[Install]
WantedBy=timers.target
EOF
After both files have been saved, run the commands in order. If one fails, investigate before continuing. The first run should create a log entry, and the timer list should show its next scheduled run:
sudo systemctl daemon-reload
sudo systemctl start dchost-disk-check.service
sudo systemctl enable --now dchost-disk-check.timer
systemctl list-timers dchost-disk-check.timer --all --no-pager
sudo journalctl -t dchost-disk-check -n 10 --no-pager
WARNING means at least one selected threshold was reached; ERROR means a measurement could not be obtained. Do not treat a failed check as 0% usage. If inodes=not-reported appears, the check cannot provide inode alerts for that filesystem. An active timer alone does not prove that the most recent measurement succeeded; read the timestamp and result.
Verify that the scheduled check ran and that disk usage crossed the configured threshold.
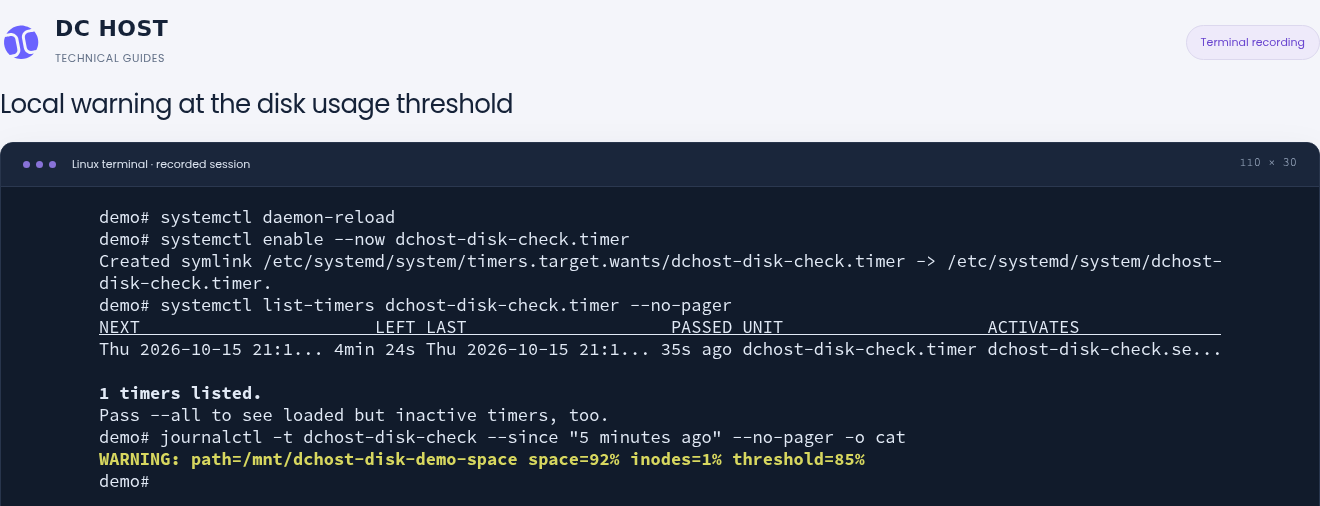
Step 1: Confirm the next scheduled check
- Confirm the next scheduled check
The timer schedules the next run in 4 minutes 24 seconds. LAST/PASSED also show that the previous check took place.
- Compare usage with the threshold
The local record shows space=92% and threshold=85%, producing WARNING. Inode usage is only 1% in this example.
The check was triggered by the actual timer. This setup only writes to the server’s local journal; it does not send email or SMS. The terminal abbreviates long dates and service names with ellipses.
In the real demo, the script, service, and timer files were installed on the server. The separate test filesystem was selected with an 85% threshold. The first automatic run after enable --now logged WARNING, space=92%, inodes=1%, and threshold=85%. The timer list also showed its last and next run.
The demo load file was removed, then the check service was started manually for immediate verification.

Step 1: Run a check manually when needed
- Run a check manually when needed
systemctl start dchost-disk-check.service reruns the check without waiting for the next timer event.
- Check the values in the new record
The new OK entry shows space=1%, inodes=1% and threshold=85%. The df output below independently confirms 1% space usage.
The earlier WARNING remains in the journal history; the following OK is the new check result. This verification was started manually and sent no external notification. Only the relevant terminal section is cropped from the recording.
After removing only the 50 MiB threshold-demo.bin file created for the alert test, the service was started manually once. This produced OK, space=1%, inodes=1%, and threshold=85%. The automatic warning and the separate manual check after cleanup were therefore verified. No email or Telegram message was sent; these are local journal entries. Reboot persistence and long-term monitoring were not tested in this demo.
7. Verify recovery after freeing space
Use the same path you selected at the beginning. If you opened a new SSH session, set CHECK_PATH again first:
df -hT -- "$CHECK_PATH"
df -i -- "$CHECK_PATH"
systemctl --failed --no-pager
| Check | Expected result |
|---|---|
| Space and inodes | The exhausted resource now has available capacity. |
| The original failing operation | A controlled retry no longer produces the same error. |
| The affected application/service | Expected data is available and its normal function works. |
| New log entries | The same No space left on device error is not being generated again. |
| A later measurement | Usage does not immediately fill again; unnecessary data generation has been addressed. |
An empty systemctl --failed list does not test every application function. If a database stopped, newly available space alone does not prove it recovered; inspect its logs and recovery procedure. Do not repeatedly submit transactions such as payments or email sends when the previous outcome is uncertain.
Recheck the same mount points after recovery, then assess service status separately.
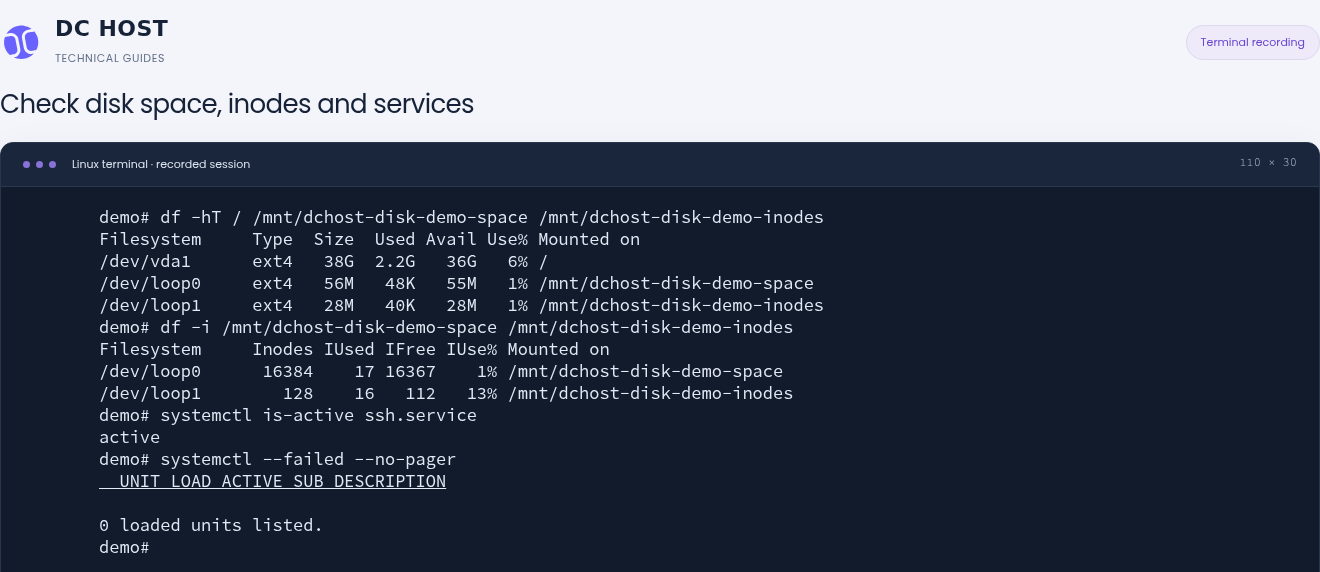
Step 1: Read the final values for the same disks
- Read the final values for the same disks
The root disk uses 6% of its space and both test filesystems use 1%. The df -i output below also confirms that free inodes remain.
- Check service status separately
SSH reports active. The 0 loaded units listed. result from systemctl --failed means no units are listed as failed.
This screen was captured before the demo filesystems were removed. SSH is active and the systemd failed-unit list is empty; these results alone do not verify every website or database function. Also retry the operation that failed in your own application.
The final screen confirmed 1% space usage on both test filesystems, with inode usage of 1% and 13%, respectively. The writes that had failed because of space and inode exhaustion were now successful. The main system filesystem showed 38G capacity, approximately 2.2G used, 36G available, and 6% usage. SSH was active, and there were 0 failed systemd units.
Before cleanup, the SHA-256 hashes of three protected test files were compared with their initial values and matched. These were not customer files; they existed inside the test images prepared for this guide. After recovery had been verified, only our alert script, two systemd units, and enablement link were removed. The test filesystems were unmounted normally, loop devices were detached, and this exercise’s images, files, and directories were cleaned up. The example files whose hashes had been checked were therefore also removed with the test images at the end of the exercise.
After final cleanup, main filesystem usage remained at 6% and inode usage at 3%, with the same used-inode count as the baseline. SSH remained active, and the failed-unit count was still 0. These results verify the isolated demo exercise; they are not a claim that real customer data was recovered.
Rollback and next steps
Read-only df, du, findmnt, and lsof checks need no rollback. Deleted files can only be recovered from an appropriate backup. Work in small, targeted steps and repeat the same measurement after each change.
If you change an application or log policy, keep the original setting and roll back only that change if necessary. To remove the alert, stop the timer first:
sudo systemctl disable --now dchost-disk-check.timer
Then remove only the .service, .timer, and script files you created for this guide, and run sudo systemctl daemon-reload. Do not remove pre-existing monitoring files. Closing the temporary demo environment is not an instruction to remove disks or partitions on a customer server.
If storage requirements have grown permanently, plan a package upgrade or additional storage. A larger package does not prove that the partition and filesystem have expanded automatically; expansion depends on the filesystem and disk layout. mkfs, arbitrary partitioning commands, or setting ext4 reserved blocks to zero are not disk cleanup methods.
What to include in a support request
When opening a request in the DCHost customer portal, include the service, error time and timezone, failing operation, and exact error message. Add the relevant findmnt, df -hT, df -i, and short du results, plus an applicable lsof entry if needed. Describe recent changes and the type of data you cleaned up.
Hide hostnames, IP addresses, usernames, and private paths in public posts. Do not send passwords, SSH keys, database contents, or customer files.
Frequently asked questions
Why can Linux not create a file when GB are still available?
Inodes may be exhausted. Run df -i against the same path and inspect IFree and IUse%. If inodes remain available, check account quotas, separate mount points, and the exact error. The inode section explains how to identify a directory accumulating many small files.
Why did deleting a file not free disk space?
A program may still hold it open. Match sudo lsof +L1 results to the affected filesystem. Space may return once the last open reference closes, following the controlled process described above. Other hard links or checking a different filesystem can also affect the result.
Can I delete everything in /tmp or /var/log?
No. These locations may contain files used by running applications, sessions, sockets, or records needed for troubleshooting. Identify the owner and retention policy, then use the operating system's or application's cleanup method.
Should I reboot when the disk shows 100%?
Rebooting does not resolve persistent data growth, inode exhaustion, or quotas. Services may fail to write the files they need during startup. Identify the cause first. Even with deleted open files, consider the affected application's supported reopen or maintenance procedure.
Will a package upgrade definitely fix space and inode exhaustion?
No. Unnecessary file generation may continue, and the partition or filesystem may need to be expanded separately. Measure the requirement and verify that the new capacity is visible inside the server. How inode capacity changes depends on the filesystem and expansion method.
Related guides
- Check CPU, RAM, and disk usage on Linux
- First SSH connection to a Linux server
- Plan server backups
- Verify that a backup can be used
- Plan Linux package updates
- Prepare for a package upgrade
Memory exhaustion is different from a full disk. For Killed, Out of memory or services stopping unexpectedly, continue with the Linux OOM and swap guide. A swap file consumes disk space; do not create one on a full filesystem without planning capacity.
Free disk capacity does not mean that the application is not waiting for storage operations. If space and inode use are normal but load average is high, distinguish CPU usage from I/O wait. Do not delete files or upgrade CPU capacity based only on load average.