cPanel guides: Hosting management and WHM administration
Choose the task you want to complete in cPanel. From signing in and uploading files to creating databases and taking backups, these guides follow the steps shown in the interface. If you manage your own VPS/VDS, use the separate WHM path below.
Make sure you are in the right panel
| Where you are | What it manages | Start here |
|---|---|---|
| DCHost customer portal | Services, invoices, support and hosting access | Open your hosting service and enter cPanel |
| cPanel | The hosting account's websites, files, mailboxes and databases | Basic control-panel tasks |
| WordPress administration | Pages, posts, themes and plugins | WordPress installation and administrator login |
| WHM | Hosting accounts and shared server settings for authorized administrators | Install cPanel and WHM on a VPS |
The customer portal, cPanel, WordPress and WHM are separate sign-ins. A hosting user does not need to install WHM or work as root.
After a customer login, tools are grouped by purpose. Match the labels on the screen to the explanations below.
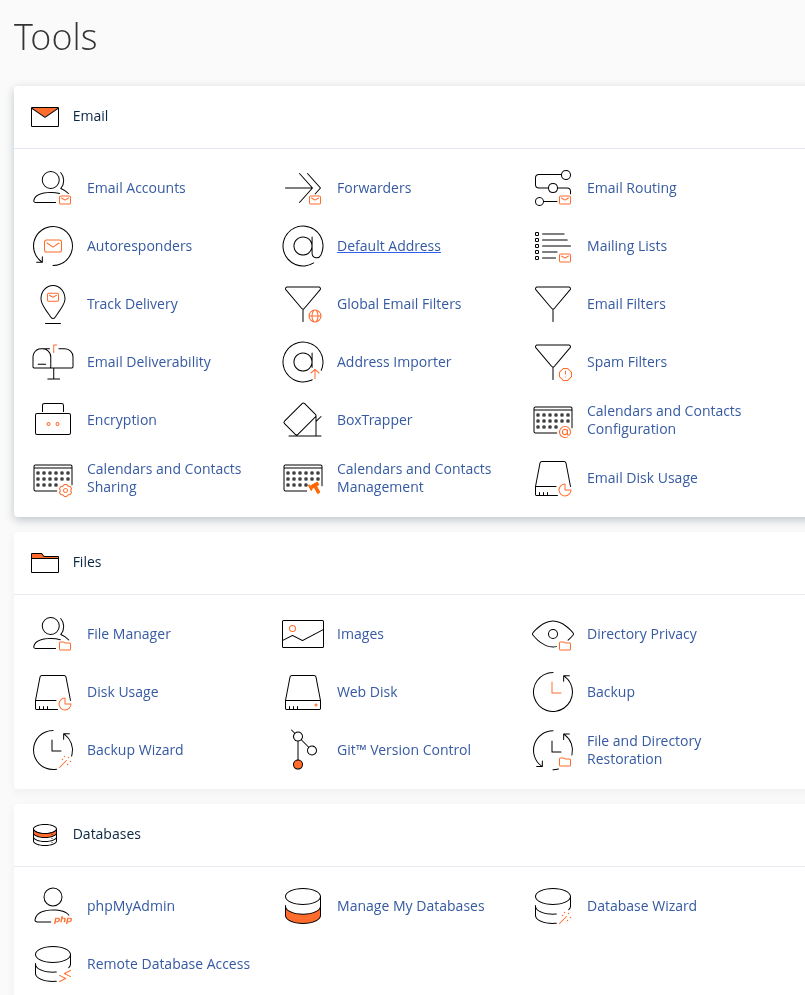
Step 1: Recognize the Tools screen
- Recognize the Tools screen
Email, Files and Databases group the different management tasks.
What you should see: Find the section that matches the task you need.
- Use File Manager for website files
File Manager in the Files section opens the hosting account’s files and folders.
What you should see: Reach the tool for working with website files.
- Use Backup Wizard for backups
Backup Wizard walks through the supported backup and restore options. You cannot restore a full account backup yourself from this tool.
What you should see: Identify the route for file and database backups.
- Separate the database tools
Manage My Databases manages databases and database-user permissions. phpMyAdmin is for tables and import/export operations.
What you should see: Separate database and permission management from data operations.
Captured after saving the optional analytics preference and closing the separate survey with its native close control. Available tools can vary by hosting account.
If you are using hosting for the first time
- Open your hosting service and cPanel access. Select the service for the correct domain.
- For a ready-made application, follow WordPress installation. For your own files, use the cPanel file-upload and backup guide.
- If the application needs a database, complete the database, user and permission steps.
- Check DNS and HTTPS access at your own website address.
- Create an email account, then complete a backup and restore check.
Find a guide for your task
If you are moving an existing website
Start with the preparation in the WordPress migration guide. Back up files and the database, open a separate copy on the new hosting, and test logins and write operations. Plan the DNS change after verifying the new server.
Having a backup file does not prove the website can be restored from it. A restore test is a separate part of migration and a regular backup plan.
If you manage WHM on your own VPS/VDS
WHM manages packages, hosting accounts and shared server components. Distinguish a single customer's cPanel setting from a setting that affects every customer on the server.
- Complete cPanel installation, licensing and the first customer login.
- Configure hosting packages, feature lists, accounts and disk quotas.
- Review cPanel and WHM security settings.
- Verify PHP versions, extensions, PHP-FPM and OPcache using actual application results.
- Establish a server backup plan and restore checks; monitor CPU, RAM and disk use.
The actual account list shows one hosting account, the example package and the final saved 5120 MB disk quota.
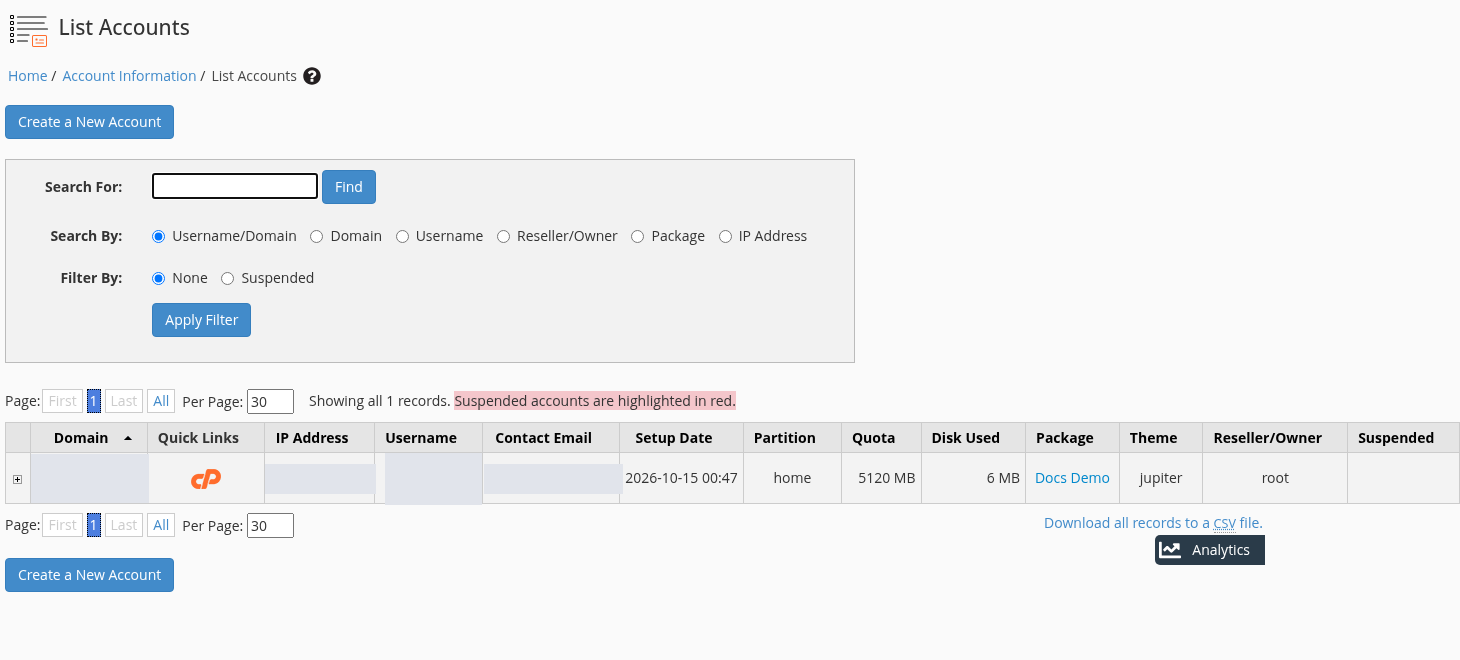
Step 1: Read the list and record count
- Read the list and record count
Open WHM → Account Information → List Accounts and find the new account.
What you should see: The example shows Showing all 1 records.
- Match the account and package
Compare Domain, Username and Package with the account you created on your own screen.
What you should see: The account and package match; there is no need to recreate it.
- Compare the quota with the package
The Quota column shows 5120 MB, the 5 GB disk limit saved for this example. Compare your own account’s value with its package.
What you should see: The quota column shows the final configured limit; the package name is not the only check.
- Verify cPanel access separately
The cPanel icon in Quick Links opens the account; also check normal username/password login in the next step.
What you should see: The account list and a customer login are separate checks.
Private account details are masked; other column values are unchanged. This screen does not prove website, DNS or email delivery operation.
If a tool is missing
Available tools depend on the hosting package, feature list, installed software and license. A missing cPanel menu does not mean that you should use root. First check that you selected the correct service and signed in as the intended user.
In a support request, include the task, time, displayed error and a screenshot with private details hidden. Do not put passwords, one-time login links or database credentials in a public image.
Frequently asked questions
Are cPanel and WordPress the same thing?
No. cPanel manages the hosting account and infrastructure tools; WordPress manages website content, themes and plugins. Installing WordPress through cPanel does not merge the two sign-ins.
Should I follow the WHM guides if I only use hosting?
Use the cPanel guides for everyday website tasks. The WHM path is for users who manage their own server or have an authorized reseller account.
Can I restore a full account backup myself in cPanel?
Partial restores, such as files or a database, differ from restoring an entire account. Backup Wizard does not automatically restore a full account; that needs WHM or the service provider. Identify the backup type and recovery path first.