Improve cPanel performance: PHP, PHP-FPM and OPcache settings
To optimize a cPanel website, first identify which page or action is slow and when the delay happens. Then check the PHP settings and server resources that serve that request. This guide covers measurement and controlled changes for PHP websites hosted with cPanel.
If your website returns 500 Internal Server Error: Use the 500 error guide to identify the cause from the logs and review the latest change. Return to performance measurements after resolving the error.
By the end: You will understand your website's PHP version and required extensions, the roles of PHP-FPM and OPcache, and how to check whether a change helps. There is no RAM allocation, process count or percentage improvement that applies to every website.
1. Identify which settings you can manage
cPanel manages the websites in one hosting account. WHM manages the server's accounts and shared web server components. Your DCHost customer portal account, cPanel user and VPS root account are separate forms of access.
| Your access | Relevant parts of this guide |
|---|---|
| Your hosting account's cPanel | Domain PHP version, permitted PHP INI settings, error logs and compression if available |
| Authorized WHM access to your VPS/VDS | EasyApache packages, per-domain PHP-FPM, server services and processes |
| Customer portal only | First open cPanel for the hosting service; portal access does not imply WHM privileges |
A missing tool may be unavailable for the service or your account's permissions. Do not install another PHP management system merely to replace a missing menu; use the method supported by your service.
Before changing anything:
- Confirm the correct domain and hosting account.
- Record the current PHP version, PHP-FPM status and any values you intend to change.
- Make current file and database copies, and verify the recovery method.
- If possible, prepare a separate test copy with restricted access. It must not initiate real payments, order notifications or customer email.
- Choose a time that limits the effect on visitors. Change one group of settings at a time.
Creating a snapshot or an EasyApache profile does not prove that application restoration has been tested. Before changing shared server settings, also preserve a working second administration connection and a recovery access method.
Before this walkthrough’s changes, separate private backups were taken for site files, the database and relevant configuration. The EasyApache package selection was also saved as a profile; the profile was not used as a substitute for those backups.
2. Measure the delay and identify the account
Record the affected URL and time. Test the actual slow action, such as product search, administrator login or saving content, rather than only the homepage. Check the same URL several times under similar network conditions; do not base a decision on one measurement.
| Check | Where to look | How to read the result |
|---|---|---|
| Response and error code | The affected page; the browser developer tools' Network tab | A slow initial response, large images and failed requests are different problems |
| Disk and file count | cPanel home Statistics and available disk tools | Check free space and inode limits separately |
| Services and server summary | WHM → Server Status → Service Status | up is a service check; it does not prove every application action works |
| Current processes | WHM → System Health → Process Manager | Use Owner, CPU%, Memory% and Command to identify the account and process |
| Usage during the day | WHM → Server Status → Daily Process Log | Daily averages and the peak values in Top Processes mean different things |
If your hosting account has no CPU graph: cPanel's CPU Usage, Memory Usage and Entry Processes statistics depend on CloudLinux. They are not available in every cPanel account on AlmaLinux. Use the measurements your service provides or ask support to investigate the relevant time range.
A busy process in Process Manager does not automatically need to be killed. Arbitrarily terminating a database, backup or update process can cause data loss. First identify its owner, purpose and duration.
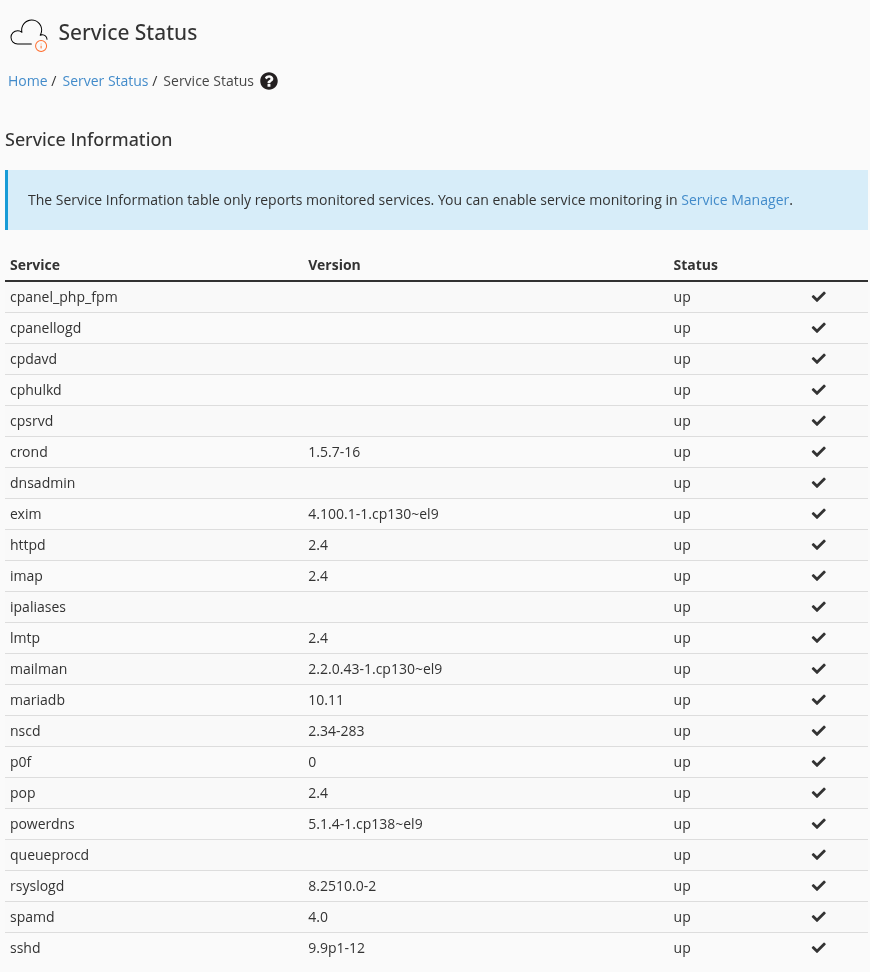
Service Status reports services configured for monitoring.
Step 1: Check monitoring scope
- Check monitoring scope
The notice states that only monitored services are listed.
What you should see: Do not infer the status of an unlisted service.
- Separate web and database services
httpd is the web server; mariadb is the database service. Read Status.
What you should see: Verify application operations separately from service status.
cpanel_php_fpm relates to the cPanel interface’s PHP service; it does not by itself verify a website’s PHP-FPM pool. This service snapshot is not a speed test.
Service Status lists monitored services only. The example shows httpd and mariadb as up; that alone does not establish that every application page or operation works.
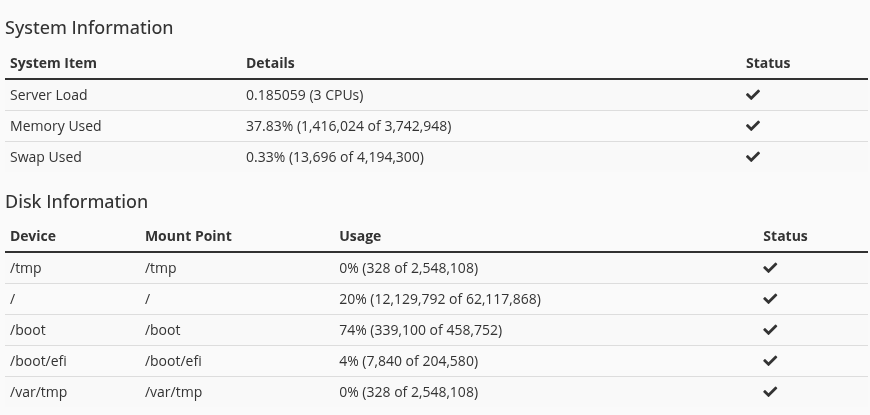
System and disk summaries from the same Service Status page.
Step 1: Read load and memory
- Read load and memory
Server Load, Memory Used and Swap Used measure different things.
What you should see: Do not raise PHP limits based on one percentage.
- Check the relevant filesystem
Use Mount Point and Usage to identify the relevant filesystem.
What you should see: Distinguish full storage from a PHP memory limit.
Values describe the capture time, not peak-load capacity or a product’s resource specification.
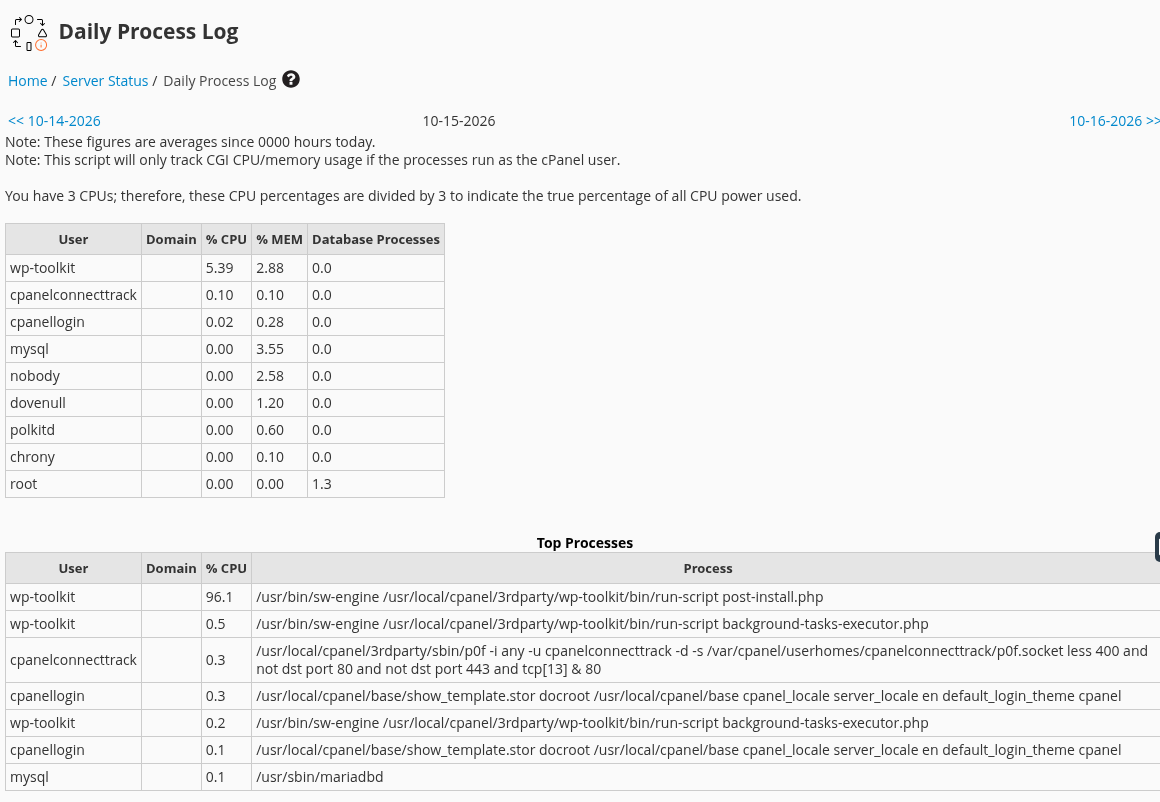
Daily Process Log presents two different tables.
Step 1: Read the upper table’s time period
- Read the upper table’s time period
The notice defines the figures as averages since the start of the day.
What you should see: Do not read a daily average as current CPU usage.
- Identify the work in Top Processes
Read the owner and Process together; this example includes post-install.php.
What you should see: Do not present installation work as continuous website load.
This is an actual log. Identify a process before stopping it; the screen is not a visitor-capacity measurement.
The upper table in this actual Daily Process Log shows averages since the start of the day. Top Processes includes a WP Toolkit post-installation process. Its high process value does not mean a customer website continuously uses that much CPU.
For more server detail, follow the CPU, RAM, swap and disk checks. Raising PHP memory limits does not fix a full disk, and PHP-FPM settings do not directly reduce the time needed to download large images.
3. Check the domain's PHP version
PHP runs applications such as WordPress. A version appearing in the menu does not prove that the PHP project still provides security updates for it. Check both your application's compatibility requirements and the current PHP support schedule.
Open cPanel → Software → MultiPHP Manager:
- Find the intended domain and record its current PHP Version.
- If it displays Inherited / inherit, understand that the version comes from a parent setting. A system default does not affect every account in the same way.
- Test a version that remains security-supported and is compatible with your application, themes and extensions.
- Select the domain's checkbox, choose the version from PHP Version, then select Apply.
- Test the website, administrator login and a content-saving action. Review error logs again.
If the required version is absent, it may not be installed or enabled for your account. Hosting users should contact support. WHM administrators can check EasyApache packages in the next section.
Actual PHP 8.2 → 8.3 change through WHM
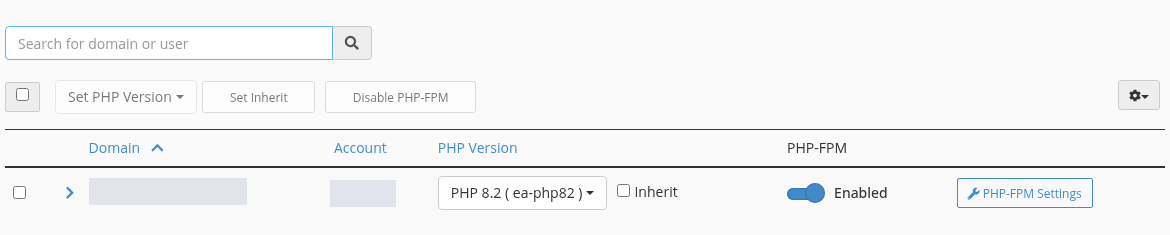
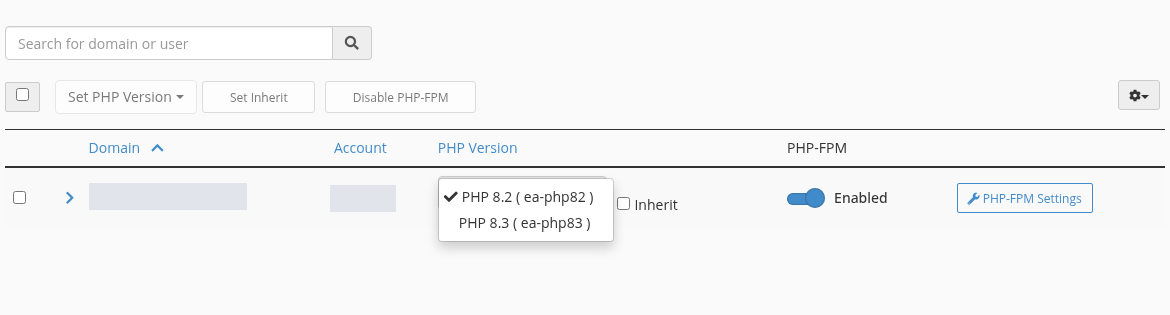
This walkthrough changed one demo domain under WHM → Software → MultiPHP Manager → User Domain Settings. Initially it showed PHP 8.2 (ea-php82) and PHP-FPM Enabled, with Inherit unchecked.
The single demo-domain row in WHM User Domain Settings.
Step 1: Note the existing PHP version
- Note the existing PHP version
PHP Version shows PHP 8.2 (ea-php82).
What you should see: The starting version is known for rollback planning.
- Separate FPM and Inherit state
Inherit is unchecked and PHP-FPM is Enabled.
What you should see: Read each effective setting separately.
This is a WHM administrator screen. Do not assume the customer cPanel interface uses identical controls.
The domain row’s own PHP Version menu was opened and PHP 8.3 (ea-php83) selected. This is WHM’s row menu, not the cPanel Apply action described above. The bulk Set PHP Version action and system default were not changed.
Version choices are open in the domain’s own row menu.
Step 1: Use the correct row menu
- Use the correct row menu
This menu belongs to one domain; the bulk action above has a wider scope.
What you should see: Keep the change scoped to one domain.
- Select a compatible version
PHP 8.3 (ea-php83) was selected here; assess application compatibility first.
What you should see: Check the settled state after selecting the version.
Menu availability does not establish that a PHP branch still receives upstream security support.
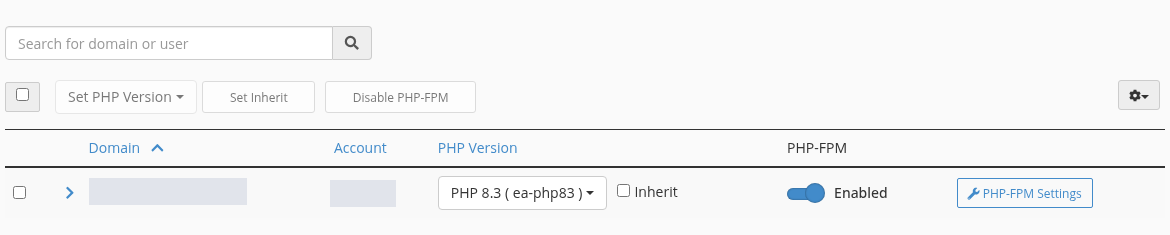
After completion, the row was checked again for PHP 8.3 and PHP-FPM Enabled. The website’s actual PHP response and database read were also verified in the OPcache section’s test.
The final image was captured after the loading indicator disappeared.
Step 1: Read the final version
- Read the final version
PHP Version now shows PHP 8.3 (ea-php83).
What you should see: The new selection is settled in the row.
- Check FPM again
PHP-FPM remains Enabled.
What you should see: Continue verification with an actual web request.
The panel result was followed by web-runtime PHP/OPcache checks. The image shows the PHP setting; final public DNS and HTTPS checks were performed separately.
Recovery: If the application fails, return to the recorded previous version and test again. This only reverses the runtime selection. Application or database updates performed at the same time need their own recovery process. Returning to an unsupported version is not a permanent solution.
4. Manage required PHP extensions with EasyApache
This section is for an authorized WHM administrator. A PHP extension provides functionality required by an application. An extension installed for one PHP version is not automatically available for another version.
Open WHM → Software → EasyApache 4:
- Use Currently Installed Packages → View all packages to inspect installed versions and extensions.
- Compare the application's required extensions with its published system requirements. Installing more extensions does not automatically make a website faster.
- To record the current package selection, you can use Convert to profile. This does not back up website files, databases or all custom settings.
- If a change is needed, select Customize for the current installation. Use the correct PHP branch in PHP Versions and PHP Extensions.
- Read Review, including packages to install, upgrade, uninstall and leave unchanged. Stop if removals are unexpected or the effect on other websites is unclear.
- If the plan is suitable, select Provision, wait for completion, then check the affected websites again.
What was saved and installed in this walkthrough?
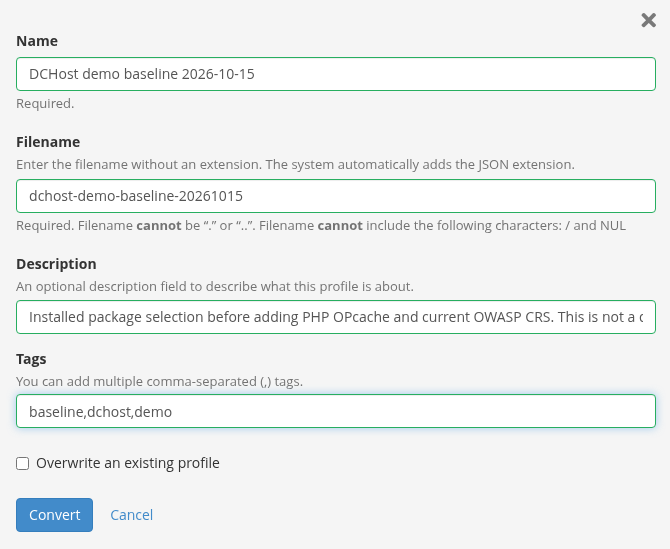
The installed package selection was first saved as DCHost demo baseline 2026-10-15. The image below shows the name and filename in Convert to profile. This does not back up files, the database or all custom settings.
Convert to profile records the installed package selection.
Step 1: Separate name and filename
- Separate name and filename
Name is a descriptive label; Filename names the profile file.
What you should see: Prepare a package-selection record you can locate later.
- Understand the profile’s scope
Convert saves this selection; site files, databases and custom settings need separate backups.
What you should see: Do not treat a package profile as a full-server backup.
The image is the actual form before conversion. Profile saving was separately completed, with files/database/configuration backed up independently.
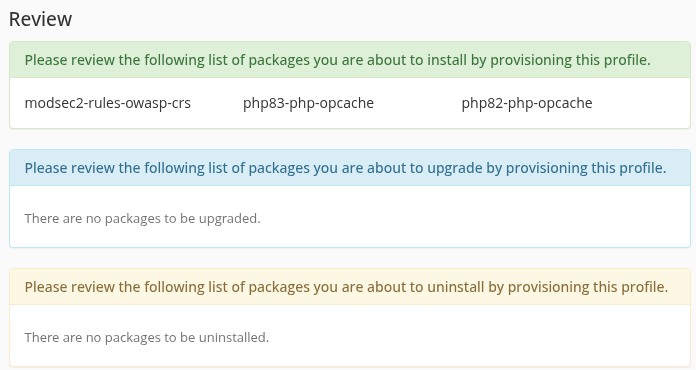
The final Review contained three additions: php82-php-opcache, php83-php-opcache and modsec2-rules-owasp-crs, planned in the same maintenance work. No packages were to be upgraded or removed. OWASP CRS supplies security rules; it is not an acceleration package required for OPcache.
The final Review separates additions, upgrades and removals.
Step 1: Identify additions
- Identify additions
Two OPcache packages and OWASP CRS planned in the same maintenance are listed.
What you should see: Distinguish version-specific extensions from security rules.
- Read upgrades and removals too
Neither group contains a package in this plan; another server may differ.
What you should see: Do not provision after reading only the additions.
OWASP CRS provides security rules; it is not a performance dependency required by OPcache.
Provision ended with The provision process is complete, and installed package status was separately verified. The next step is to verify the extension in an actual web request.
The end of the process log and WHM’s completion notice.
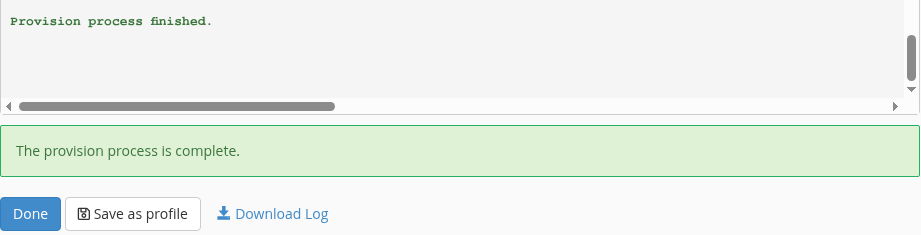
Step 1: Read the completion message
- Read the completion message
The provision process is complete is displayed.
What you should see: The interface reports provisioning complete.
- Continue with application checks
Done returns to the interface; verify installed packages and the web response separately.
What you should see: A completion message does not replace application testing.
Installed package state was separately verified. This screen is not a speed or traffic-load measurement.
Several accounts may use the same PHP version. A shared extension or web server package change can affect more than one website. Do not provision an unfamiliar EasyApache profile without reviewing its changes.
5. Evaluate PHP-FPM for the individual domain
PHP-FPM manages worker processes that respond to PHP requests. A pool is a group of processes assigned to a website or account. It can help a suitable workload, but enabling PHP-FPM does not guarantee a fast website.
Open WHM → Software → MultiPHP Manager → User Domain Settings:
- Check the domain row's Account, PHP Version and PHP-FPM values.
- PHP-FPM controls are unavailable when the version is Inherit. Assign a suitable explicit PHP version before proceeding.
- Check whether other domains share the same document root, because they can be affected together.
- If the application and resource plan are suitable, set PHP-FPM to Enabled for the intended domain.
- Read Show Help Text in PHP-FPM Settings. Record existing values before changing them.
| Setting | Meaning | Why not raise it arbitrarily? |
|---|---|---|
| Max Children | Maximum number of PHP-FPM processes in the pool | More concurrent processes can require more RAM and database connections |
| Max Requests | Requests a process can serve before it is replaced | It is not a website's visitors-per-second limit |
| Process Idle Timeout | How long an idle process waits | It affects process retirement/recreation and resources held while idle |
More workers do not always produce faster responses. Measure actual PHP process memory, other accounts, database use and operating system requirements first. Do not allocate all RAM to PHP; assess peak-time waiting and error logs too.
If a change is justified, adjust one setting and record the reason. Validate Settings checks configuration validity; it does not benchmark performance. After saving with Update, test the application and services. Reset Settings returns edits to saved values; it does not automatically undo a previously saved change to an earlier date.
These initial pool values were left unchanged.
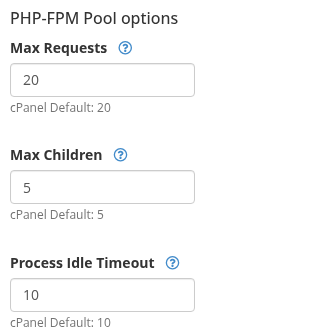
Step 1: Separate request count from concurrent workers
- Separate request count from concurrent workers
Max Requests sets process recycling; Max Children limits concurrent workers.
What you should see: These numbers are not visitors per second.
- Read the idle timeout
Process Idle Timeout affects idle-worker behavior.
What you should see: Do not choose a universal value without measuring resources.
20/5/10 are this demo pool’s actual starting values, not recommendations for every website.
This demo pool initially used Max Requests 20, Max Children 5 and Process Idle Timeout 10. They were not increased just to make a change; do not treat them as a recipe for every server.
Actual information message from Validate Settings.

Step 1: Read the validation result
- Read the validation result
Valid PHP-FPM settings indicates an accepted configuration.
What you should see: This is not a performance-test result.
- Recognize the separate Update action
The message separately says to use Update to save.
What you should see: Validation alone does not mean the settings were saved.
The initial pool values were retained; the message’s generic “changed values” wording is not treated as evidence that they changed.
Validate Settings returned the valid-configuration message. Update, mentioned in the message, is a separate save action. Validation does not demonstrate changed pool values or a faster website.
System Settings and Enable on All Domains have a broader scope. Do not convert all domains while investigating one website. Seeing a PHP-FPM status in your own cPanel account does not grant permission to change the server's pool settings.
6. Verify that OPcache is actually working
OPcache stores compiled PHP code in memory, reducing repeated compilation work. A cache of HTML page output, a WordPress plugin cache and an object cache such as Redis operate at different layers.
As the WHM administrator:
- Identify the PHP version serving the website.
- Check EasyApache 4 for the OPcache extension belonging to that PHP version. Review the transaction before installing anything.
- Check PHP handler compatibility. cPanel's official documentation does not consider suPHP or CGI compatible with opcode caching.
- Review OPcache configuration for the relevant PHP version. An installed package alone does not prove it is enabled and useful.
- Verify effective status and error logs in the PHP runtime serving the website's web requests. Terminal output from
php -vor CLI OPcache does not prove the website uses the same configuration.
If diagnostics are necessary, expose only the required information in a restricted test environment. Do not leave a public phpinfo() page; remove temporary diagnostic files afterwards. If you cannot check safely with your hosting account, ask support to verify the runtime.
Actual result from a web request
An access-restricted demo page returned the following result from the web server’s PHP runtime, rather than the terminal:
This is the output of an actual access-restricted demo page.
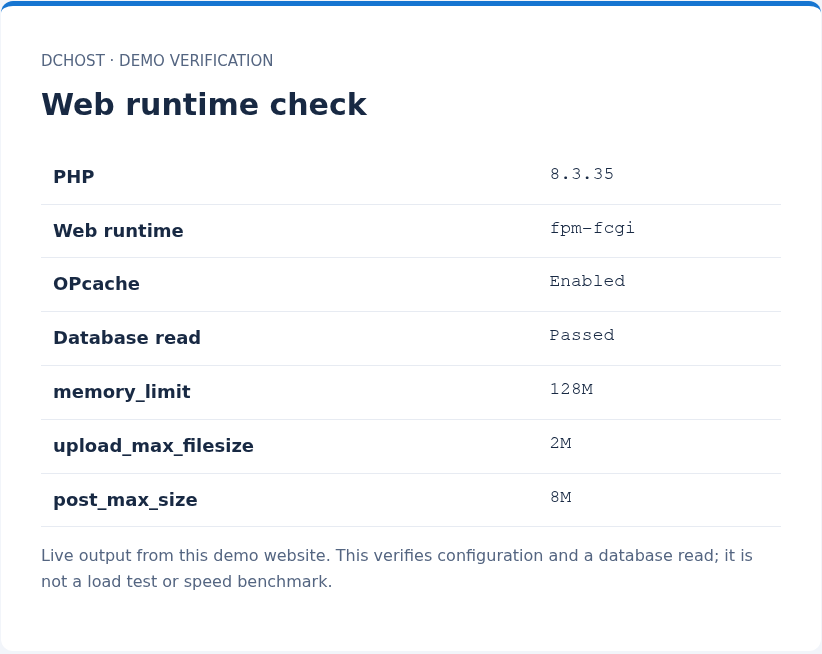
Step 1: Read the runtime and cache state
- Read the runtime and cache state
PHP, Web runtime and OPcache describe the runtime serving this web request.
What you should see: Verify the web runtime rather than inferring it from CLI output.
- Read the test’s scope
Database read Passed verifies a database read; lower rows show effective PHP limits.
What you should see: Do not infer write, load or public HTTPS tests.
This initial measurement used local name resolution; it is not a speed or high-traffic capacity benchmark. Public DNS and HTTPS were verified separately afterward.
| Check | Actual result |
|---|---|
| PHP version | 8.3.35 |
| Web runtime | fpm-fcgi |
| OPcache | Enabled |
| Database read | Passed |
| Effective memory/upload/POST limits | 128M / 2M / 8M |
For this initial test, the domain was directed to the server only in the test browser. The result verifies the PHP runtime and a database read; it is not proof of public DNS, normal HTTPS access, a database write or load-test performance. Check those separately at your production website’s normal address.
Separate final HTTPS check: A Let's Encrypt certificate was subsequently obtained through Wizard in the customer's cPanel account. The site opened over HTTPS using normal DNS resolution without a local override or bypassing certificate warnings; the PHP page returned 200, and the database read succeeded. Follow the certificate and HTTPS verification steps. The gzip sizes below belong to the earlier HTTP comparison; no new speed or size measurement was performed over HTTPS.
Memory allocation: OPcache memory is different from PHP's memory_limit. Consider the project's file count, PHP versions and other server workloads together. There is no single OPcache memory value suitable for every website.
Code updates: Disabling file-change checks can prevent new code from becoming active when expected. Do not change settings such as opcache.validate_timestamps without a defined cache-refresh procedure during deployment.
7. Set PHP limits according to the application
Open cPanel → Software → MultiPHP INI Editor → Basic Mode. Select the relevant domain from Configure PHP INI basic settings to target one website. Home Directory can have a broader, account-level effect.
| Setting | Purpose | Common misunderstanding |
|---|---|---|
memory_limit | Limits memory available to one PHP execution | Raising it does not add physical RAM or repair memory-hungry faulty code |
max_execution_time | Limits execution time | A longer limit does not make a slow operation faster |
upload_max_filesize / post_max_size | Affect upload and POST body limits | They are not general speed settings; application and other infrastructure limits also apply |
| Error logging / displayed errors | Controls where diagnostic details appear | Displaying detailed errors to public visitors is not a performance fix |
Change values according to actual application requirements, save with Apply, then test the specific operation. Writing a value to an INI file does not override every server-level restriction; verify the application's effective settings as well.
Basic Mode in the actual customer account, with private domain/path values masked.
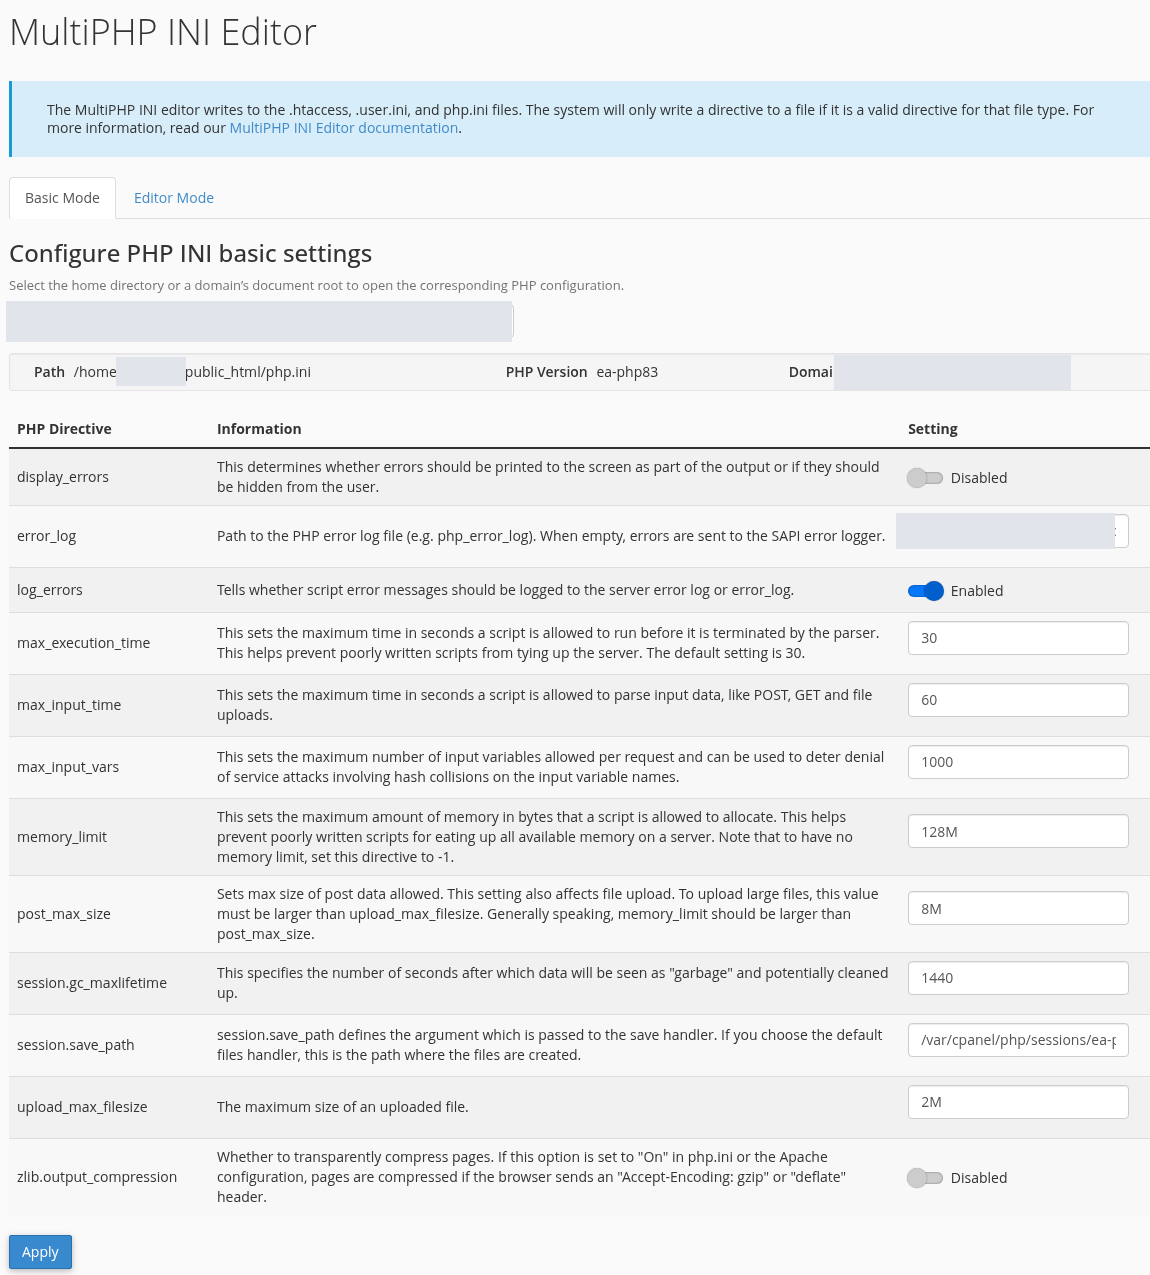
Step 1: Check the location and PHP version
- Check the location and PHP version
Select the intended domain; this example shows ea-php83 under PHP Version.
What you should see: Distinguish Home Directory from a domain-specific scope.
- Separate memory and upload limits
128M memory_limit, 8M post_max_size and 2M upload_max_filesize set different limits.
What you should see: Raising every visible value is not a speed optimization.
These values were not changed; they were compared with the effective 128M/2M/8M web-test result.
The intended domain was selected in the actual customer account, and PHP Version ea-php83 and its settings were inspected. memory_limit 128M, upload_max_filesize 2M and post_max_size 8M were left unchanged. Error display was disabled and error logging enabled. Appropriate limits depend on the application’s requirements.
Do not paste unfamiliar blocks into Editor Mode. If a problem appears, restore the recorded values instead of deleting entire php.ini, .user.ini or .htaccess files to reset the account.
8. Check transfer compression separately
If cPanel → Software → Optimize Website is available, you can manage content compression there. Its availability depends on Apache mod_deflate support and service configuration.
- Record the current selection.
- Review Compress the specified MIME types and the content types your application serves.
- Save the appropriate configuration with Update Settings.
- Check the same resource's response headers and transferred size in the browser's Network tab. If a CDN is involved, distinguish which layer applies compression.
Adding already-compressed formats such as JPEG/PNG is not a general solution. Do not blindly enable separate compression settings in PHP, the web server and the CDN; verify the actual response remains correct.
Compression check using the same response
The actual customer screen initially had Disabled selected.
Optimize Website initially had Disabled selected.
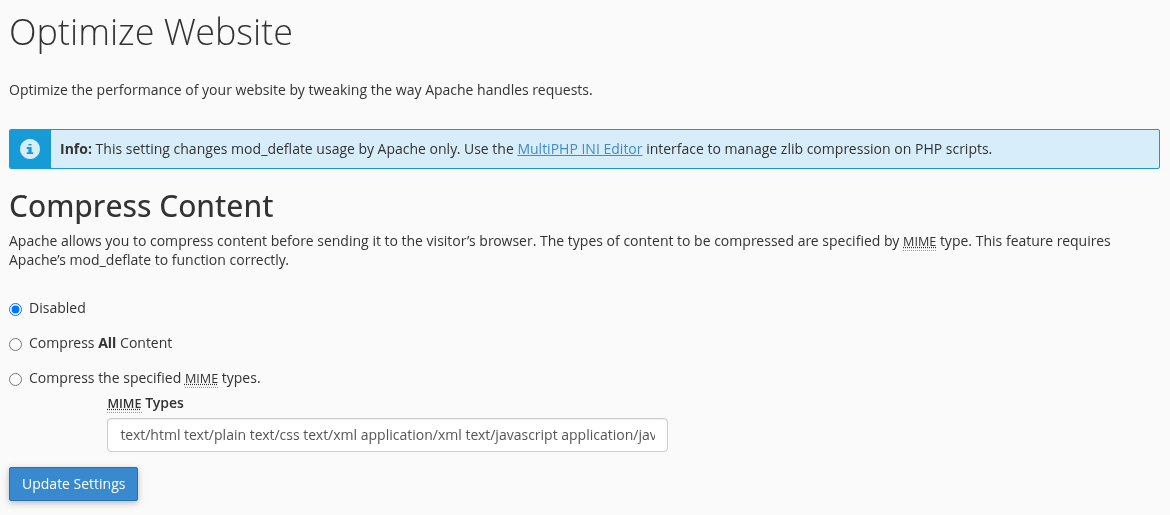
Step 1: Read which layer is affected
- Read which layer is affected
The notice describes Apache mod_deflate; PHP zlib is managed separately.
What you should see: Avoid enabling overlapping settings indiscriminately.
- Record the starting selection
Disabled is selected; retain this state for comparison.
What you should see: The previous setting and rollback point are known.
This is the starting image; compression has not yet been enabled.
Compress the specified MIME types was selected, retaining the interface’s existing text-content types. JPEG/PNG images were not added, and PHP’s zlib setting was not changed.
Specific MIME types were selected while retaining the existing text types.
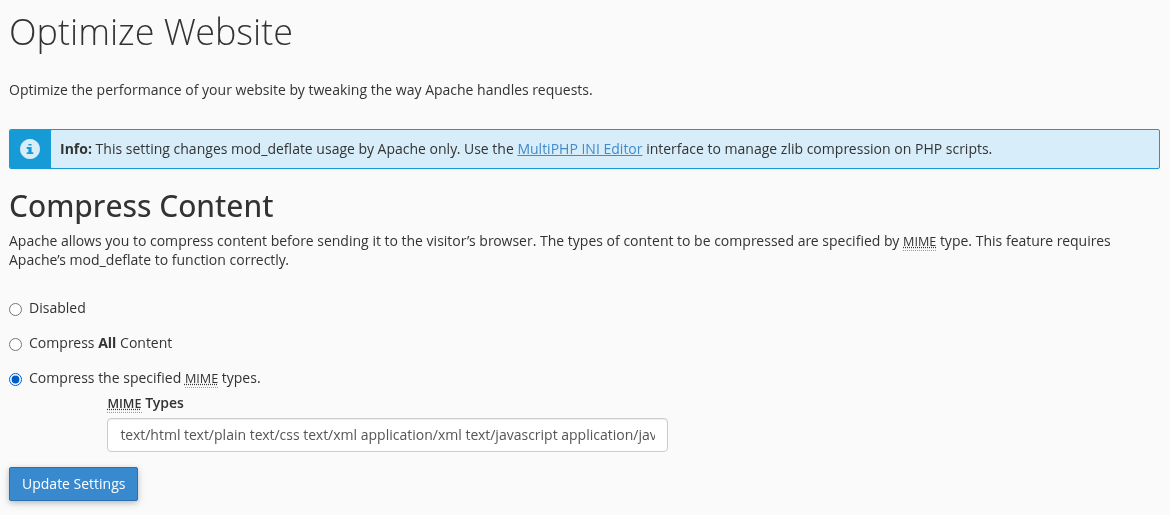
Step 1: Select specific types
- Select specific types
Compress the specified MIME types was selected; JPEG/PNG were not added.
What you should see: Define which content types will be compressed.
- Review the list and save
Check MIME Types and apply with Update Settings.
What you should see: Check the success result and actual response separately.
The single-line MIME input does not display its full text here; the following saved screen shows the complete enabled list.
After Update Settings, the interface confirmed compression was enabled for the listed MIME types.
cPanel confirmed compression for the selected types.

Step 1: Read the save result
- Read the save result
Content compression is now enabled is displayed.
What you should see: The interface confirms the setting was accepted.
- Compare the enabled list and response
The lower line lists enabled MIME types; check the gzip header in a real request.
What you should see: Verify both the setting and its effect on the response.
For the same 200 response, body size changed from 1172 to 670 bytes with identical decoded content. TTFB and page-load speed were not measured.
The same demo page’s HTTP response was compared before and after, using a request that accepts gzip:
| Measurement | Before | After |
|---|---|---|
| HTTP status | 200 | 200 |
| Content-Encoding | None | gzip |
| Response body received over the connection | 1172 bytes | 670 bytes |
| Decoded body size | 1172 bytes | 1172 bytes |
| Decoded-content SHA-256 check | Identical | Identical |
This comparison measures only this response’s body size; HTTP headers and connection overhead are excluded. A smaller transferred body with unchanged content was verified. Page-load time, TTFB and a site-wide speed-improvement percentage were not measured.
9. Verify the outcome and recover if necessary
After each change, repeat the same action that originally showed the problem. A first request and subsequent cached requests can differ; compare measurements under equivalent conditions.
| Check | Information to record |
|---|---|
| Page/action | Same URL and user action |
| Time and environment | Date, time, connection, cache state and the single change |
| Correctness | Page, administrator login, controlled content write and necessary application actions |
| Resources and errors | Relevant process/service state and new error entries |
| Decision | Keep the change, restore the previous value or investigate further |
cPanel → Metrics → Errors displays the most recent 300 web server error entries. It may not contain every PHP error. A WHM administrator should check the domain's PHP-FPM Settings → Error log for the actual log location. Do not confuse cPanel's own management-service logs with the website's PHP logs.
The retained performance results are a single-domain PHP 8.3 selection, PHP-FPM and OPcache verification in a web request, a successful database read, and gzip body-size comparison for identical content. High-traffic capacity and WordPress checkout were not tested. Normal DNS and HTTPS access were verified in the separate final check; that result is not a speed measurement.
If results worsen, restore the changed value to the recorded previous state and repeat the test. Broader changes, such as EasyApache package transactions, may require more than reverting one PHP selection; follow the prepared recovery plan.
Successful outcome: The website and its essential actions work, no new errors appear, and the targeted problem shows a measurable improvement. An empty demo website loading does not establish the capacity required by a busy store.
Frequently asked questions
What should I set PHP-FPM Max Children to?
First determine whether requests are waiting for workers and measure actual memory use under load. Do not choose a fixed count without accounting for RAM, the database and other accounts. More workers can increase memory pressure and make responses slower.
OPcache is enabled, so why is WordPress still slow?
Slow database queries, external APIs, heavy plugins, large images or network delays may remain. Identify the slow action and its time, then investigate that layer. For a new installation, use the separate WordPress installation guide.
Does changing PHP update all my websites?
A per-domain selection differs from the system default. Inherited versions and shared document roots can broaden the effect of a change. Check the selected domain and affected accounts before applying it.
Do I need a larger hosting plan?
Evaluate capacity if measurements show the application regularly exceeds available resources. First distinguish unnecessary work, faulty code and incorrect configuration. Use the upgrade guide to plan the required resources and transition.
Related guides
- Hosting management and cPanel access
- Install cPanel and WHM on a VPS
- Check CPU, RAM and disk usage
- Test backup restoration
- Diagnose SSL and HTTPS problems
- What to include in a support request
Official sources
Sources were checked on 15 October 2026. Interface appearance, available features and supported versions can change.