cPanel databases, phpMyAdmin backups and Cron Jobs
A database stores information such as WordPress posts, memberships and application records. A database user determines which operations the application can perform on that data. Cron Jobs schedules tasks to run at defined times. This guide connects the three through an actual demo.
Open cPanel from the DCHost customer portal. This example used cPanel 138 and phpMyAdmin 5.2.3. A database and user were created, a sample record was inserted, and an SQL export was restored into a separate database. A temporary cron job was also run, checked and removed. Private account details are masked in the screenshots.
1. Create the database through cPanel
Open Databases → Database Wizard. Older cPanel versions may call it MySQL Database Wizard.
- Enter a recognizable name in New Database. The example uses the suffix
rehber. - Check the account prefix next to the field. The full database name combines that prefix and your suffix.
- Click Next Step. cPanel creates the database and opens the user step.
Databases → Database Wizard asks for the name first.
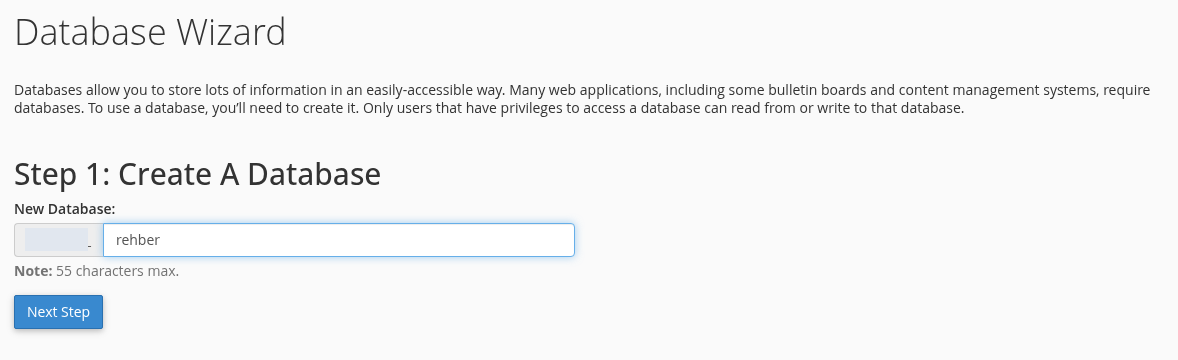
Step 1: Include the prefix in the name
- Include the prefix in the name
cPanel adds an account prefix. Your application must use the resulting full name, not just a suffix such as rehber.
- Create it with Next Step
Use a distinct test name. This button creates the database and opens the user step.
An actual cPanel demo screen. Account-specific information is permanently masked.
Create databases and users through cPanel’s tools. Creating them inside phpMyAdmin can interfere with cPanel’s account mapping and backup/restore management. Use phpMyAdmin for the tables and data of databases already created in cPanel.
2. Create a separate user and password
In Step 2: Create Database Users, complete Username. Enter the same strong password in Password and Password (Again), or use Password Generator. Save it securely, then click Create User.
The application database user has its own password.
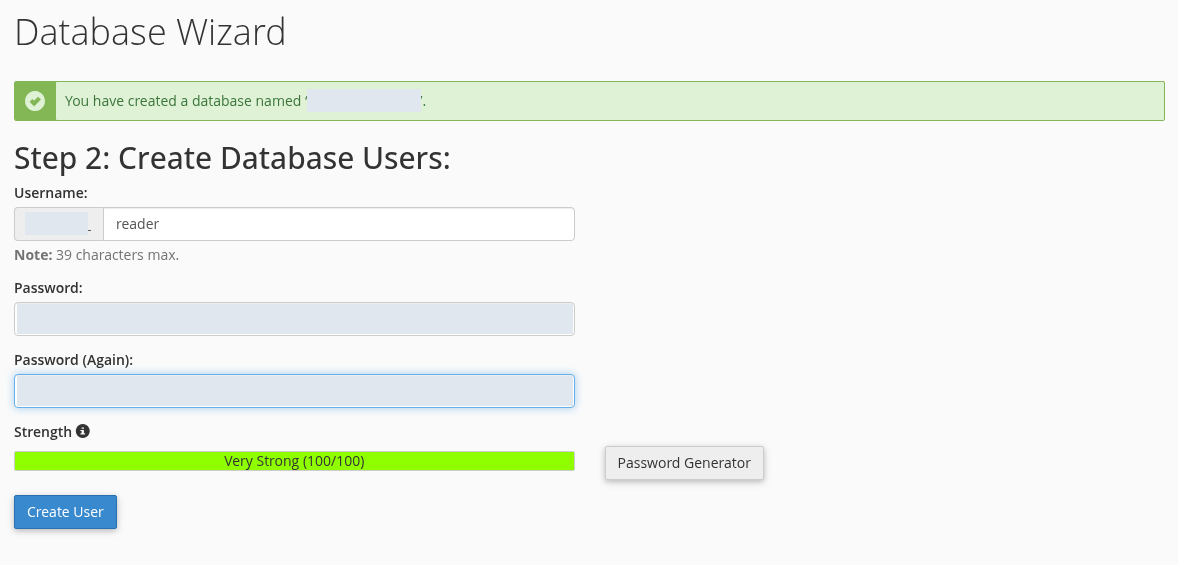
Step 1: Save the full username
- Save the full username
Enter a recognizable suffix in Username. Use the full prefixed name in application settings.
- Store a strong password securely
Password and Password (Again) must match. Keep the password in a private password manager, not a support message or screenshot.
- Continue with Create User
The next step associates this user with the selected database and sets its privileges.
An actual cPanel demo screen. Account-specific information is permanently masked.
The database user is separate from the DCHost customer portal and cPanel login accounts. Your application’s configuration uses this new user’s full name and password. Separate users for separate applications make access easier to manage.
3. Associate the user with the required privileges
At the top of Step 3: Add user to the database, compare the user and database names. Select the privileges required by the application.
This sample application only reads data, so it uses SELECT.
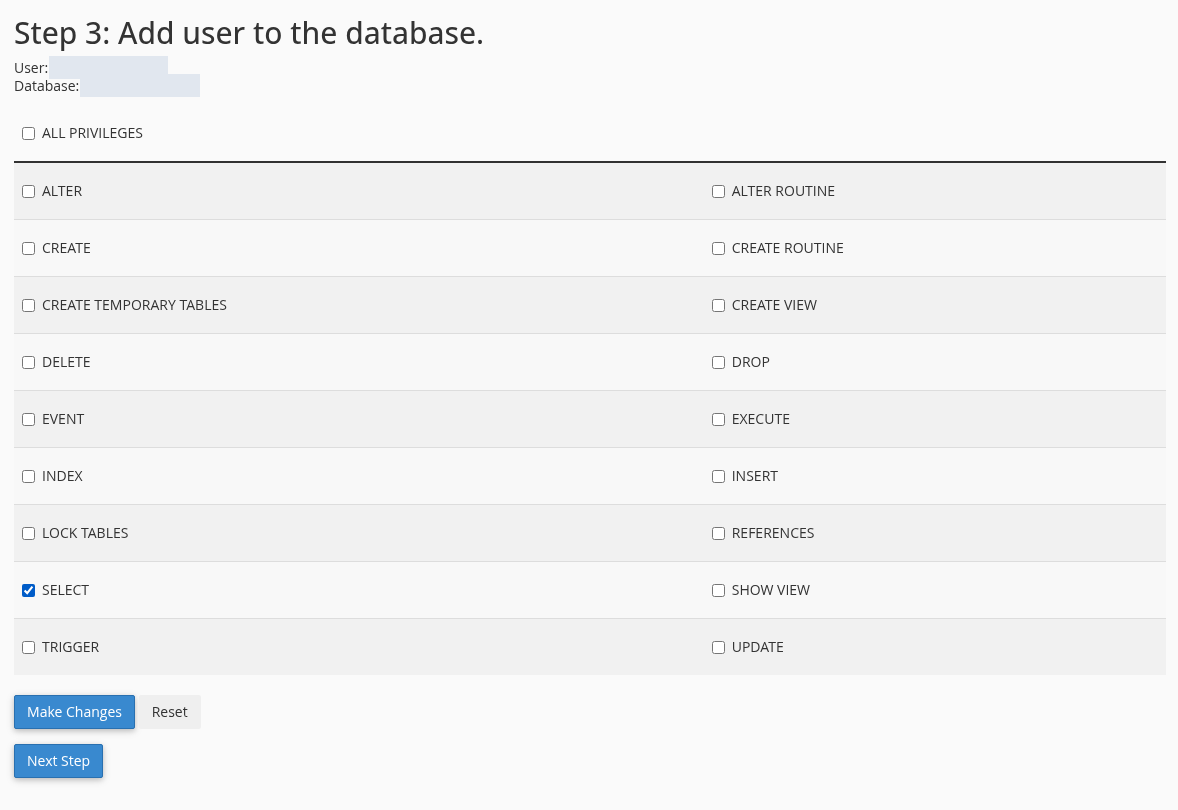
Step 1: Match the user and database
- Match the user and database
Check both names at the top. ALL PRIVILEGES is not an automatic choice for every application.
- Select privileges for the task
SELECT permits reads. Tasks such as installing or updating WordPress may need more privileges; follow the application requirements.
- Finish with Next Step
The final wizard step adds the user to the database. Once confirmed, you do not need to add the same user again.
An actual cPanel demo screen. Account-specific information is permanently masked.
| Privilege | Purpose |
|---|---|
| SELECT | Reads records. This was sufficient for the simple read test in the guide. |
| INSERT / UPDATE / DELETE | Adds, changes or deletes records. |
| CREATE / ALTER / INDEX | Creates or changes tables and related structures. Installation and upgrades may require these. |
| DROP | Can remove objects such as tables. Grant it when required. |
| ALL PRIVILEGES | Grants the listed privileges for the selected database; it is not an automatic choice for every example. |
The demo application only reads one record, so it uses SELECT. WordPress or another application may require broader privileges for installation, normal operation and upgrades. Do not apply this example’s single permission to every application; follow the application’s current requirements.
Click Next Step to finish. Step 4: Complete the Task shows User … was added to the database … when the association is complete.
Step 4 confirms the result.
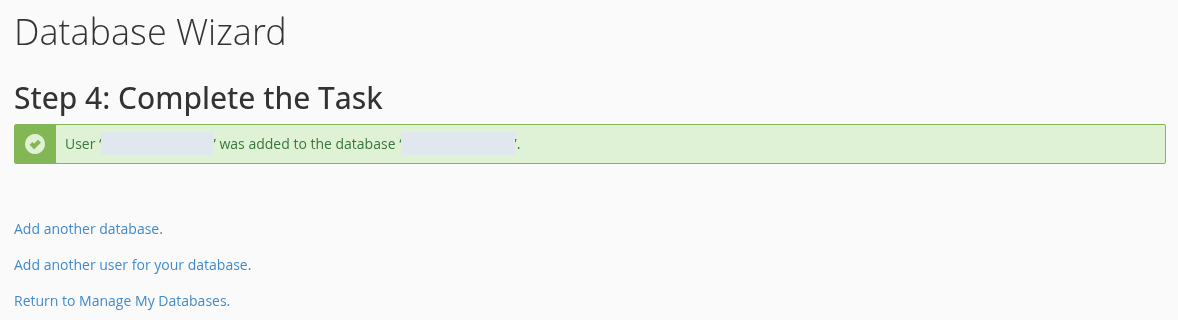
Step 1: Read the success message
- Read the success message
User … was added to the database … confirms the association.
- Use the management link next
Return to Manage My Databases lets you manage users, passwords and privileges later.
An actual cPanel demo screen. Account-specific information is permanently masked.
After completing the wizard, you do not need to add the same user again through Add User To Database. If you use the separate Manage My Databases workflow, creating the database, creating the user and associating the two are separate steps.
4. Match the application’s connection settings
An application installer or configuration file commonly asks for these values:
| Application setting | Value to use |
|---|---|
| Database name / DB_NAME | The full prefixed database name created by cPanel. |
| Database user / DB_USER | The full prefixed user associated with that database. |
| Password / DB_PASSWORD | That database user’s password. |
| Database host / DB_HOST | The database server’s connection address. This demo uses localhost; use the value provided for your service. |
The example keeps connection details in a private file outside the web root. An actual web request verified that PHP could connect and read the sample record. Domain DNS and HTTPS publication still require their own checks.
For Access denied, compare the full username, password, database association and privileges. For Unknown database, check the complete database name. Connection timeouts also require checking the host, port and service configuration. Do not open access to every remote address as a general fix.
If you change the password under Manage My Databases → Current Users → Change Password, update the application configuration too. Leaving the old password in the application will break its connection. The customer portal database and FTP guide explains the other entry points.
If WordPress reports “Error establishing a database connection”, follow the wp-config.php, user and privilege checks. Creating an empty database and starting a new installation does not repair the existing site.
5. Import an SQL file in phpMyAdmin
Open cPanel → Databases → phpMyAdmin. Select the correct database in the left tree, then open Import. Verify the target in the Importing into the database heading.
Select the target database in the left tree before opening Import.
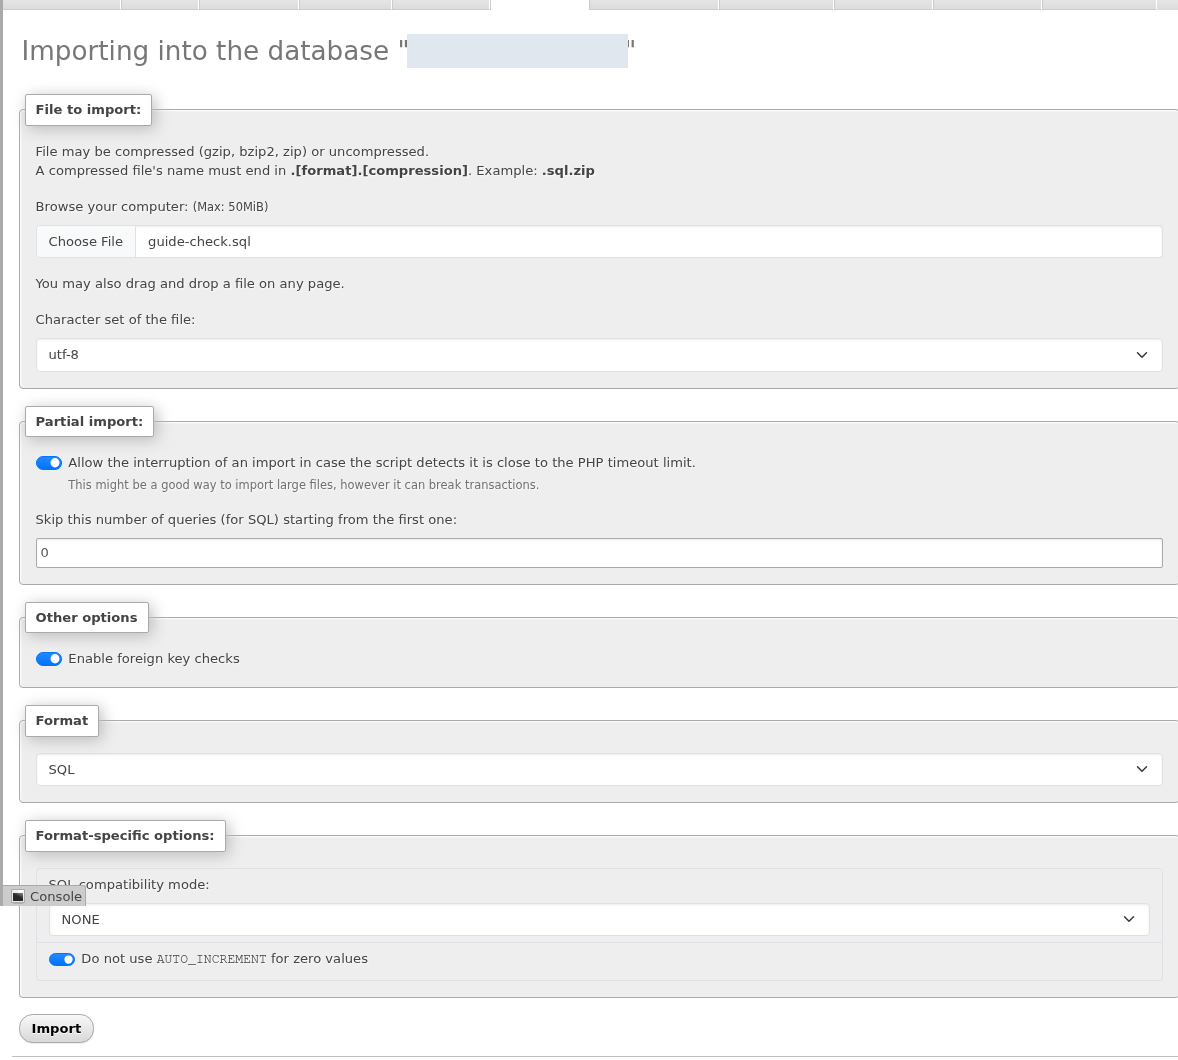
Step 1: Verify the target in the heading
- Verify the target in the heading
Importing into the database names the target. Do not use live data as a test destination.
- Match the file and format
This example imports a two-statement guide-check.sql file as SQL with UTF-8. The displayed upload limit can vary.
- Wait for the import result
Click Import once. Read the completion or error message before leaving the page.
An actual cPanel demo screen. Account-specific information is permanently masked.
- Use Choose File to select the SQL file.
- Check its encoding and Format → SQL. This example used UTF-8.
- Read the upload limit shown on the page. The demo value is not a promise for every hosting account.
- Check the SQL for
CREATE DATABASE,USE,DROPor other statements that can redirect the operation or change existing tables. Establish the file’s source and intended destination. - Click Import once and wait for the result.
The guide-check.sql example only created a new guide_check table and one sample row. It is not a live-site database migration. Allow the interruption… can permit interruptions for larger files, but interruptions can affect operations and transaction integrity. For large SQL files, ask support which method your package supports instead of dividing the file arbitrarily.
The example created a table and inserted one row.
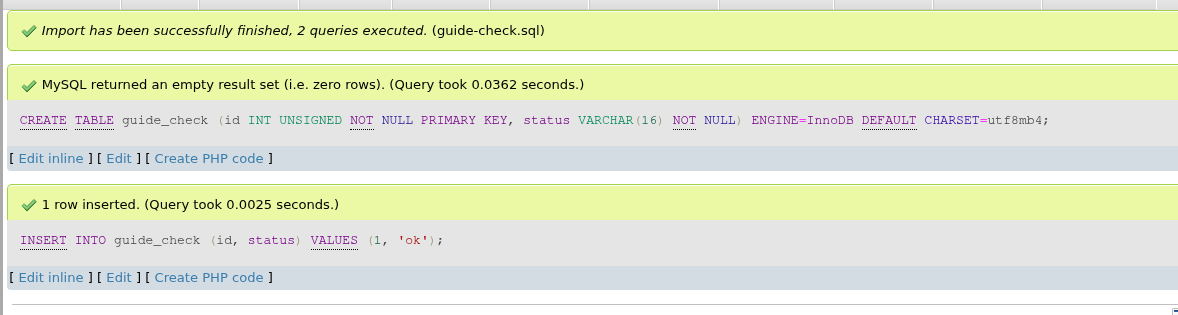
Step 1: Check the completed query count
- Check the completed query count
2 queries executed reports that both statements were processed. Open the table after the success message.
- Identify the inserted row
1 row inserted belongs to the insert step. An empty result set for CREATE TABLE is not itself an error.
An actual cPanel demo screen. Account-specific information is permanently masked.
Import has been successfully finished, 2 queries executed confirms that both statements were processed. 1 row inserted is the data-insertion result. An empty result set for a statement such as CREATE TABLE, which returns no data rows, is not itself an error.
6. Export an SQL backup
Select the database you want to back up and open Export. Quick presents basic options; Custom shows the detailed scope. This example used Custom to check the selected table.
Export → Custom shows which tables will be backed up.
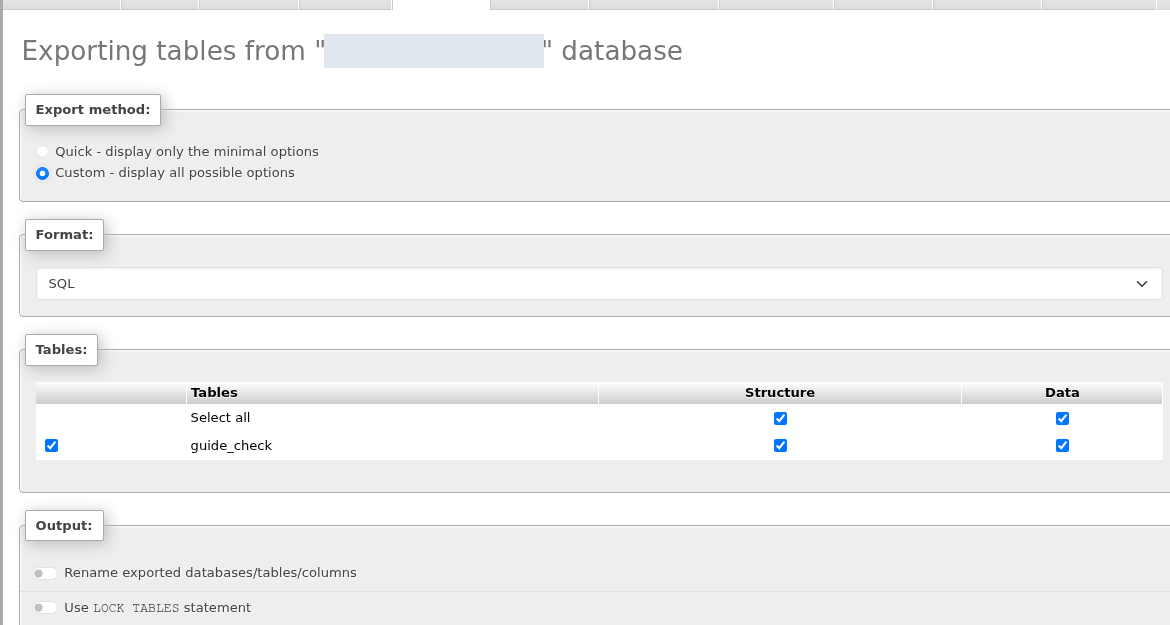
Step 1: Choose the correct database
- Choose the correct database
Check the Exporting tables from heading and SQL format. Keep the backup outside the web root.
- Check Structure and Data
This actual export included both the structure and data of guide_check. The file was then restored into a separate test database.
An actual cPanel demo screen. Account-specific information is permanently masked.
Keep Format → SQL selected. Check both Structure and Data for the relevant tables. Structure alone may omit the records, while data alone may omit table-creation statements. Save output to a file creates a download. Click Export at the bottom of the page to start.
Check the downloaded file’s size and contents in a secure location. The demo export included both the table structure and sample record. It was also checked for CREATE DATABASE or USE statements that could change the intended target; none were present. Keep SQL backups outside public_html, as they may contain customer records and sensitive application information.
7. Restore and verify the backup in a separate database
A downloaded file alone is not proof of a usable backup. This test preserved the original database:
- A different, empty test database was created through cPanel → Manage My Databases → Create New Database.
- The new database was selected in phpMyAdmin. The original database was checked to ensure it was no longer the selected target.
- Import was used to choose the actual SQL file downloaded in the previous step.
- After import completed, the table was opened in Browse.
Create a new empty database through cPanel, then select it here.
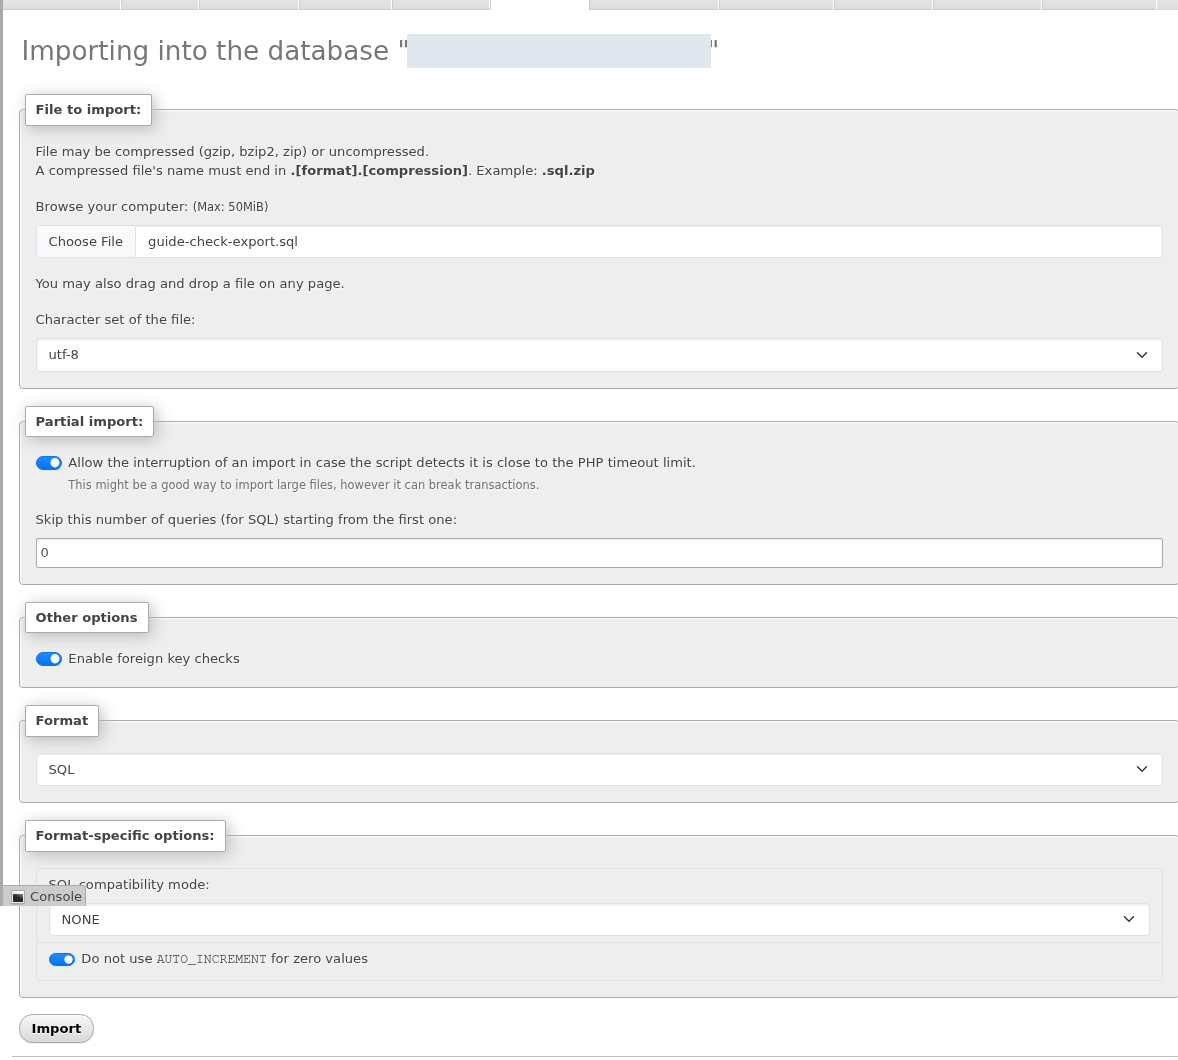
Step 1: Choose a target distinct from the live database
- Choose a target distinct from the live database
The heading names a different database from the original example. Also check the SQL for CREATE DATABASE or USE statements.
- Choose the actual exported file
This file came from the preceding Export operation. After Import, verify row counts and sample data.
An actual cPanel demo screen. Account-specific information is permanently masked.
The completed restore reported 14 queries executed. Exported session-setting and transaction statements contribute to this count; it is not the number of recovered customer records.
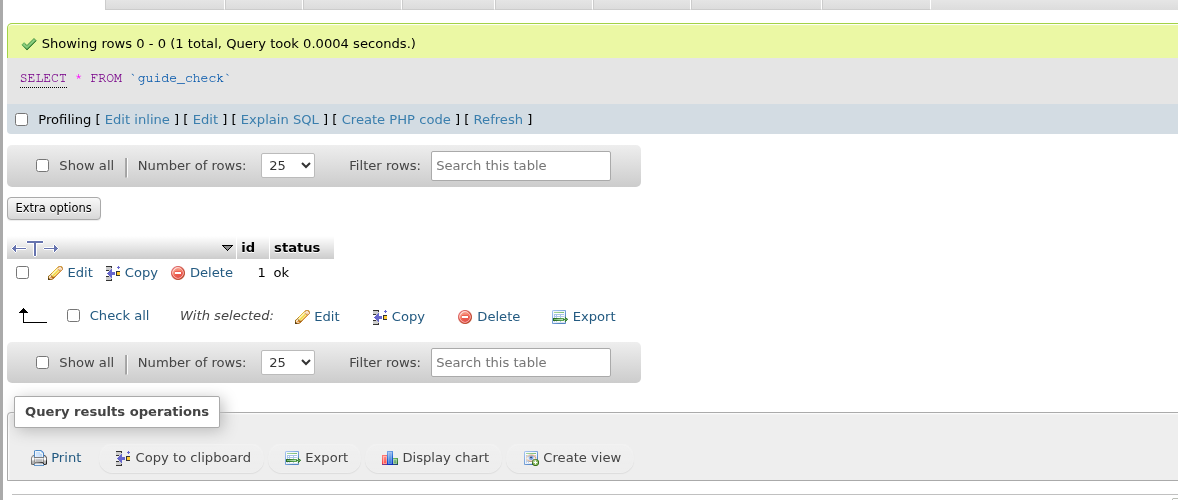
Open the data in Browse after the success message.
Step 1: Check the row count
- Check the row count
Showing rows … (1 total) shows the expected single row. For a real site, compare the expected tables and counts.
- Inspect the contents
id = 1 and status = ok appear in the new test database. This check did not write to the original database.
An actual cPanel demo screen. Account-specific information is permanently masked.
The new database showed 1 total row with the expected id = 1, status = ok values. The original database was not modified. For a real site, compare tables and row counts and test relevant application functions, such as signing in, saving a form or viewing an order. The backup verification guide covers a fuller isolated test.
8. Prepare the cron schedule
Open cPanel → Advanced → Cron Jobs. Cron runs scheduled server tasks even when no customer has a browser open. Applications may use it for queues, maintenance or reports. The appropriate command and interval depend on the application.
| Field | Meaning | Daily at 03:00 example |
|---|---|---|
| Minute | Minute | 0 |
| Hour | Hour | 3 |
| Day | Day of the month | * |
| Month | Month | * |
| Weekday | Day of the week | * |
* matches every value in that field. Read all five fields together. Verify the server timezone; it need not match your browser or computer. Also consider daylight-saving changes in regions that use them.
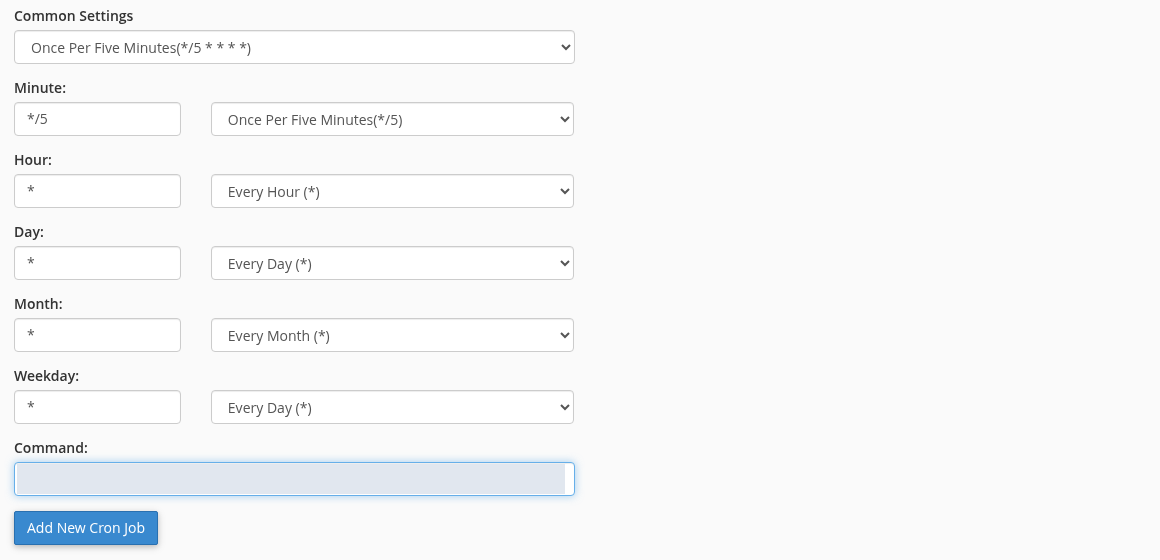
The schedule controls when the job runs; Command controls what it does.
Step 1: Read the schedule fields together
- Read the schedule fields together
The temporary demo used */5 * * * *. Five minutes is not a recommendation for all applications; choose the application’s required interval.
- Verify CLI PHP and the script path
PHP 8.3’s CLI path was verified on this server. The account-specific path is masked; use your own absolute script and log paths.
The task was guarded to attempt the test only once; output went to a private log and no email was sent.
The demo used */5 * * * * only for a temporary functional test. Its script was guarded against doing further work after the first attempt, and the cron entry was removed after verification. A five-minute or one-minute interval is not a general recommendation for all applications.
What belongs in Command?
A PHP task needs the full path to both the CLI PHP executable and the script. Replace the uppercase account placeholder, script name and log path in this example with your own values:
/opt/cpanel/ea-php83/root/usr/bin/php /home/CPANEL_USER/cron/application.php >> /home/CPANEL_USER/logs/application-cron.log 2>&1
This server’s PHP 8.3 CLI path was verified; do not assume your account has the same path. The website’s PHP version and the PHP version used by a cron command can differ. Check the application’s required version and extensions. When PHP reads the script through an explicit interpreter command, the file needs to be readable; independently executable shell scripts have different permission requirements.
Here, >> appends normal output to the log and 2>&1 sends errors to the same log. This preserves error output for inspection. Store the log outside the web root and monitor its growth. Do not discard output through /dev/null before checking failures. If the application must not run twice concurrently, use its locking or overlap-prevention mechanism; allow enough time for an earlier run to finish.
9. Save the job and check its first run
Once the schedule and command are ready, click Add New Cron Job. Check the new entry under Current Cron Jobs.
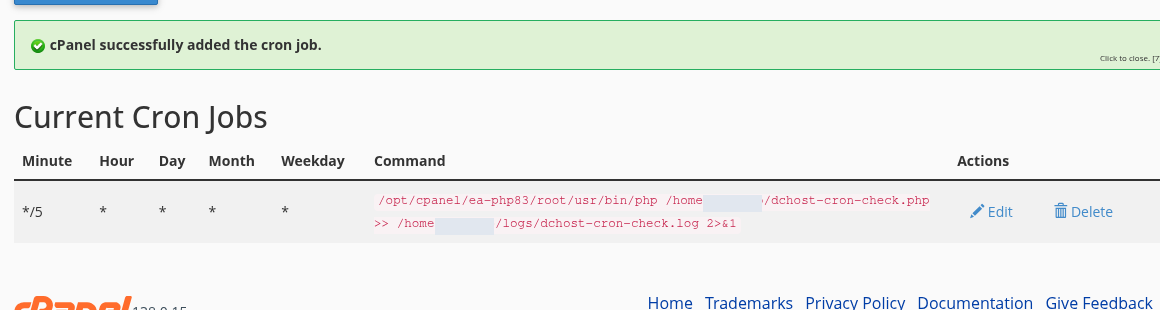
cPanel confirms saving; successful execution needs a separate check.
Step 1: Read the add confirmation
- Read the add confirmation
cPanel successfully added the cron job confirms the entry, not successful application execution.
- Find the schedule, command and action buttons
Compare the schedule and command under Current Cron Jobs. Edit changes this entry; Delete removes this job.
An actual cPanel demo screen. Account-specific information is permanently masked.
cPanel successfully added the cron job confirms the saved entry. After the scheduled time, check the task’s output and log. The actual demo output was opened through File Manager → logs → log file → View:
Use File Manager → logs → log file → View to read the actual output.

Step 1: Open the correct log file
- Open the correct log file
The heading identifies this test job’s log. Logs are kept outside the web root in an account-private directory.
- Match the timestamp and success message
This run passed the cron and database-read test. UTC identifies the log’s timezone; compare it with your server schedule.
An actual cPanel demo screen. Account-specific information is permanently masked.
The log shows Cron ve veritabanı okuma testi başarılı, meaning the cron and database-read test passed, with a UTC timestamp. Task output was redirected to the file, so no cron email was sent; the account’s Cron Email setting was not changed. Redirecting cron output does not independently stop emails sent by the application itself.
Where should I start if the job does not run?
First check whether the scheduled time has arrived and whether timezone differences explain the delay. Then inspect the full script path, ownership/read permission, CLI PHP version, required extensions and the first error in the log. Cron’s working directory and environment can differ from a browser request or interactive terminal. Do not create repeated copies of the same job while troubleshooting.
10. Edit or remove a cron job
Current Cron Jobs → Edit changes the existing entry’s schedule or command. Edit that entry instead of adding a second copy of the same task. Check the next run after any change.
When a temporary test is finished, click its Delete action. Review the command in the confirmation, then click Delete to remove that entry only.
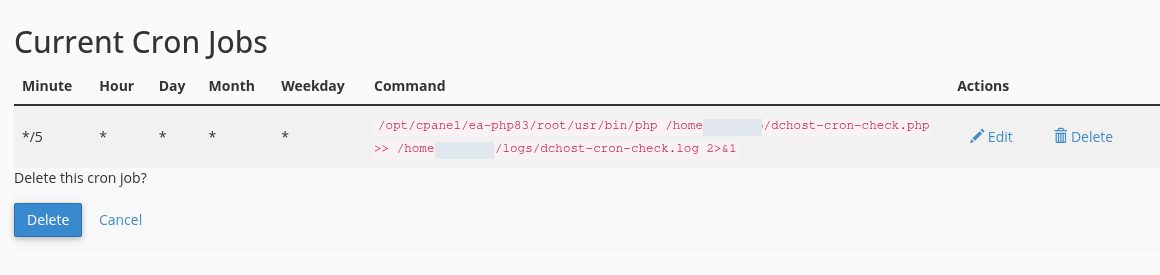
Current Cron Jobs → Delete opens a confirmation.
Step 1: Check the entry being deleted
- Check the entry being deleted
Verify that the displayed command belongs to the completed test. Preserve other applications’ jobs.
- Confirm removal with Delete
The confirmation removes this cron entry only. It does not delete the PHP file, log or data already produced.
An actual cPanel demo screen. Account-specific information is permanently masked.
Check Current Cron Jobs again after removal.

Step 1: Read the final list
- Read the final list
This demo account had only the test job; after removal it shows No Cron Jobs.
- Treat file cleanup separately
Other jobs in your account should remain. Clean up unneeded test files separately after confirming your backup.
An actual cPanel demo screen. Account-specific information is permanently masked.
This demo account had only the test job, so the final list shows No Cron Jobs. Other applications’ jobs should remain in your account. Removing a cron entry does not delete the PHP script or data produced by earlier runs.
11. Distinguish web errors from the cron log
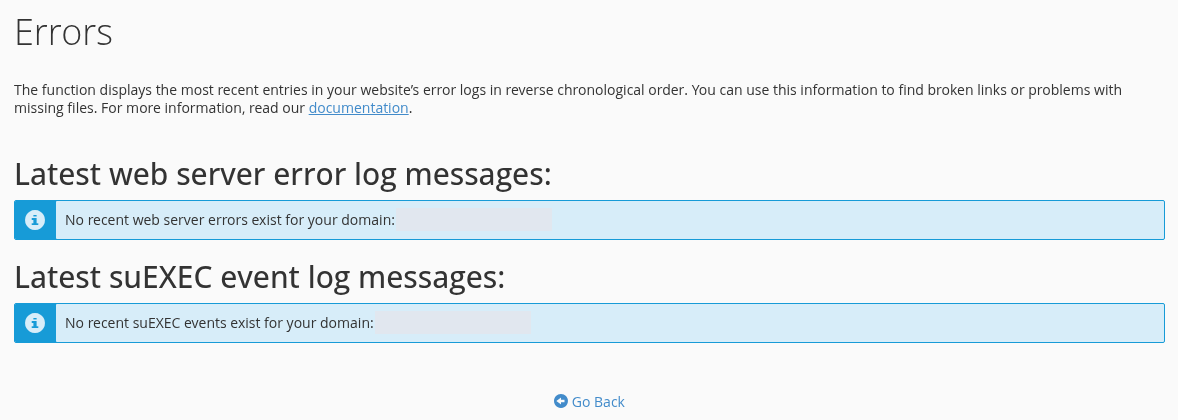
Metrics → Errors shows the latest 300 web-server error entries. It is not a combined view of all PHP-FPM, application and cron logs. For cron, inspect the log specified in the command; for the website, inspect the relevant web/PHP application log.
Metrics → Errors shows web-server log entries.
Step 1: Check web-server messages
- Check web-server messages
This actual check shows no recent web error. Note the time of a problem and compare it with the new request’s log entry.
- Do not treat an empty log as a complete health check
Errors is limited to the latest 300 web-server entries. PHP-FPM and application logs may need separate inspection.
An actual cPanel demo screen. Account-specific information is permanently masked.
The demo showed no recent web errors. This is not a complete health check of every application function. The file-management guide explains folders and permissions; the support-request guide explains how to include the problem time and relevant message. Do not paste passwords or private connection settings into a support request.
Frequently asked questions
Why can the application not connect after I create the database?
Check the full prefixed database and user names, password, host and user-to-database association. Creating a database does not grant every user access to it.
Does access to phpMyAdmin prove that the application password is correct?
No. A phpMyAdmin session opened through cPanel is different from the application’s connection using its own credentials. Test the application’s actual connection separately.
Should I test an SQL backup after downloading it?
Yes. The file must contain the required structure and data and import successfully into a separate test target. This guide re-imported the actual export and checked the sample record. Do not overwrite a live site for a restore test.
Does a saved cron entry mean the task has succeeded?
No. The list confirms the schedule. Check the first run time, log and expected application result. Incorrect CLI PHP, paths or permissions can make a saved task fail.
Official references: Database Wizard, Manage My Databases, phpMyAdmin import/export, Cron Jobs, Errors.