cPanel File Manager: uploads, permissions and backups
cPanel File Manager lets you upload and edit hosting files in your browser. This guide helps you find the right website folder, verify an upload, understand file permissions and choose between creating a backup and restoring one.
Start by opening cPanel from the DCHost customer portal. The screenshots come from an actual demo hosting account, with account details masked. The files were uploaded and a sample PHP application was checked for database reads. A full account backup was also generated and downloaded through Backup Wizard. The completed database restore example is in the database guide.
1. Identify the website’s document root
Open Files → File Manager from cPanel. The left pane lists folders; the right pane shows the selected folder’s contents. The path field at the top shows your current location. Enter a path and click Go to open it.
The primary domain often uses public_html. An additional domain or subdomain can use a different folder. If you are unsure, check Document Root under Domains → Domains. The document root is the folder from which the website serves files to visitors.
Check the document root and the uploaded files together in File Manager.
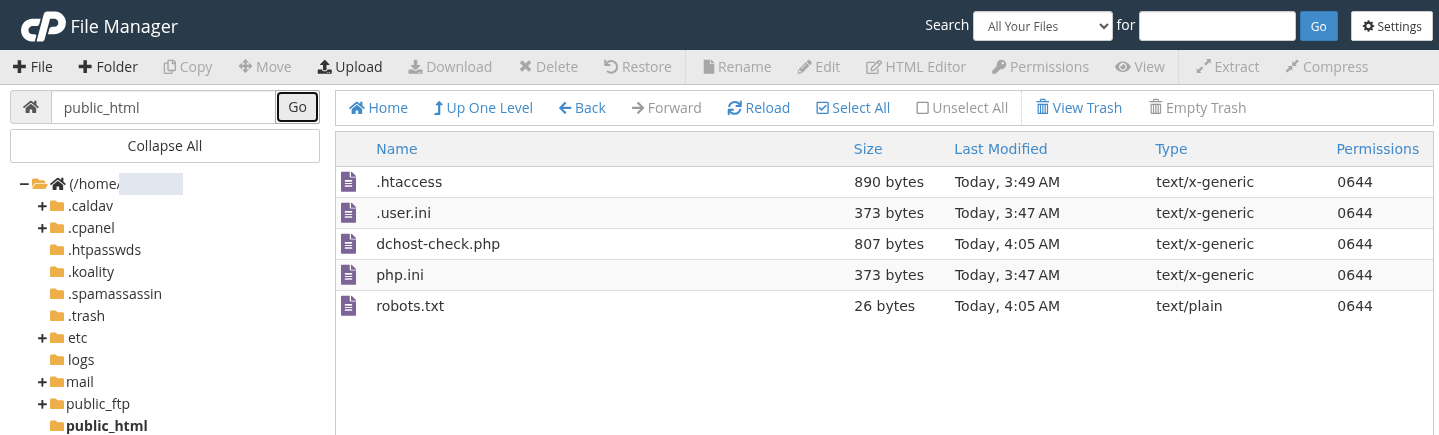
Step 1: Read the folder path
- Read the folder path
The primary site uses public_html in this example. An additional domain may use a different document root.
- Verify the filename and size
Your uploaded file should appear in the list. Back up an existing file before replacing one with the same name.
An actual cPanel demo screen. Account-specific information is permanently masked.
| Folder or entry | Purpose |
|---|---|
public_html | The primary website’s publication folder in this example. Upload application files to the correct root. |
mail | Email data. Do not remove it simply because you are moving a website. |
logs | Account logs. Some logs can be stored elsewhere. |
.cpanel, etc, ssl | Account and service configuration. Do not replace these in bulk as ordinary website files. |
www or access-logs | These can be links to another location. Do not delete them because they look like duplicate folders. |
Expected result: The domain’s document root and the File Manager path should refer to the same location. A familiar folder name alone is not enough to establish that you are in the correct place.
2. Show hidden files such as .htaccess
- Click Settings at the top right of File Manager.
- Select Show Hidden Files (dotfiles).
- Click Save and return to the file list.
This option reveals dotfiles such as .htaccess.
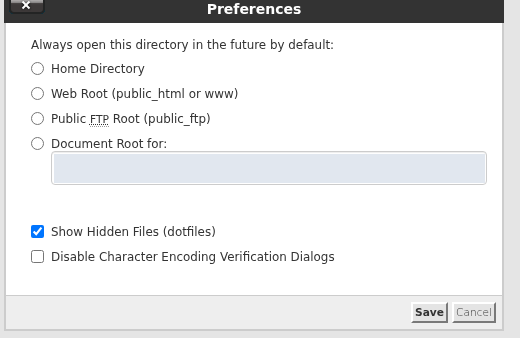
Step 1: Choose the starting folder
- Choose the starting folder
Home Directory opens the account, Web Root opens the web folder, and Document Root for selects a domain.
- Show dotfiles and save
Select Show Hidden Files (dotfiles), then Save. You do not need to disable character-encoding checks.
An actual cPanel demo screen. Account-specific information is permanently masked.
Files such as .htaccess and .user.ini can now appear. This option reveals existing files; it does not create them. If a file is still missing, verify the folder. You do not need to enable Disable Character Encoding Verification Dialogs. Reading the encoding check can help prevent damage to files containing non-ASCII text.
3. Upload files and verify completion
- Open the destination folder for the website.
- Click Upload in the toolbar.
- Check the destination path at the top of the new tab.
- Use Select File to choose a local file, or drag it into the upload area.
- Wait for 100% and a complete result.
- Use Go Back to return to the list. Click Reload if needed, then compare the filename, size and date.
Selecting a file and completing its upload are separate steps.
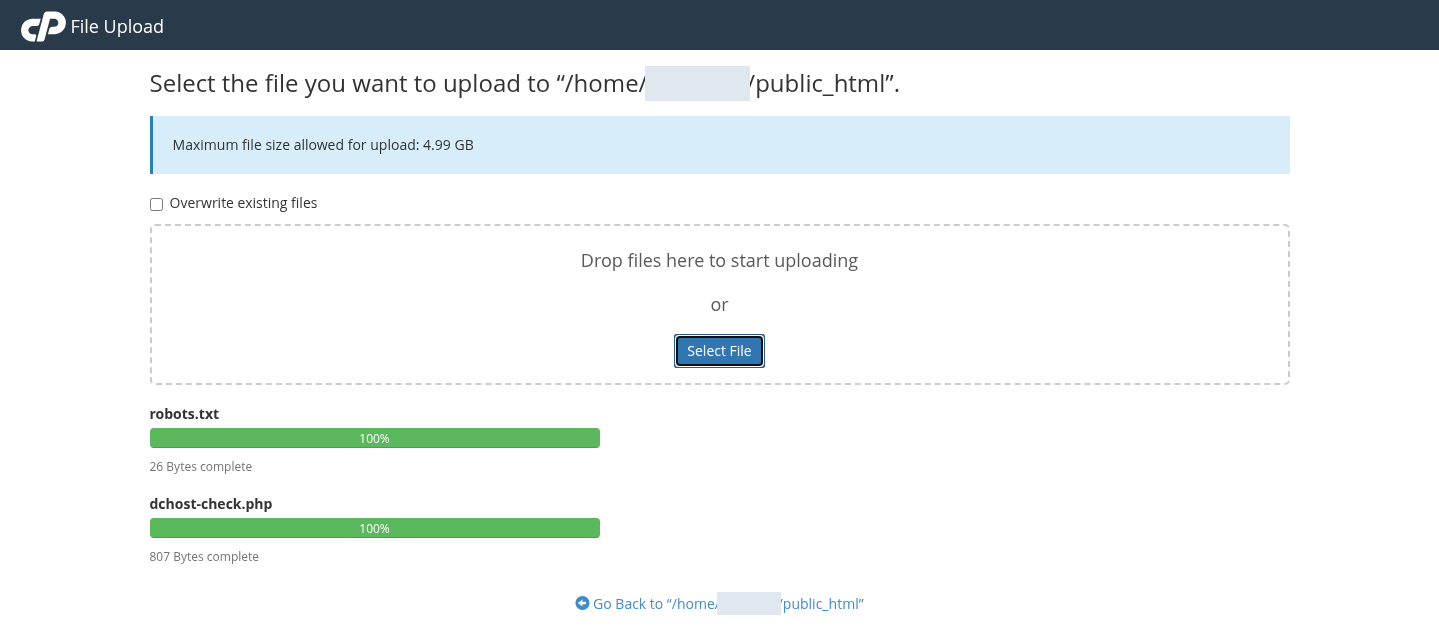
Step 1: Check the destination
- Check the destination
The path at the top points to public_html. Overwrite existing files can replace current files; leave it off unless you intend that.
- Look for 100% completion
Both files completed at 100% in this actual upload. Use Go Back and verify them in the file list.
An actual cPanel demo screen. Account-specific information is permanently masked.
Overwrite existing files can replace a file with the same name. Leave it off for a new upload. Before updating an existing file, download its current copy and check that you are replacing the intended file.
The robots.txt and dchost-check.php files in the screenshot belong to this demo. Search-engine crawling was disabled for the demo; do not copy its robots.txt contents onto your live website. Your live site needs its own publication files and crawling rules.
How do I upload a folder or ZIP archive?
For many files, you can prepare a ZIP archive on your computer. Upload it to the intended destination, select it and click Extract. Check the extraction path. If the archive contains an extra outer folder, the website might end up under public_html/project/ instead of the domain’s root.
Extraction can affect existing files with the same names. Prepare a backup and migration plan before replacing a working website. Do not leave database dumps or complete site archives in the web root afterward. The WordPress migration guide covers files and the database together.
4. Keep a recoverable copy before editing
Click a file once to select it. Download copies it to your computer; Edit opens a text file for editing. If an encoding dialog appears, choose the file’s actual encoding. If characters appear corrupted, leave without saving and check the encoding first.
Use this sequence for a controlled edit:
- Download the original, or use Copy to place it in a separate backup folder outside the web root.
- Open Edit and make a small, specific change.
- After saving, test the affected page or application function as well as the text in the editor.
- If the change causes a problem, restore the saved copy to the correct path and test again.
Do not keep .bak, .old or ZIP copies of password-bearing configuration files under public_html. Changing the extension can cause the web server to offer the contents for download instead of executing the file. For projects deployed through Git, use the project’s deployment workflow; a later deployment can overwrite direct File Manager edits.
5. Understand file permissions
Select a file and open Permissions. User is the account owner, Group is the associated group and World covers other users. Read allows reading, Write allows changes, and Execute allows execution or directory traversal.
Permissions determine who can read or modify a file.
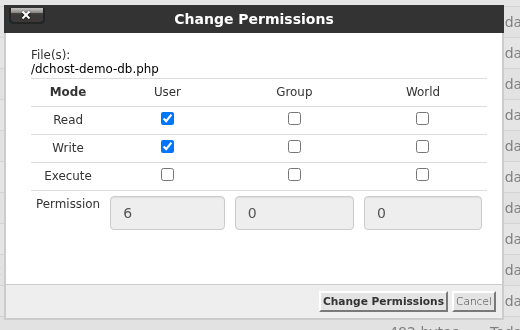
Step 1: Read User, Group and World
- Read User, Group and World
This example is a private connection file outside the web root. Mode 600 allows only the account owner to read and write it.
- Apply only to the selected file
Change Permissions saves the selected file. Do not apply 600 to the whole site; web files and directories need different permissions.
An actual cPanel demo screen. Account-specific information is permanently masked.
In this example, the private database configuration file was kept outside the web root and set to 600. The sample PHP application could read it as the account owner. This is not a setting to apply to every file and directory in a website.
Ordinary web files often use 644; directories can use 750 or 755, depending on the server configuration. Correct permissions depend on ownership and how PHP runs. Setting everything to 777 to resolve an error can grant unnecessary write access.
Expected result: The selected file’s Permissions column should show the saved value, and the application using it should still work. If a permission change breaks access, restore the earlier value and have ownership checked rather than trying arbitrary modes.
If an upload or permission change is followed by 403 Forbidden, follow the 403 error guide. Check the document root, index file and access rules against the matching log.
6. Review total disk usage
Files → Disk Usage shows which account folders consume space. Find the larger directories, then inspect their contents in File Manager. Databases and email also contribute to account usage.
Consider site files, email and other account data together.
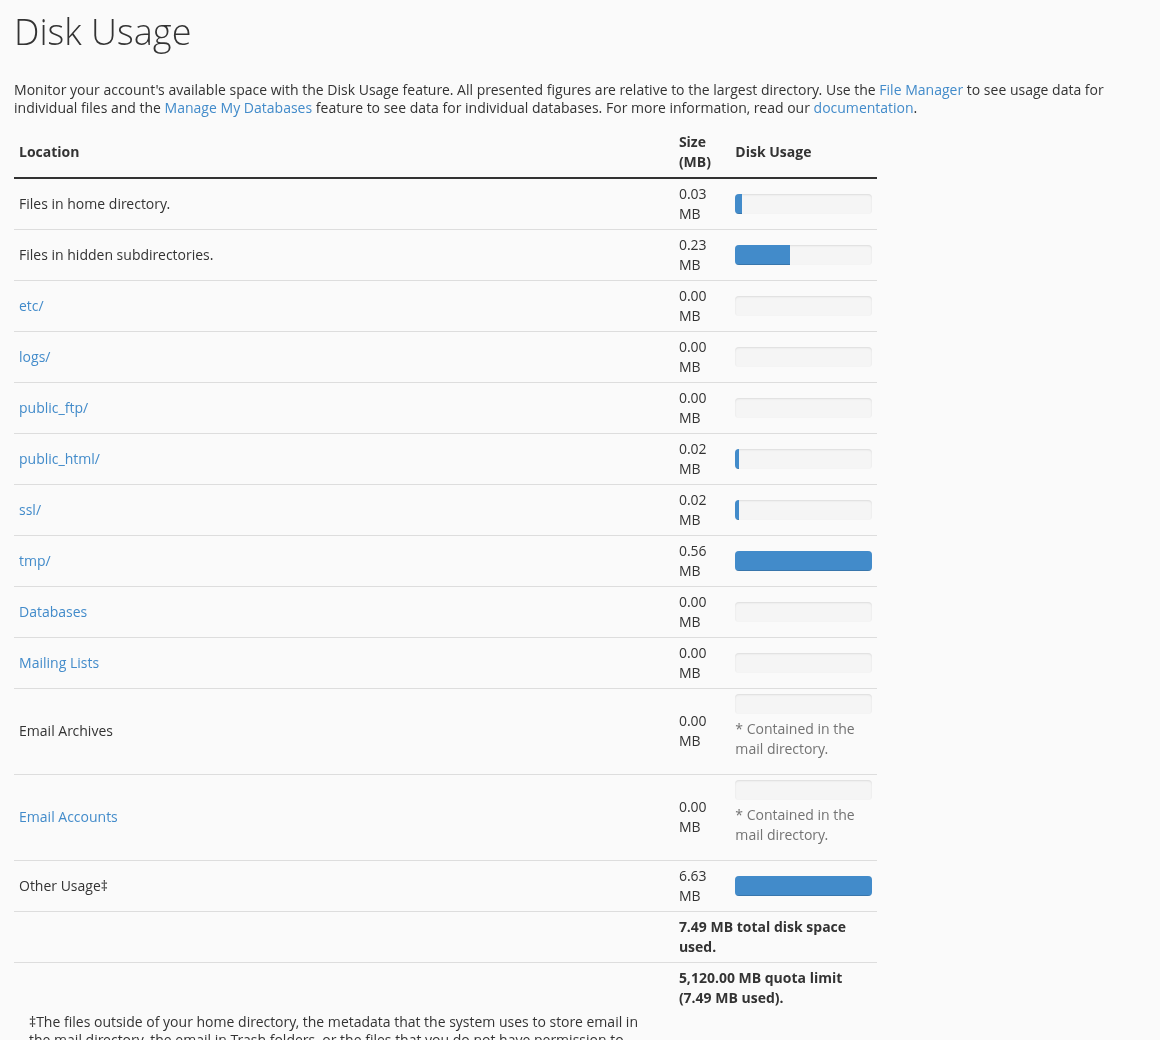
Step 1: Inspect the largest directories
- Inspect the largest directories
Disk Usage shows directory usage. Use File Manager for individual files; do not delete unfamiliar directories.
- Compare the total and quota
This demo account shows a 5,120 MB limit. Your plan can differ, and counters may not update immediately.
An actual cPanel demo screen. Account-specific information is permanently masked.
The demo displays a 5,120 MB quota; your plan can have a different limit. Other Usage is not the same as the individual website files visible in File Manager. Counters can lag behind recent changes, and a file’s logical size can differ from the disk space allocated to it.
Check free space before creating a backup. An account at its quota might be unable to write an archive or required temporary files. Review old archives and logs before removing them; do not delete unfamiliar system folders or email data to free space.
7. Choose the backup type
Open Files → Backup Wizard. Back Up prepares a new copy, while Restore restores an existing partial backup.
Backup Wizard starts with two distinct operations.
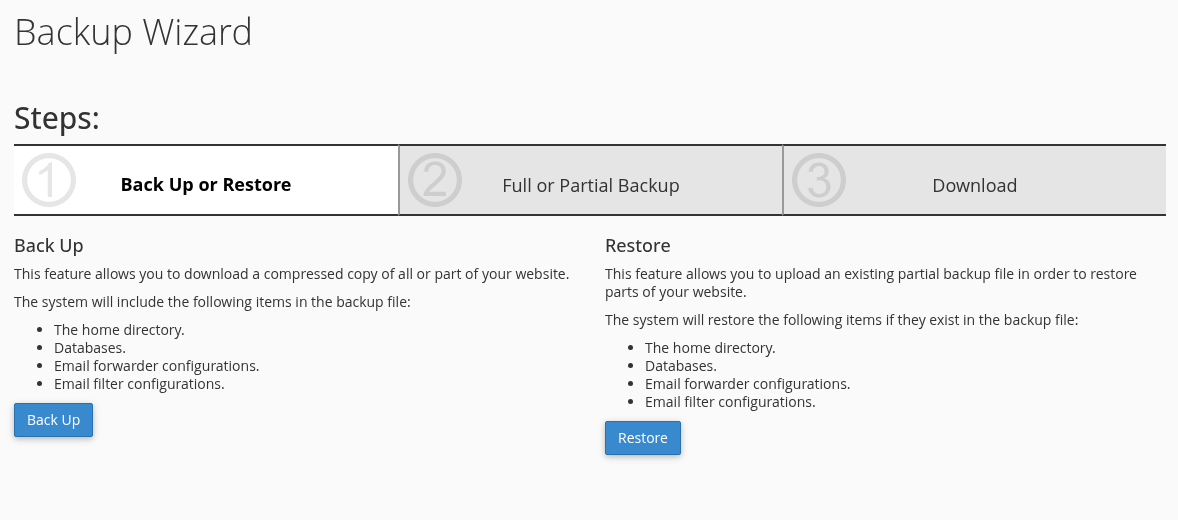
Step 1: Use Back Up to make a copy
- Use Back Up to make a copy
Back Up creates a backup. Use this path to preserve a copy of the current working data.
- Use Restore for an existing copy
Restore uploads an existing partial backup and can change current data. Identify the target and backup scope first.
A full account backup was created and downloaded through Back Up in this demo. No full account restoration was performed through Restore.
Choose Back Up to see full and partial backup options:
Choose according to the data you need to protect.
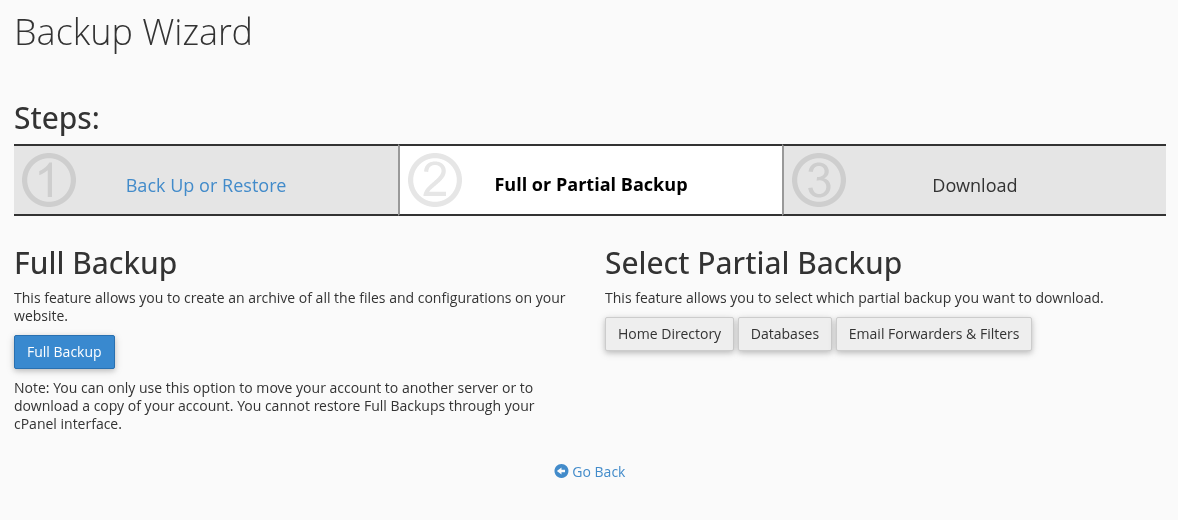
Step 1: Understand Full Backup
- Understand Full Backup
A full account archive is useful for migration or a broad copy. Customer cPanel cannot restore that full archive itself.
- Choose the needed component
Home Directory covers files, Databases covers databases, and Email Forwarders & Filters covers forwarding and filtering settings.
An actual cPanel demo screen. Account-specific information is permanently masked.
| Option | Contents and use |
|---|---|
| Full Backup | An archive covering files and account configuration. Automated restoration of the full account is handled by the provider/WHM. |
| Home Directory | Files within the account-home backup scope, including website files and covered mail data. It does not replace a separate database backup. |
| Databases | The selected database. It does not include website files. |
| Email Forwarders & Filters | Forwarding and filtering settings. It is not a backup of every message in the mailboxes. |
Restoring WordPress or another database-backed website requires compatible copies of the files and database. Keep an independent backup outside the hosting account as well. Use the backup guide to define coverage and retention.
The full-backup generation form
Under Full Backup, Backup Destination → Home Directory stores the archive in the account home. Check the notification address, or choose the no-notification option if appropriate. Include integration links may include external-account credentials; understand its purpose before enabling it.
This actual example selected Home Directory as its destination.
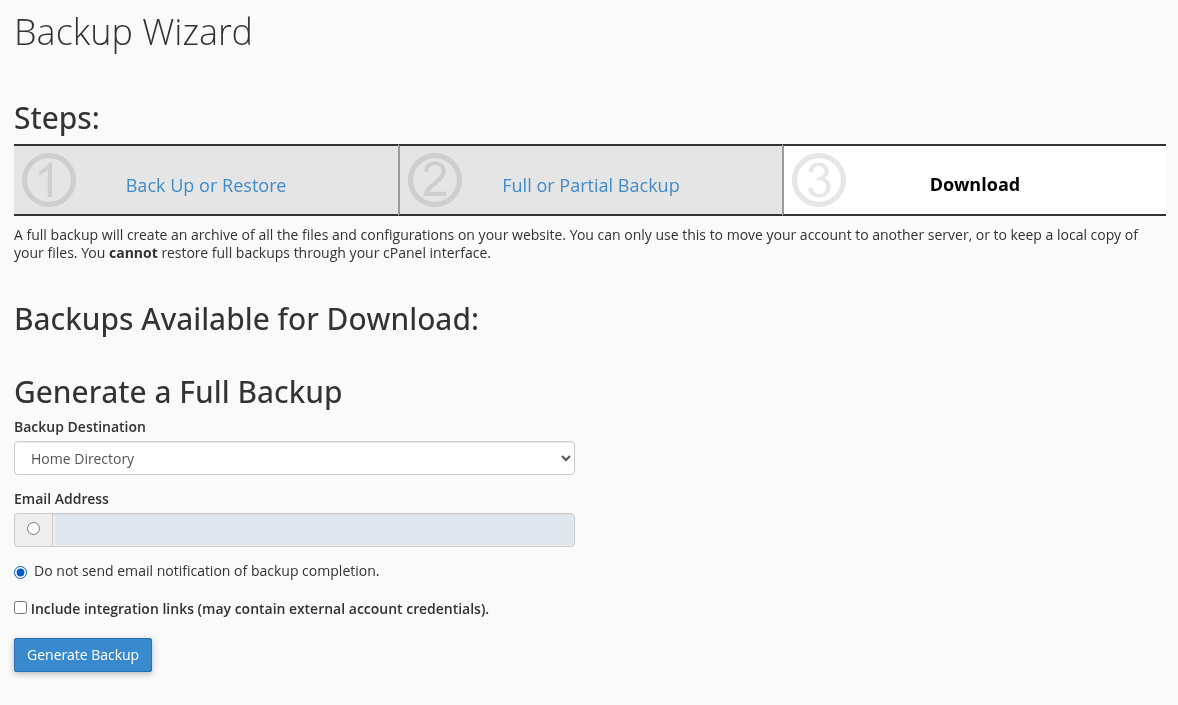
Step 1: Check destination and scope
- Check destination and scope
Home Directory stores the archive in the account home. Include integration links was left off in this demo.
- Set the notification preference
This demo selected Do not send email notification of backup completion. Generate Backup was used once.
An actual cPanel demo screen. Account-specific information is permanently masked.
Once the destination and free space are ready, Generate Backup starts the process. Acceptance of the request does not mean the archive is usable yet. Review Backups Available for Download, the date and the file size, then download the completed file to a secure location.
This demo selected Home Directory, disabled the completion email and submitted Generate Backup once. The first result was Full Backup in Progress:
The start message does not mean the backup is complete.

Step 1: Read the In Progress status
- Read the In Progress status
Full Backup in Progress means generation is running. Do not treat the archive as ready at this stage.
- Check the result in the download list
Use Go Back. Wait for the completed file in the list instead of starting the same backup again.
An actual cPanel demo screen. Account-specific information is permanently masked.
The dated archive then appeared in the download list. It was downloaded and checked for readability, account files and SQL data.
The generated file appears under Backups Available for Download.
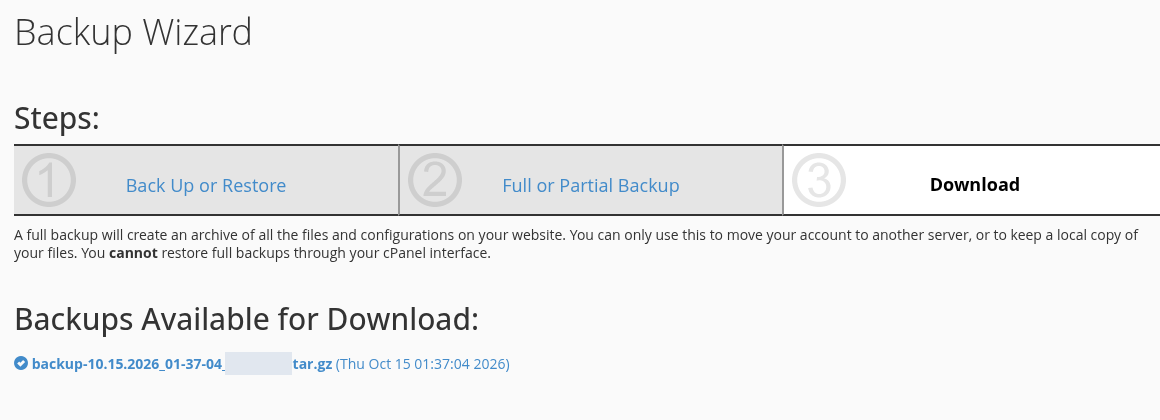
Step 1: Find the dated archive
- Find the dated archive
The filename and date should match the backup just started. The account-specific filename portion is masked.
- Verify the contents after downloading
This archive was downloaded and checked for readability, home-directory contents and SQL data. A full account restore test remains a separate task.
An actual cPanel demo screen. Account-specific information is permanently masked.
This check is not a full account restoration test. Uploading a full cPanel archive to the customer-facing Restore form does not automatically restore the whole account. For full-account recovery, open a support request.
8. Restore the appropriate component
Backup Wizard → Restore provides separate paths for Home Directory, Databases, Email Forwarders and Email Filters. Select the required type, choose the relevant file with Choose File and check the destination. Upload starts restoration and can affect current data.
Backup Wizard → Restore → Databases opens the database-backup upload form.
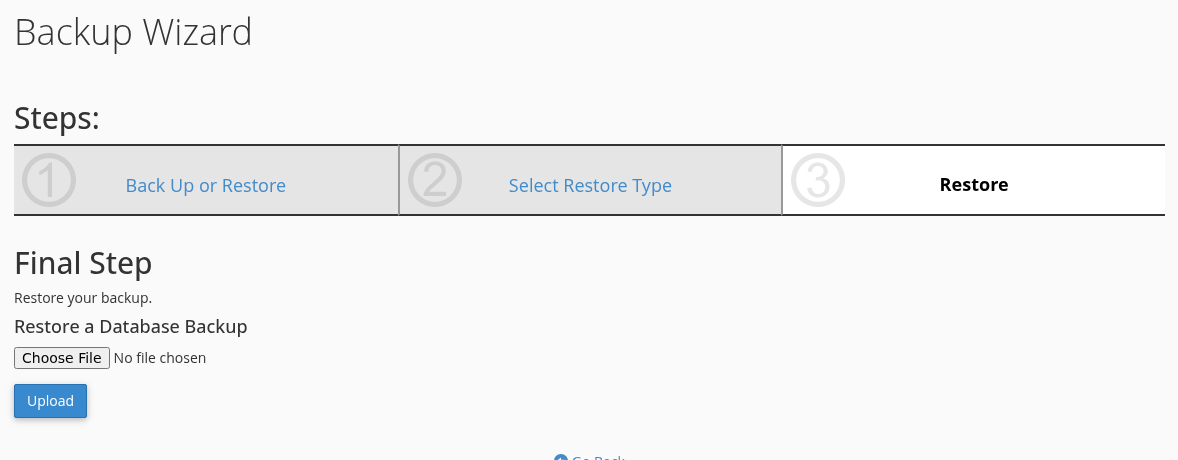
Step 1: Match the backup type
- Match the backup type
This form is for a cPanel partial database backup. Uploading a full account archive here does not restore the entire account.
- Check the file and target
Choose File selects the copy. Upload can change data; do not overwrite a live database for a test.
This form was previewed without submission. The completed SQL restore test in this guide used phpMyAdmin and a separate test database.
This form was previewed without submission. The completed practical example instead restored an SQL export from phpMyAdmin into a separate empty database created in cPanel. The actual export and restore walkthrough shows both the import result and the recovered sample record.
A matching file count is not a complete recovery check. Open the site and test its database connection and important functions. Review permissions, domain settings, SSL and application configuration. Follow the backup verification guide for a fuller isolated test.
Frequently asked questions
Why does the site still fail after the files upload?
Compare the domain’s document root with the destination folder. Then check the index file, DNS and SSL. A database-backed application also needs correct connection details and privileges. A 100% upload result does not establish that all of these work.
Can I restore a deleted file?
A normal File Manager deletion can move a file to Trash. Use View Trash → select the file → Restore. If you selected permanent deletion or used Empty Trash, you need a verified backup instead.
Does a ZIP of my folder back up the whole website?
It includes only the files you compressed. Databases, email and account settings need separate consideration. A WordPress file archive does not replace the database containing posts or orders.
What if characters look corrupted in the editor?
Leave without saving. Check the source file’s encoding and the editor’s selected encoding. Many current web applications use UTF-8, but converting a file without establishing its actual encoding can damage the text.
What if File Manager or Backup Wizard is missing?
Availability depends on the hosting package and panel configuration. Search for the tool in cPanel; if it is still missing, contact support with the service name. Do not share a password or backup through a publicly accessible link.
Official references: cPanel File Manager, Backup Wizard, Disk Usage.