CentOS Stream 10 graphical ISO installation on a VPS
CentOS Stream 10's graphical installer provides Anaconda settings screens for networking, storage, software and an administrator account. This guide uses the DCHost customer portal to upload a Boot ISO, then follows the mouse-driven console interface to create a server without a desktop environment.
If you prefer numbered menus, use CentOS Stream text-based ISO installation. Do not add the text guide's inst.text option to this graphical workflow.
This guide shows a graphical installation completed on a real demo server on 16 October 2026 using the CentOS Stream 10 x86_64 Boot ISO. Startup from disk, regular-user console and SSH access, and sudo privileges were verified. Screenshots use English labels; personal details, network values and passwords are hidden.
Before you start
Repartitioning the installation disk can erase the existing operating system and files. Select the correct server and keep the data you need outside it. Complete the server backup plan before deleting existing partitions.
Release and CPU compatibility
This guide covers CentOS Stream 10, a different release series from discontinued CentOS Linux 7/8. Its x86_64 image requires x86-64-v3 CPU features. Also check whether your applications support Stream 10. See the official CentOS download page for current architectures and lifecycle information.
The graphical installer is separate from desktop software
Using Anaconda's graphical interface does not require the Server with GUI package set. Software Selection → Minimal Install prepares a base server without a desktop environment. The graphical wizard makes the installation choices easier to navigate.
Boot ISO and resource requirements
The Boot ISO is a smaller image that starts the installer. Selected packages are downloaded from CentOS network repositories, so the server's IP, gateway and DNS settings must work during installation. Uploading the ISO does not mean that all software packages are already available on the server.
The Anaconda family's official RHEL 10 resource table lists a 3 GiB RAM minimum for x86_64 HTTP/HTTPS network installation. This supports installer planning; size websites, databases and control panels separately. Do not try to work around it by disabling memory checks.
The example server used for this guide has 3 vCPU, 4 GB RAM and a 60 GiB disk. These are the resources of the server used for the walkthrough; size your applications separately. The portal can label the disk package as 60 GB; the verified virtual disk capacity is 60 GiB.
1. Upload the CentOS Stream Boot ISO
- Open Templates & ISO → ISO Management → Upload ISO for the server.
- Give it a Label identifying the CentOS Stream release and Boot ISO.
- Select File URL and paste the direct official ISO address into Upload from URL.
- Choose Upload, then wait for Ready in the image list.
The selected file for this guide is CentOS-Stream-10-20261013.0-x86_64-boot.iso. Use the complete address:
https://mirror.stream.centos.org/10-stream/BaseOS/x86_64/iso/CentOS-Stream-10-20261013.0-x86_64-boot.iso
Check the matching SHA-256 verification file. If you choose another build, obtain that file and its verification record together from the official ISO directory. This Boot ISO is 949,528,576 bytes.
In Upload ISO, enter a descriptive label, select File URL, and paste the direct Boot ISO link from the official CentOS mirror. This actual example uses the label CentOS Stream 10 x86_64 Boot GUI.
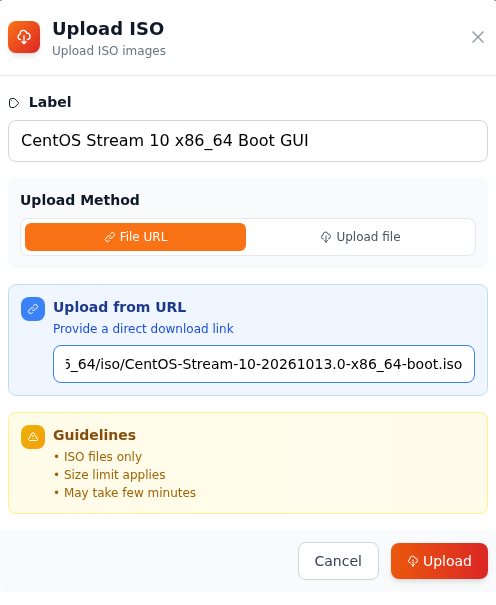
Step 1: Enter a recognizable ISO label
- Enter a recognizable ISO label
Use Label for a name that identifies the release and architecture. The example enters CentOS Stream 10 x86_64 Boot GUI.
- Select File URL
Select File URL under Upload Method. The panel downloads the ISO from the direct link you provide.
- Paste the direct Boot ISO link
In Upload from URL, verify that the official link points to the intended x86_64 Boot ISO. In this capture, the filename ends with CentOS-Stream-10-20261013.0-x86_64-boot.iso.
- Start the download with Upload
After checking the label and link, click Upload. Follow the download status in the list that appears next.
The URL field is horizontally scrolled, so the screenshot shows the filename portion. Copy the full Boot ISO link from the official source.
The Upload from URL field is horizontally scrolled in the screenshot, so it shows the filename part. Use the full URL above, not only the filename. A Label such as CentOS Stream 10 x86_64 Boot GUI makes the image easy to identify in the list.
Pending or Importing means the transfer is still running. Track its status instead of submitting the same file again. Ready means only that the installation media is available; CentOS is not yet installed on the server disk. See ISO upload for the full form.
When the download finishes, the CentOS Stream 10 x86_64 Boot GUI card shows Ready and provides the Boot from ISO button.

Step 1: Verify that this is the Boot ISO
- Verify that this is the Boot ISO
Check the card label and filename. In this example, the filename ends with CentOS-Stream-10-20261013.0-x86_64-boot.iso.
- Verify the Ready status
Ready appears when the download is complete. Wait for this status before proceeding to boot from the ISO.
- Click Boot from ISO
Choose Boot from ISO on the correct ISO card. The panel opens a boot confirmation.
Ready means the installation media is available to boot. Installation to the server disk follows after booting the ISO and opening the console.
2. Open the graphical installer
- Click Boot from ISO for the correct Ready Boot image.
- Check the image in Boot from ISO?, then confirm with Boot Now. This restarts the server.
- Open Console / VNC Console Access.
Boot from ISO? explains that the virtual machine will boot from the selected ISO. Verify that you opened it from the correct Boot ISO card, then confirm when ready.
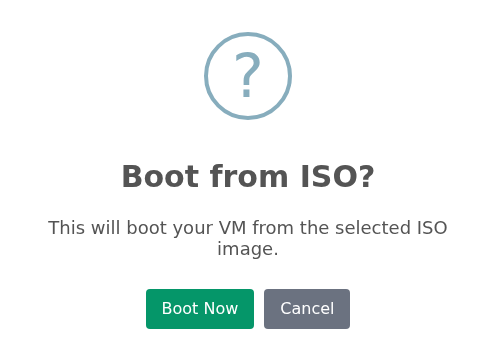
Step 1: Read the selected-ISO boot notice
- Read the selected-ISO boot notice
The dialog states that the VM will boot from the selected ISO image. Make sure you are ready for the server to restart.
- Confirm with Boot Now
Select Boot Now to confirm. Cancel closes the dialog without confirming the boot action.
This image shows the boot confirmation. After Boot Now, open the console to follow the installation media starting.
Select Test this media & install CentOS Stream 10 in the GRUB menu and press Enter. This entry also starts the media check. Wait for the check and the graphical installer to open.
After booting from the ISO, the console opens the GRUB menu. Test this media & install CentOS Stream 10 is selected in this actual capture.
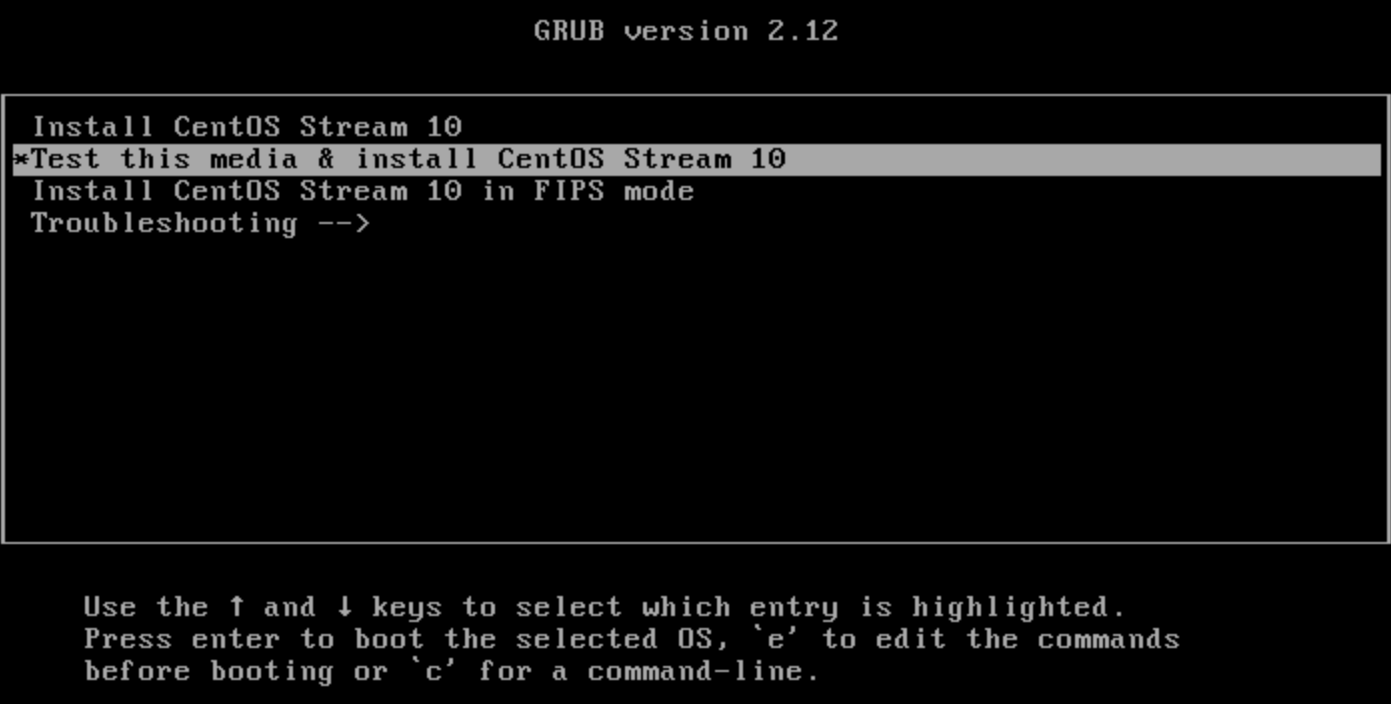
Step 1: Press Enter on the selected entry
- Press Enter on the selected entry
Press Enter while Test this media & install CentOS Stream 10 is selected. Wait for the media check to finish and the graphical installer to open.
This entry checks the installation media before starting the installer. This demonstration continued with Enter without changing the boot parameters.
This workflow uses the default entry without editing its boot line. Do not add inst.text, which opens the text-based installer. The graphical interface opened without additional boot options or disabling memory checks.
3. Select the language and open the summary
On the welcome screen, select English and English (United States) on the right to use the interface shown in this guide. Choose Continue to open the installation summary. You may choose another language, but the labels will differ from these screenshots.
The CentOS Stream 10 welcome screen asks which language to use during installation. English is selected on the left and English (United States) on the right in this actual capture.
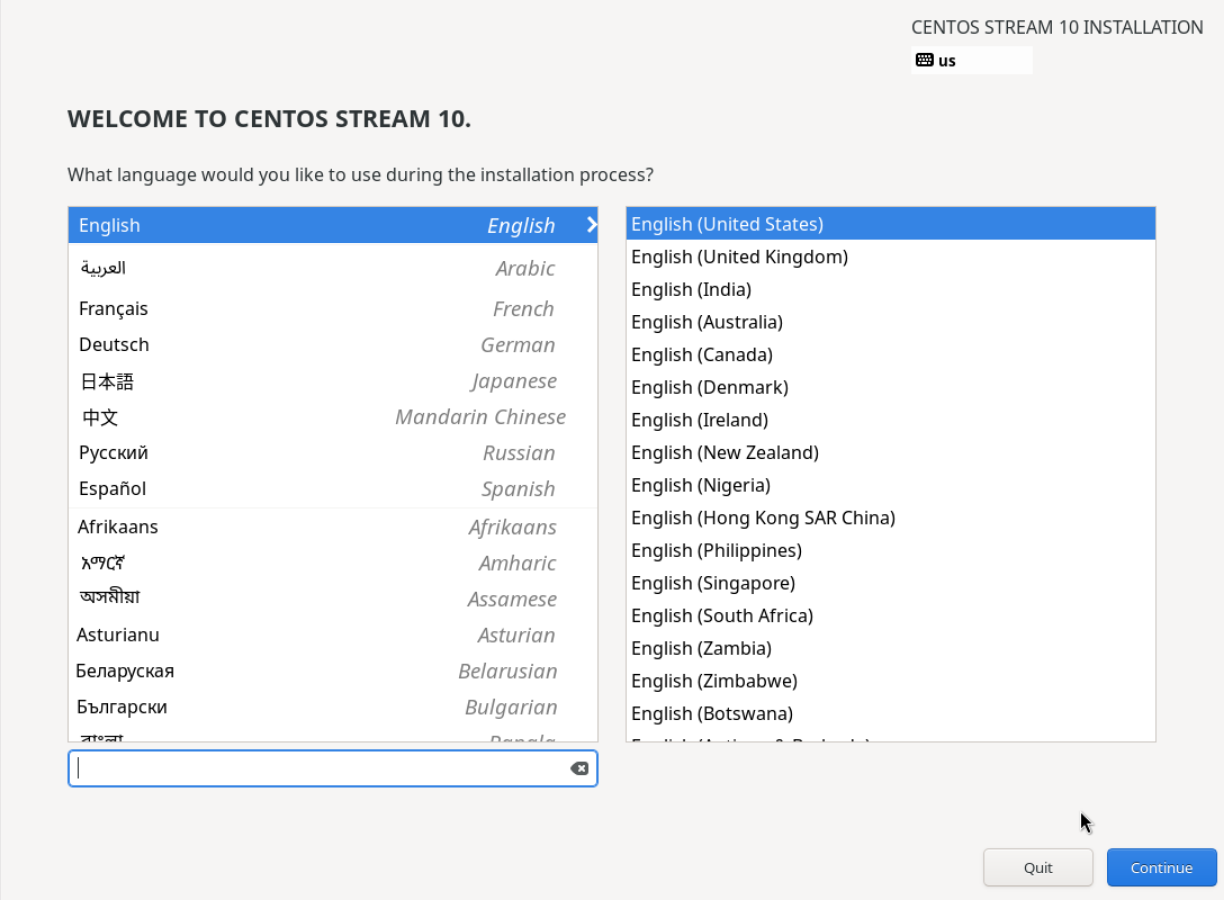
Step 1: Check the English selection
- Check the English selection
English in the left list sets the installer language. This demonstration continues with English selected.
- Check the language variant
English (United States) is selected on the right. You can choose the variant that matches your preference.
- Open the summary with Continue
Click Continue to confirm the choice. The next screen brings the installation settings together.
Check the language choice and use Continue to open the installation summary. Keyboard layout and time zone are configured separately from that summary.
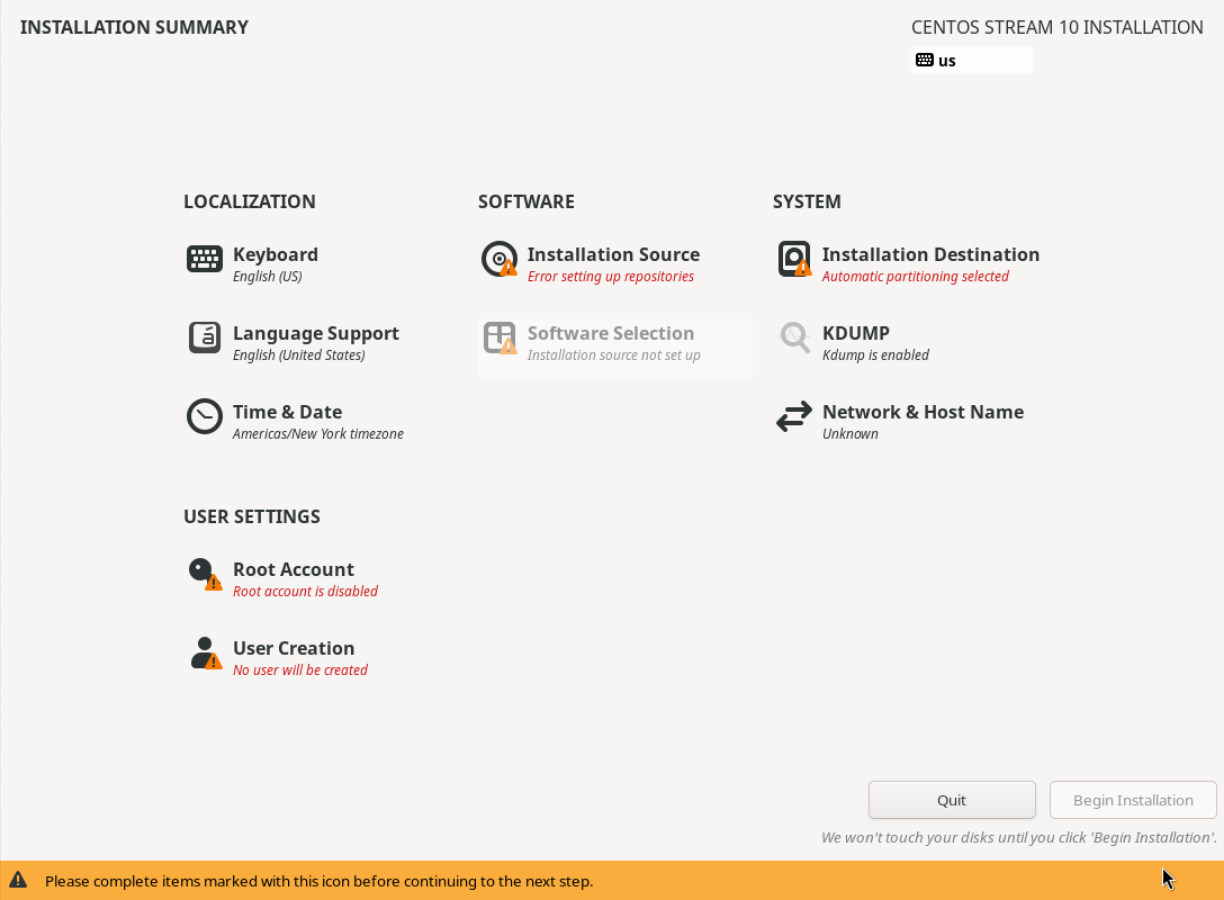
Installation Summary brings the settings together. Open its entries to configure networking, the package source, storage and a user account. Required incomplete settings carry a warning, and Begin Installation remains unavailable until they are completed.
Before networking is configured, Installation Source may show Error setting up repositories. Complete the network step below, then check the package source. Root account is disabled and the status showing no user yet mean that an administrator account still needs to be prepared.
Installation Summary brings together language, software, disk, network, and user settings. Several items are still unconfigured in this initial screen, and Begin Installation is disabled.
Step 1: Open Network & Host Name first
- Open Network & Host Name first
The network is still shown as Unknown in this demonstration. Open Network & Host Name to configure it.
- Recognize that the installation source is pending
Error setting up repositories under Installation Source shows that the source setup is not complete. Configure the source address after the network settings.
- Complete the required setup items
The yellow banner identifies the icon used for items that need attention. Begin Installation becomes available after the required settings and administrator access are configured.
Installation has not started at this point. The network and installation source are configured in the following steps; read the source warning in the context of this initial setup state.
4. Configure networking, the hostname and timezone
Use the assigned IP address, prefix or subnet mask, gateway and DNS values from the portal network information. Do not copy another server's values.
- Open Network & Host Name from the summary.
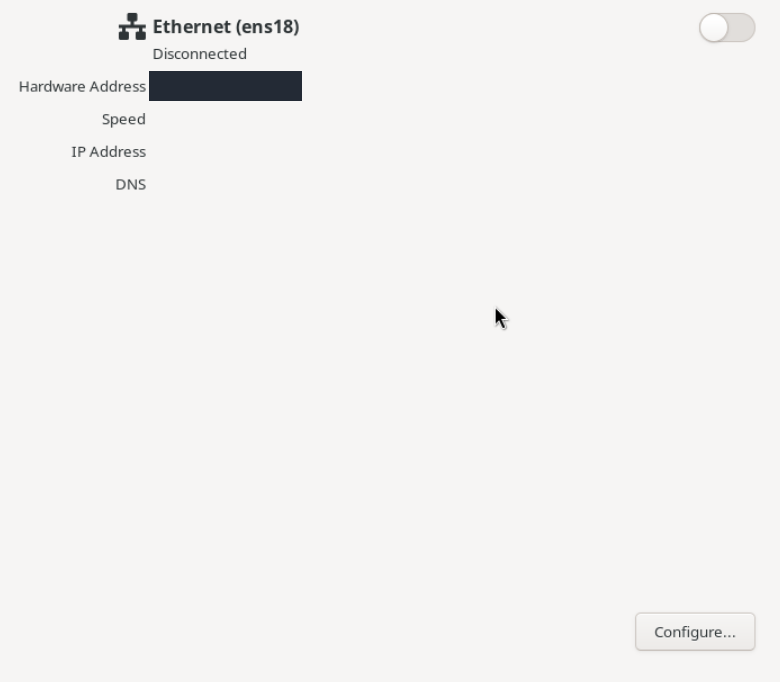
- Select Ethernet (ens18) on the left. Disconnected means the connection is not yet configured or active.
- Click Configure and open IPv4 Settings.
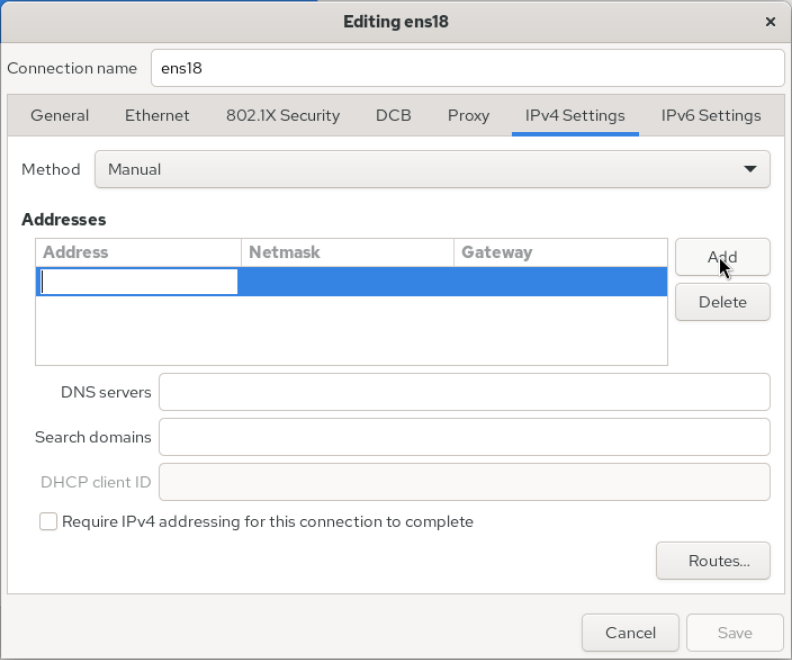
- Choose Manual for Method, then use Add to create an IPv4 row.
Ethernet (ens18) initially shows Disconnected in Network & Host Name. Use Configure to edit the connection details.
Step 1: Click Configure
- Click Configure
Select Configure to open the selected Ethernet connection’s IPv4 and automatic-connection settings.
The interface name can differ on your server. Use the network details assigned to this service in your control panel.
In IPv4 Settings, choose Manual from Method and use Add to insert a row. The actual image shows the cursor in the new empty Address cell.
Step 1: Select Manual for Method
- Select Manual for Method
Open the Method list in IPv4 Settings and choose Manual.
- Add an address row
Add creates a row for the Address, Netmask and Gateway values.
No IP address has been entered in this screen. Enter your server’s address, netmask and gateway in the next step.
| Field | What to enter |
|---|---|
| Address | The IPv4 address assigned to your server. |
| Netmask | Its subnet mask. |
| Gateway | The gateway for your service. |
| DNS servers | DNS server addresses, separated by commas when entering more than one. |
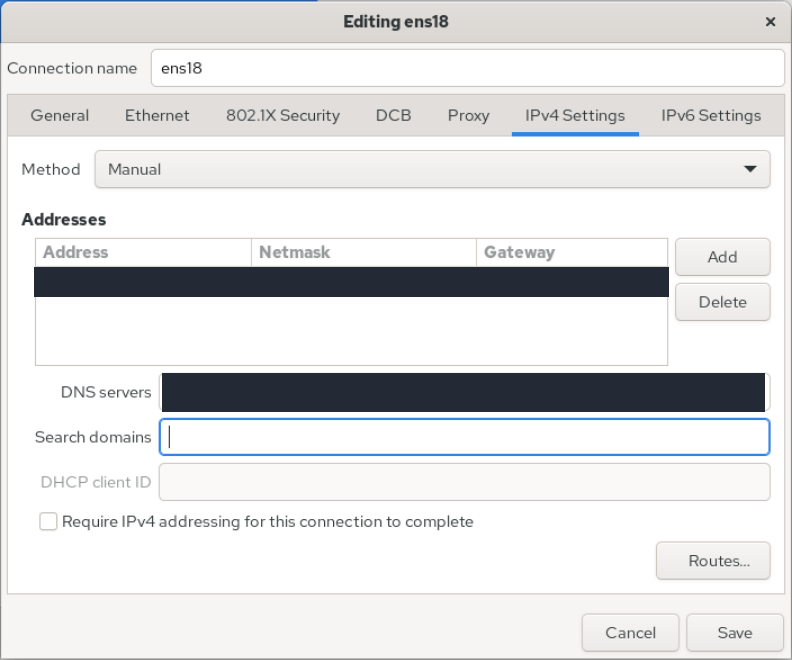
Address, Netmask and Gateway share a row; DNS servers is a separate field below. Do not place DNS addresses in the gateway column. Private network values are hidden in the screenshots; use your own service details.
Fill in Address, Netmask and Gateway in the added row, then complete DNS servers. The network values entered in this actual capture are hidden.
Step 1: Enter the IPv4 address
- Enter the IPv4 address
Enter the IPv4 address assigned to your server in Address.
- Complete Netmask
Enter the netmask specified for your service in Netmask.
- Enter the gateway
Use your service’s default gateway in the Gateway cell.
- Complete DNS servers
Enter the DNS servers to use, then open General to check automatic connection.
Use the values assigned to your own service. Field labels remain visible; the masks do not represent example network settings.
Actual recording: fill IPv4 and DNS fields
Actual CentOS Stream graphical installer recording: the Address, Netmask, Gateway and DNS servers fields are filled. The clip ends before Save is clicked; network values are hidden.
Written transcript
The recording starts on the ens18 connection’s IPv4 Settings tab with Method already set to Manual. The Address, Netmask and Gateway values are entered in the address row; column widths change during editing. The DNS servers field is then filled, and focus moves to the empty Search domains field. Actual network values are hidden throughout. The recording ends with the connection editor still open, before Save is clicked. Saving the settings, enabling the connection and verifying network access are not shown.
Save and activate the connection
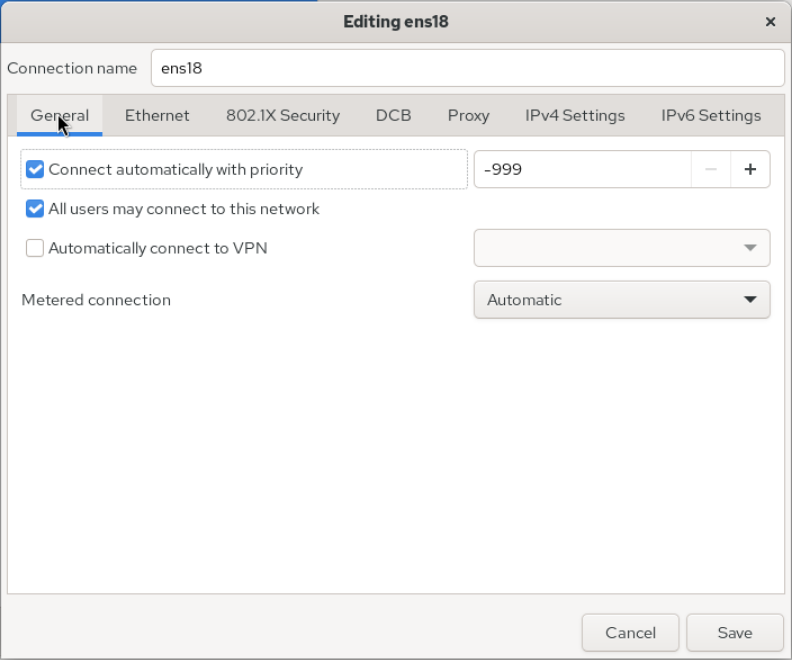
- On the General tab, check that Connect automatically with priority is enabled so the connection can start automatically after a reboot.
- Choose Save to store the connection settings.
- Return to Network & Host Name and turn the network switch On.
- Enter a recognizable server name in Host Name and click Apply.
- Once the connection shows Connected, choose Done to return to the summary.
Connect automatically with priority is checked in General. This setting allows the connection to start automatically when the system boots.
Step 1: Verify automatic connection is checked
- Verify automatic connection is checked
Check that Connect automatically with priority is selected.
- Save the connection
Choose Save to store the network settings and return to the main network screen.
After Save, enable the switch on the main network screen and check the connection status.
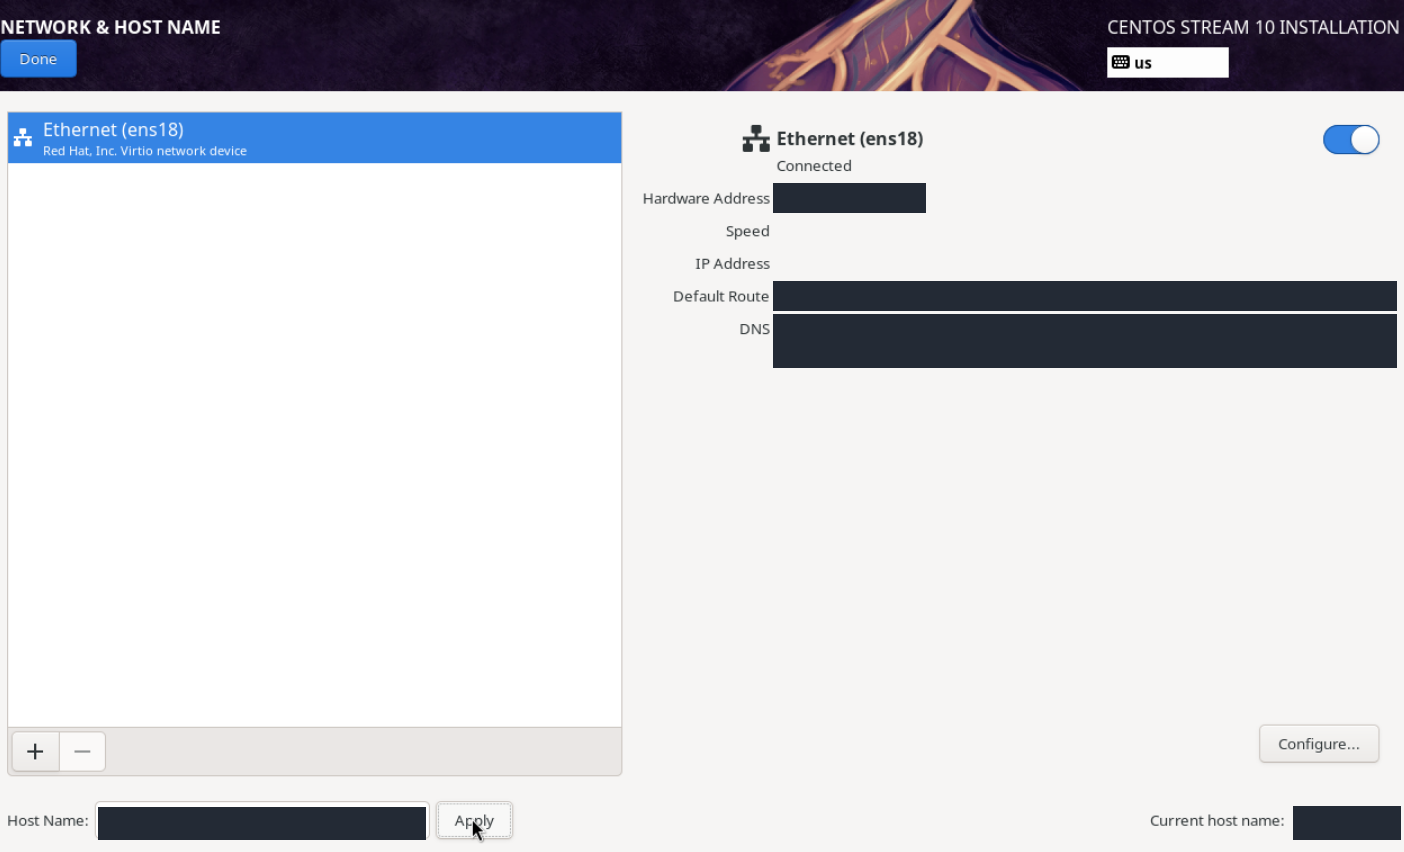
After saving, turn on the network switch. This actual final screen shows Ethernet (ens18) as Connected, with the Host Name value applied using Apply.
Step 1: Turn on the network switch
- Turn on the network switch
The switch at the top right should be on. It is blue and on in this capture.
- Check for Connected
Verify that Connected appears beneath the Ethernet connection name.
- Apply the Host Name value
Enter your server name in Host Name and choose Apply. The applied name appears in Current host name on the right.
- Return to the summary with Done
After checking the connection and hostname, choose Done.
The IP Address row is visibly blank in this capture. MAC, Default Route, DNS and both hostname values are hidden.
Connected shows that the network connection is active. Entering a hostname does not create a DNS record; configure the relevant DNS record separately if you want to connect by that name.
Select the timezone
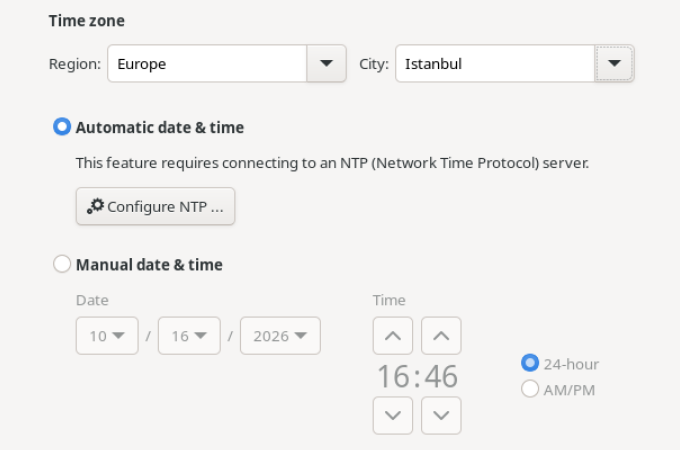
Open Time & Date from the summary. Select Region → Europe, then City → Istanbul. Leave Automatic date and time enabled for network time synchronization, then choose Done. Check that the summary shows Europe/Istanbul.
Time & Date shows Europe for Region and Istanbul for City. Automatic date & time remains selected.
Step 1: Choose Europe for Region
- Choose Europe for Region
Select Europe as the time-zone region.
- Choose Istanbul for City
Select Istanbul from City to set the Europe/Istanbul time zone.
- Keep automatic date and time selected
Leave Automatic date & time selected. Use Configure NTP if you need to adjust NTP settings.
Automatic date & time uses NTP for the clock. Check the choices and return with Done; verify time synchronization after installation.
5. Check the network installation source and Minimal Install
After you save networking and return to the summary, the installer prepares the package source automatically. Wait for Closest mirror under Installation Source. This workflow uses that automatic network source; there is no need to enter a BaseOS URL manually.
If Software Selection shows Source changed - please verify, reopen the software choices to check them. A ready package source does not mean Minimal Install has already been selected.
Open Installation Source and check On the network → Closest mirror. Leave the URL field empty for this method; do not enter a repository address manually. Choose Done to return to the summary.
Installation Source has On the network selected and the source method set to Closest mirror. The URL field is left blank in this actual installation.

Step 1: Check On the network and Closest mirror
- Check On the network and Closest mirror
Verify the network source and Closest mirror selection. No value is entered in the URL field in this example.
No separate repository URL was entered in this flow. Return to the summary with Done and wait for the installer to prepare the repository information.
Select Minimal Install
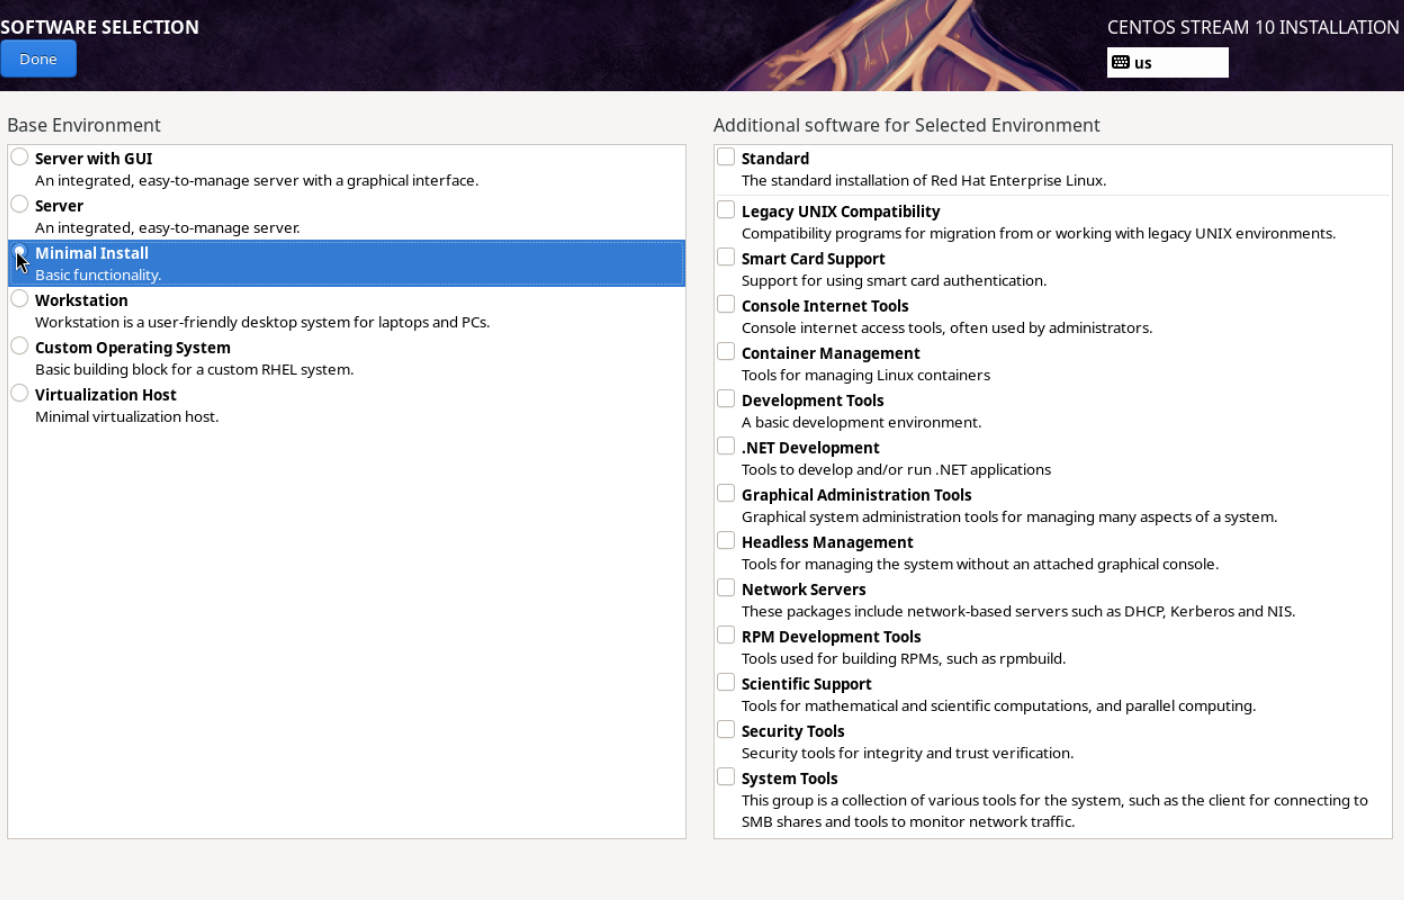
Open Software Selection. Choose Minimal Install under Base Environment instead of leaving Server with GUI selected. Leave the additional software boxes on the right unchecked for this base setup, then choose Done.
Software Selection has Minimal Install selected for Base Environment. None of the additional software options on the right are checked in this demonstration.
Step 1: Select Minimal Install
- Select Minimal Install
Choose Minimal Install in Base Environment and verify that it is selected.
- Confirm the software choice with Done
Choose Done to save the selection and return to the summary.
Minimal Install installs the base system without a desktop environment. This choice is made in the graphical installation wizard.
Actual recording: select Minimal Install
Actual CentOS Stream graphical installer recording: the base environment changes from Server with GUI to Minimal Install. The clip ends before Done is clicked.
Written transcript
The recording starts on Software Selection with Server with GUI selected as the base environment. The pointer moves to Minimal Install and selects that base environment. The Additional software for Selected Environment list on the right refreshes for the new selection; its visible checkboxes remain unchecked. The recording ends with Minimal Install selected and Software Selection still open, before Done is clicked.
Check that the summary reads Minimal Install. This uses the graphical installation wizard while preparing a server without a desktop environment.
6. Select the installation disk
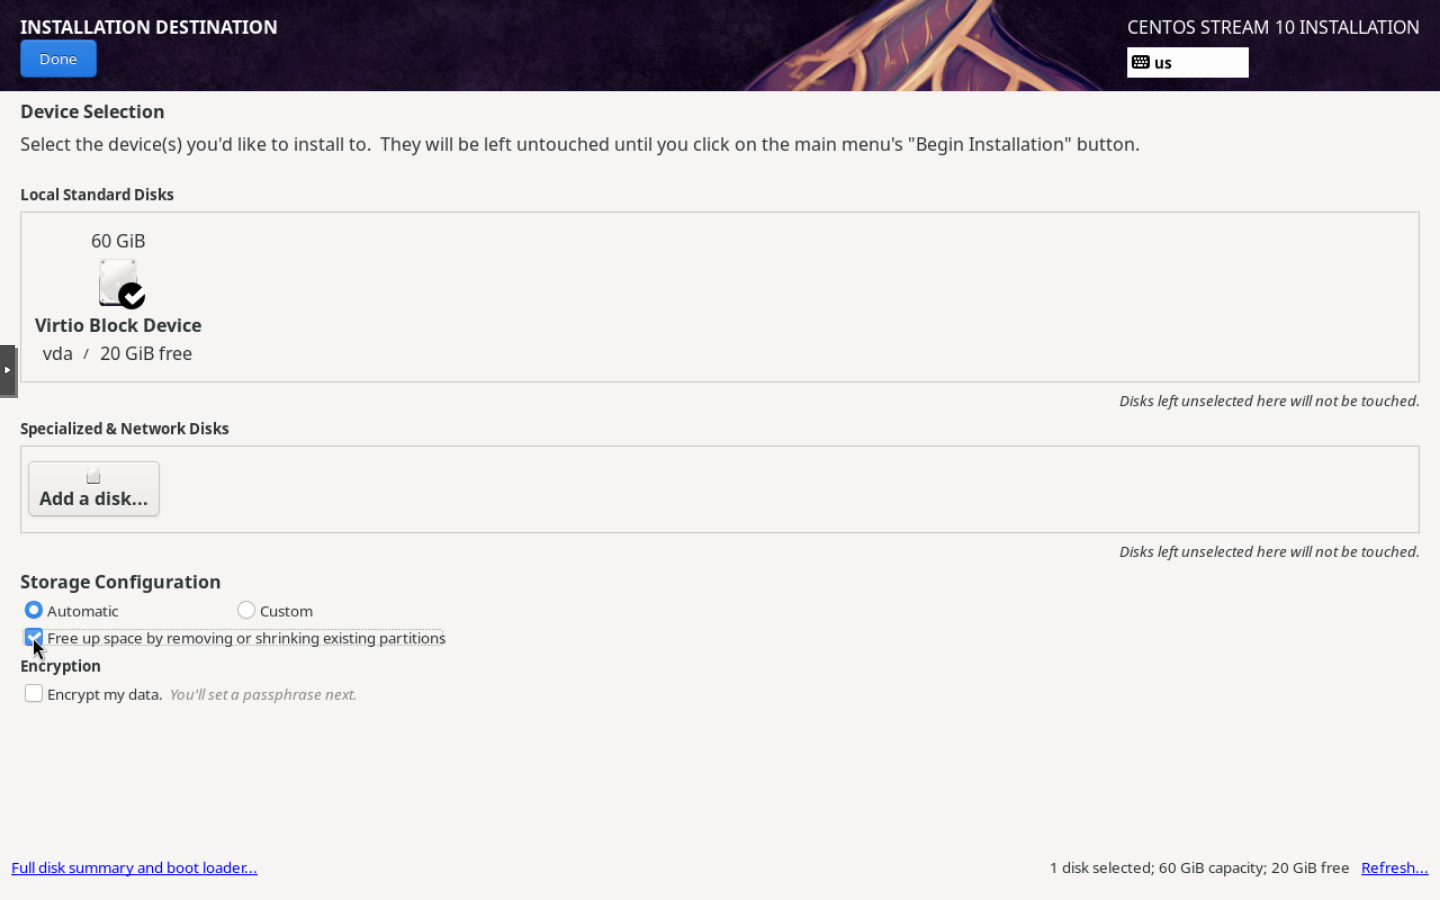
Open Installation Destination. This example has a single system disk labeled Virtio Block Device — 60 GiB — vda. Keep that disk selected and use Storage Configuration → Automatic. Compare the device name and capacity with your own service if they differ.
This example selects the 60 GiB vda disk, which shows 20 GiB free. Automatic and Free up space are checked.
Step 1: Check the installation disk
- Check the installation disk
Check the selection mark, disk name and capacity. The target in this capture is the 60 GiB vda virtual disk.
- Select Automatic and Free up space
Keep Automatic selected. Check Free up space to review a plan for reclaiming space from the existing partitions.
- Open the plan with Done
Select Done to open Reclaim Disk Space. This is storage planning before the Begin Installation step.
These selections prepare the storage plan. The on-screen explanation says disks remain untouched until Begin Installation is selected on the main menu.
Reclaim space from old partitions
The previous Debian installation still occupies part of the disk, leaving about 20 GiB free. This guide performs a clean installation across the disk. First verify your backup outside the server and that only the intended installation disk is selected.
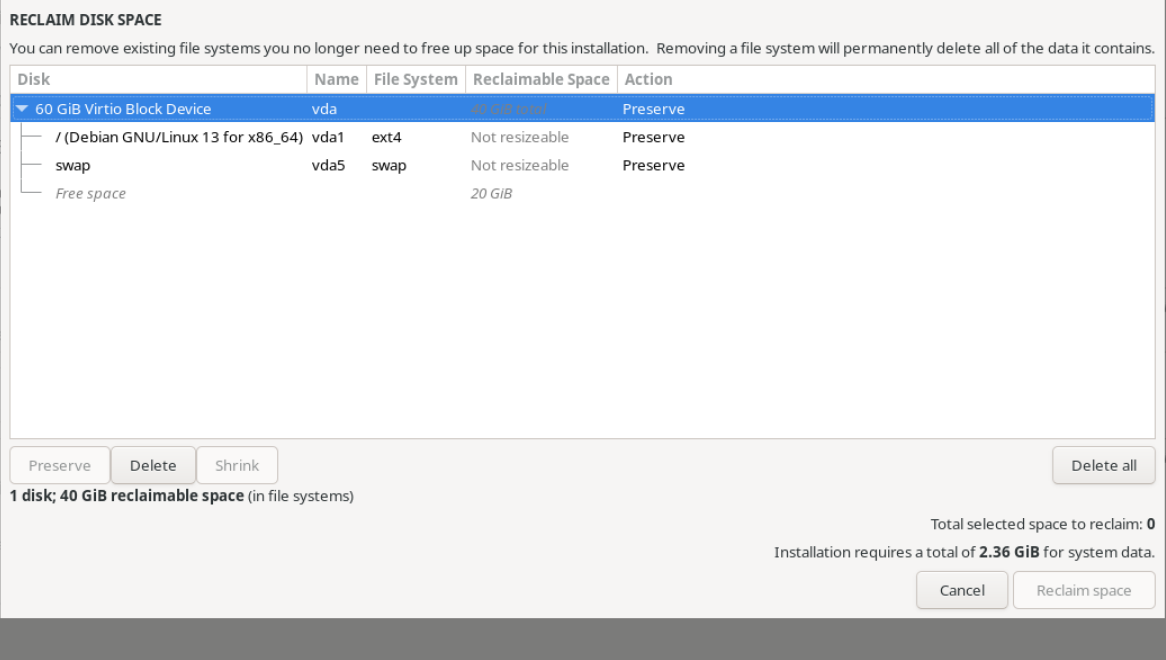
Check Free up space by removing or shrinking existing partitions, then choose Done. In Reclaim Disk Space, review the old partitions to be removed. The pictured Debian system uses a vda1 ext4 root partition and vda5 swap; its existing partitions occupy about 40 GiB altogether.
Reclaim Disk Space shows the existing Debian 13 partitions set to Preserve. The disk has 40 GiB of reclaimable space and a further 20 GiB of free space.
Step 1: Identify the existing partitions
- Identify the existing partitions
Debian 13 appears on vda1 ext4, with swap on vda5. The initial Preserve actions keep these partitions in the current plan.
- Plan deletion with Delete all
Select Delete all if you intend to remove every existing partition on this disk. The next state changes the Action values to Delete.
Delete all marks every existing partition for deletion. Review the dialog’s data-deletion warning; actual disk changes occur at the later Begin Installation step.
Mark the old partitions for removal
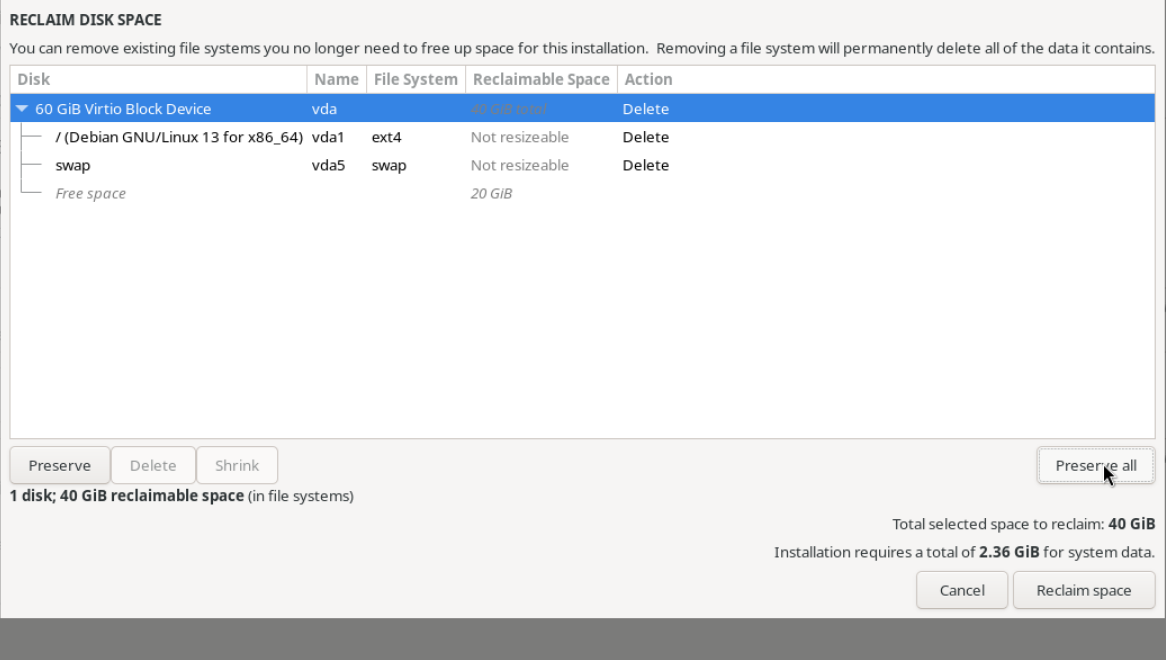
For a clean installation across the disk, click Delete all. Check that Action reads Delete for the sole destination disk, vda, and its old Debian partitions. The old space selected for removal in this example totals 40 GiB.
The disk and partition rows are marked Delete, with 40 GiB selected for reclamation. Preserve all and Reclaim space are available.
Step 1: Verify the Delete plan
- Verify the Delete plan
Check that the target disk and old partition rows show Delete. This example selects 40 GiB for reclamation.
- Accept the plan with Reclaim space
Select Reclaim space to accept the plan and return to the installation summary. Disk writes belong to the later Begin Installation step.
This view is a deletion plan. Reclaim space accepts the plan; actual disk changes begin at the later Begin Installation step on the main screen.
Actual recording: mark partitions for deletion
The actual CentOS Stream recording marks existing partitions for deletion with Delete all. The clip ends before Reclaim space is clicked; disk writes are not shown.
Written transcript
The Reclaim Disk Space dialog shows the 60 GiB vda virtual disk and its existing Debian GNU/Linux 13 partitions: vda1 ext4 and vda5 swap. The Action column initially shows Preserve; 40 GiB is reclaimable and a further 20 GiB is listed as free space. Clicking Delete all marks the disk and partition rows as Delete. The selected space to reclaim becomes 40 GiB, the button changes to Preserve all and Reclaim space becomes enabled. These are selections in the deletion plan. The recording ends before Reclaim space is clicked and while the dialog remains open. Actual partition deletion, formatting and disk writes are not shown; Begin Installation is a later, separate step.
If the list is correct, choose Reclaim space to return to the summary. The Automatic partitioning warning should be cleared. This prepares the partition-removal plan; Anaconda states that the disk changes are applied at the later Begin Installation step. Complete the final review below before clicking it.
7. Create an administrator account
Root account
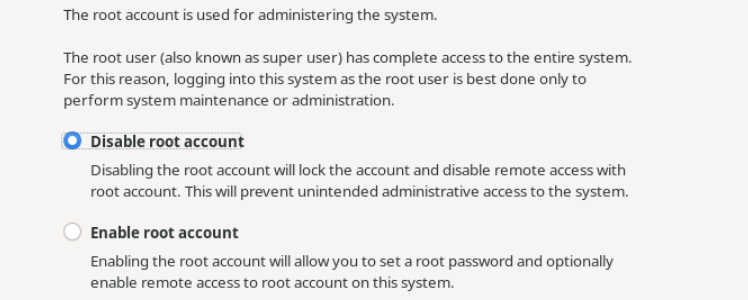
Open Root Account. This guide keeps Disable root account selected and uses a regular account with sudo for administration. Check the choice, then select Done.
Disable root account is selected in Root Account and is retained in this demonstration. A separate user receives wheel-group privileges for administration.
Step 1: Keep Disable root account selected
- Keep Disable root account selected
Leave Disable root account selected. Return with Done and open User Creation.
Create an administrator user in the following User Creation step. No root password is configured on this screen.
Regular user with administrator access
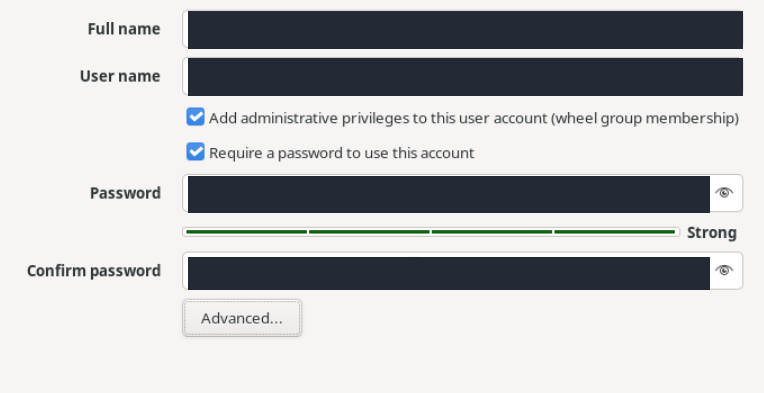
Open User Creation. Enter the display name in Full Name and the server login username in User Name. This username is separate from the hostname set in the network step.
Check that Add administrative privileges to this user account is enabled. It adds the user to the wheel group for administration with sudo. Keep Require a password enabled, enter the same strong password in both password fields, then choose Done.
Complete Full name and User name. Administrator privileges and the password requirement are already checked in this actual form; the password has been entered in both fields.
Step 1: Complete Full name and User name
- Complete Full name and User name
Enter your name and the username you will use to sign in.
- Check administrator privileges
Keep Add administrative privileges to this user account (wheel group membership) selected.
- Keep the password requirement
Leave Require a password to use this account selected.
- Confirm the password and check its strength
Enter the same strong password in Password and Confirm password. The actual capture shows Strong.
Names and password characters are permanently hidden. Check administrator privileges and matching password entries, then return to the summary with Done.
This account belongs to the CentOS server; it does not change your DCHost customer portal account. Store its credentials safely. Check for Administrator will be created in the summary.
8. Review the settings and begin installation
Before clicking Begin Installation, review Installation Summary once more:
| Setting | Choice used in this guide |
|---|---|
| Installation Source | Closest mirror. |
| Software Selection | Minimal Install. |
| Time & Date | Europe/Istanbul. |
| Network & Host Name | ens18 is active and Connected. |
| Installation Destination | The correct vda disk is selected and the Automatic partitioning warning is cleared. |
| Root Account | Disable root account. |
| User Creation | Administrator will be created. |
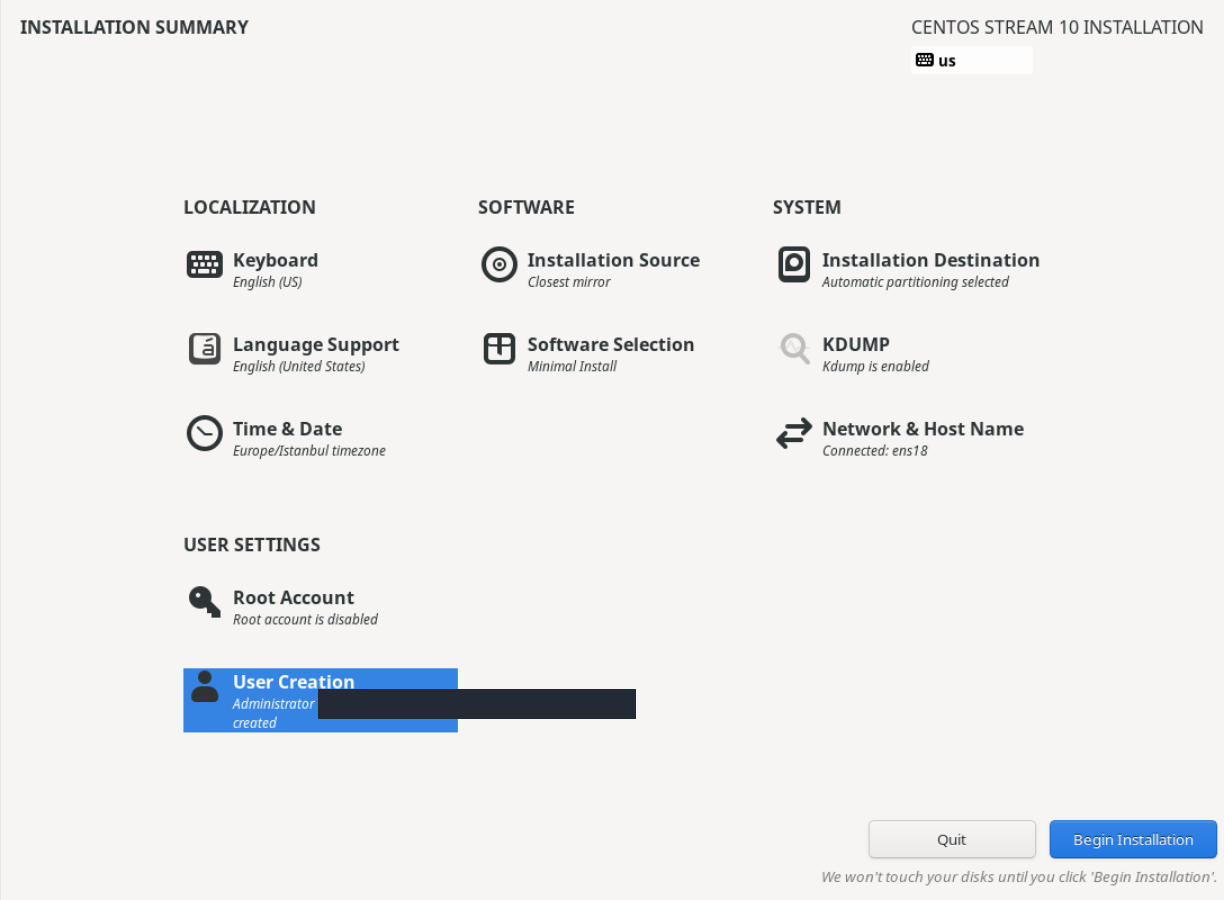
The final Installation Summary shows Closest mirror, Minimal Install, Europe/Istanbul, a connected network, and the prepared administrator user. Begin Installation is now enabled.
Step 1: Verify the source and software selection
- Verify the source and software selection
Check for Closest mirror under Installation Source and Minimal Install under Software Selection.
- Check that the administrator user is ready
Verify the Administrator status under User Creation. The username is hidden in this image.
- Start installation to disk with Begin Installation
After the final checks, select Begin Installation. The notice below states that disks remain untouched until this button is clicked.
The previous partitions have been marked for deletion. Begin Installation starts the installation that applies pending disk changes; verify the target disk, backups and settings before clicking it.
Begin Installation applies the planned disk changes and starts package installation. Verify your backup and target disk, then click it once. Wait for the progress screen to finish; do not detach the ISO or restart the server while installation is running.
Wait for the completion screen
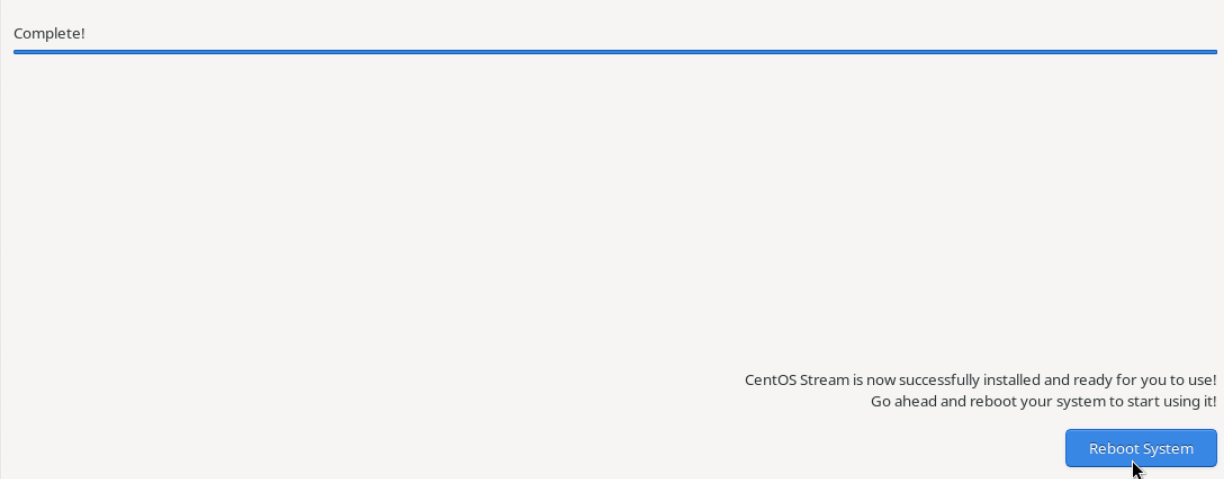
When Complete! and the successful-installation message appear, Reboot System becomes available. Click it once to restart.
The installer shows Complete!, a full progress bar and a message that CentOS Stream has been installed successfully. Reboot System is enabled.
Step 1: Check the Complete! status
- Check the Complete! status
Wait for Complete! and the installation-success message.
- Restart with Reboot System
Select Reboot System. In the next step, use ISO Image in the portal to detach the installation ISO.
This screen confirms completion of the installer. After restarting, detach the ISO in the portal and separately verify that the installed system boots from disk.
9. Detach the ISO and log in to the installed system
Detach the installation media
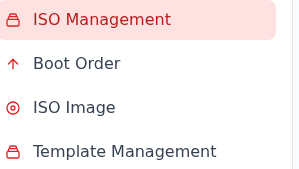
After using Reboot System, open the same server in the customer portal and select Templates & ISO → ISO Image.
With ISO Management expanded, select ISO Image. This action opens a confirmation that the server will reboot.
Step 1: Select ISO Image
- Select ISO Image
Select ISO Image, then read and accept the confirmation that the server will reboot.
The confirmation says the server will reboot. In this actual flow it was accepted and the portal reported ISO Image detached. Next, verify that the installed system boots from disk and is accessible.
Read the confirmation that the server will restart. Confirm once installation has finished, then check for ISO Image detached. The screenshot above shows the menu item used to detach the image.
Reopen Console / VNC Console Access and wait for the CentOS login screen from the installed disk. If the installation menu appears again, check the boot order before repartitioning anything. The shared ISO guide explains the detachment menu.
Use the account created during installation
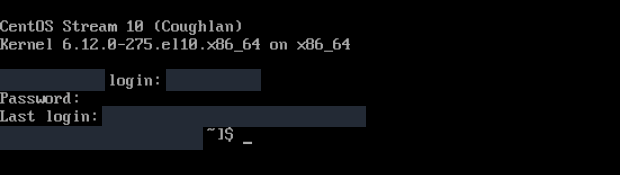
The console opens the CentOS Stream 10 (Coughlan) login screen. Use the username and password chosen in the ISO installer's User Creation step. These credentials belong to the new account, separately from root credentials supplied with a previous template installation. Password characters may not appear while typing.
This actual console capture shows the CentOS Stream 10 header, the login and Password lines, and the shell prompt after sign-in. The username, hostname and previous-login details are hidden.
Step 1: Sign in with your username and password
- Sign in with your username and password
Enter the username created during installation at login, then enter its password at Password. Password characters are not displayed.
- Check that the shell prompt appears
The user shell prompt appears after sign-in. Its identity is hidden in this capture, while the prompt ending and cursor remain visible.
This image records an actual console sign-in. Password characters are not displayed while typing. After signing in, run the system and service checks in the next step.
To connect from a terminal on your own computer, replace both fields with your details:
ssh USERNAME@SERVER_IP
Verify the server's host-key fingerprint on first connection. Reinstalling the operating system can change that key; follow SSH connection and host-key errors if your computer warns about the old entry. Use sudo from your regular account for administration.
Post-installation checks
Check the release, root filesystem, access services and clock:
cat /etc/centos-release
uname -r
findmnt -no SOURCE,FSTYPE /
systemctl is-active sshd qemu-guest-agent chronyd
timedatectl status
getenforce
systemctl --failed
sshd provides SSH access, qemu-guest-agent supports management communication with the virtualization layer, and chronyd synchronizes the clock. Check that these services are active after installation. Applying all system updates is a separate maintenance step; continue with the Linux updates guide.
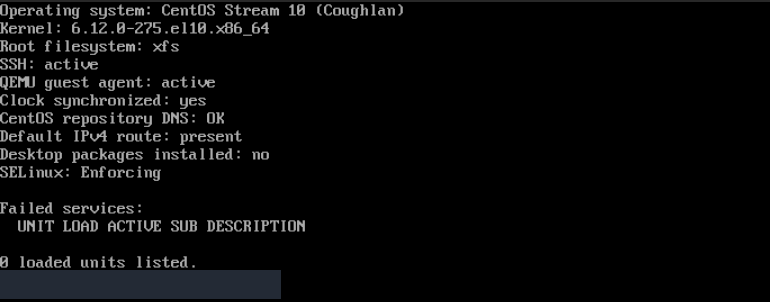
This actual console output shows CentOS Stream 10, the xfs root filesystem and the post-installation service, network and security checks. The identity in the shell prompt is hidden.
Step 1: Read the system and filesystem
- Read the system and filesystem
Operating system shows CentOS Stream 10 (Coughlan), Kernel shows 6.12.0-275.el10.x86_64 and Root filesystem shows xfs. Compare these with your intended installation.
- Check services and the clock
SSH and the QEMU guest agent report active in this check. Clock synchronized: yes confirms clock synchronization for this run.
- Verify DNS and the route
CentOS repository DNS: OK shows that the repository name resolved. Default IPv4 route: present shows that a default IPv4 route was found.
- Review SELinux and failed units
The output shows Desktop packages installed: no and SELinux: Enforcing. Under Failed services, 0 loaded units listed means no failed units were listed in this check.
These results were collected on this server at the time of the check. Run the guide’s checks on your own server to verify the system, service and network results.
| Check | Verified result in this installation |
|---|---|
| Operating system | CentOS Stream 10, Coughlan. |
| Kernel | 6.12.0-275.el10.x86_64; later updates can change it. |
| Root filesystem | XFS on LVM; the system started from disk. |
| Access | Console and SSH login with the regular user created during installation; sudo privileges verified. |
| Networking | A default IPv4 route is present; repository DNS resolution succeeds. |
| Services | SSH, the QEMU guest agent and chrony are installed and active. |
| Time | Europe/Istanbul, with the system clock synchronized. |
| Security and units | SELinux Enforcing; 0 failed units. |
| Desktop | GNOME and GDM are not installed. |
Check the results on your own server; its disk name and kernel can differ. A text login prompt is expected because Minimal Install prepares a server without a desktop.
Delete the unused Boot ISO
After detaching the installation image and verifying startup from disk, you can delete the corresponding Boot file from the ISO library. Delete removes the media file; it does not erase the CentOS system running from the server disk.
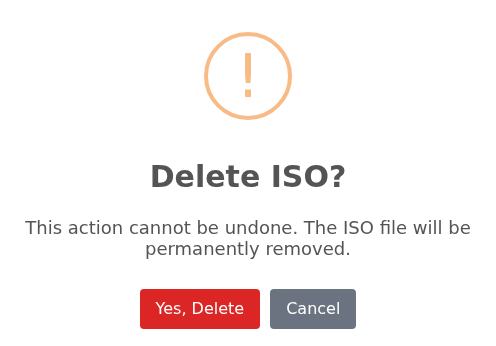
In ISO Management, select Delete for the correct Boot ISO. Read Delete ISO? and confirm with Yes, Delete. Check that the deleted Boot file is no longer listed; the library may remain populated if other images are present.
After verifying disk boot and server access, open the delete action for the Boot ISO used in this installation under ISO Management. The actual confirmation is titled Delete ISO?.
Step 1: Read the permanent-removal warning
- Read the permanent-removal warning
The notice says the ISO file will be permanently removed and the action cannot be undone.
- Remove the selected ISO with Yes, Delete
Choose Yes, Delete after verifying the selected ISO. Use Cancel to leave it in place.
The dialog does not show the ISO name; first verify that you selected the correct Boot ISO card. The Boot ISO used here was removed; the other ISO entries were retained.
To upload another image, follow ISO management and cleanup.
Frequently asked questions
What should I check if text menus open instead of the graphical installer?
The inst.text boot option requests the text interface. Also check the selected image, available memory and graphical display requirements. Meet the resource requirements rather than disabling memory checks, or follow the text-based guide. Do not restart only to switch interfaces once disk writes have started.
Is SSH ready after selecting Minimal Install?
After installation, run systemctl is-active sshd and test an SSH connection from your computer. The final results table verifies both the service and a regular-user connection for this guide. Package choices, network settings or firewall rules can affect another server; use the SSH connection guide if access fails.
Why is there no desktop after a graphical installation?
Minimal Install does not install a desktop environment. A console login prompt is expected, and you can continue administration over SSH. The graphical setup interface and desktop packages are separate choices.
Next step
Continue with SSH keys and the server backup plan. Before installing a control panel, verify the vendor's explicit CentOS Stream 10 support.