Install Ubuntu Server 24.04 LTS from an ISO: text interface
Installing Ubuntu Server from an ISO lets you choose the disk layout, user account and SSH access in the installer. The DCHost customer portal makes the ISO available to the server; you then use Console to work through the operating system setup.
This guide covers the Ubuntu Server 24.04 LTS series. The selected installation media is 24.04.5 LTS for amd64. Use the Server image; a desktop interface is not required for remote server administration.
This guide shows an installation completed on a real demo server on 16 October 2026. The Ubuntu Server 24.04.5 LTS amd64 ISO was used, and startup from the installed disk, console login and SSH access were verified. Personal information and private server values are hidden in the screenshots.
Why does Ubuntu Server use text-based screens?
Ubuntu Server's official installer, Subiquity, provides a keyboard-driven text and menu interface. This guide follows that interface; you do not need to build the entire installation by typing shell commands. Use Tab, the arrow keys and Enter to move between fields.
Canonical's Subiquity documentation describes the Server interface as text-based. Ubuntu Desktop has a different graphical installation workflow; it is not a second interface for this Server guide. The Debian and CentOS Stream guides show graphical installers that can create a server without a desktop. Choose your distribution according to application support.
Before you start
Installing a new system to the selected disk can erase its files. Open the correct VPS service and keep a backup outside the server. Complete the preparation in the server backup guide.
| Requirement | How to prepare |
|---|---|
| Correct architecture | Choose amd64 for a 64-bit x86 VM. |
| Enough RAM and storage | Allow capacity for the installer, updates and your applications. |
| Network information | Record the assigned IP address, prefix or subnet mask, gateway and DNS settings. |
| Portal console | Confirm that you can open it before relying on a system that does not yet have SSH. |
| User account plan | Choose a login username and hostname separately. |
Use the portal network information step to locate the assigned IPv4 address, network prefix and Gateway field.
Canonical's 24.04 amd64 requirements list 1.5 GB RAM as the ISO installation minimum and 3 GB or more as the suggested minimum. These are not application sizing recommendations. Websites, databases and control panels require additional planning.
LTS release and ISO file
Select the live-server-amd64.iso file from the Ubuntu 24.04 download directory. The researched file is ubuntu-24.04.5-live-server-amd64.iso. Its checksum must match the same release; follow Ubuntu's ISO verification instructions.
24.04 is an LTS series. Choose a release after checking application support and the Ubuntu lifecycle. A higher version number does not automatically make a release suitable for every application or control panel.
1. Upload the Ubuntu ISO in the portal
Follow the ISO management guide to open Templates & ISO → ISO Management → Upload ISO. Give the image a Label identifying its Ubuntu release. With File URL, enter a direct official ISO download link.
The actual Upload ISO form uses the label Ubuntu Server 24.04.5 LTS amd64 and the File URL method.
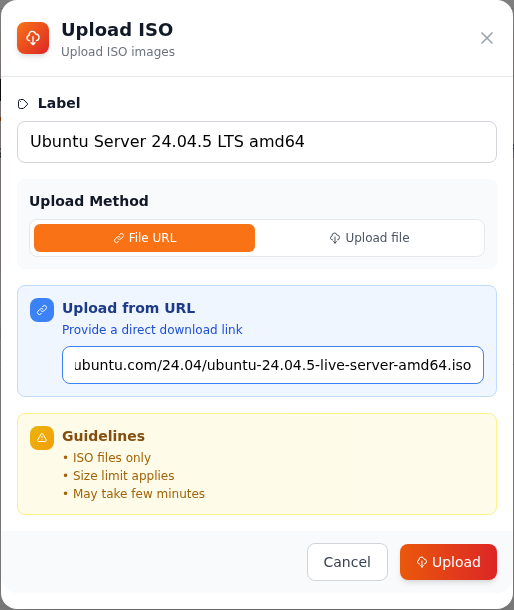
Step 1: Give the ISO a clear label
- Give the ISO a clear label
Enter the distribution, version and architecture in Label. This demonstration uses Ubuntu Server 24.04.5 LTS amd64.
- Paste the official ISO download address into File URL
With File URL selected, enter the direct download URL of the Ubuntu Server ISO. The input is horizontally scrolled, so the screenshot shows only the end of the address.
- Start the upload with Upload
Check the details and click Upload. Wait for the transfer to finish and the ISO status to become Ready before booting from it.
This screenshot shows the form filled for the Ubuntu Server 24.04.5 LTS ISO used in the demonstration. The URL field displays only the end of the link; obtain the full address from the official download source. Check that the filename identifies the correct Ubuntu Server release and amd64 architecture.
After the upload completed, the Ubuntu image reached Ready. This means that the ISO is available to boot, not that the operating system has been installed. Select Boot from ISO on the correct image to open its boot confirmation.
The Ubuntu Server 24.04.5 LTS amd64 entry is Ready and its Boot from ISO button is available.
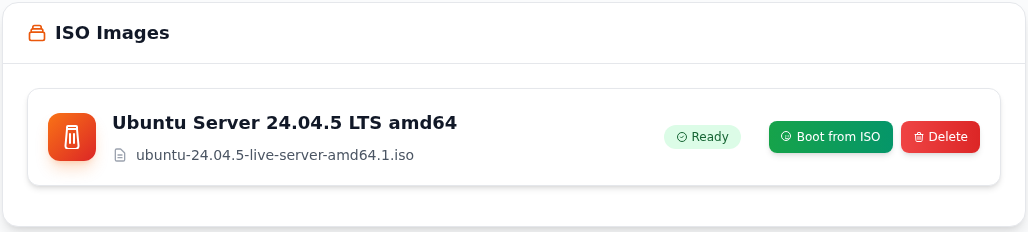
Step 1: Check the Ready label on the correct ISO entry
- Check the Ready label on the correct ISO entry
Check that the ISO entry is the intended Ubuntu Server image and that its status is Ready. This status shows that the transfer has finished.
- Start the installation media with Boot from ISO
Check your backup and confirm that you are working on the correct server, then click Boot from ISO. Read the confirmation on the next screen before continuing.
Check the correct Ubuntu image in the Boot from ISO? dialog, then confirm with Boot Now. This operation restarts the server.
The Boot from ISO? dialog states that the server will boot from the selected ISO image.
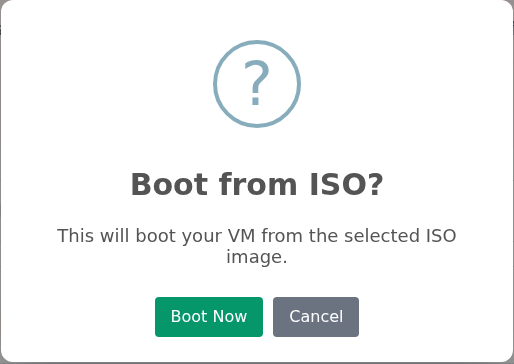
Step 1: Click Boot Now when ready
- Click Boot Now when ready
Check that you selected the correct server and ISO image. Click Boot Now to confirm when ready, or Cancel to cancel the operation.
Wait while the portal shows VM Task in Progress. Console / VNC Console Access opens the screen where you continue the operating system installation. Ubuntu is not yet installed on the server disk at this stage.
The actual portal shows VM Task in Progress and the Console card in the same area.
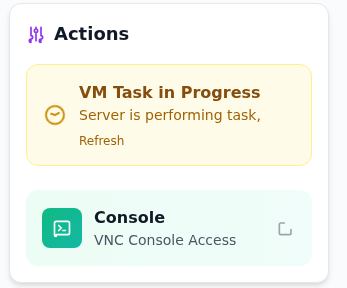
Step 1: Wait for the boot task to finish
- Wait for the boot task to finish
VM Task in Progress means the server is processing an operation. Do not send another boot request while the task is running.
- Open the installer through the Console card
After the boot operation, use Console / VNC Console Access to open the server screen. The next image shows the Ubuntu boot menu.
2. Open the installer and choose the language and keyboard
The console opens the GNU GRUB 2.12 menu. Select Try or Install Ubuntu Server and press Enter. Click inside the console first to direct keyboard input to it.
The actual GNU GRUB 2.12 menu lists Try or Install Ubuntu Server as the first option.
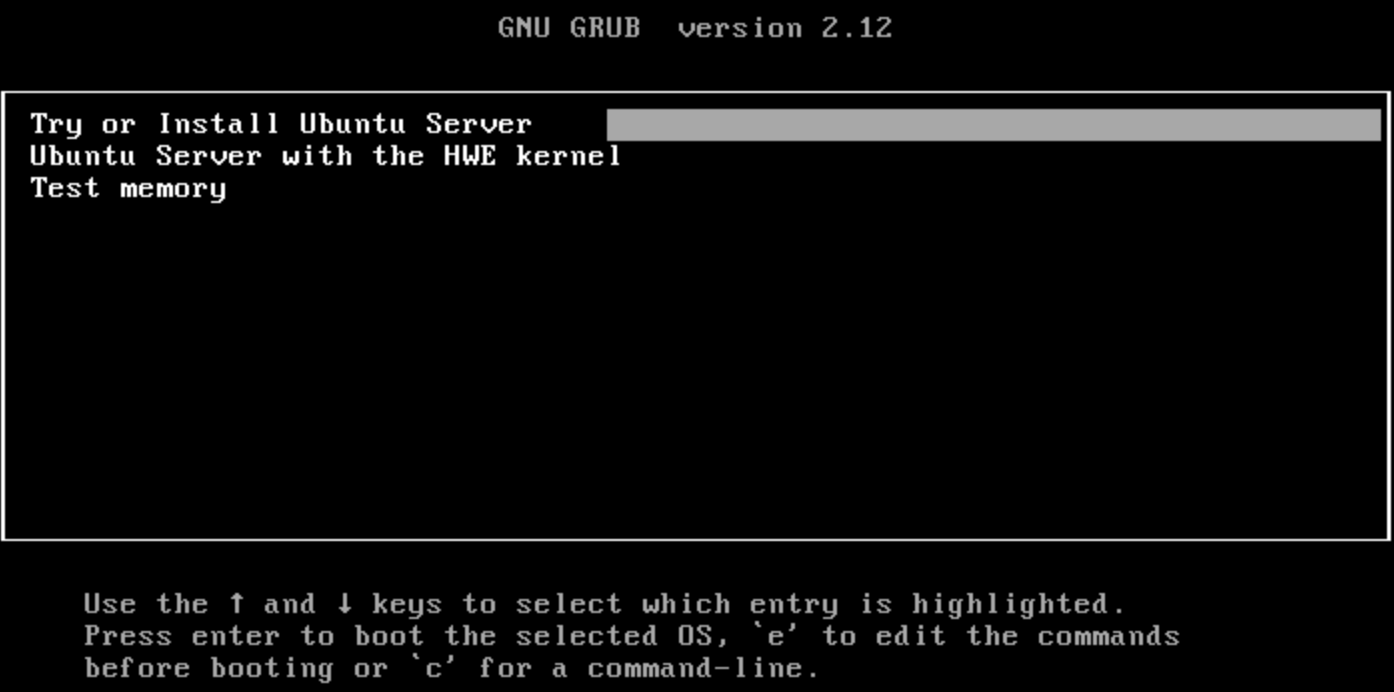
Step 1: Press Enter with Try or Install Ubuntu Server selected
- Press Enter with Try or Install Ubuntu Server selected
Select the first option with the arrow keys and press Enter. This demonstration does not use the HWE kernel option. Wait for the Ubuntu installer environment to load.
Installer language and keyboard
This actual installation uses English. Menu names in the guide match the English labels on screen.
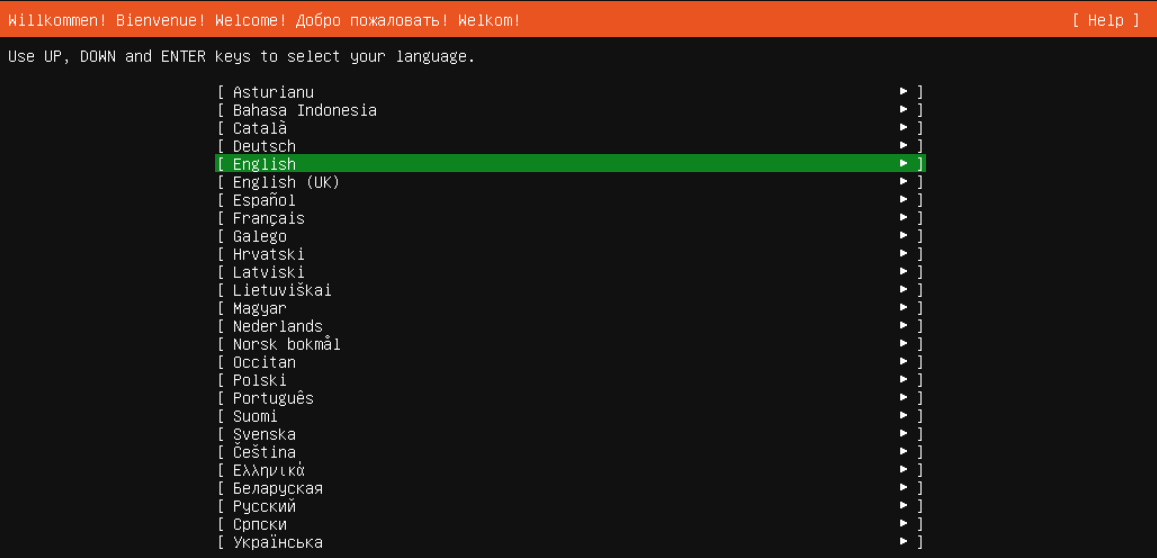
Step 1: Confirm English with Enter
- Confirm English with Enter
Use the up and down arrow keys to select English, then press Enter. The keyboard configuration screen opens next.
- Choose English on the welcome screen. This guide uses English screenshots; selecting another language changes the displayed labels.
- Check the keyboard settings on Keyboard configuration. Both the layout and variant were left as English (US) in the demonstration.
- Continue with Done.
You can choose the layout that matches your own keyboard. Language and keyboard layout are separate settings; check punctuation before entering a password.
Keyboard configuration has Layout and Variant fields. Both are left at English (US) in this demonstration.
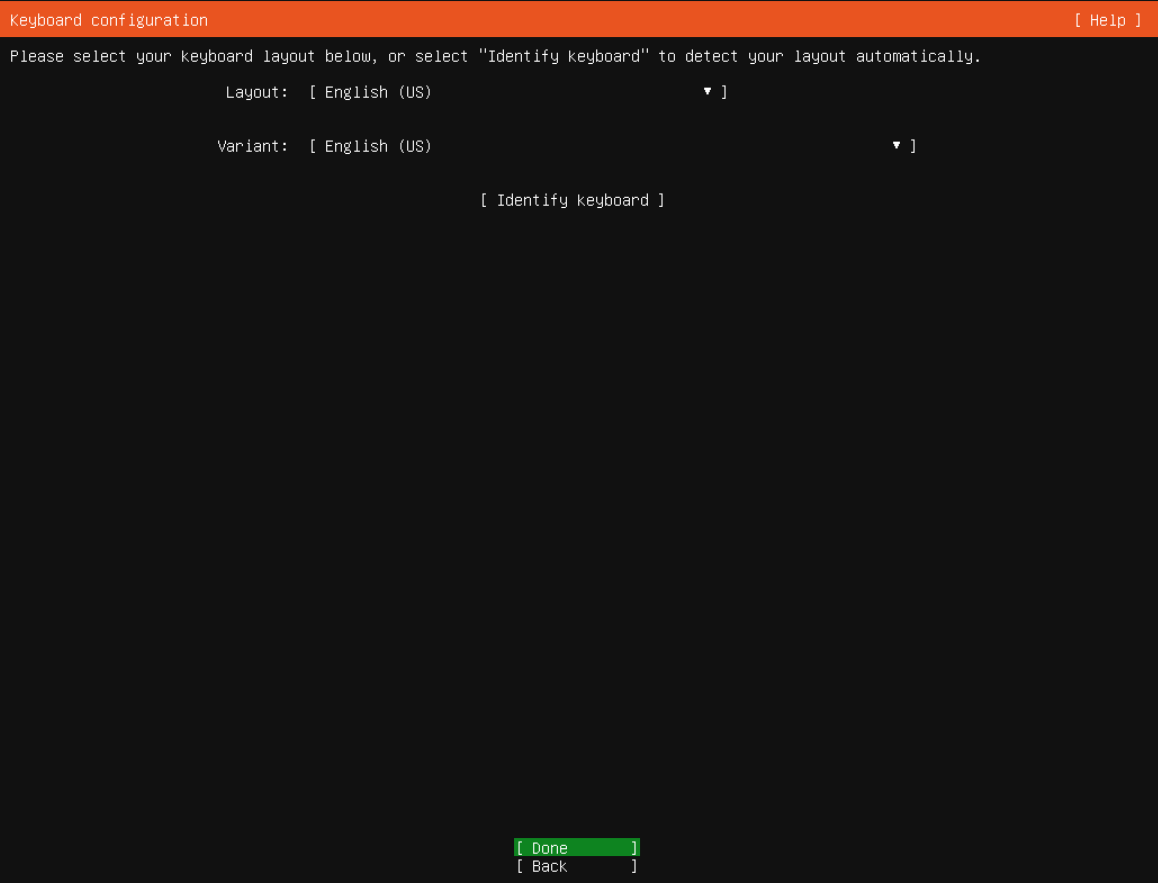
Step 1: Check Layout and Variant
- Check Layout and Variant
Choose a layout that matches your keyboard so you can type passwords and commands correctly. The screenshot shows English (US) for both Layout and Variant.
- Continue with Done
After checking the keyboard settings, use Tab or the arrow keys to select Done and press Enter.
Ubuntu Server installation type
Ubuntu Server was left selected on the installation-type screen. Ubuntu Server (minimized) was not used, and the option to search for additional third-party drivers remained unchecked. Done continued to networking.
This choice does not install a desktop interface. The regular Ubuntu Server selection prepares a server system that can be managed through the console and SSH.
This demonstration keeps the standard Ubuntu Server selection. Ubuntu Server (minimized) and the third-party driver search are not used.
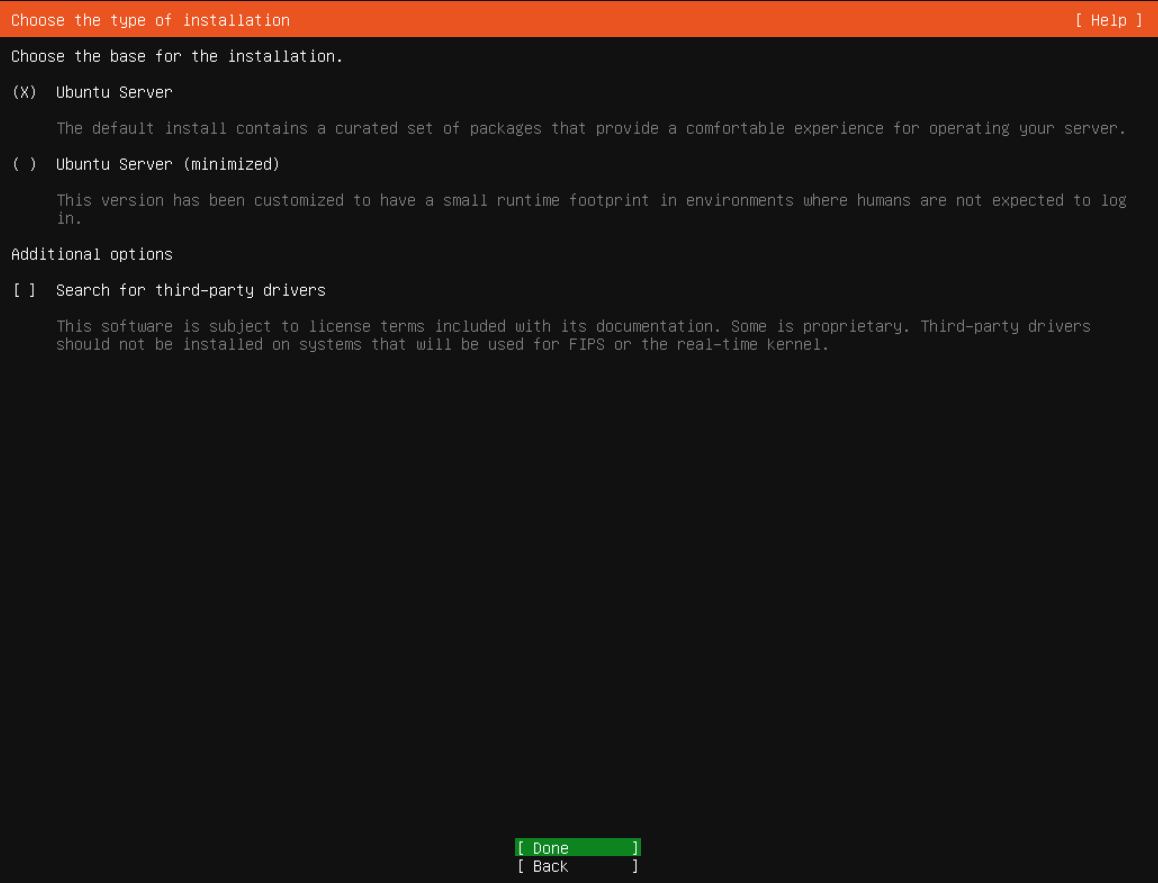
Step 1: Check the Ubuntu Server selection
- Check the Ubuntu Server selection
Check that Ubuntu Server is selected. This guide follows the standard server installation.
- Check the third-party driver option
Search for third-party drivers is unchecked in this demonstration. The default selections are retained.
- Continue to network settings with Done
After checking the selections, select Done and press Enter.
Language and keyboard layout are separate settings. Check punctuation placement before entering a password. If the console does not receive keystrokes, click inside it first to give it keyboard focus.
3. Configure networking and the package source
The installer detected ens18, but automatic network configuration did not complete. The assigned IPv4 settings were therefore entered manually. If automatic configuration succeeds on your service, still compare its addressing with the portal information.
This actual installation shows disabled and autoconfiguration failed for ens18. The network settings are entered manually in the following steps.
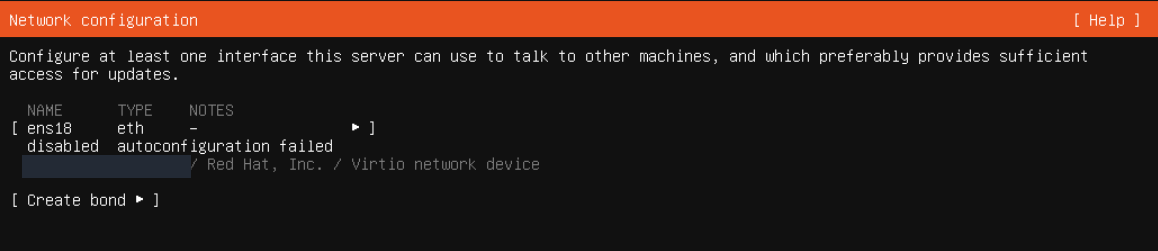
Step 1: Open the ens18 interface menu
- Open the ens18 interface menu
Have your assigned network details ready. Select ens18 and press Enter to open its menu. This demonstration does not use Continue without network; the network is configured first.
- Open the ens18 menu on Network connections.
- Select Edit IPv4.
- Set IPv4 Method to Manual.
- Fill in the following fields with the settings assigned to your server.
- Choose Save. The demonstration's network summary then showed a static address.
The ens18 menu lists Info, Edit IPv4, Edit IPv6 and Add a VLAN tag.
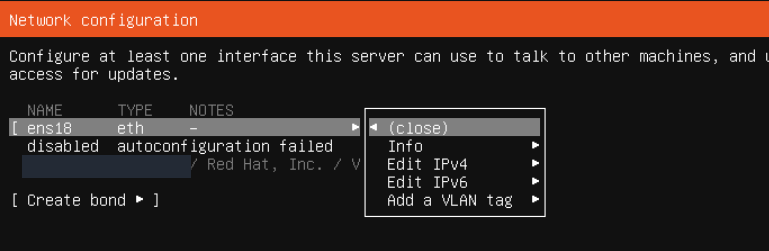
Step 1: Select Edit IPv4
- Select Edit IPv4
Use the arrow keys to select Edit IPv4 and press Enter.
The Edit ens18 IPv4 configuration dialog initially shows Disabled for IPv4 Method.
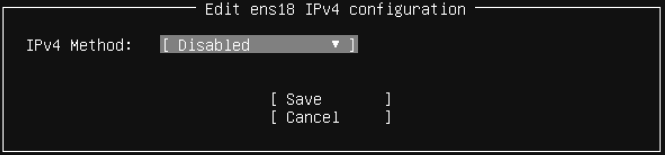
Step 1: Open the IPv4 Method list
- Open the IPv4 Method list
Select IPv4 Method and press Enter. The list lets you choose manual configuration.
The IPv4 Method list contains Automatic (DHCP), Manual and Disabled.
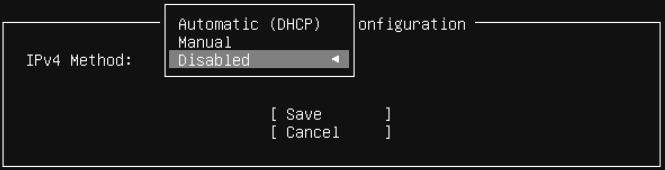
Step 1: Select Manual with Enter
- Select Manual with Enter
Use the arrow keys to select Manual and press Enter. The next form accepts the assigned subnet, IP address, gateway and DNS details.
| Field | What to enter |
|---|---|
| Subnet | The assigned network in CIDR notation: network address/prefix length. This is not the individual server address. |
| Address | The assigned IPv4 address, without appending a /prefix. |
| Gateway | The IPv4 gateway assigned to the service. |
| Name servers | DNS server addresses, separated with commas when entering more than one. |
| Search domains | Search domains used to resolve short names. Left empty in this demonstration. |
Subnet, Address, Gateway and Name servers contain the actual service values. These four private values are permanently hidden; Search domains is empty.
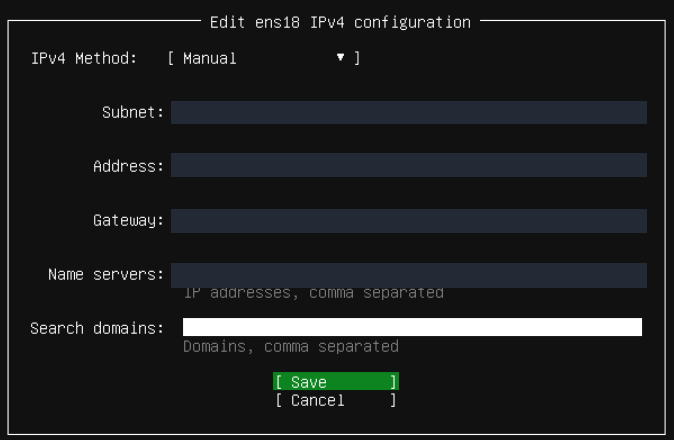
Step 1: Enter the network in CIDR notation under Subnet
- Enter the network in CIDR notation under Subnet
Use the network address and prefix length matching the service’s IP Configuration. Subnet is a separate field from the individual IPv4 address assigned to the server.
- Enter Address and Gateway
Enter the assigned server IPv4 address in Address and the service gateway in Gateway. Both fields are populated in this screen.
- Populate Name servers
Enter DNS addresses separated by commas. Search domains is left empty because this example does not use a custom search domain.
- Save the settings
Compare all four network fields with your service details, then press Enter on the selected Save button.
After saving the settings, ens18 shows static and the assigned address. IP and MAC values have been hidden.
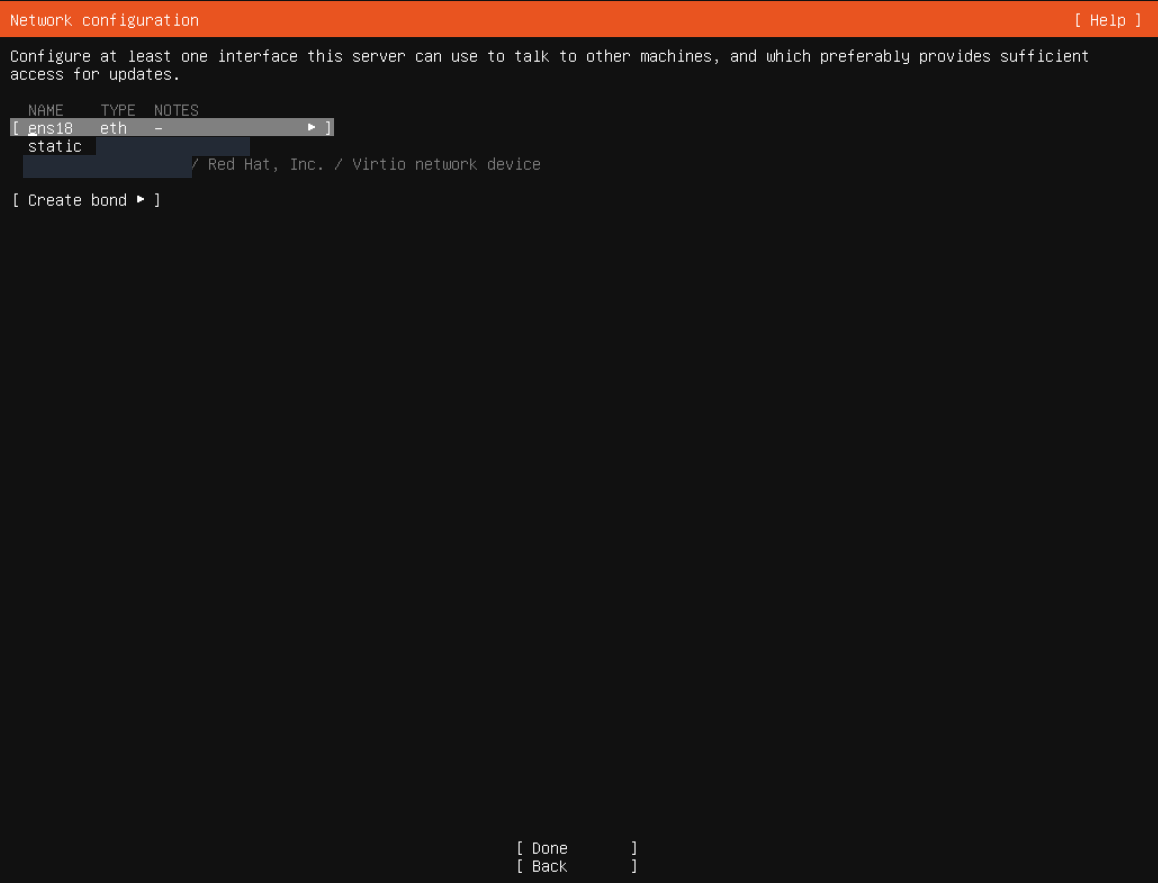
Step 1: Check the static entry under ens18
- Check the static entry under ens18
The static entry shows that the manually entered address was applied to the interface. Internet and package-source access are checked separately in the mirror test that follows.
- Continue with Done
After checking the saved network configuration, select Done and press Enter.
When reopening the form only to review settings: In this installation, Gateway and Name servers appeared empty when Edit IPv4 was reopened. The saved Netplan settings, default route and DNS were checked and were correct. If you opened the form only to inspect it, leave with Cancel. To make a change, fill in all network fields with the correct values before choosing Save.
Manual network configuration may ask for the network in CIDR notation and the server's IP address in separate fields. Use the assigned prefix, mask and gateway; do not copy another server's /24.
Once the static network settings were ready, Done continued to the next screen. The address on Proxy was left empty and Done was selected. A proxy routes traffic through an intermediary; use the assigned address if your network requires one.
This demonstration does not use a proxy for internet access. Proxy address is left empty.
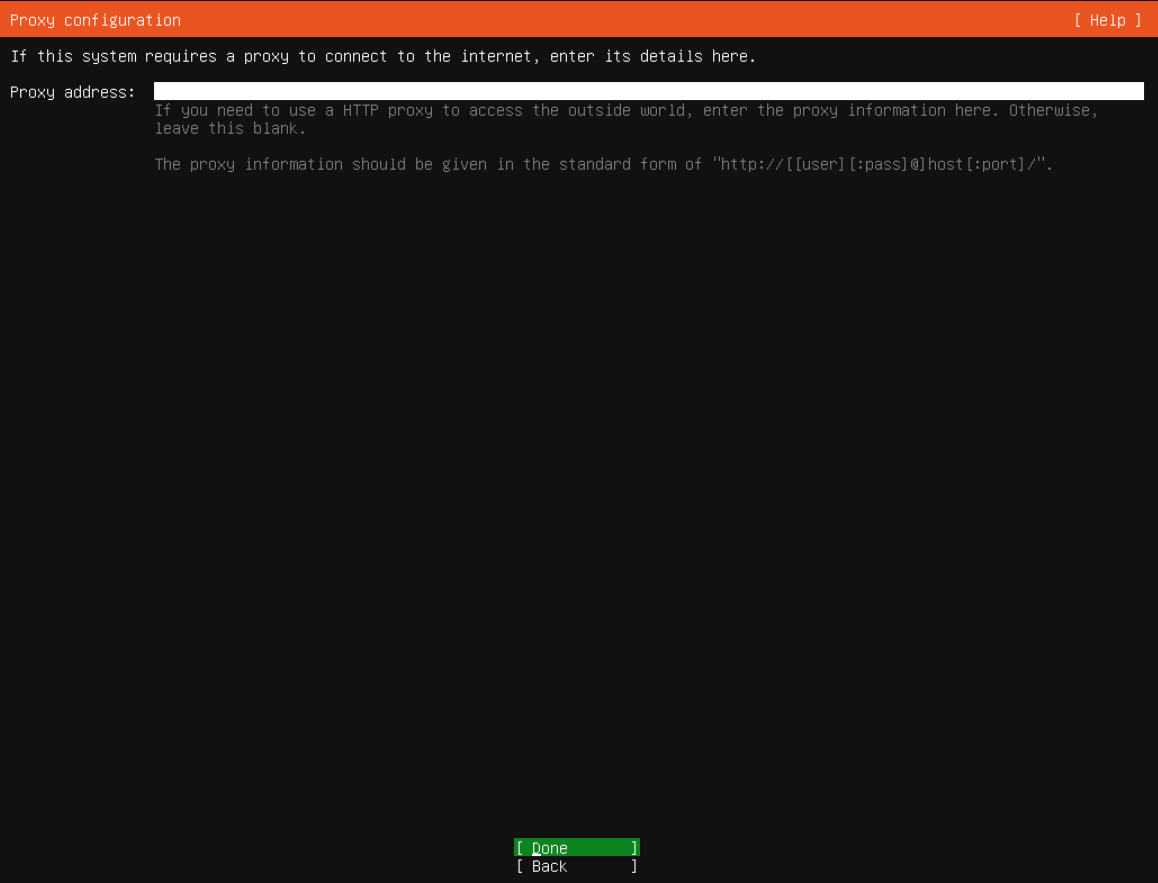
Step 1: Check Proxy address for your environment
- Check Proxy address for your environment
Leave this field empty unless your network requires a proxy. If a proxy is required, use the address supplied by your administrator.
- Continue to the package source with Done
This example keeps the field empty and selects Done. Press Enter to continue.
Check the Ubuntu package mirror
The proposed http://archive.ubuntu.com/ubuntu/ address was retained. The package mirror supplies Ubuntu packages; it is not the ISO download URL. The installer tests access to this source.
The test reported This mirror location passed tests., confirming that this installation environment could access the package source. Seeing a static IP in the network summary and passing the repository test are separate checks; review both.
The default http://archive.ubuntu.com/ubuntu/ address is used, and the actual screen reports This mirror location passed tests.
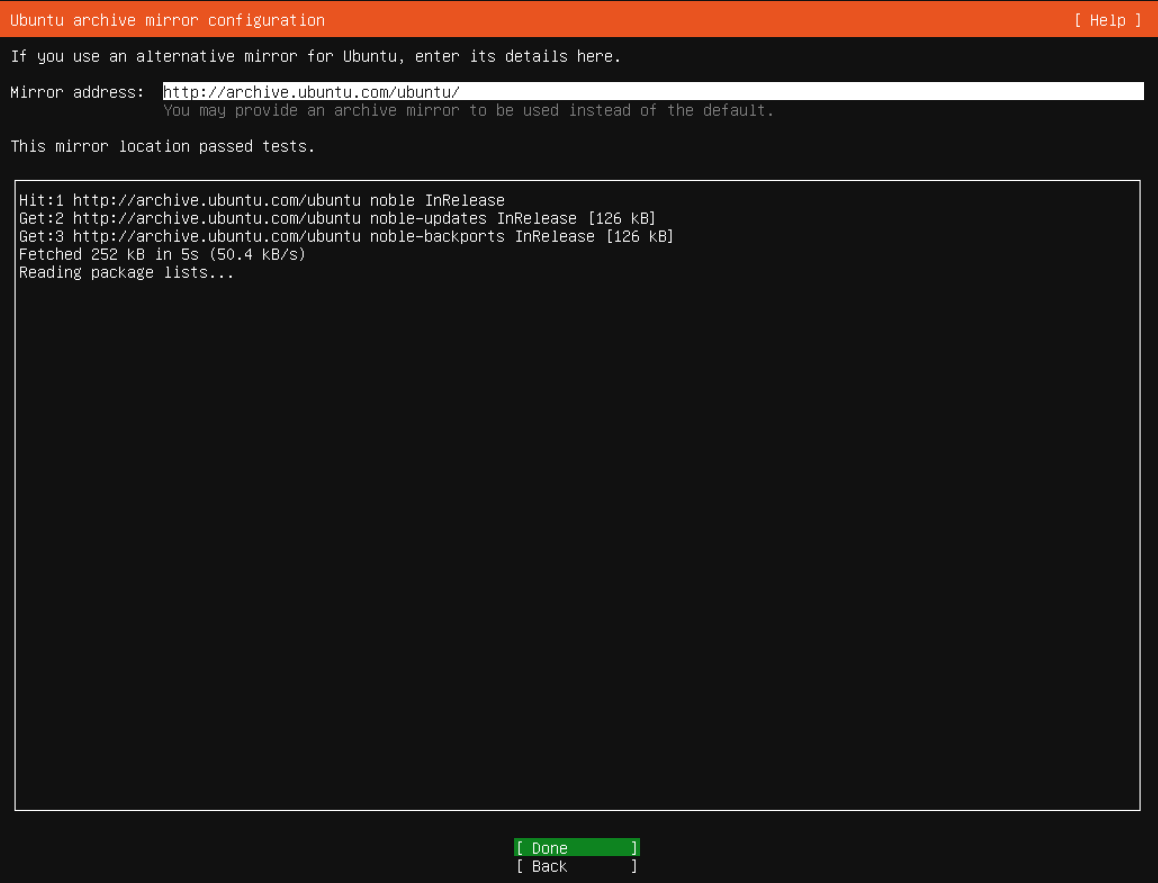
Step 1: Wait for This mirror location passed tests.
- Wait for This mirror location passed tests.
Check that the package-source access test has passed. The screenshot shows retrieval of noble, noble-updates and noble-backports metadata.
- Continue to storage configuration with Done
Once the test has passed, select Done and press Enter.
4. Select the disk and storage layout
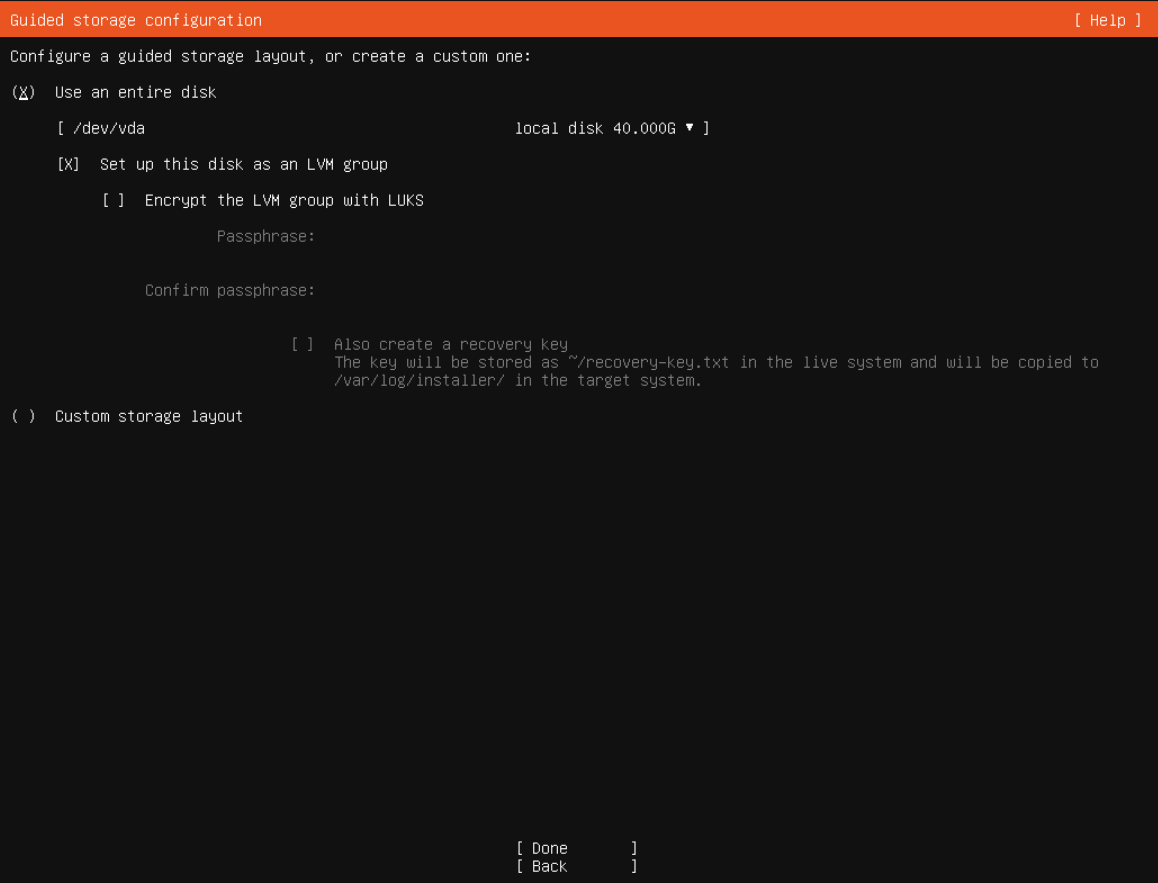
The following choices were used on Guided storage configuration:
- Use an entire disk remained selected.
- The target was checked as
/dev/vda — 40.000G. - Set up this disk as an LVM group remained checked.
- Encrypt the LVM group with LUKS was not checked.
- Done opened the proposed storage layout.
This demonstration selects Use an entire disk and Set up this disk as an LVM group. The target is /dev/vda, shown as 40.000G on screen.
Step 1: Check the correct target disk
- Check the correct target disk
Use an entire disk can replace the existing disk layout. Check /dev/vda, the disk size and your backups before continuing.
- Check the LVM selection
Set up this disk as an LVM group is checked. Encrypt the LVM group with LUKS is not checked in this demonstration.
- Open the proposed layout with Done
After checking the choices, select Done and press Enter to open the storage summary. The disk-write confirmation is a separate later step.
Using the entire disk allocates its previous operating system and partitions to the new installation. Check the backup stored outside the server before giving the final confirmation. Disk encryption was not selected in this demonstration; an encrypted installation has different startup and key-management requirements.
Read the LVM storage summary
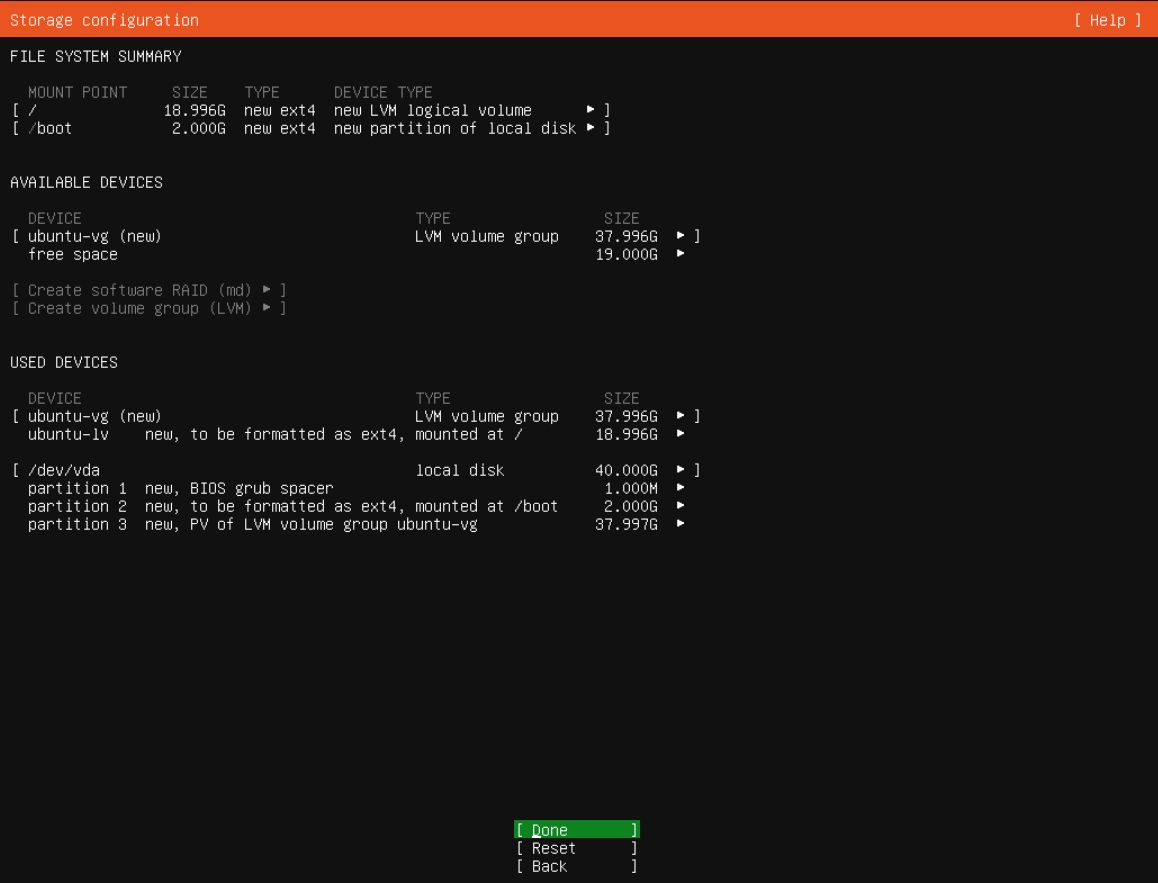
The proposed layout for this installation is shown below. These values belong to the demo's 40 GiB disk; a different disk capacity may produce different sizes.
| Area | Size shown in the summary | Purpose |
|---|---|---|
/ | 18.996G | An ext4 root filesystem on a new LVM logical volume. |
/boot | 2.000G | A separate ext4 partition for boot files. |
| BIOS GRUB space | 1 MiB | Boot-loader space for this BIOS installation. |
Free space inside ubuntu-vg | 19.000G | LVM capacity not yet assigned to a logical volume. |
The entire 40 GiB disk was not allocated to /. The default layout assigns approximately 19 GiB to the root filesystem and leaves approximately 19 GiB free inside the volume group. This space has not disappeared: it has not yet been added to a filesystem, so df -h / does not report it as available root-filesystem space.
The actual storage summary shows 18.996G ext4 for the root filesystem, 2.000G ext4 for /boot, and 19.000G free space inside ubuntu-vg.
Step 1: Check the root and /boot filesystems
- Check the root and /boot filesystems
Under FILE SYSTEM SUMMARY, review the / and /boot mount points, ext4 type and allocated sizes. These are the proposed values for this example.
- Inspect free space in the LVM group
ubuntu-vg is shown as 37.996G with 19.000G free space. Selecting the entire disk does not allocate the entire volume group to the root volume.
- Check the target disk and proposed partitions
USED DEVICES lists /dev/vda 40.000G, a BIOS grub spacer, /boot and an LVM physical volume. Go back before confirming if the disk or layout is wrong.
- Open the final confirmation with Done
After verifying the layout, press Enter on the selected Done button. The next screen displays the data-loss warning.
Confirm the disk writes
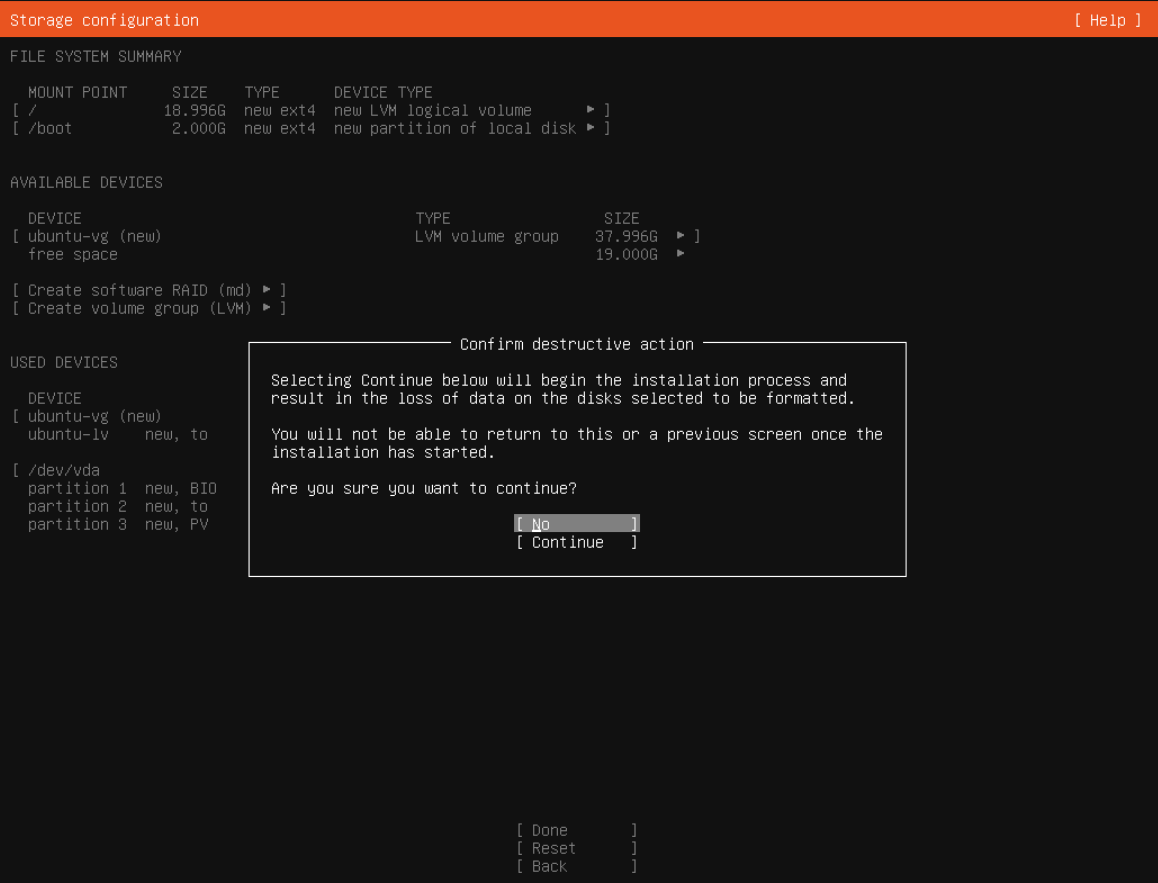
If the storage summary is correct, choose Done. The warning explains that proceeding will destroy data on the selected disks; No is initially selected. Check the target disk and backup one last time, then confirm with Continue. In the demonstration, this opened the profile screen and installation continued.
The Confirm destructive action dialog explicitly warns that Continue starts installation and causes data loss on disks selected for formatting.
Step 1: Confirm the target disk and backups once more
- Confirm the target disk and backups once more
The warning says that after installation starts you cannot return to this or previous screens. Choose No if the target disk and backups have not been verified.
- Confirm Continue when ready
The initial selection in this actual screen is No. When ready, use the down arrow to select Continue and press Enter.
Actual recording: final disk confirmation
Actual console recording: final data-loss warning, change No to Continue, confirm with Enter and reach the empty profile screen. The recording ends before installation completes.
Recording transcript
The recording starts at the disk-write confirmation and its data-loss warning. The selection changes from No to Continue, then Enter confirms it. The empty Profile configuration screen opens. The recording ends there; entering the user details and completing Ubuntu installation are covered in the following steps.
After the first boot, check the installed layout again with lsblk -f and df -h /. Use sudo vgs to inspect free space in the volume group; filesystem capacity and unallocated LVM space are different values.
5. Create the administrator account
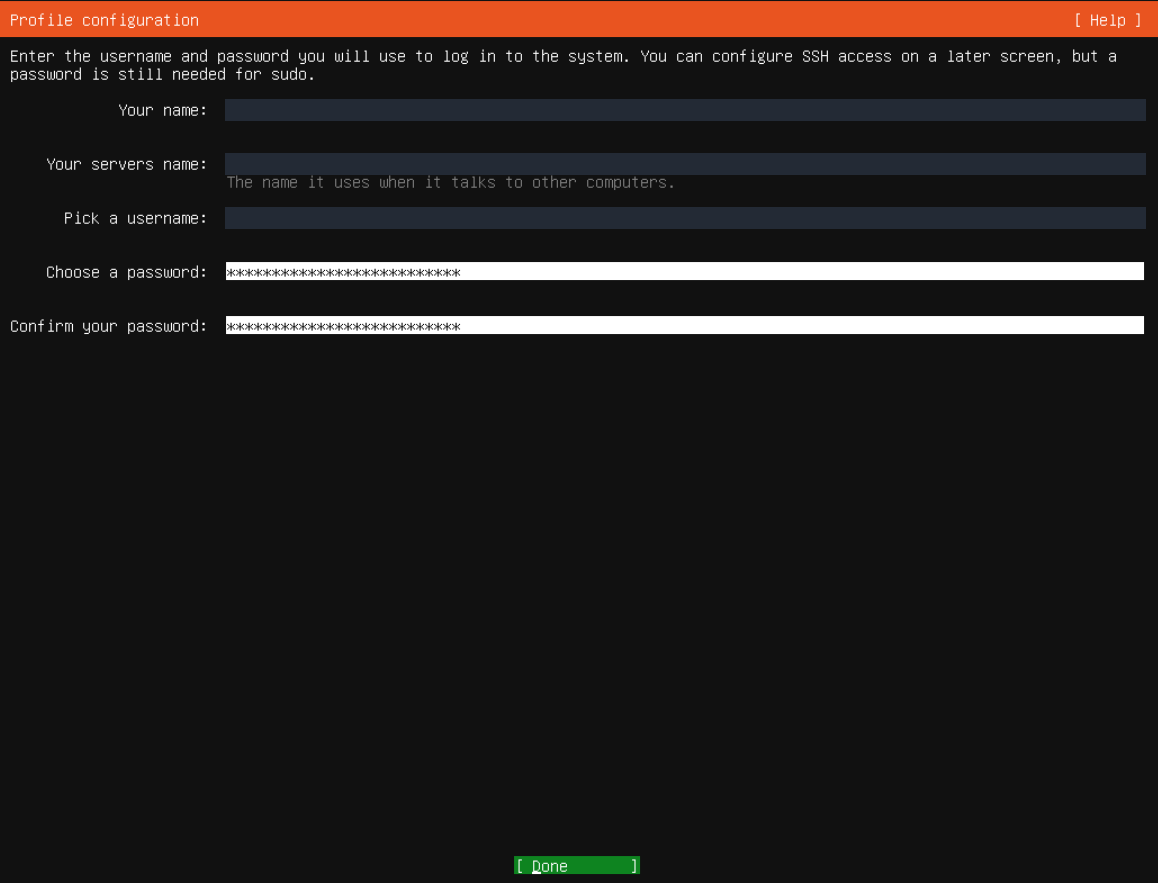
The profile was completed with a display name, hostname and username, followed by the user's password entered twice. Record the Linux username you create: this is the account you will use for console and SSH login.
Your name, Your servers name and Pick a username are populated; personal and server details are hidden. Both password fields retain the installer’s own asterisks.
Step 1: Enter your name and server name
- Enter your name and server name
Complete Your name and the machine name under Your servers name. The server name identifies this machine on the network.
- Choose the login account under Pick a username
Enter and securely record the username for the first login. This field is separate from your display name and the server name.
- Enter the same password in both fields
Complete Choose a password and Confirm your password. This screen explains that a password is still needed for sudo even if SSH keys are configured later.
- Save the account details with Done
After reviewing the fields, press Enter on the selected Done button.
The profile fields serve different purposes:
| Information | Purpose |
|---|---|
| Display name | A description of the account owner; it need not be the SSH login username. |
| Hostname | The machine's name. Entering it does not create a DNS record. |
| Username | The account name used when signing in through the console or SSH. |
| Password | This user's password; it is separate from the customer portal account. |
Ubuntu's first user can run administrative commands through sudo. Do not expect a separate root-password login in the default workflow. Enter your password using the selected keyboard layout; hidden screenshot fields are not sample credentials.
Ubuntu Pro choice
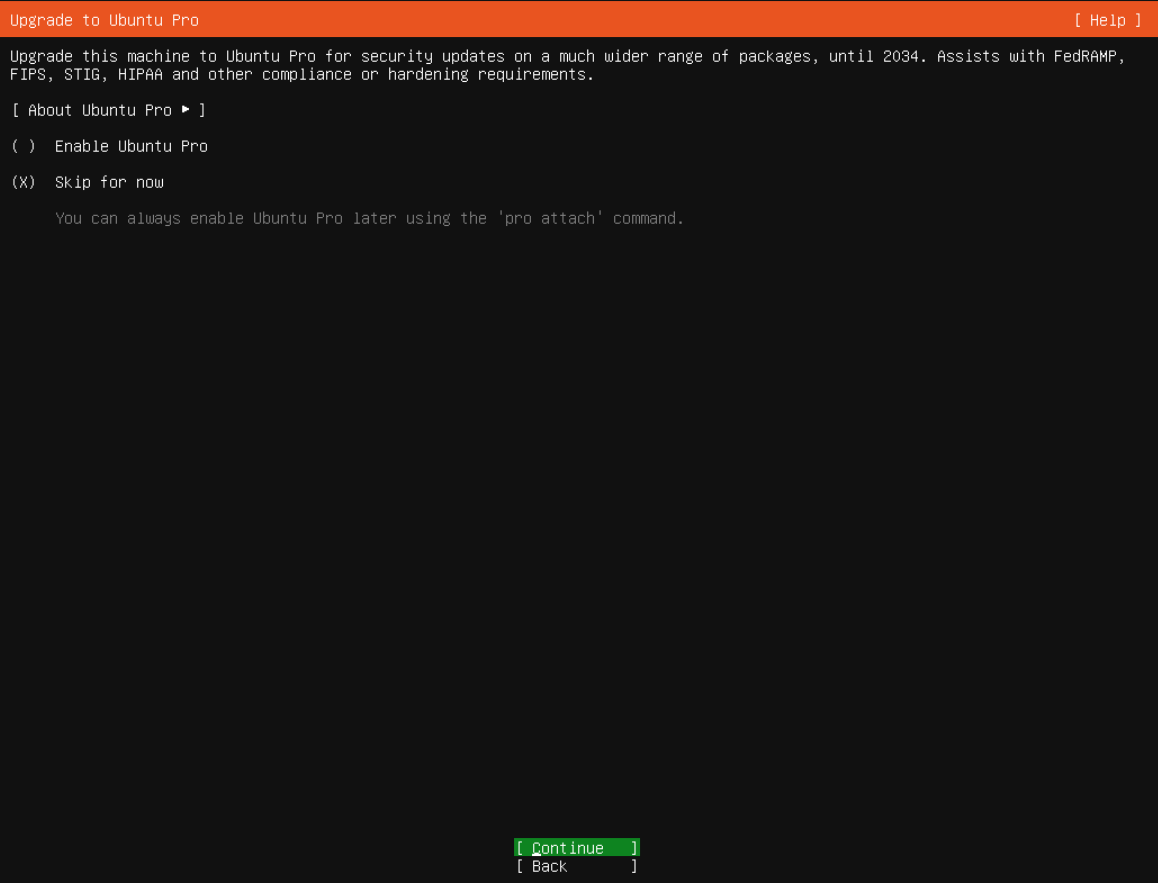
On Upgrade to Ubuntu Pro, Skip for now was selected, followed by Continue. Activating Ubuntu Pro is not required for this setup; the demonstration continued without attaching a subscription. See the Ubuntu Pro page for details of the service.
This demonstration retains Skip for now on the Upgrade to Ubuntu Pro screen. Ubuntu Pro setup is outside this installation flow.
Step 1: Keep Skip for now selected
- Keep Skip for now selected
Ubuntu Pro is not enabled in this example. The screen indicates that it can be enabled later.
- Continue to SSH configuration
Press Enter on the selected Continue button.
6. Configure OpenSSH and finish installation
Enable the SSH server
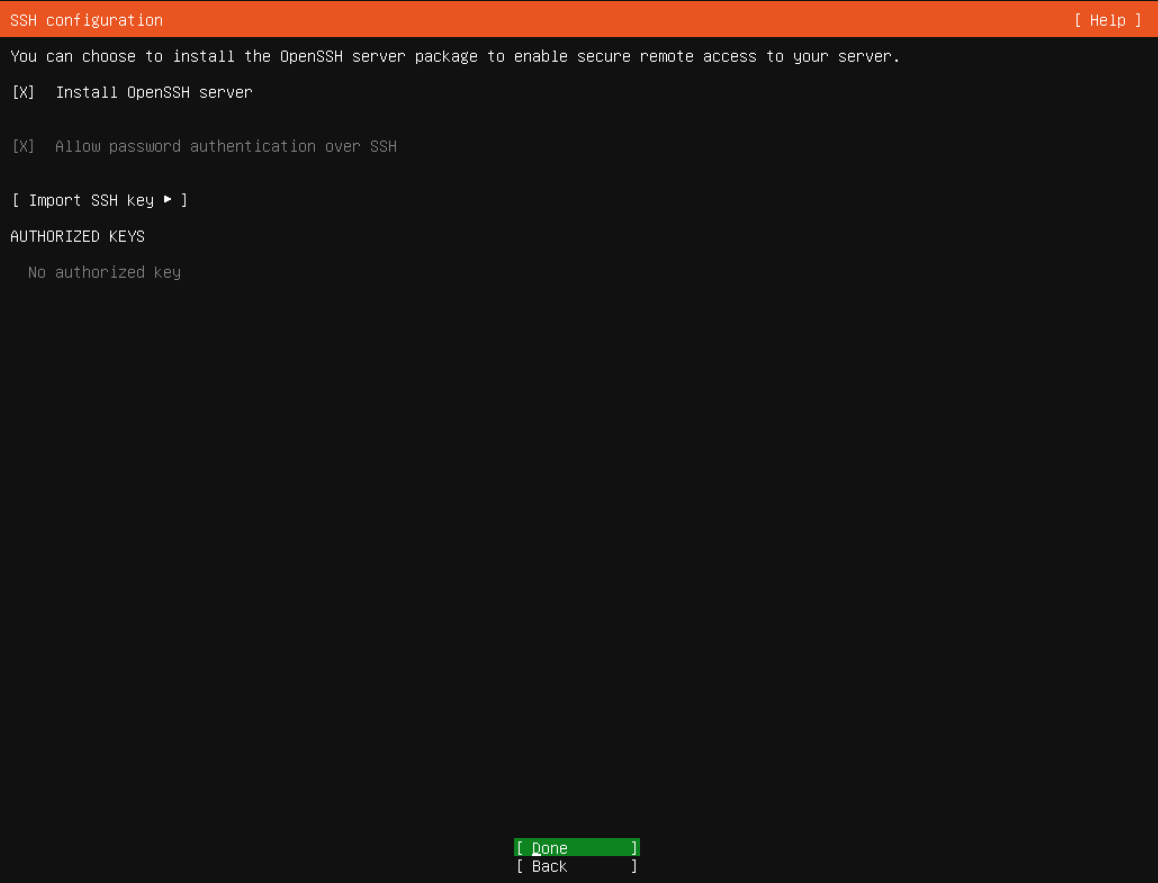
- Install OpenSSH server was initially unchecked and was enabled for this installation.
- Allow password authentication remained checked; no SSH key was imported for this installation.
- Done continued to the next screen.
These choices prepare password-based SSH access for the user created during installation. With no imported key, the password option is checked and cannot be changed on this screen; that appearance does not mean password login is disabled.
The actual final selection has Install OpenSSH server and Allow password authentication over SSH checked. No authorized key is shown; no SSH key has been imported.
Step 1: Check Install OpenSSH server
- Check Install OpenSSH server
Select the OpenSSH server package for remote SSH access. The checkbox is selected in this screen.
- Review the authentication choice
This example keeps SSH password authentication enabled and imports no key. Choose according to your access policy; use the account created in the profile step for the first login.
- Continue to optional packages with Done
Press Enter on the selected Done button. The next screen opens the Featured server snaps list.
Choose additional server applications
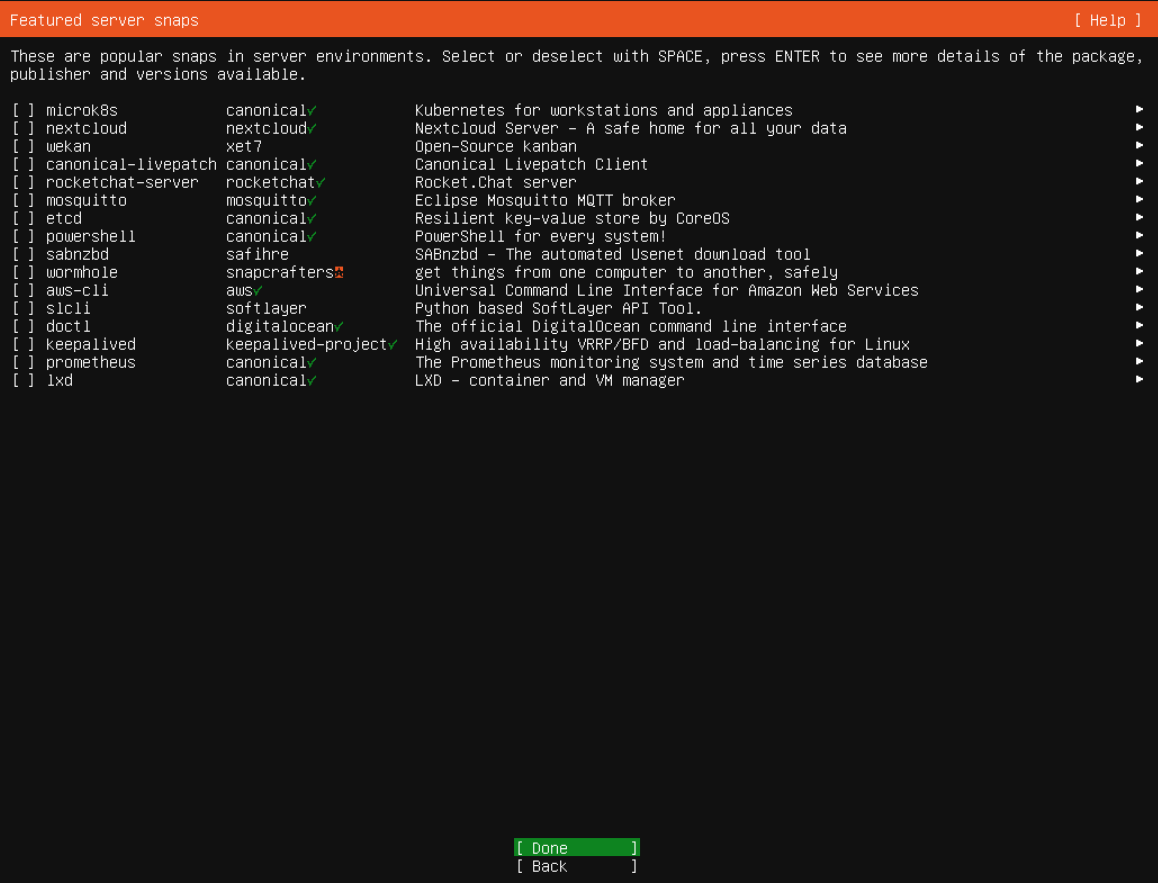
All 16 options in the following Snap application list were left unchecked for this basic installation. Done continued to the installation-progress screen. Prepare any additional applications after the operating system has been installed.
All checkboxes in Featured server snaps are left empty in this demonstration. Additional applications can be installed as needed after the base installation.
Step 1: Check optional package selection
- Check optional package selection
No package is selected in the list. To install a specific package, use Space to change its selection as indicated on the screen.
- Continue to installation progress with Done
This example leaves the list unselected and presses Enter on the selected Done button.
Wait for installation to finish
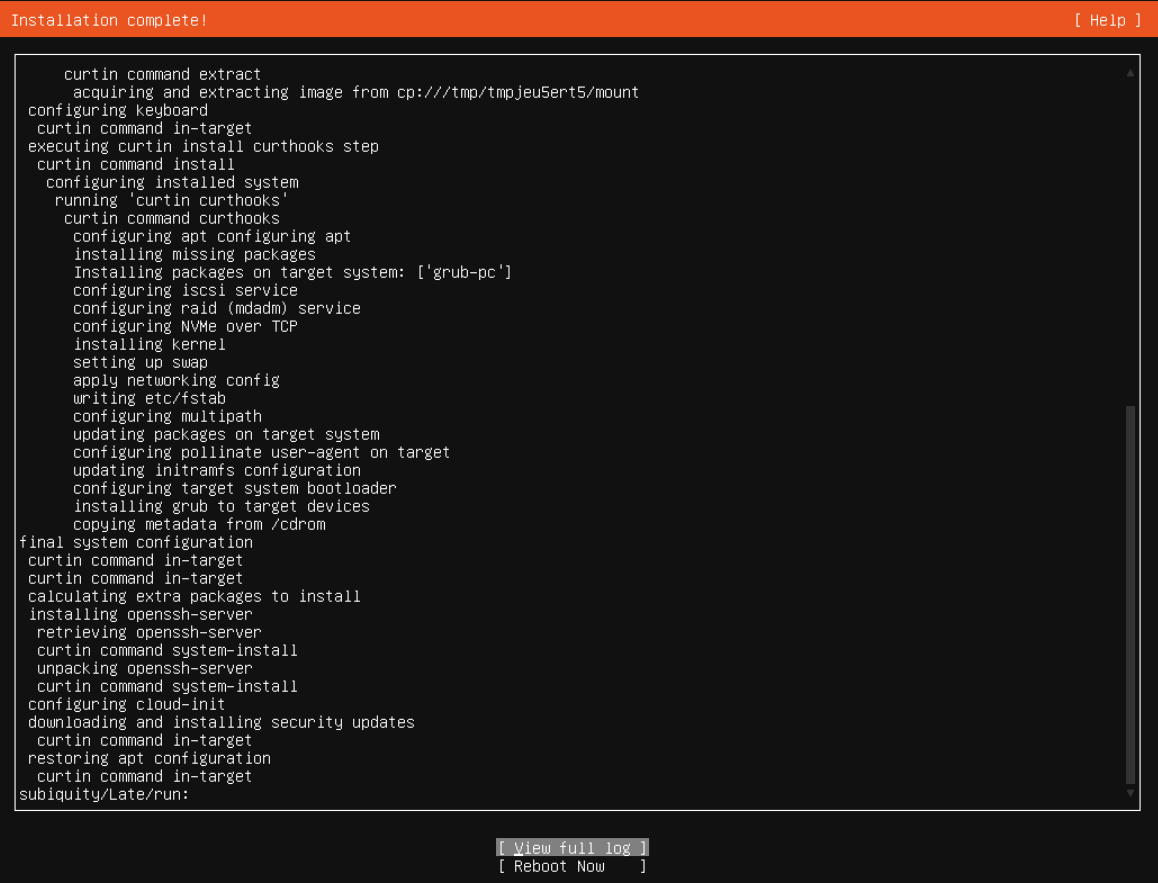
Do not restart the server or detach the ISO while the operating system and security updates are being installed. In this demonstration, Installation complete! appeared after those operations finished, with Reboot Now available.
The installer’s orange title reads Installation complete!, and Reboot Now is available. The first disk boot and login checks follow in the next steps.
Step 1: Check the Installation complete! title
- Check the Installation complete! title
After the installation tasks and security-update stage finish, confirm this completion title.
- Restart with Reboot Now
Select Reboot Now and press Enter. If prompted to remove installation media, follow the ISO detach step that follows.
The operating system can be installed without OpenSSH, but SSH access would then need to be prepared later through the console. This guide enables it during installation for remote login. To prepare key-based access, continue with the SSH keys guide.
7. Leave the ISO and sign in to the installed system
Reboot Now was selected on the completion screen. The next stage displayed Please remove the installation medium, then press ENTER. This asks for the virtual installation media to be removed after setup has finished.
After Reboot Now, the console shows Please remove the installation medium, then press ENTER:. The same actual screen also contains two cdrom.mount unmount warnings.

Step 1: Detach the installation ISO
- Detach the installation ISO
The installation medium must be detached from the virtual CD-ROM. Use ISO Image in the next portal step and check the portal’s restart result.
- Return to this server's page in the customer portal.
- Select Templates & ISO → ISO Image.
- Read and accept the confirmation stating that the operation will restart the server.
- Check the ISO detach result and follow startup in the console.
The ISO detach instructions show the portal screens in detail. Use this operation only after installation completes, because it restarts the server.
The portal reported ISO Image detached. The server restarted and booted the installed Ubuntu Server 24.04.5 LTS system from disk.
Sign in with the user created during installation
- Enter your Linux username at the console's login: prompt.
- At Password:, enter that user's password. Password characters normally remain invisible as you type.
- Check that the command prompt appears.
The demonstration verified console login followed by a separate SSH connection. The SSH host key was compared with the key confirmed through the console, and the same Linux user's sudo access was verified.
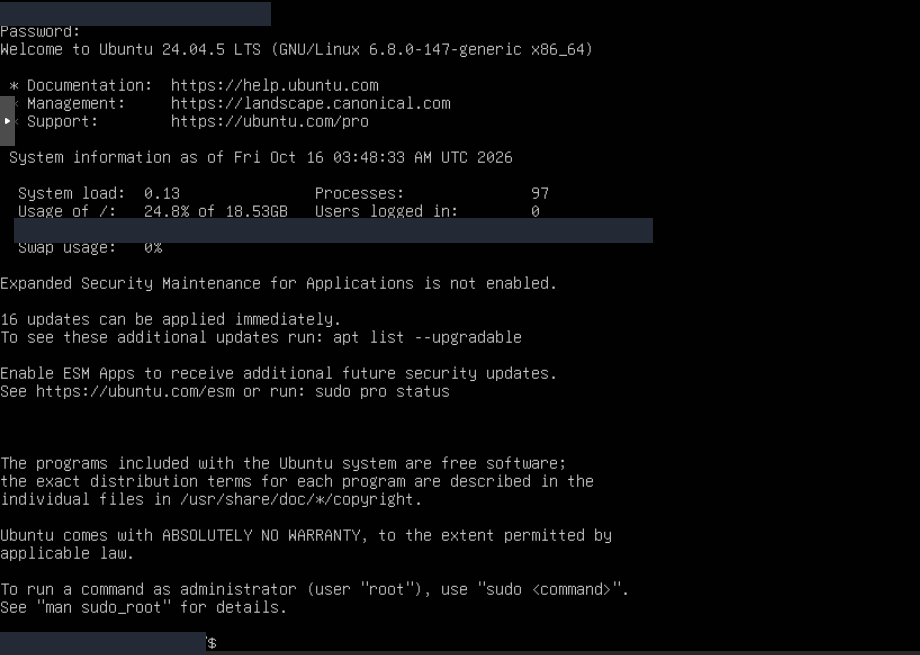
The actual console session shows Ubuntu 24.04.5 LTS, the running 6.8.0-147-generic kernel, and a user shell prompt ending in $. Account, server and IP details are hidden.
Step 1: Check the installed release in the welcome line
- Check the installed release in the welcome line
Sign in with the username and password created during installation. The Welcome to Ubuntu line shows the release and kernel for this actual session.
- Confirm the user shell prompt
A command prompt ending in $ shows a successful user session. Use sudo from this account for administrative actions. The update count on screen is a snapshot from this first login.
If the installer opens again after restarting, do not partition the disk a second time. Check that installation completed and which device is being used to boot. Follow the shared first-boot check.
After signing in, check the installed release, addresses, routes and SSH service:
cat /etc/os-release
ip -br address
ip route
systemctl is-active ssh
active means the SSH service is running. External access also requires the correct IP, port and access rules. SSH troubleshooting and network/DNS checks help identify where a connection fails.
Check for updates after installation
sudo apt update
sudo apt upgrade
apt update refreshes package lists. apt upgrade displays proposed package changes and asks for confirmation. Use the Linux update guide for reboot and final verification steps.
Reinstallation may change the SSH host key. If you receive a warning for a previously used IP, verify the new key through the console. Follow the first SSH login guide before changing the saved trust entry.
Prepare the guest services
In this demonstration, qemu-guest-agent was installed after the first boot; systemd-timesyncd was already at the current package version. QEMU Guest Agent provides communication between the VM and virtualization management. systemd-timesyncd synchronizes the system clock.
sudo apt-get install qemu-guest-agent systemd-timesyncd
sudo systemctl start qemu-guest-agent
sudo systemctl enable --now systemd-timesyncd
Review and approve the package transaction. Check the service states with:
systemctl is-active ssh qemu-guest-agent systemd-timesyncd
timedatectl status
Results verified on this installation
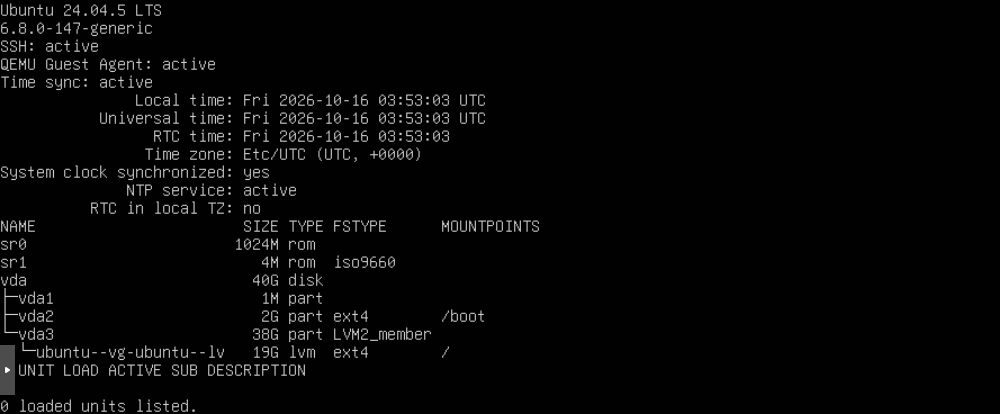
The actual installed Ubuntu 24.04.5 LTS system was checked for the running 6.8.0-147-generic kernel, three active services, synchronized time, disk layout and failed units.
Step 1: Check SSH, guest agent and time service
- Check SSH, guest agent and time service
SSH, QEMU Guest Agent and Time sync all report active. In this actual check, these correspond to ssh, qemu-guest-agent and systemd-timesyncd.
- Confirm that the clock is synchronized
Check System clock synchronized: yes and NTP service: active. This demonstration retains the Etc/UTC system time zone.
- Verify the root and /boot filesystems
The lsblk output shows vda 40G, 2G ext4 for /boot and a 19G ext4 LVM volume for /. These are the actual values of the installed disk layout.
- Check that no failed units are listed
0 loaded units listed. indicates that this check found no failed units. If your output differs, inspect the affected service.
| Check | Result |
|---|---|
| Installed system | Ubuntu 24.04.5 LTS (Noble Numbat). |
| Kernel | 6.8.0-147-generic. |
| Disk and root filesystem | LVM on the 40 GiB vda disk; approximately 19 GiB ext4 / and a separate 2 GiB ext4 /boot. |
| Free LVM volume-group space | Approximately 19 GiB, not yet allocated to the root filesystem. |
| Networking | Assigned address, default route and DNS correct in the installed system; manual settings retained. |
| SSH and administration | Console and separate SSH login succeeded; sudo verified. |
| Services | ssh, qemu-guest-agent and systemd-timesyncd active. |
| Time | Etc/UTC; system clock synchronized, NTP active. |
| Package lists | apt-get update completed successfully. |
| Pending upgrades | The guest-package installation reported 20 not upgraded. |
| Failed systemd units | 0. |
These results belong to this demo installation. Installing the guest packages does not upgrade every package; 20 packages remained unupgraded at this check. Review your server's upgrade list and apply appropriate updates during a suitable maintenance window. Later package versions, kernels and upgrade counts may differ.
8. Remove the installation ISO from storage
After startup from the installed Ubuntu disk, console and SSH login, and retained network settings were verified, the unused ISO file was removed:
- Open Templates & ISO → ISO Management.
- Choose Delete on the Ubuntu installation-image card.
- Check the filename in Delete ISO?, then confirm with Yes, Delete.
- Verify that the list updates.
The demonstrated result was No ISO Images, with 3 uploads remaining again on the demo service. The installed Ubuntu system remains on the server disk. Detaching the ISO and deleting its stored file are separate operations; the shared ISO deletion guide illustrates the final checks.
Frequently asked questions
Are the Ubuntu Server and Ubuntu Desktop ISOs the same?
They are different installation images. This guide uses Ubuntu Server for a virtual server. A server administered through SSH does not require a desktop interface; check for live-server-amd64.iso in the downloaded filename.
Why select Install OpenSSH server?
An SSH service must be available on the server before you can connect from another computer. The operating system can be installed without this selection, but remote access then needs to be prepared through the console. Also check the permitted password or key method in the OpenSSH step.
Do I use my customer portal account for SSH login?
Use the Linux user created in the installer's profile screen. Your customer portal email account does not automatically create an identical server user. The difference between username, hostname and display name is explained in account creation.
Why does / not show the full size of my server disk?
An LVM installation can leave part of the disk unallocated to any logical volume. In this guide's summary for a 40 GiB disk, approximately 19 GiB is assigned to the root filesystem and approximately 19 GiB remains free inside ubuntu-vg. The disk has not become smaller. Review the storage layout, check the filesystem with df -h /, and inspect free volume-group space with sudo vgs.