Install Debian 13 from an ISO: text-based method
Installing Debian on a VPS from an ISO lets you configure the base system, user account and remote access yourself. This guide follows the installer from the DCHost customer portal, explains the choices on each screen, and covers the checks after first login.
The demonstration uses Debian 13.7.0 amd64 netinst and the keyboard-driven Install option. netinst is a small installation image; additional selected packages can be retrieved over the network. Screenshots come from an actual demo server, with passwords and private service details hidden.
Graphical or text-based installation?
This page covers the text-based installer, opened with Install in the Debian boot menu. You make the selections with the keyboard. For a mouse-driven walkthrough, use Debian graphical ISO installation, which opens Graphical install from the same ISO.
Either method can install a server without a desktop environment. Opening the graphical installer does not install GNOME or another desktop; the later Software selection choices determine which packages are installed.
Before you start
Partitioning the selected disk and writing changes can erase its operating system and files. Open the correct service, keep a backup outside the server, and review your backup plan.
Have the assigned IP address, prefix or subnet mask, gateway and DNS settings available. You may need to enter them if automatic networking is unavailable. During installation, use the portal console rather than SSH.
Use the portal network information step to find the assigned IPv4 address, network prefix and Gateway field.
| Setting | Used in this guide |
|---|---|
| Operating system | Debian 13 series; installation media 13.7.0. |
| Architecture | amd64: 64-bit x86, not ARM. |
| Installation file | debian-13.7.0-amd64-netinst.iso. |
| Installer | Install in the BIOS menu, using the text interface. |
| Interface language | English; the text retains the labels visible in the screenshots. |
A desktop environment is not required to manage a server. Debian's non-desktop resource figures depend on conditions such as a text installer and swap. Plan the RAM and disk capacity needed by your applications separately.
1. Upload the Debian ISO and wait for Ready
- Open Templates & ISO → ISO Management → Upload ISO for your server.
- Enter a recognizable Label; the demonstration uses
Debian 13.7 amd64 netinst. - Under File URL, enter the official Debian ISO link and choose Upload.
- Wait for the image to reach Ready.
After the download completed, the example entry changed to Ready and offered Boot from ISO.
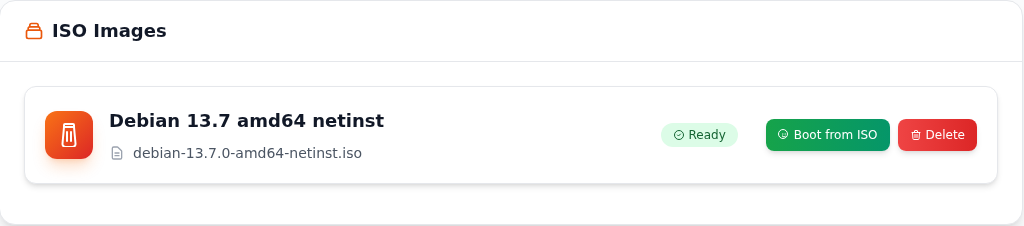
Step 1: Confirm the Ready status
- Confirm the Ready status
Check for Ready next to the intended Debian file. Do not proceed with an entry that is still Pending.
- Proceed with Boot from ISO
After preparing backups and installation settings, select Boot from ISO. The portal asks for confirmation.
A ready ISO does not mean Debian has been installed on the server disk. Installation continues in the console after booting from the ISO.
If you are using the form for the first time, follow the ISO upload guide. Select the image from the official Debian download directory. The current file in that directory changes over time; check the ISO version and its verification information together. A checksum for another release does not apply.
2. Choose Install in the ISO boot menu
Choose Boot from ISO → Boot Now for the Ready image. The server restarts from the ISO. Open Console / VNC Console Access using the shared console step.
The console displays the Debian GNU/Linux installer menu after booting from the ISO. This guide uses the keyboard-driven Install option.
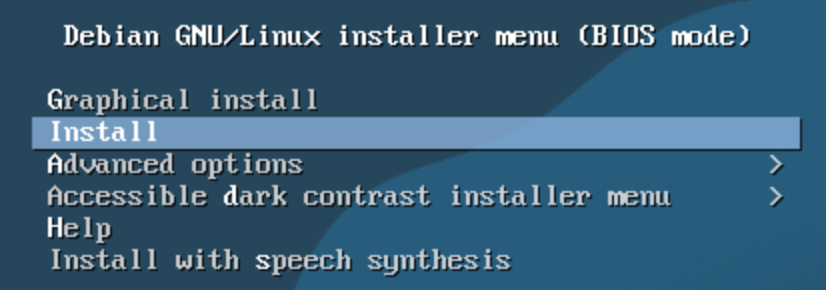
Step 1: Start Install with Enter
- Start Install with Enter
Use the up and down arrow keys to select Install, then press Enter. The language selection screen appears when the installer starts.
Click inside the console first to give it keyboard focus. Select and confirm Install promptly because the menu may automatically start a selection.
- Click inside the console once to give it keyboard focus.
- Select Install in Debian GNU/Linux installer menu (BIOS mode).
- Press
Enterbefore the countdown expires.
Install opens the text-based installer used here; it does not mean that a desktop environment will be installed. The initial menu can look different on a VM that boots using UEFI.
Use the arrow keys to select rows. Tab moves between fields and buttons, space checks selection boxes, and Enter activates the selected control. Follow the keyboard instructions at the bottom of each screen.
3. Choose the language, location, locale and keyboard
Installer language
The demonstration selects English on Select a language. You can choose another language, but the visible labels will then differ from the screenshots. The selection affects the installer and the system's default language.
Select a language sets the installer language. This example uses English to match the labels shown throughout the guide.
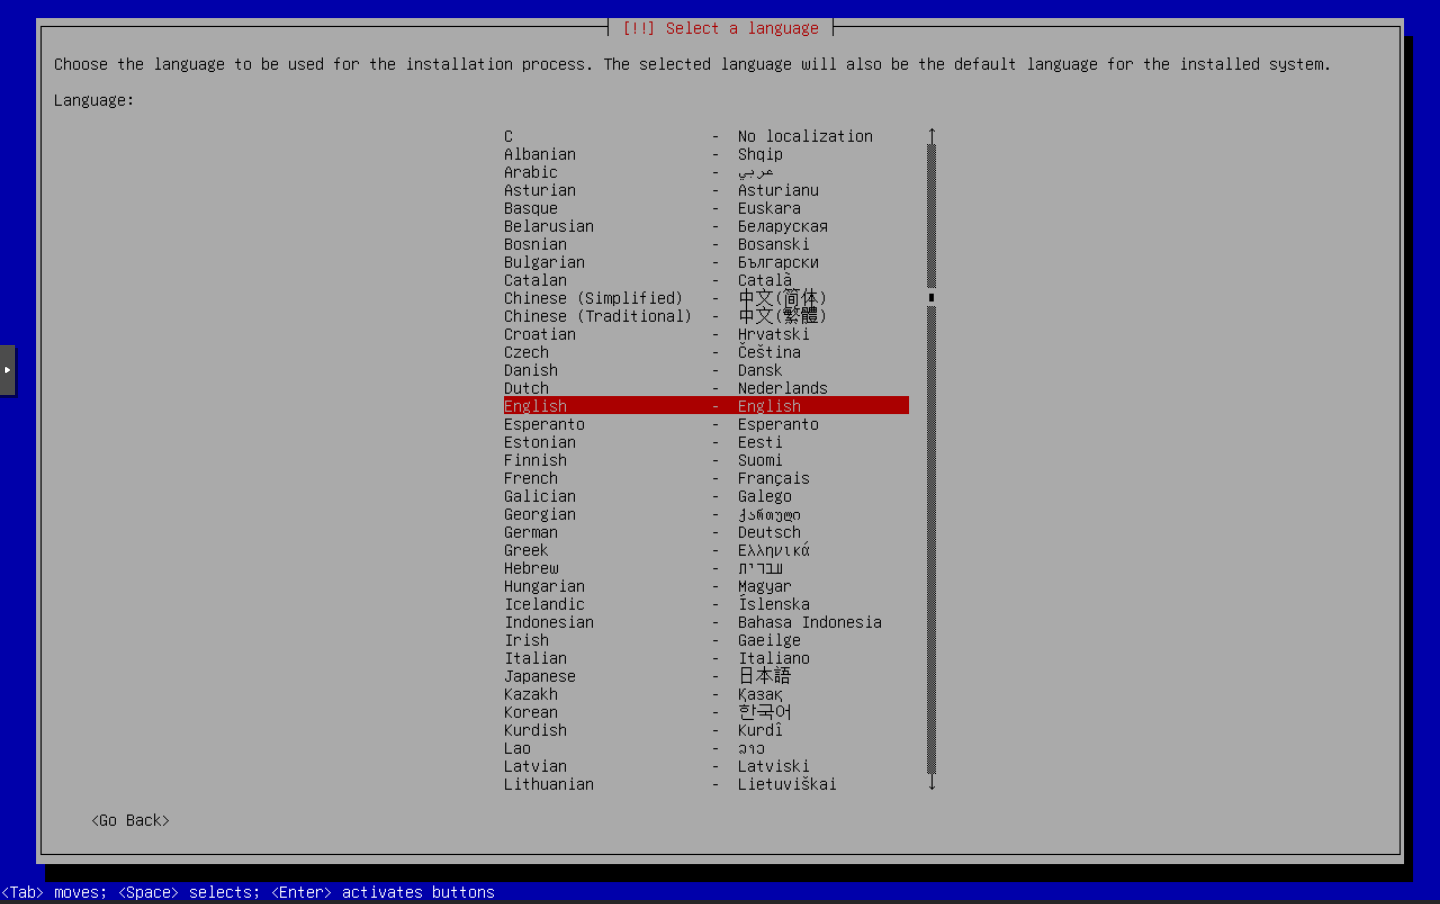
Step 1: Select English and press Enter
- Select English and press Enter
Use the arrow keys to highlight the intended language. English is highlighted in red in the example; press Enter to confirm.
- Use the keyboard hints at the bottom
The bottom line explains Tab, Space and Enter. Use Tab to move between fields and buttons, and Enter to activate your selection.
You can choose another supported language. It affects the installer text and the installed system’s default language; location and keyboard layout are selected separately.
Location: Türkiye
After English is selected, Select your location first opens a country shortlist. This Debian installer reaches Türkiye through the following path:
- Choose other in the shortlist.
- Select Asia under Continent or region.
- Select Türkiye in the country list and press
Enter.
Choosing English first opens a shortlist of associated countries. This example uses other to reach Turkey through the full location list.
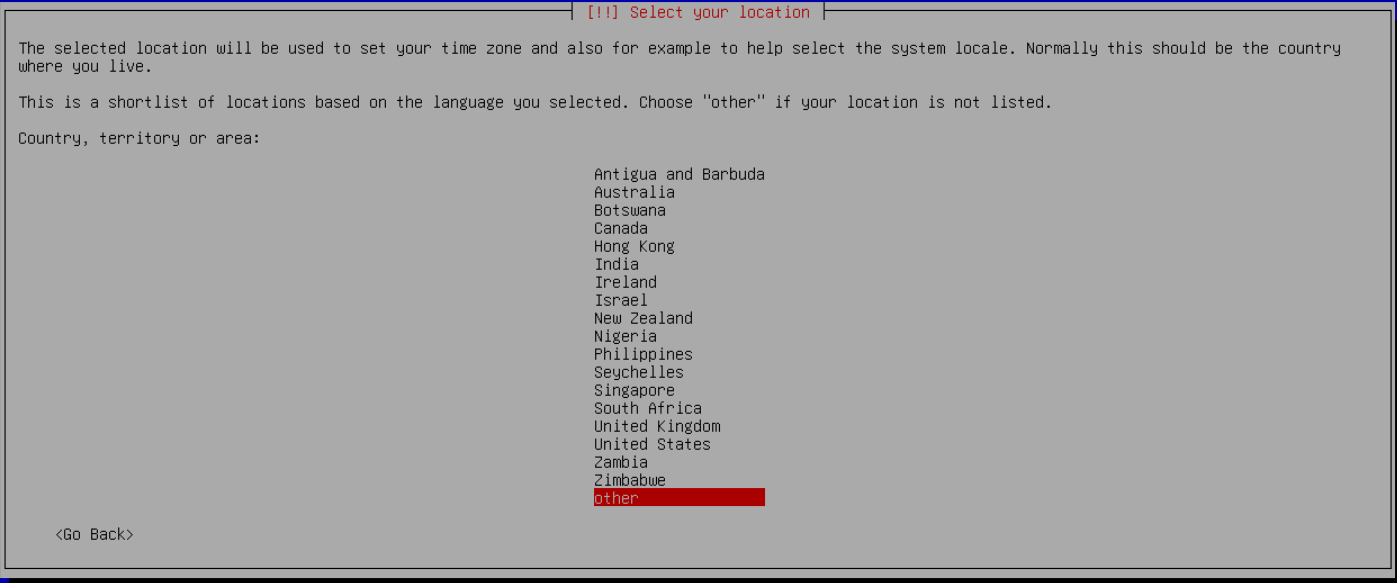
Step 1: Use other to open the region and country lists
- Use other to open the region and country lists
Use the arrow keys to select other at the bottom and press Enter. The next screen asks for a continent or region.
The installer uses your selected location for time-zone settings and locale suggestions.
This Debian installer lists Türkiye under Asia. After other, choose Asia to open its country list.
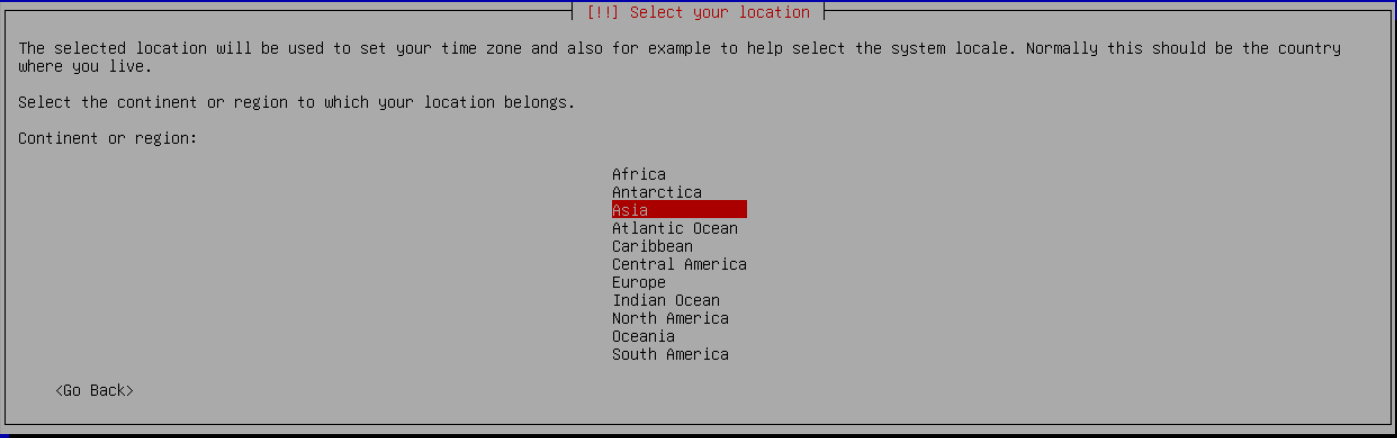
Step 1: Confirm Asia with Enter
- Confirm Asia with Enter
Use the arrow keys to highlight Asia. Check that the red selection is on Asia, then press Enter.
The region selection opens the country list. Select Türkiye on the following screen.
Locate Türkiye in the Asia country list. The actual console screenshot shows Türkiye highlighted.
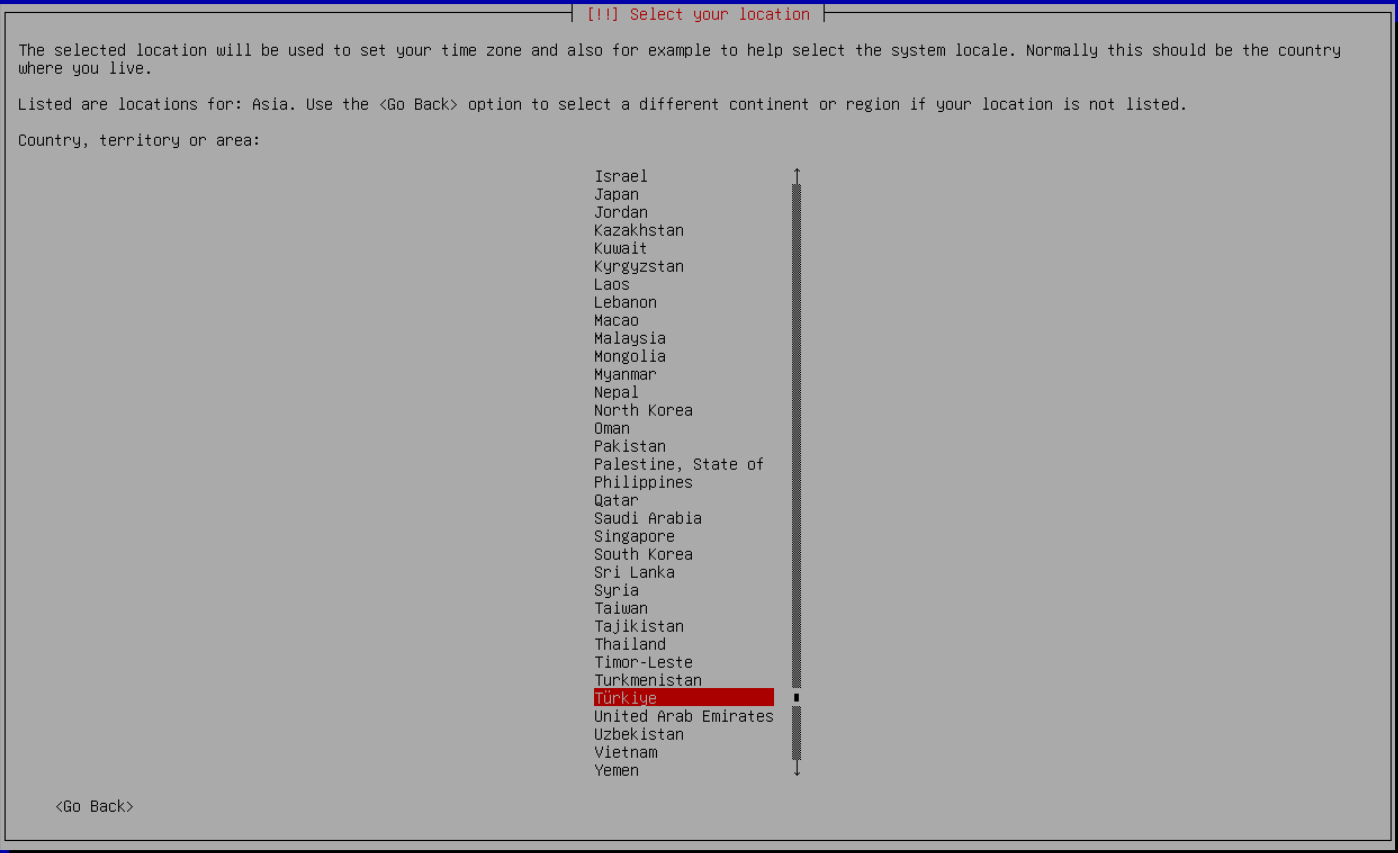
Step 1: Confirm Türkiye
- Confirm Türkiye
Use the arrow keys to select Türkiye and press Enter. As you move down the list, check that the highlighted row is the intended country.
The installer uses your selected location for time-zone settings and locale suggestions.
The installer uses the location for time-zone and locale suggestions. Choose the country appropriate to your setup.
Locale: en_US.UTF-8
Choosing English with the Türkiye location opens Configure locales. The example selects United States — en_US.UTF-8.
Selecting English with Türkiye opens Configure locales. This example uses United States — en_US.UTF-8.
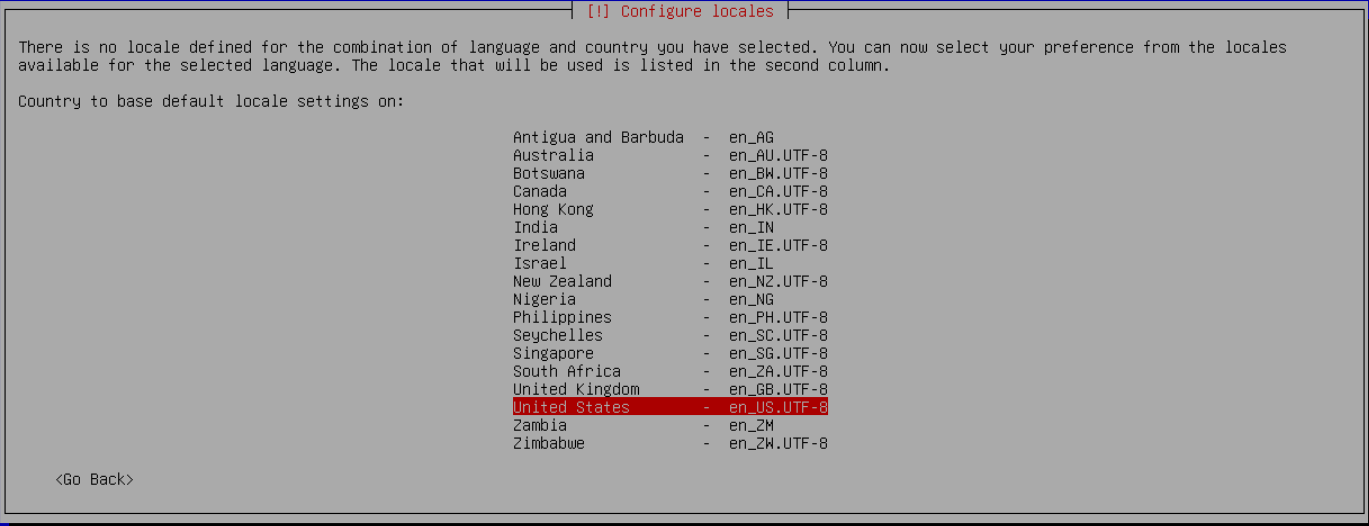
Step 1: Confirm en_US.UTF-8 with Enter
- Confirm en_US.UTF-8 with Enter
Check the locale code in the second column. To follow this example, confirm en_US.UTF-8 on the United States row and press Enter.
The locale affects conventions such as language and date/number formatting. Time zone and keyboard layout are separate settings.
The locale affects preferences such as language and date/number formatting in applications. The Türkiye location is retained; keyboard layout is selected separately on the next screen.
Keyboard layout
On Configure the keyboard, the demonstration selects American English. Use the layout that matches your own keyboard, especially when entering punctuation in passwords.
This example selects American English in Configure the keyboard. Use the layout that matches your own keyboard.
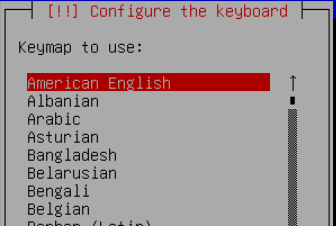
Step 1: Confirm the selected layout with Enter
- Confirm the selected layout with Enter
Press Enter with American English highlighted if that is your layout. Otherwise, first use the arrow keys to select the appropriate layout.
The keyboard layout affects punctuation and symbol keys. Confirm the correct layout before entering passwords.
Actual recording: from language to the location list
A close-up of the actual installer: confirming English, selecting other and opening the continent list. The country is selected after this clip.
Written description of the recording
The clip confirms English, chooses other in the country shortlist, and opens the continent or region list. It ends there. Asia, Türkiye, locale and keyboard selection are shown in the separate screenshots above.
4. Configure networking and the hostname
The installer detected the ens18 network interface in this example. Automatic configuration did not complete, so setup continued manually from Network autoconfiguration failed. Your server may configure its network automatically without displaying this message.
In the example, DHCP configuration did not complete and the installer displayed Network autoconfiguration failed. The next screen lets us enter the service’s network settings manually.

Step 1: Continue to the configuration methods
- Continue to the configuration methods
Press Enter with Continue selected. The installer then offers retry and manual configuration choices.
This screen may not appear if your network is configured automatically. The following steps cover manual configuration when this message is shown.
Choose Continue, then select Configure network manually on Network configuration method.
The example uses static network details, so Configure network manually is selected under Network configuration method.
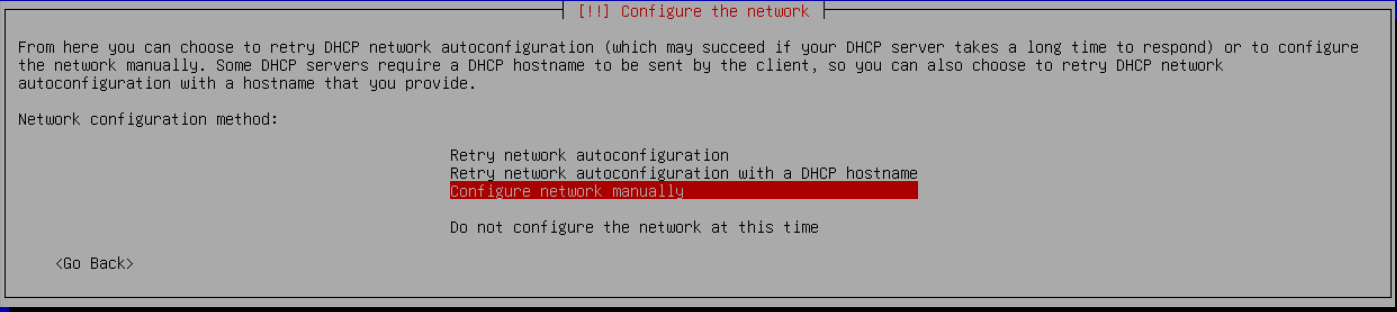
Step 1: Confirm manual configuration
- Confirm manual configuration
Use the arrow keys to select Configure network manually and press Enter. The IP address field opens first.
Use the IP address, netmask, gateway and DNS details assigned to this server in the following fields. Do not copy another service’s values.
The following fields open on separate screens. Enter the values assigned to your service and choose Continue after each one:
| Field | What to enter |
|---|---|
| IP address | The IPv4 address assigned to this server. |
| Netmask | The service's IPv4 subnet mask. This field expects the mask, which uses a different notation from a prefix length. |
| Gateway | The assigned gateway. Do not guess it from the last part of the IP address. |
| Name server addresses | DNS server addresses. Separate multiple addresses with spaces. |
Use the address assigned to this virtual server in IP address. The actual example IP is masked.
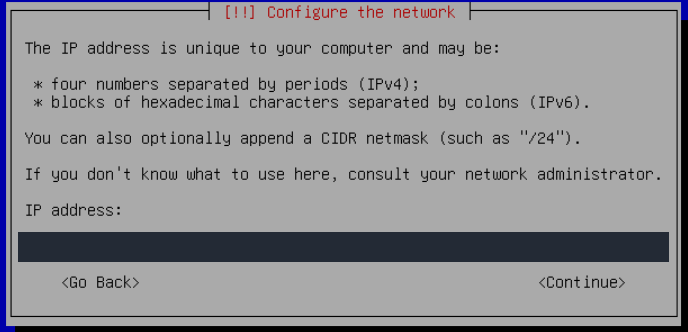
Step 1: Enter your service IP address
- Enter your service IP address
Enter the IP address assigned to this service in the DCHost customer portal. Use Tab to select Continue, then press Enter.
The network/prefix shown in the portal for this demo ends in /24, so 255.255.255.0 was entered on Netmask. The portal shows the prefix; Debian asks for its dotted-decimal mask equivalent. Do not copy this mask if your server has a different prefix. If you are unsure of the correct conversion, confirm it with DCHost support.
Netmask asks for the mask that defines the address’s network. Use the value supplied for your service.

Step 1: Enter the supplied netmask
- Enter the supplied netmask
Fill Netmask using the network details for your service. Check any suggested value before continuing with Continue.
Gateway is the next hop the server uses to reach addresses outside its local network.

Step 1: Use the service gateway address
- Use the service gateway address
Enter the gateway provided for this service. Check the service network details rather than repeating the server IP address, then continue.
Name server addresses sets the DNS servers used to resolve hostnames to IP addresses.

Step 1: Separate DNS addresses with spaces
- Separate DNS addresses with spaces
Enter the DNS server IP addresses. Separate multiple addresses with spaces; the on-screen instructions allow up to three addresses.
The actual network values are hidden in the screenshots. Use the settings assigned to your server. After filling a field, use Tab to move to Continue and Enter to proceed.
Choose a recognizable server name on Hostname. The example leaves Domain name blank. Entering a hostname or domain does not create DNS records; configure the relevant DNS record separately if you want to connect by name.
Hostname asks for the short name used to identify this system. The example hostname is masked.

Step 1: Enter a short, recognizable name
- Enter a short, recognizable name
Enter a server name without spaces and continue. The domain name is requested separately on the following screen.
Domain name was left empty in this example. If the server belongs to a domain, enter the name appropriate to your configuration.

Step 1: Leave empty when not required
- Leave empty when not required
If you have not planned a domain name for this server, leave Domain name empty and continue. This field does not take an IP address.
5. Create the user account
Root password
The demonstration leaves both Root password and its confirmation field blank, continuing from each screen without entering a password.
The installer explains that this locks the root account's password and adds the first user to the sudo group. Administrative commands can then be run through sudo from that user's account. Setting a root password is a different installation choice; this walkthrough uses the two blank fields.
Root password was left empty in this installation. This locks the root password and grants sudo privileges to the initial user.
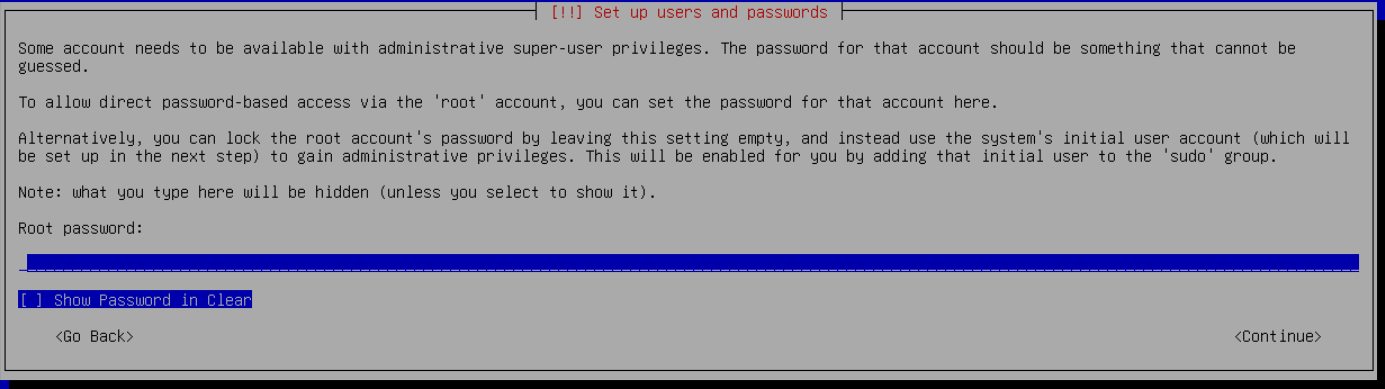
Step 1: Leave Root password empty
- Leave Root password empty
To follow the method in this guide, continue without entering a root password. The next steps create your user account and its strong password.
Because no root password was entered, the confirmation field was also left empty.
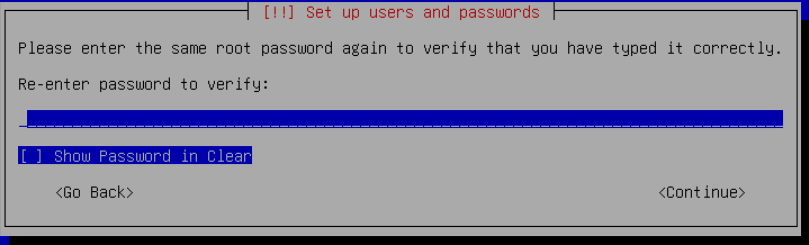
Step 1: Leave the confirmation empty too
- Leave the confirmation empty too
If Root password was left empty, keep Re-enter password to verify empty as well. Continue to create the user account.
First user
The installer first asks for Full name for the new user, then the username. The full name describes the account owner; the username is the short account name used for console and SSH login. It is separate from the customer portal email address.
- Enter the full name and continue.
- Choose and note the login username.
- Enter the user's password.
- Enter the same password again on the confirmation screen.
The demonstration leaves Show Password in Clear unchecked. You do not need to reveal the password to continue.
Full name for the new user sets the account’s display name. The login username is requested on the next screen.

Step 1: Enter the display name
- Enter the display name
Enter a name that identifies the user, then continue. The example’s personal information has been permanently masked.
The name in Username for your account is used for console and SSH sessions.

Step 1: Choose a name beginning with a lowercase letter
- Choose a name beginning with a lowercase letter
Enter a username without spaces, beginning with a lowercase letter. The installer permits numbers and lowercase letters after the first character. Keep this name for signing in after installation.
Enter a strong, unique password for the new user. The password field has also been masked in the image.
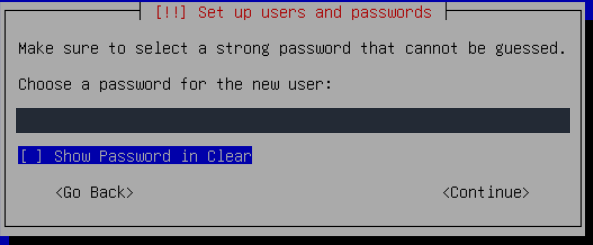
Step 1: Enter and securely store the password
- Enter and securely store the password
Fill Choose a password for the new user. Keep Show Password in Clear unchecked, then continue to the confirmation screen.
Enter the password from the preceding step in Re-enter password to verify.
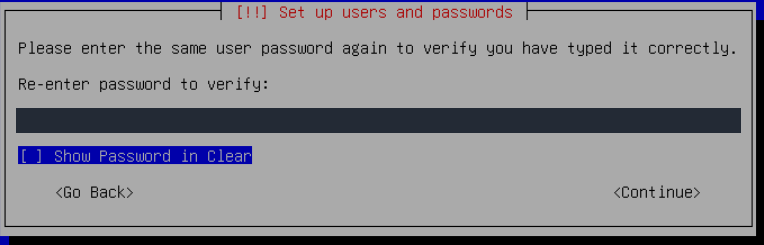
Step 1: Verify the same password
- Verify the same password
Re-enter the same password and keep Show Password in Clear unchecked. Continue to the next installation step.
Choose a strong password of your own. Hidden fields in screenshots are not a sample password to copy. Check the keyboard layout when entering and repeating the password.
6. Select the disk and approve partitioning
The demonstration selects Guided - use entire disk. The installer prepares an automatic partition layout without LVM.
This example uses Guided - use entire disk for a fresh installation that removes existing data from the selected disk.
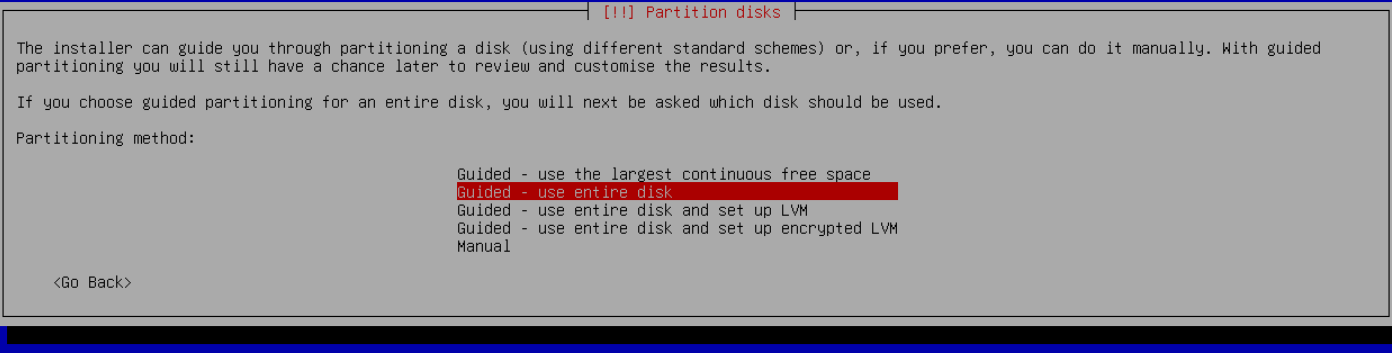
Step 1: Select Guided - use entire disk
- Select Guided - use entire disk
Select this option only for the installation disk whose backup you have checked, then press Enter. The target disk is chosen on the next screen.
- Select guided partitioning using the entire disk.
- Check the target disk's capacity and device name.
- Select All files in one partition (recommended for new users).
- Read the proposed partitions on the summary screen.
- When ready, select Finish partitioning and write changes to disk to open the final confirmation.
The example's only disk appears in the installer as Virtual disk 1 (vda) - 42.9 GB Virtio Block Device. The portal labels the same virtual disk virtio0 / 40 GB. Approximately 42.9 GB in the installer corresponds to 40 GiB. Both the device name and capacity notation can differ; in this example they identify the same disk. Verify the selected disk on your own service.
The example server lists one Virtio disk as vda. Check the disk name and capacity on your own server.

Step 1: Select the correct disk and capacity
- Select the correct disk and capacity
The example selects Virtual disk 1 (vda) - 42.9 GB Virtio Block Device. If more than one disk is listed, identify the disk intended for installation before continuing.
This basic server setup uses a single root partition for files. The installer may also create a swap area.
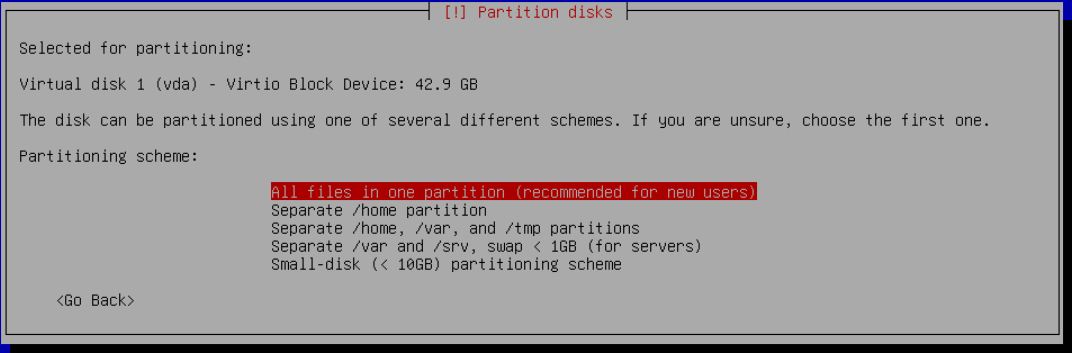
Step 1: Select All files in one partition
- Select All files in one partition
Select All files in one partition (recommended for new users). Press Enter to review the partition layout before the final confirmation.
The proposed layout is:
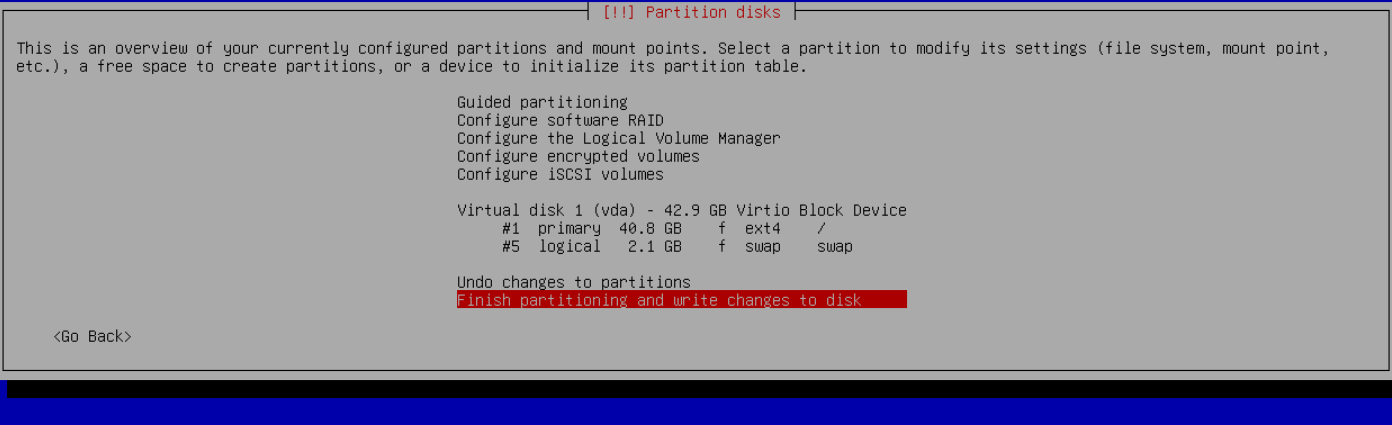
The summary shows the partitions and mount points to be created. This example has an ext4 root partition and a swap area.
Step 1: Check the root partition and swap
- Check the root partition and swap
The example lists 40.8 GB ext4 / and 2.1 GB swap on vda. Capacity and layout can differ on your server; verify the target disk and the / mount point.
- Proceed to the final confirmation
If the layout is correct, select Finish partitioning and write changes to disk. The next screen asks for a separate Yes confirmation before writing to disk.
| Partition | Size | Purpose |
|---|---|---|
vda, partition #1 | 40.8 GB | ext4, mounted at /; the operating system and files. |
vda, partition #5 | 2.1 GB | swap; disk space the system can use for memory pages when needed. |
These sizes belong to the demo disk. A disk with a different capacity can produce a different layout.
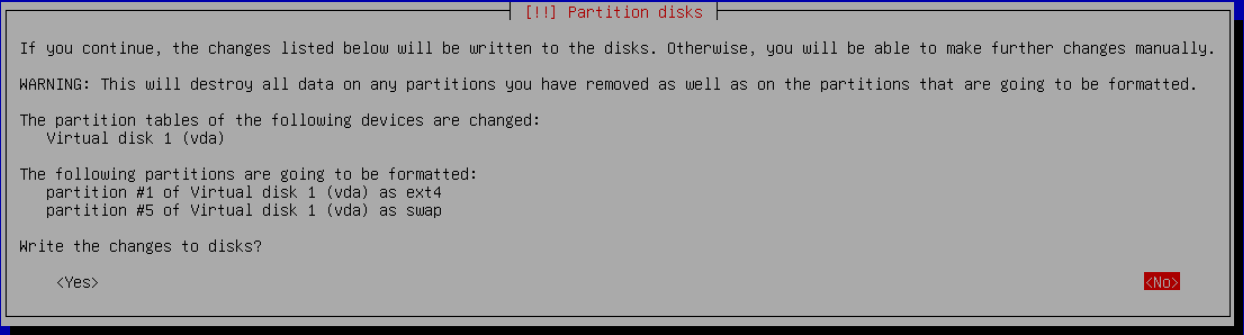
Write the changes to disks? is the final confirmation that formats the selected partitions. It opens with No selected. The demonstrated list includes #1 as ext4 and #5 as swap on vda. Check the target disk and your backup before selecting and confirming Yes.
Write the changes to disks? is the final confirmation. Yes writes the listed changes and erases data on the formatted partitions.
Step 1: Read the disk and partition list
- Read the disk and partition list
This example lists only the vda disk with partition #1 as ext4 and #5 as swap. If you see another disk or data you need to retain, return with No.
- Choose Yes when ready to format
When the installation disk is correct and required backups are ready, use Tab to select Yes and press Enter. Formatting and installation of system files then begin.
After confirmation, the installer started formatting. The progress screen shows that operation in progress; operating system installation continues in later stages.
Actual screen recording: disk confirmation and formatting
Actual console recording: disk confirmation, selecting Yes and the start of ext4 formatting.
Recording transcript
The recording starts with a final review of the changes to be written to disk. After Yes is selected and confirmed, the installer starts creating the ext4 filesystem for /. The clip ends with formatting at 33%; base system and software installation continue in the following steps.
7. Select the package source and SSH server
If package setup from the installation media reports a warning
This installation displayed apt configuration problem. It reports that configuring APT to install additional packages from the media failed.

Step 1: Identify the operation mentioned in the warning
- Identify the operation mentioned in the warning
Read the message. In this example it concerns installing additional packages from the media; no separate root cause has been established.
- The example continues to a network package source
In the demonstration, Continue led to configuring the network mirror with Türkiye, deb.debian.org and an empty proxy field. Follow those selections in the next screens.
Before mirror selection, this installation displayed apt configuration problem with the message An attempt to configure apt to install additional packages from the media failed. It reported a problem preparing additional packages from the installation media.
Selecting Continue opened the network-mirror steps below. With deb.debian.org selected, installation of SSH and standard utilities proceeded, and the installer later reached Installation complete.
If you see this message, record its text. If the network mirror is also unreachable, do not treat the installation as complete: check the assigned IP address, gateway and DNS settings. You will separately verify package sources and SSH access in the first-boot checks.
After the first boot, refreshing the package lists also succeeded; see the verification section below.
Debian package repository
Netinst may retrieve selected software from a network package repository. The demonstration makes these mirror selections:
- Türkiye for Debian archive mirror country.
- deb.debian.org as the mirror server.
- A blank HTTP proxy field.
If your network uses a proxy, enter the assigned proxy settings. This example leaves the field blank for a direct connection.
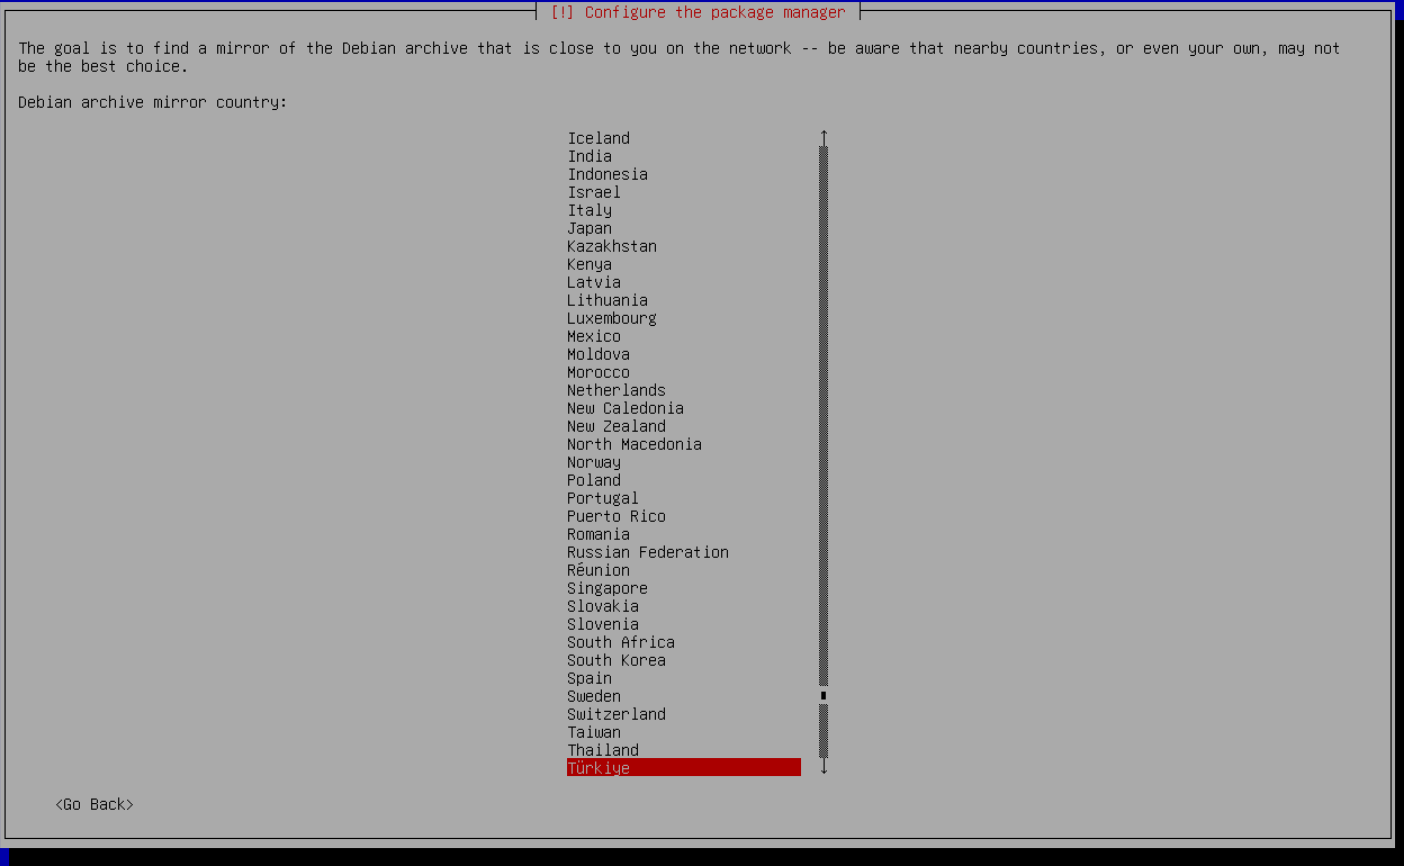
Debian archive mirror country determines the list of package download sources. This example selects Türkiye.
Step 1: Confirm Türkiye in the list
- Confirm Türkiye in the list
Use the arrow keys to select Türkiye and press Enter. Choose the package server on the following screen.
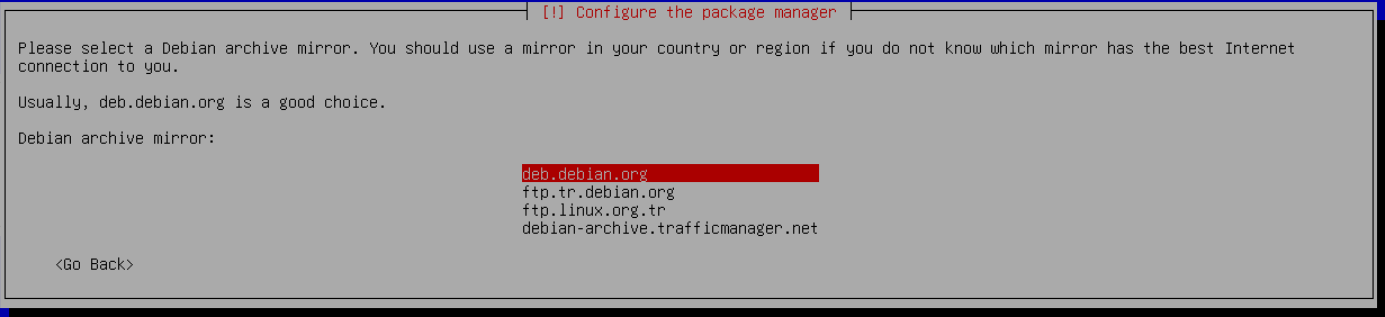
The example uses deb.debian.org for Debian archive mirror. The installer also suggests this address for general use.
Step 1: Select deb.debian.org
- Select deb.debian.org
Confirm deb.debian.org with Enter. The network and DNS settings must work so the installer can download the package list.
HTTP proxy information is only needed when your network requires an HTTP proxy. It was left empty in this installation.
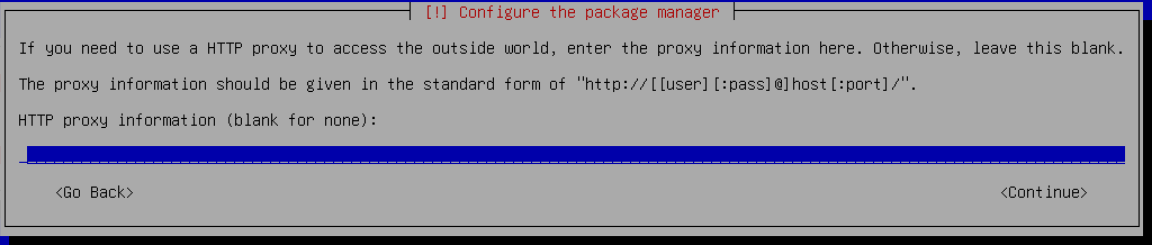
Step 1: Continue directly when no proxy is required
- Continue directly when no proxy is required
On a connection that does not require a proxy, leave the field empty, use Tab to select Continue and press Enter. If you use a proxy, enter the address supplied by your network administrator.
If the repository is unreachable, check addressing, routes and DNS together. The DNS and internet connection guide helps distinguish the error messages.
Software selection
Participate in the package usage survey? asks whether to send package usage statistics to the distribution developers. The demonstration selects No. After this optional survey, the installer opens Software selection.
popularity-contest asks whether to share package usage statistics. This example selects No.
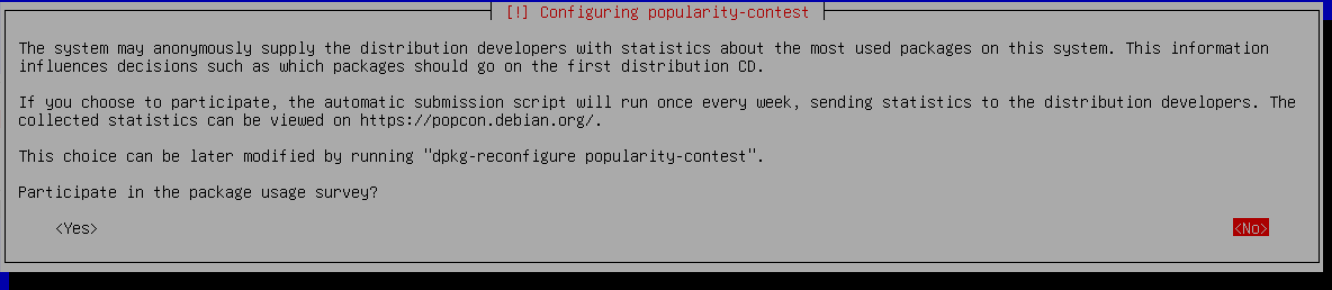
Step 1: Confirm your preference with Enter
- Confirm your preference with Enter
This guide chooses No to opt out. Read the on-screen explanation and confirm your preference, then continue to software selection.
Only two options are checked for this basic server installation:
| Option | Demonstrated selection | Purpose |
|---|---|---|
| SSH server | Checked | Server software for terminal connections from another computer over SSH. |
| standard system utilities | Checked | Standard tools used for day-to-day system administration. |
| Debian desktop environment, GNOME and the other options | Unchecked | No additional desktop or other software group was selected for this installation. |
Use the arrow keys to reach an option and Space to change its checkbox. Review the checked boxes before continuing. When ready, use Tab to select Continue and press Enter to start package installation.
This example selects only SSH server and standard system utilities. Move between rows with the arrow keys and toggle boxes with Space.
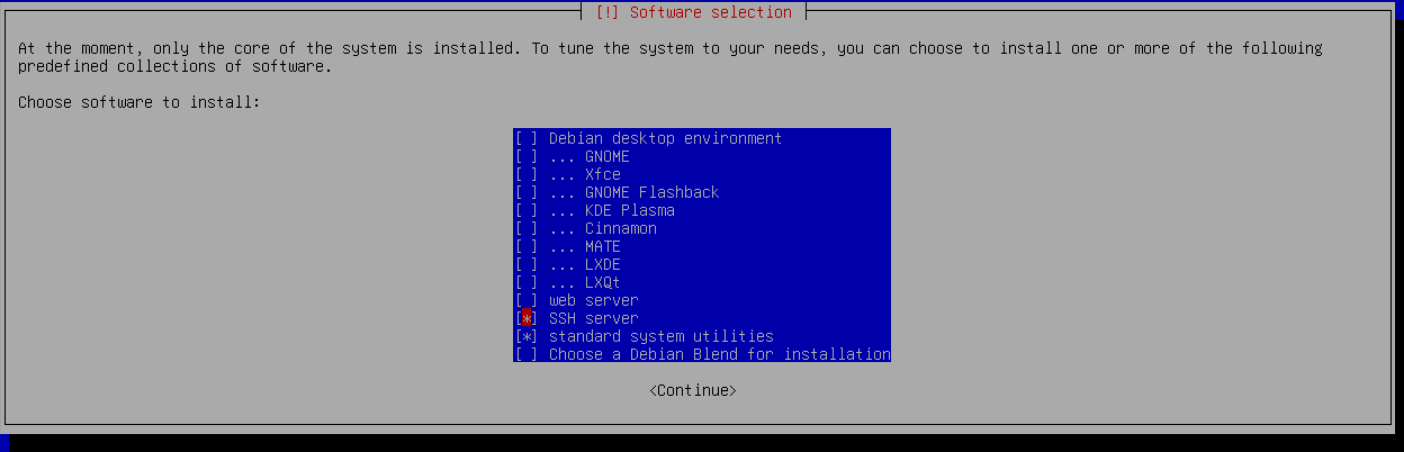
Step 1: Check the desktop selection
- Check the desktop selection
Debian desktop environment and the desktop options are unchecked in this basic server setup. Leave them unchecked when a graphical desktop is not required.
- Select SSH and standard utilities
SSH server is selected for remote SSH connections, and standard system utilities provides the basic system tools. Check that both rows show [*].
- Start installing the selected packages
After checking the boxes, use Tab to select Continue and press Enter. Wait for the console to show package download and installation progress.
Actual screen recording: installing SSH and standard utilities
Actual console recording: confirming SSH and standard utilities, package downloads and installation progress.
Recording transcript
The recording starts with only SSH server and standard system utilities checked. Selecting Continue starts package downloads, unpacking and configuration. The clip ends at 84% software-installation progress. Boot-loader installation and restart are covered in the next section.
8. Finish installation and boot from disk
Install the GRUB boot loader
GRUB starts the installed operating system from disk. After package installation, this BIOS-mode setup displayed Install the GRUB boot loader to your primary drive?. The preselected Yes was confirmed with Enter.
GRUB starts the installed operating system from disk. This single-OS example selects Yes to install it on the primary drive.

Step 1: Select Yes for this single-OS installation
- Select Yes for this single-OS installation
Read Install the GRUB boot loader to your primary drive? When following this fresh single-OS setup, continue with Yes. The next screen asks for the target disk.
The next device screen selects /dev/vda, the whole virtual disk used for this installation. Compare the disk listed on your server with the earlier partitioning step to make sure the boot loader is installed on the intended disk.
The example selects its installation disk, /dev/vda, in Device for boot loader installation.

Step 1: Select and confirm the target disk
- Select and confirm the target disk
Choose the disk used for the installation. This example uses /dev/vda. Check the selection and press Enter, then wait while GRUB and the final settings are installed.
Check startup of the installed system
The installer reached Installation complete. Continue proceeds to restart the server. After installation files have been written to disk, verify that the new system actually starts from that disk.
Installation complete shows that the installer has finished. Next, check removal of the installation media and startup from the installed disk.

Step 1: Read the Installation complete message
- Read the Installation complete message
The installer reminds you to remove the installation media to avoid returning to the installer. Follow the post-installation ISO step in the guide.
- Choose Continue to restart
Continue restarts the server. In this demonstration the ISO menu reappeared, so the boot source was checked next. Do not start disk partitioning again.
In the demonstration, the Debian ISO menu returned after Continue. If this happens, do not begin partitioning again. Even after installation completes, the server can start from attached installation media again; check its boot source. In this example, Templates & ISO → Boot Order was used to place the installed virtio0 disk first, with the other two positions set to None. The settings were saved with Save, then verified by reopening the menu. Follow the shared boot-order instructions.
9. Verify first login and SSH access
After placing the installed disk first and restarting the server, the Debian login prompt appeared. Use the user created during Debian installation, rather than your customer portal account.
After saving Boot Order and restarting, the Debian GNU/Linux 13 login screen appeared. The server hostname is hidden.

Step 1: Enter your installation username at the login prompt
- Enter your installation username at the login prompt
The login prompt shows that the installed system is waiting for a user account. Continue with the username created during Debian installation.
- Enter your username at login: and press
Enter. - At Password:, enter that user's password and press
Enter. Password characters normally remain invisible while you type. - Once the command prompt opens, run the checks below.
Sign-in with the created username and password succeeded in the actual console. User and hostnames are hidden; password characters are not echoed during entry.
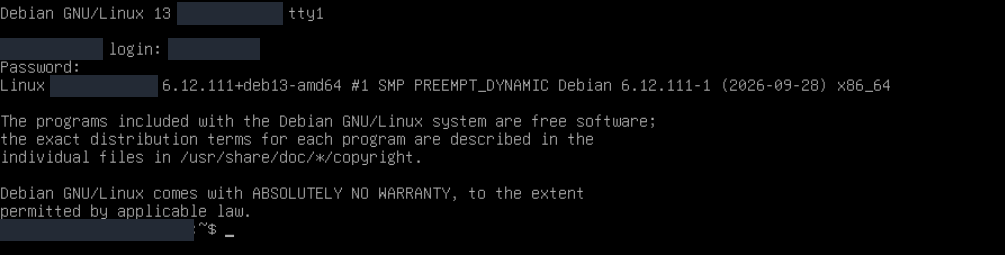
Step 1: Enter your password after the username
- Enter your password after the username
Enter your username and press Enter. At Password, type that account’s password; characters not appearing is normal. Press Enter to sign in.
- Check that the shell prompt appears
The welcome text is followed by a shell prompt. You can now check the operating system, SSH service and networking from this session.
Console login succeeded, followed by a separate successful SSH connection. The SSH host key was compared with the key shown in the console, and administrative access through sudo was also verified.
After signing in to the installed system with your user account, check:
cat /etc/os-release
ip -br address
ip route
systemctl is-active ssh
/etc/os-release identifies the installed operating system. The ip commands show addresses and routes. An active result from the final command means the SSH service is running; it does not by itself prove that a connection from another computer succeeds.
With an administrator account, refresh package information and review available updates:
sudo apt update
sudo apt upgrade
apt update refreshes package lists; it does not upgrade installed software by itself. apt upgrade asks you to approve the proposed changes. Continue with the Linux update guide.
Reinstallation may change the SSH host key. If you see a warning for a previously used IP address, verify the new key through the console before changing your saved trust entry. See first SSH login and SSH troubleshooting.
Results verified for this installation
This actual output shows /etc/os-release, uname -r, service status and root filesystem checks. An external SSH connection is verified separately.
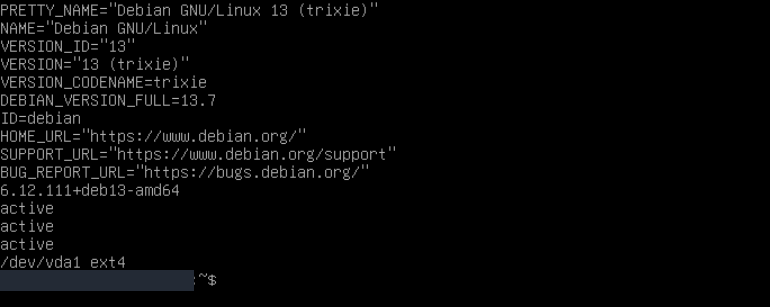
Step 1: Read the Debian 13 and trixie release information
- Read the Debian 13 and trixie release information
/etc/os-release shows Debian GNU/Linux 13 (trixie) and DEBIAN_VERSION_FULL=13.7. This identifies the installed system running from disk.
- Check the kernel and the three service states
uname -r reports 6.12.111+deb13-amd64. The following active lines correspond, in order, to SSH, QEMU guest agent and systemd-timesyncd; the command queried them in that order.
- Verify the root filesystem is on disk
findmnt -no SOURCE,FSTYPE / returns /dev/vda1 ext4. This confirms that the root filesystem is mounted from the installed disk partition.
| Check | Result |
|---|---|
| Installed system | Debian GNU/Linux 13 (trixie), 13.7. |
| Kernel | 6.12.111+deb13-amd64, retrieved during the network installation. |
| Root filesystem | /dev/vda1, ext4. |
| SSH | Service active; a separate SSH login succeeded. |
| Administrative access | sudo verified for the installation user. |
| Package repository | apt-get update completed successfully; no upgrades were pending at the check. |
| Time | Europe/Istanbul, with time synchronization enabled and synchronized. |
| Guest services | qemu-guest-agent and systemd-timesyncd active. |
| Failed systemd units | 0. |
These are the results for the demonstrated installation. Later packages and updates can change the kernel version or pending upgrade count. Repeat the checks on your own server.
10. Remove the Debian ISO when it is no longer needed
After startup from the installed Debian disk and SSH access were verified, Templates & ISO → ISO Management was opened in the portal. Delete on the Debian image card was followed by Yes, Delete in the Delete ISO? dialog. The list returned to No ISO Images, and the demo service's upload allowance returned to 3.
This removes the installation file from ISO storage. The disk containing the installed system is separate. The illustrated ISO deletion steps show how to check the image name and result. To move on to another operating system, upload its ISO; approving another installation to the same disk can remove the existing Debian system.
Frequently asked questions
Does a Debian netinst installation need internet access?
This guide installs the SSH server and standard utilities from the Debian network repository. Uploading the netinst ISO to the portal does not configure repository access inside the VM. The installer also needs correct addressing, routing and DNS settings.
Does my VPS need a desktop environment?
No. A basic Debian server managed over SSH does not require a desktop. This example selects SSH server and standard system utilities, with Debian desktop environment and GNOME left unchecked.
Does leaving the root password blank leave the server without a password?
No. This choice locks the root account's password. You set a separate password for the user created on the following screens and use that account's sudo privileges for administration. Leaving the two root fields empty is different from leaving the new user's password empty.
Why does the Debian installer menu return after installation completes?
The server may still use the CD-ROM as its first boot device. That happened after installation completed in this demonstration. The installed virtio0 disk was placed first in the portal's Boot Order settings; after saving and restarting, Debian booted from disk. Follow the boot-order instructions rather than partitioning the disk again.