Debian 13 graphical ISO installation on a VPS
Debian's graphical installer lets you choose language, network, user and storage settings with the mouse. Upload the ISO in the DCHost customer portal, open Console, and select Graphical install from Debian's boot menu. This guide prepares a server without a desktop environment, managed through the console and SSH.
If you prefer the keyboard-driven Install option, follow Debian text-based ISO installation. The two guides cover different interfaces for the same core installation; follow one method for your installation.
The demonstration used a Debian 13.7 amd64 netinst ISO and completed installation on a real demo server on 16 October 2026. The screenshots use English labels. Booting from the installed disk, console login and SSH access were verified. Passwords and private service details are hidden.
Before you start
Deleting or formatting partitions during installation can erase the existing operating system and files. Open the correct service, keep the data you need outside the server, and complete your backup plan.
| Preparation | Why it is needed |
|---|---|
Debian amd64 ISO | The correct image for a 64-bit x86 VM. |
| IP, prefix or subnet mask, gateway and DNS | To enter the network settings manually when automatic configuration is unavailable. |
| Portal console | To access installation screens before SSH is available. |
| Enough RAM and storage | For the installer, base system and applications you will add. |
The portal network information step shows the assigned address and Gateway field. Use the values assigned to your own service.
Debian's graphical installer documentation explains that this interface uses more memory than the text installer. An installer memory minimum does not size your applications; reserve additional capacity for websites and databases.
Does the graphical installer also install a desktop?
No. Graphical install is the setup interface. Whether GNOME or another desktop is installed depends on the later Software selection choices. This guide deselects desktop tasks and prepares SSH access for server use.
1. Upload the Debian ISO
Open Templates & ISO → ISO Management → Upload ISO, provide a recognizable Label, and use File URL with the direct official image URL. Choose Upload and wait for Ready. Select the file from the official Debian ISO directory and use the verification information matching that release. The full form is covered in ISO upload.
The actual Debian 13.7 amd64 netinst ISO uploaded for this graphical installation reached Ready after the download finished. Boot from ISO is available here.
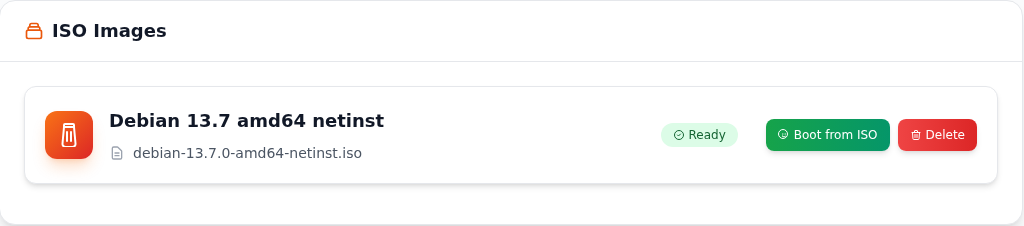
Step 1: Verify the ISO name and architecture
- Verify the ISO name and architecture
Check that the label and filename match the intended Debian release and amd64 architecture. The current filename can change with the official release.
- Check the Ready status
Wait for the download to finish. Ready indicates that this ISO is available to boot.
- Continue with Boot from ISO
Once your backups and installation settings are ready, choose Boot from ISO and follow the portal confirmation. The server may restart.
Ready only means that the ISO file is available. The server disk has not yet been installed; the graphical wizard opens after booting from the ISO and choosing Graphical install in the console.
2. Select Graphical install in the console
Choose Boot from ISO → Boot Now for the Ready image. This restarts the server. Open Console / VNC Console Access and select Graphical install, then press Enter.
The Debian ISO boot menu offers graphical and text-based installation on separate rows. Use the first row for this guide.
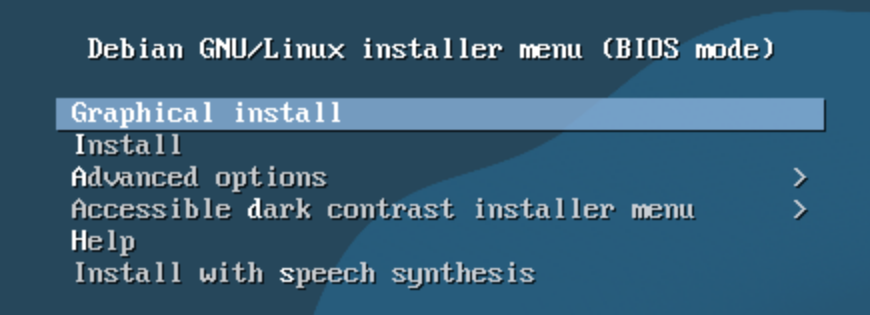
Step 1: Choose Graphical install
- Choose Graphical install
Select Graphical install with the arrow keys, then press Enter. The Install row below starts the text-based installer covered in the separate guide.
Graphical install opens the graphical installation wizard. Whether a desktop is installed is decided later on the software selection screen.
The boot menu shown is in BIOS mode. Graphical install opens the mouse-driven GTK installer. The initial menu can look different on a server using UEFI.
Once the graphical screen opens, click a choice and use Continue to move on. You can also navigate with Tab, the arrow keys and Enter.
3. Choose the language, location and keyboard
Installer language
To use the English interface shown in this guide, select English under Select a language, then choose Continue at the lower right. You can choose another language; the visible labels will then differ from the English screenshots in this guide.
Choose an installation language on Select a language. This example uses English, so its button and field labels are in English.
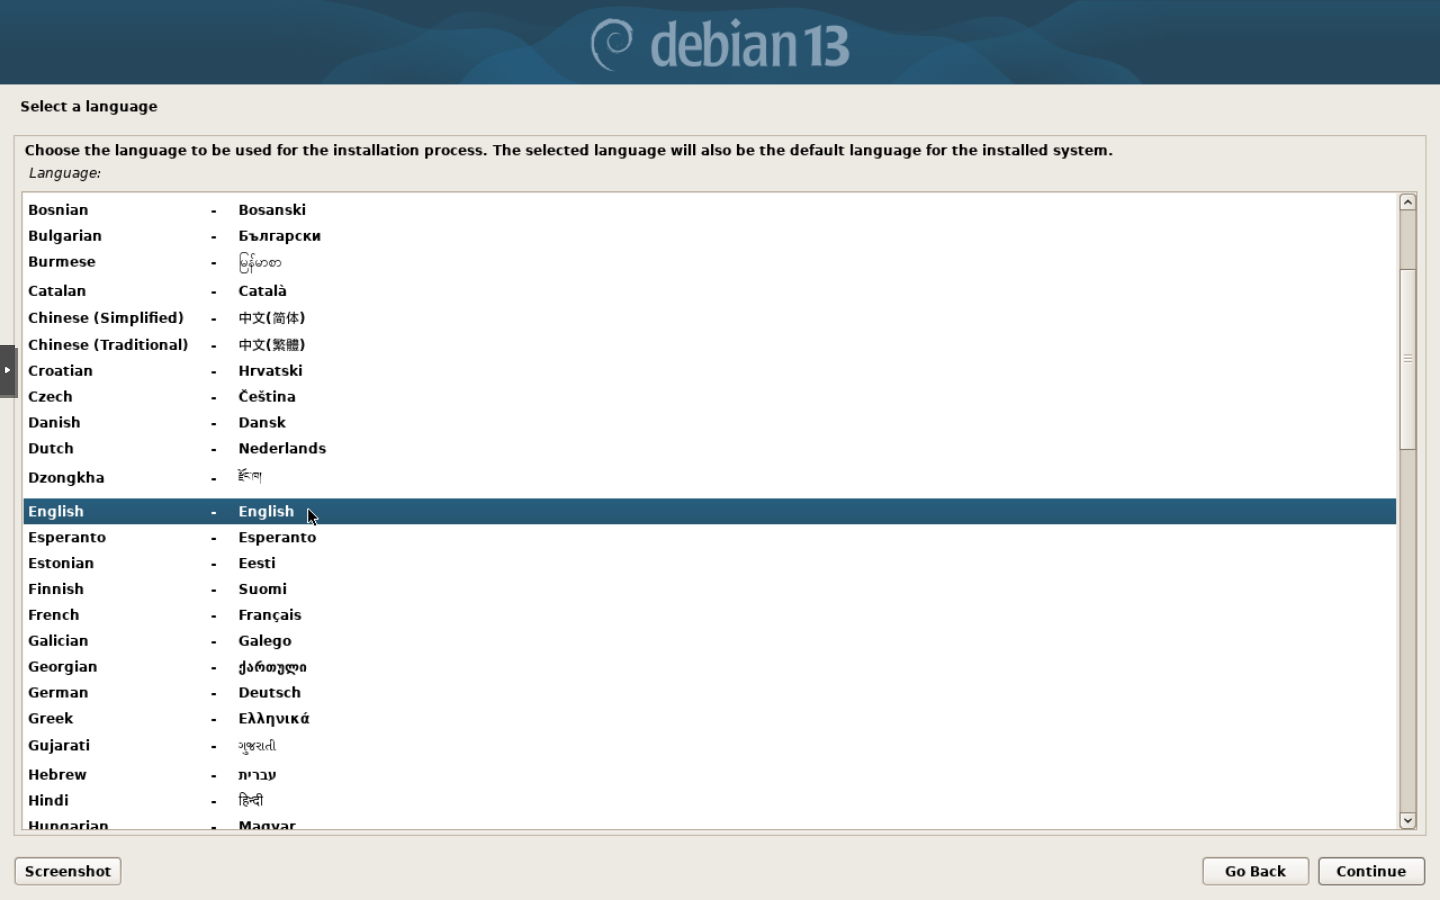
Step 1: Select English
- Select English
Choose English to follow the same labels as these screenshots. The selected row is highlighted in a dark color.
- Continue to the next screen
Click Continue at the bottom right. The next screen asks for your location; choosing a language does not automatically select Türkiye.
You can choose another language; the labels will then differ from this guide’s screenshots. This choice also sets the default language of the installed system.
Location
After English is selected, a country shortlist opens. Location affects the later locale and time-zone suggestions.
Select Türkiye using this sequence:
- Choose other in the initial country list and click Continue.
- Select Asia under Continent or region, then continue.
- Select Türkiye in the country list; scroll down if it is not visible. Check the highlighted row and click Continue.
After English is selected, the location screen first shows a country shortlist. Choose other at the bottom to find Türkiye.
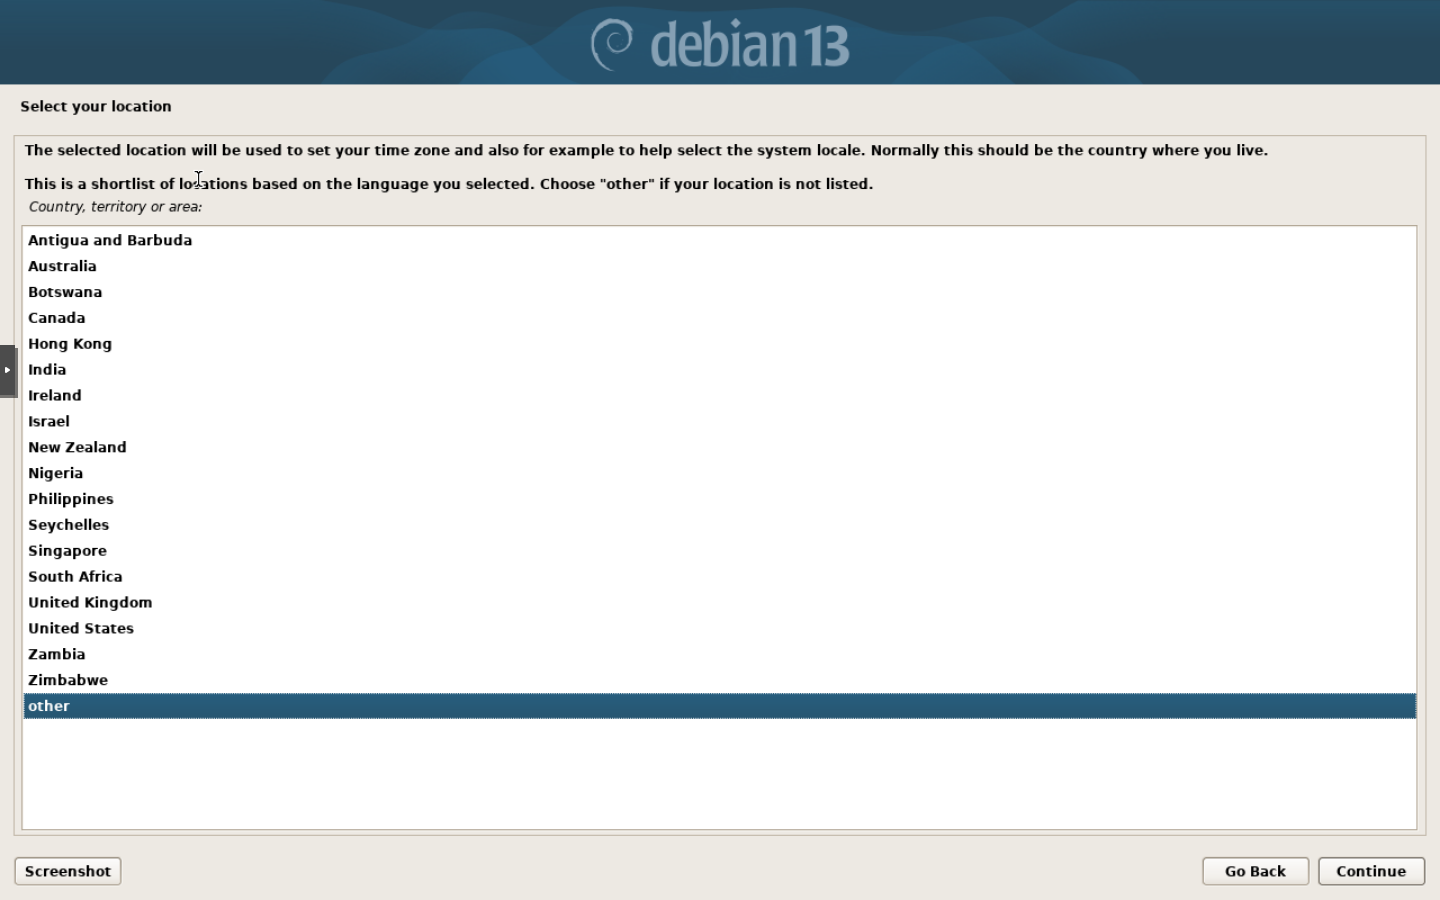
Step 1: Choose other and continue
- Choose other and continue
Select other at the bottom of the list, then click Continue. The continent or region list opens.
This screen starts the location selection. The continent and country are selected separately on the following screens.
This Debian version lists Türkiye under Asia. Confirm the continent, then choose Türkiye from its country list.
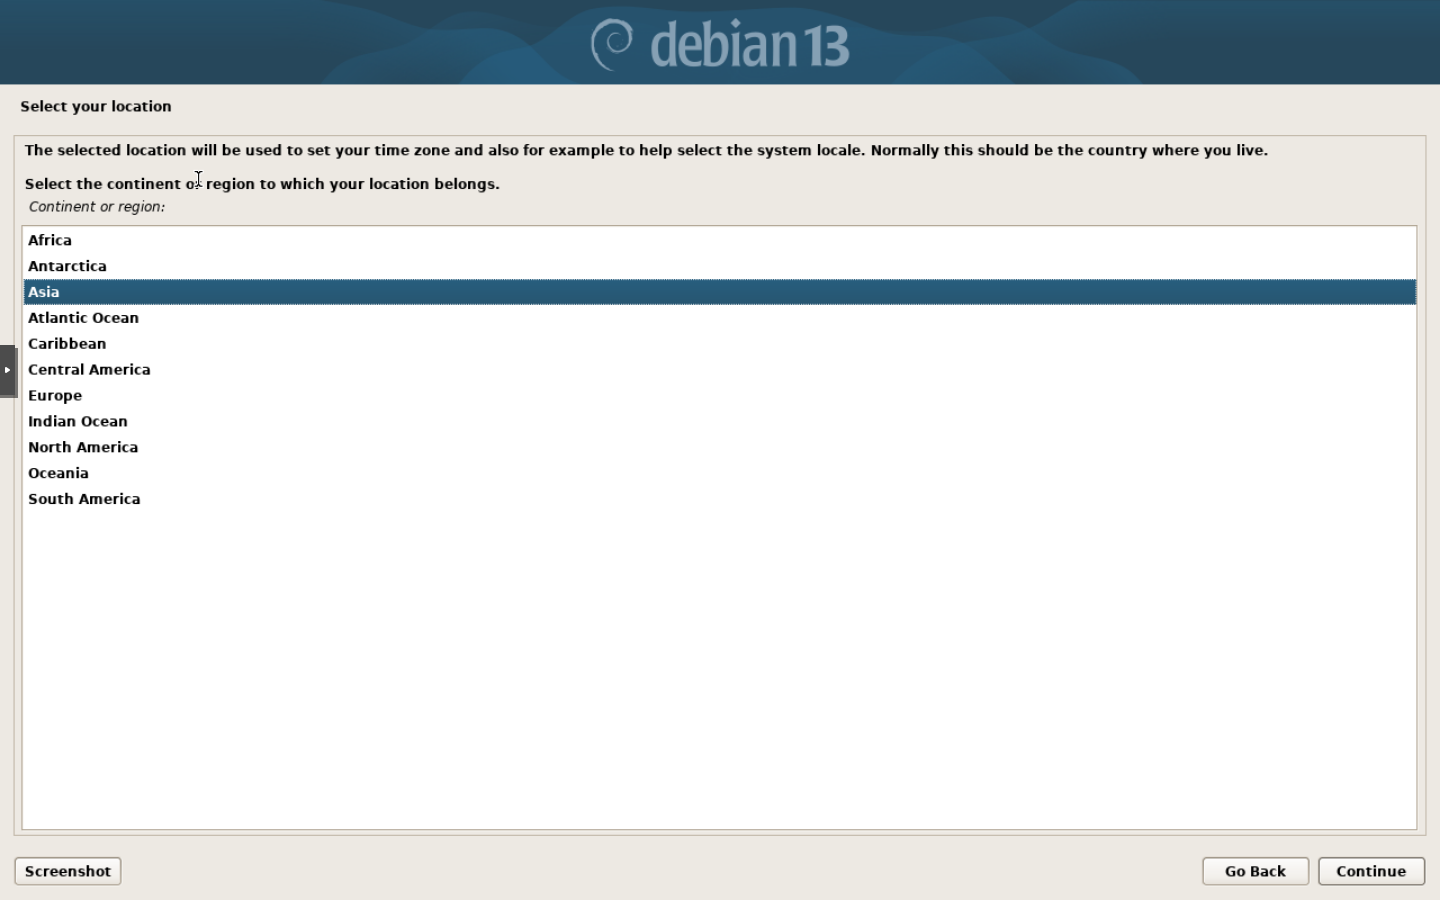
Step 1: Confirm Asia
- Confirm Asia
Select Asia under Continent or region and continue with Continue. The next screen lists countries in Asia.
The continent is part of the location setting; it does not change the physical data center location of your server.
Scroll through the Asia country list to Türkiye. This choice influences the installer’s time zone and locale suggestions.
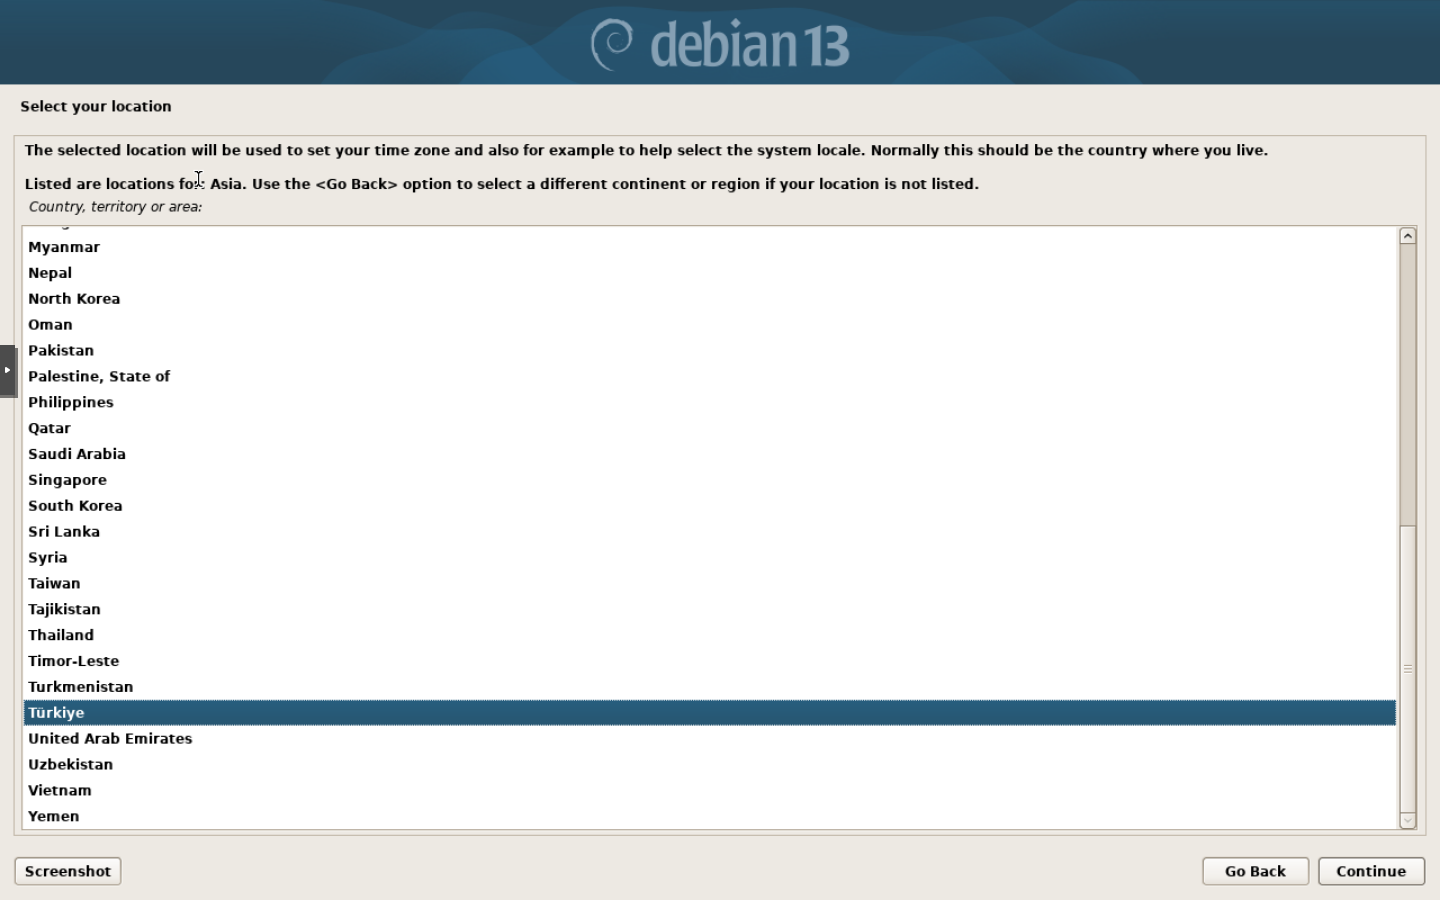
Step 1: Confirm Türkiye
- Confirm Türkiye
Select Türkiye and continue with Continue. Make sure the chosen row is highlighted.
You can combine the English interface language with Türkiye as the location. The following locale screen is a separate setting.
Locale: en_US.UTF-8
Combining English with the Türkiye location opens Configure locales. Select United States — en_US.UTF-8 for the English locale used here.
The United States row on this screen does not move the selected location to the US; it chooses the locale for English system messages and date/number formats. The earlier Türkiye selection is retained. Keyboard layout is chosen separately on the next screen.
With English as the language and Türkiye as the location, the installer asks you to select a locale. This example uses United States — en_US.UTF-8.
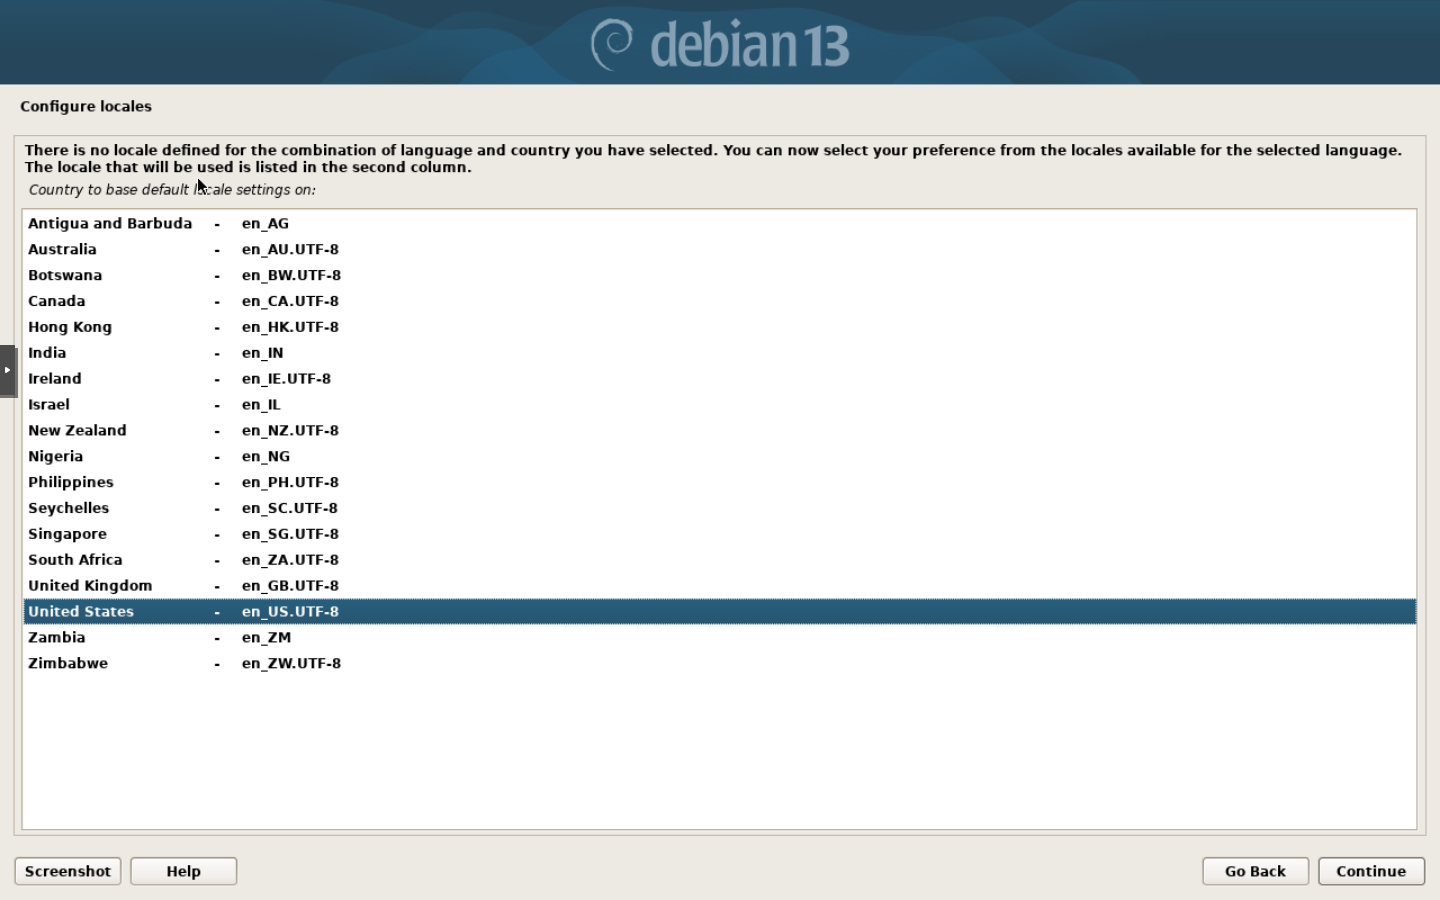
Step 1: Check the en_US.UTF-8 value
- Check the en_US.UTF-8 value
Confirm that the second column of United States shows en_US.UTF-8, then continue with Continue.
United States here is the basis for locale conventions such as number and date formats; it does not relocate the server or replace the previously selected Türkiye location.
Keyboard layout
Choose the layout matching your physical keyboard in Configure the keyboard. The screenshot uses American English; check punctuation keys before entering passwords. Check the selection and choose Continue.
Configure the keyboard determines which characters the keys produce. This demonstration uses American English.
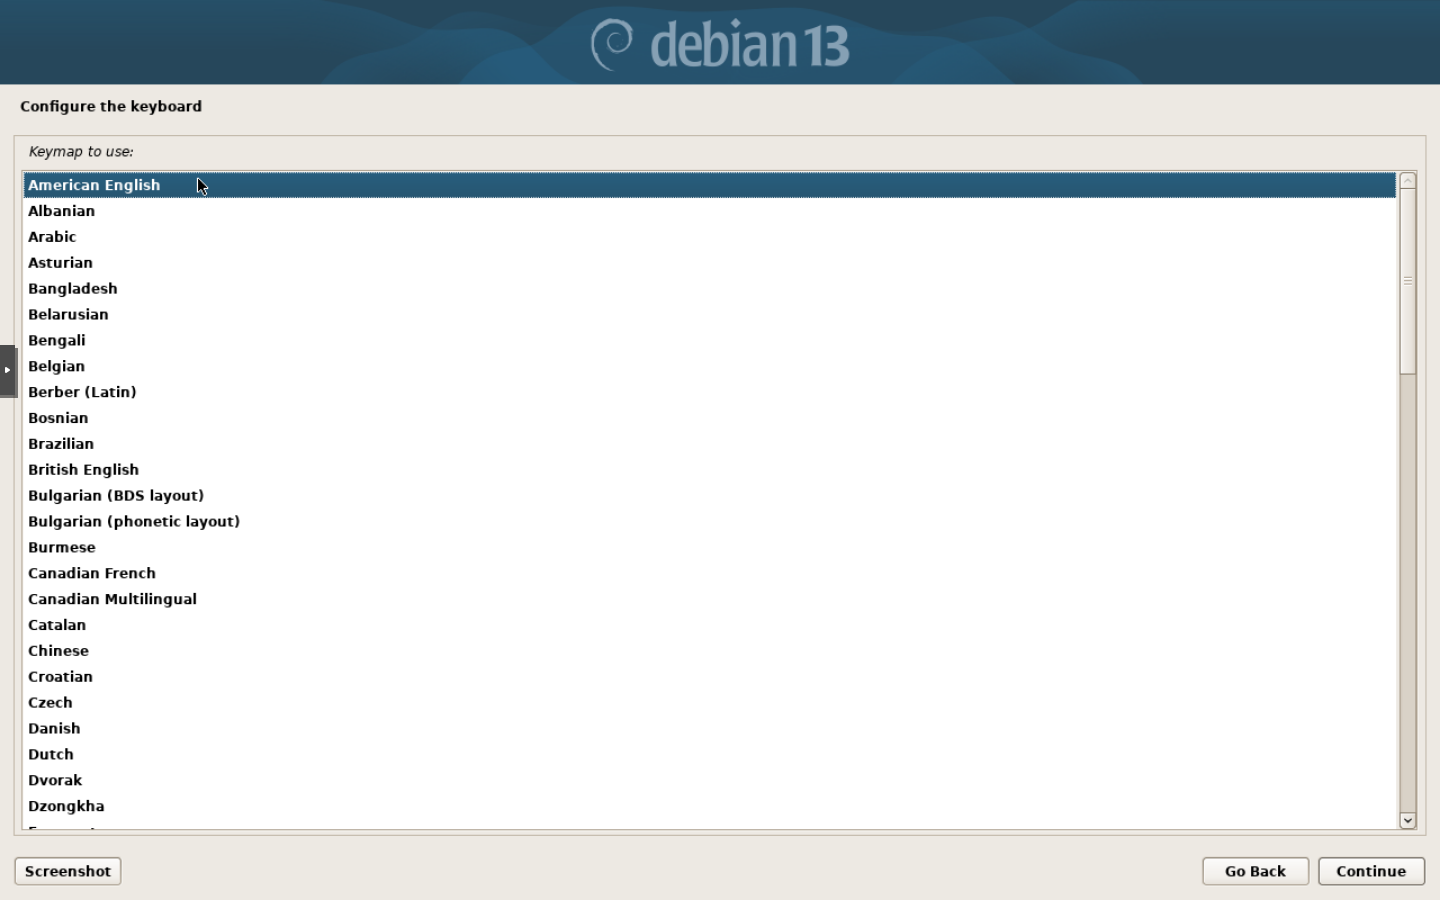
Step 1: Confirm the keyboard layout
- Confirm the keyboard layout
Select the appropriate layout and click Continue. The example continues with the selected American English layout.
Use the layout that matches your own keyboard. Check the position of punctuation and language-specific characters, especially when entering passwords.
Actual recording: select the language
Actual graphical installer recording: English selection, Continue, and the location list opening. No country is selected in this short clip.
Written transcript
The recording clicks English, then uses Continue to open the location list. The video ends there; other, Asia and Türkiye are not selected in this clip. Those steps are shown in the separate screenshots above.
4. Configure networking
If Network autoconfiguration failed appears, continue by entering the network settings manually. If automatic configuration succeeds, proceed to the hostname step.
- Click Continue on the message screen.
- Select Configure network manually under Network configuration method.
- Fill the following screens with the settings assigned to your service.
In this demonstration the installer could not complete automatic network setup. Manual configuration followed the Network autoconfiguration failed message.

Step 1: Read the message and continue
- Read the message and continue
If Network autoconfiguration failed appears, use Continue at the bottom right of the installer. The following screen lets you choose manual configuration.
You may not see this message if your network configures automatically. Use the network details assigned to your own service.
Select manual setup from the network configuration methods. The next steps ask for an IP address, netmask, gateway and DNS servers.

Step 1: Confirm manual setup
- Confirm manual setup
Select Configure network manually and continue with Continue. This installation does not use Do not configure the network at this time.
Use the values assigned to your service in the DCHost customer portal. Do not copy the example values, which are hidden in this guide.
| Installer field | What to enter |
|---|---|
| IP address | The IPv4 address assigned to this server. |
| Netmask | Its IPv4 subnet mask. If the portal displays a prefix, use the corresponding mask. |
| Gateway | The gateway assigned to the service; do not guess it from the IP address. |
| Name server addresses | DNS server IP addresses. Separate multiple addresses with a space. |
Click Continue after each value. Separate two DNS addresses with a space, not a comma. The real addresses are hidden in the screenshots; enter your own service settings.
Enter the IPv4 address assigned to this service under IP address. In this example the netmask is entered separately on the next screen.

Step 1: Complete the IP address field
- Complete the IP address field
Enter the IPv4 address assigned to your server, then continue with Continue. Do not use an address from another server or an arbitrary online example.
The dark area is a privacy mask. Obtain your own service’s IP address from the DCHost customer portal.
The netmask identifies the network portion of the IP address. This field is separate from the IPv4 address and gateway.

Step 1: Check the Netmask value
- Check the Netmask value
Enter the assigned netmask in dotted notation, or retain the suggested value if it is correct. Continue with Continue.
Compare any installer suggestion with your service’s network details. Do not change the netmask based on a guess.
Gateway identifies the router the server uses to reach addresses outside its own network.

Step 1: Complete the Gateway field
- Complete the Gateway field
Enter the gateway address assigned to your service and continue with Continue.
The gateway is separate from the server’s own IP address. Use the Gateway value shown for your service in the portal.
Enter the IP addresses of your chosen DNS servers under Name server addresses. DNS resolves names such as package repository domains.

Step 1: Separate DNS addresses with spaces
- Separate DNS addresses with spaces
Enter the addresses of the DNS servers you intend to use. Separate multiple addresses with a space, then continue with Continue.
This example enters two DNS addresses separated by a space. Do not separate multiple addresses with commas.
Hostname and domain name
Use Hostname to choose a recognizable server name. If you do not have a planned domain configuration, leave Domain name empty as shown; otherwise follow your organization's settings.
Hostname identifies this server in the command line and on the network.

Step 1: Complete the Hostname field
- Complete the Hostname field
Enter the name you want to use for the server and continue with Continue. The actual demonstration name is hidden in the image.
The following Domain name field is a separate setting. Choosing a hostname does not register a domain or create a DNS record.
This example leaves Domain name blank because no network domain is being configured for the server.

Step 1: Leave the field blank for this example
- Leave the field blank for this example
If you are not using a network domain, leave Domain name empty and continue with Continue.
This field does not purchase a domain name. If your organization uses a defined network domain, follow its network plan.
An IP address, subnet mask and gateway are different settings. If the portal shows a prefix, check whether the installer asks for a prefix or a dotted subnet mask. Entering a hostname does not create a DNS record; manage the required DNS record separately.
5. Create an administrator account
Root password
To follow this guide's regular-user and sudo approach, leave both Root password fields empty and choose Continue. With this method, Debian locks the root account password and grants the first user administrative access through sudo. You log in with your own account and use sudo when a task requires administrator privileges.
This guide creates a normal user and uses sudo for administrative commands instead of setting a root password. Both root password fields are left empty.
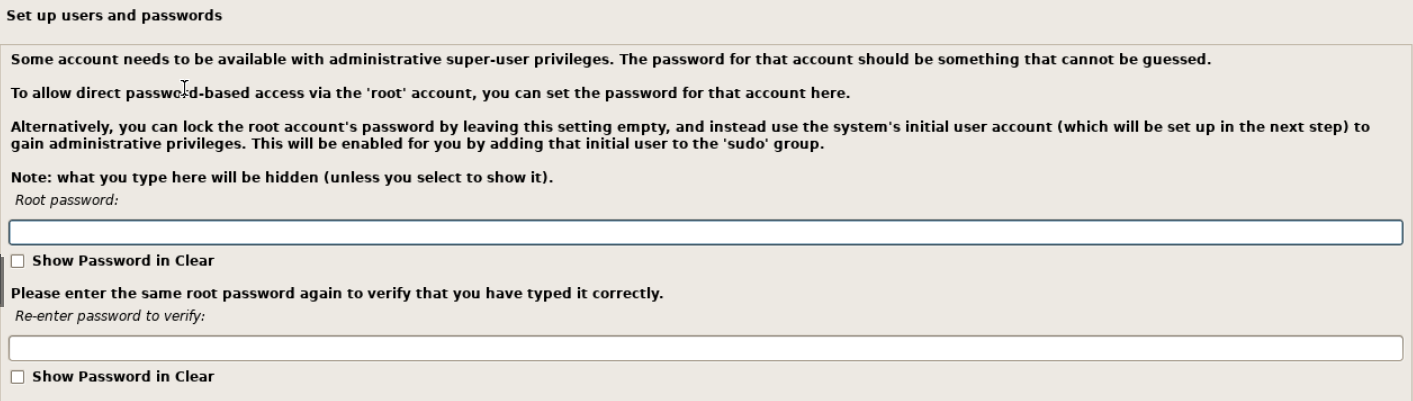
Step 1: Leave Root password empty
- Leave Root password empty
If you are following this guide’s sudo approach, do not enter a value in the first root password field.
- Leave the confirmation empty too
Leave Re-enter password to verify empty and continue with Continue. The next screen starts creation of the normal user account.
The root account is not deleted; direct root password login is locked. As the installer explains, the initial user created next is used for sudo administration.
Regular user
The next screens ask for a user's name, then a login name in Username for your account. The login username and server hostname are separate settings. You will also use this username for SSH.
Full name for the new user is the account’s display name. The short username used to sign in is set on the following screen.

Step 1: Enter the display name
- Enter the display name
Enter the new account’s display name and continue with Continue. Distinguish this field from the username on the next screen.
This account belongs to the Debian server being installed. It does not change your DCHost customer portal account or credentials.
Username for your account is the name you will enter in the console and when connecting through SSH.

Step 1: Check the short username
- Check the short username
Enter a username beginning with a lowercase letter, following the installer’s format guidance. Continue to the password step.
You can keep the installer’s suggestion or change it. Store this username and the password you set next securely for future sign-ins.
Enter a strong password in Choose a password for the new user and repeat it under Re-enter password to verify. Leave both Show Password in Clear boxes unchecked to keep the password hidden on screen. Store the password safely and choose Continue.
Enter the same strong password in both fields. An additional privacy mask hides the password characters and their length in the image.
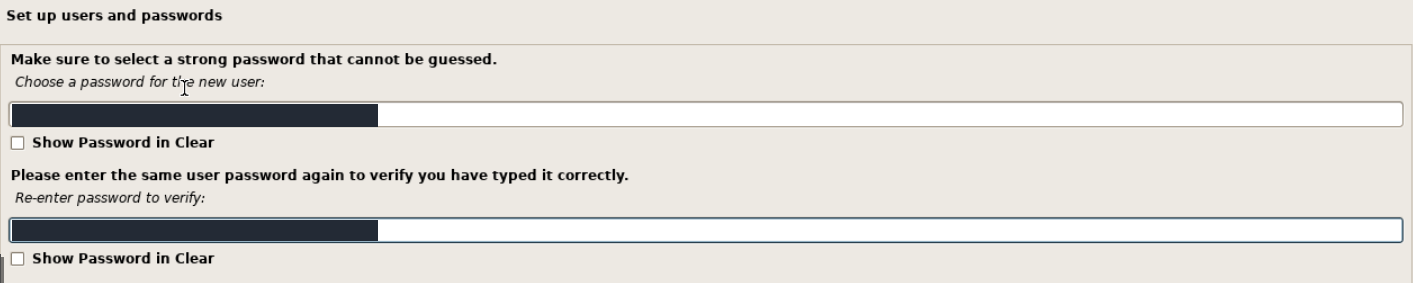
Step 1: Enter the new user password
- Enter the new user password
Enter a strong, unique password under Choose a password for the new user. You do not need to enable Show Password in Clear.
- Confirm the same password
Enter the same password again under Re-enter password to verify, then continue with Continue.
This is the password for your Debian user account. Store it securely in your password manager; it need not match your customer portal password.
These details belong to the Debian server's user account; they do not change your DCHost customer portal account.
After installation, use this account for console and SSH login, and use sudo for administration.
6. Select the installation disk and layout
Clean installation using the entire disk
Select Guided - use entire disk under Partitioning method. This prepares a new layout in place of the selected disk's existing setup; it is not a migration method that preserves files.
This demonstration uses Guided - use entire disk. The selected disk is prepared for a new Debian installation replacing the existing operating system.
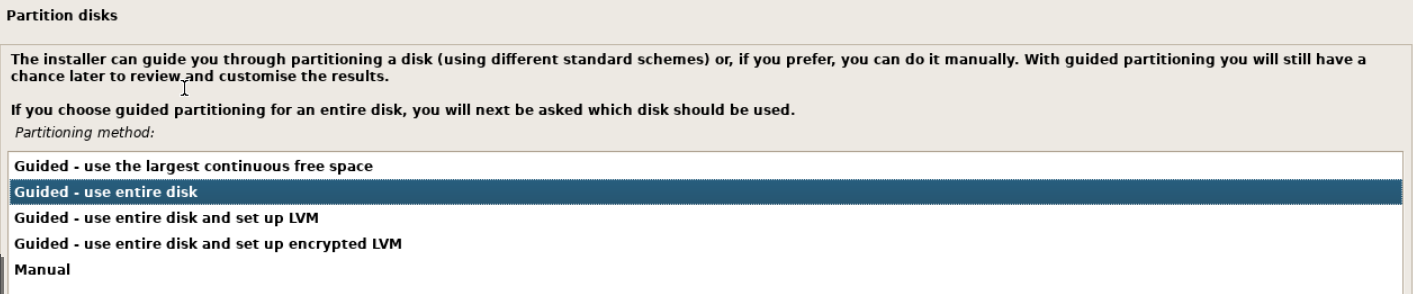
Step 1: Choose Guided - use entire disk
- Choose Guided - use entire disk
For the clean installation in this guide, select Guided - use entire disk and continue. The next screen asks which disk to use.
This method does not preserve existing data. Verify the correct service and an external backup, then read the following disk and any existing LVM confirmations carefully.
On the next screen, select the intended system disk. The pictured Virtual disk 1 (vda) — 42.9 GB Virtio Block Device is a 40 GiB disk; 42.9 GB expresses the same capacity in different units. If you have several disks, compare their device names and sizes and select only the intended installation disk.
The demonstration selects Virtual disk 1 (vda) — 42.9 GB Virtio Block Device. This is the demo server’s 40 GiB system disk.

Step 1: Check vda and the disk size
- Check vda and the disk size
Read the selected disk’s device name and capacity. Continue only when you have confirmed the correct disk.
42.9 GB and 40 GiB express the same capacity using different units. If you have multiple disks, compare their device names and sizes with your own service.
Under Partitioning scheme, select All files in one partition (recommended for new users). This keeps files in the root filesystem instead of creating separate data partitions for /home, /var and /tmp. It does not mean that only one physical partition will exist; the later summary can include swap and other partitions.
This example continues with All files in one partition (recommended for new users). It does not create separate data partitions for /home, /var and /tmp.
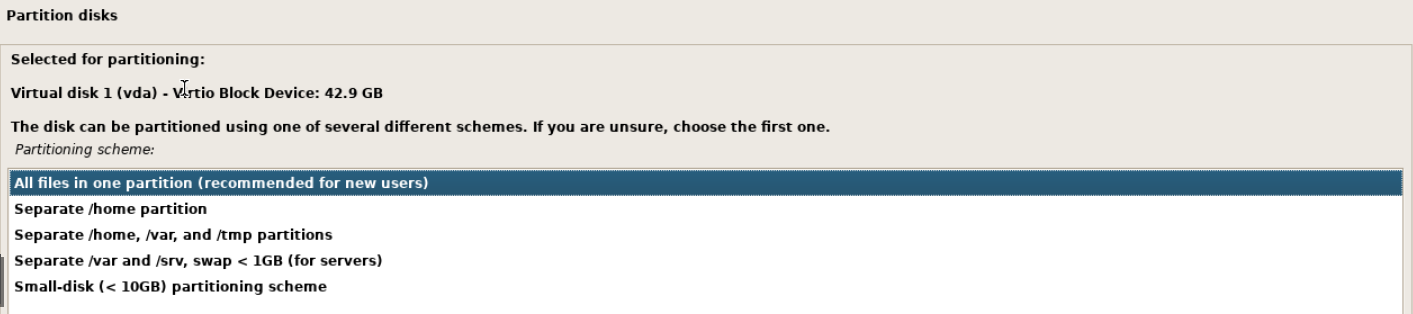
Step 1: Choose All files in one partition
- Choose All files in one partition
Confirm All files in one partition on the first row and continue. A separate confirmation may follow if old LVM data is present.
This option does not mean that the disk will contain exactly one partition. Check the proposed root, swap and any other partitions on the following summary screen.
Existing LVM data warning
If the disk contains LVM volumes from a previous system, Remove existing logical volume data? may appear. It lists the volumes to remove and warns that their data will be permanently erased.
After verifying your backup and target disk, choose Yes → Continue to replace the old system with a clean installation. Do not approve this if the disk contains files you need to preserve. You may not see this question on a new disk or one without LVM.
This demo disk contained LVM volumes from the previous installation. The installer separately warns that removing them permanently erases the data they contain.
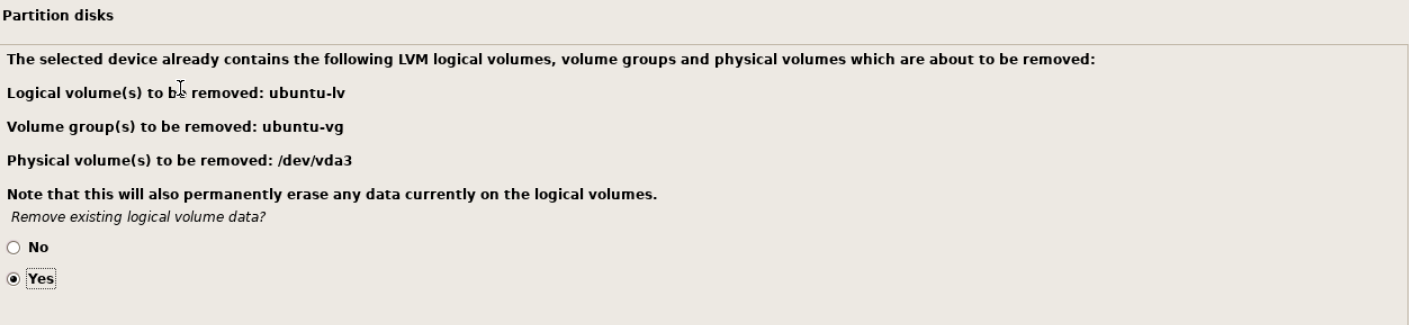
Step 1: Confirm removal only after checking the disk
- Confirm removal only after checking the disk
After verifying your backup and target disk, select Yes and Continue for the clean installation. This screen may not appear when the disk has no existing LVM data.
This is a separate data-loss confirmation before the final formatting confirmation. To preserve existing data, do not continue with Yes; choose No and reconsider the disk layout.
Actual recording: remove existing LVM data
Actual graphical installer recording: the existing LVM removal warning, confirmation with Yes and Continue, then the partition summary. The clip ends before confirmation to write the new partition table.
Written transcript
The recording shows the old LVM volumes and the permanent data-loss warning. Yes is selected, Continue confirms it, and partitioner progress leads to the new partition summary. The clip ends with Finish partitioning and write changes to disk highlighted; the later final disk-write confirmation is not given in this recording.
Check the partition summary
The prepared layout shows a 40.8 GB ext4 root filesystem (/) and 2.1 GB swap. Swap supports memory management; it is not a separate filesystem for ordinary files. This installation does not create a new LVM layout.
The demonstration proposes a 40.8 GB ext4 root filesystem (/) and 2.1 GB of swap on vda. The f flag marks partitions that will be formatted.
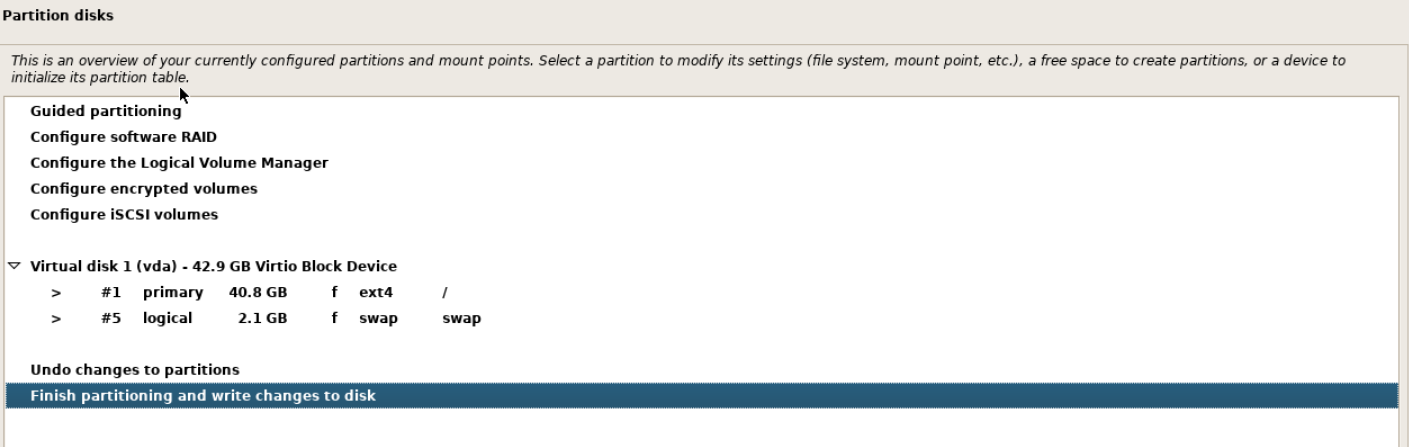
Step 1: Check filesystems and mount points
- Check filesystems and mount points
Verify ext4 and / for the root filesystem and swap for the swap partition. The f flags indicate that these partitions will be formatted.
- Continue with Finish partitioning
If the layout is correct, choose Finish partitioning and write changes to disk and select Continue. The next screen asks you to confirm writing to disk.
Sizes vary with your disk. Continuing from the final row opens a separate write confirmation; any existing LVM removal was confirmed earlier.
Apply the disk changes
Select Finish partitioning and write changes to disk in the summary, then choose Continue. Write the changes to disks? lists the disk to change and the partitions to format.
The pictured list schedules partition 1 on vda for ext4 and partition 5 for swap. Check your own disk and partition list, then confirm with Yes → Continue. This applies the disk changes and begins formatting; the old data listed for replacement is not preserved.
Write the changes to disks? lists the affected disk and partitions to format. In this example, partition 1 on vda is formatted as ext4 and partition 5 as swap.
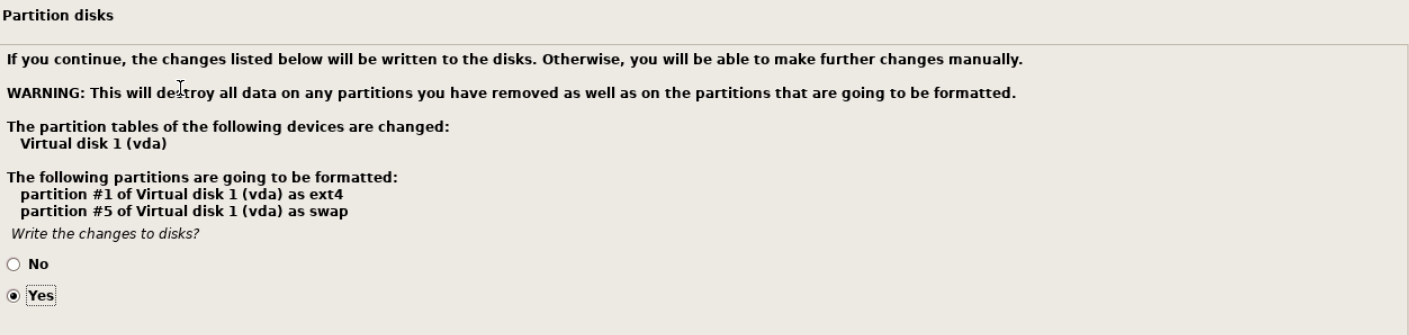
Step 1: Check the list and choose Yes
- Check the list and choose Yes
If the correct disk and partitions are listed and your backup is ready, choose Yes. Continue starts writing the changes and formatting.
Selecting Yes and Continue applies the listed disk changes and starts formatting. Data on deleted or formatted partitions is lost.
Actual recording: start formatting
Actual graphical installer recording: Yes is selected on the final warning, Continue applies disk changes, then formatting and base-system installation begin.
Written transcript
The clip starts with No selected on the final disk-write question. Yes is selected and Continue is clicked. Swap and ext4 formatting follows, then Install the base system begins. The clip ends before all packages are installed or the first boot occurs.
7. Select the package source and software
If a package-source warning appears
The apt configuration problem warning reports that APT could not be configured to obtain additional packages from the installation media. If it appears, choose Continue to select a network mirror. The cause cannot be determined from this screen alone.
In this run, apt configuration problem reported that configuring APT to install additional packages from the installation media had failed.
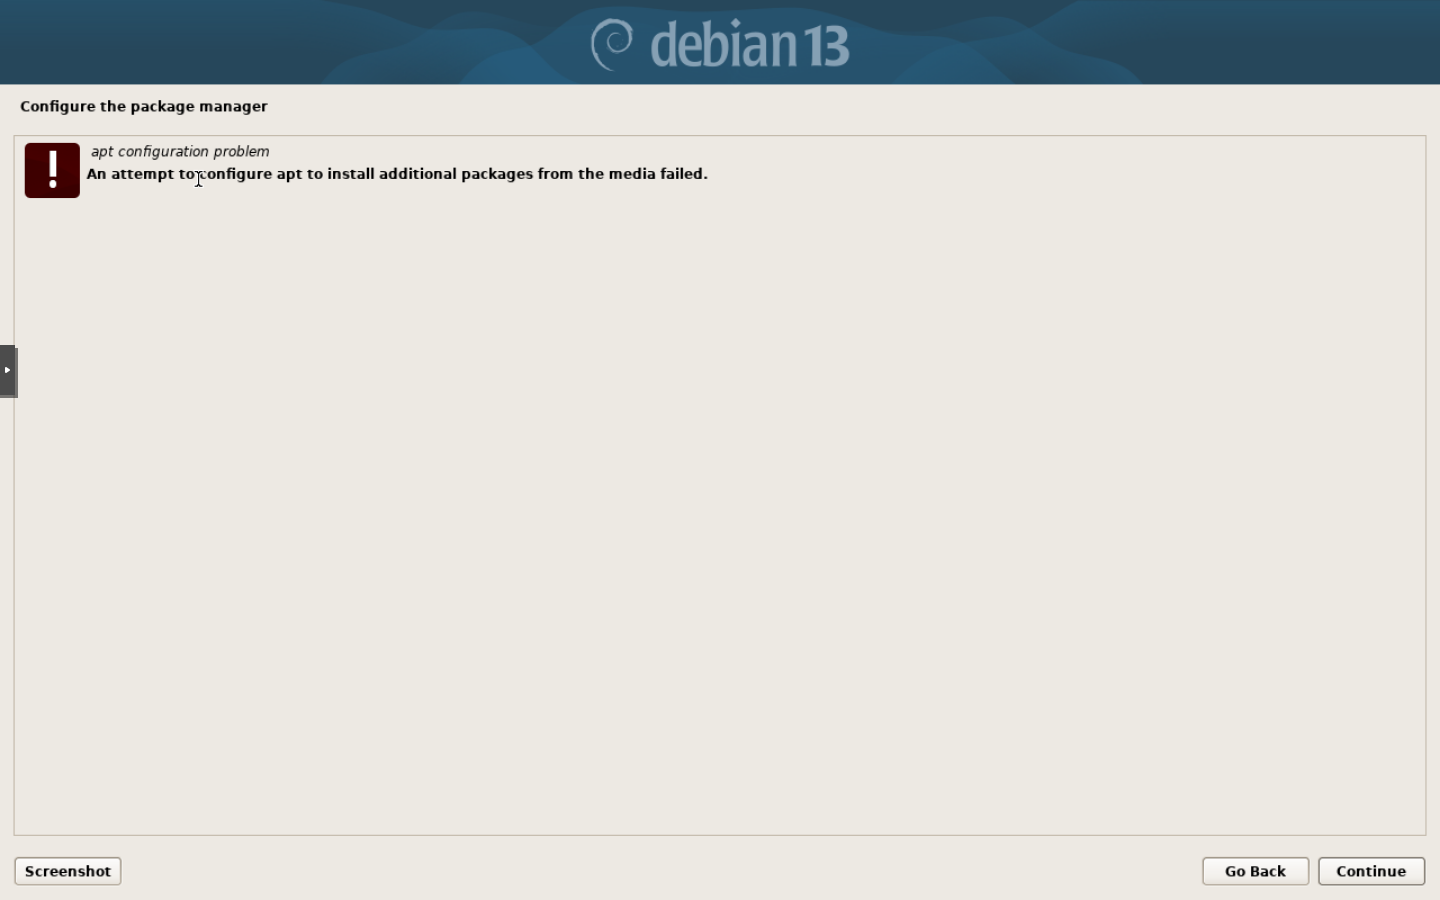
Step 1: Use Continue to check the next step
- Use Continue to check the next step
In this demonstration, Continue opened the Debian archive mirror country list. If the error repeats in your installation, check networking and the installation source.
This screen does not establish the cause. In the actual demonstration, Continue led to network-mirror selection; it does not mean installation has completed.
Select a network package mirror
- Select Türkiye under Debian archive mirror country.
- Choose deb.debian.org in Debian archive mirror.
- Leave HTTP proxy information empty if you do not use a proxy. Choose Continue and wait for package indexes to be retrieved.
This country choice concerns the package mirror, separately from the earlier system location. If you do not use a proxy, do not enter the server IP or gateway in this field. If your network requires one, use the details supplied by its administrator.
This asks for the package-mirror country separately from the system location. Türkiye is selected in the example.
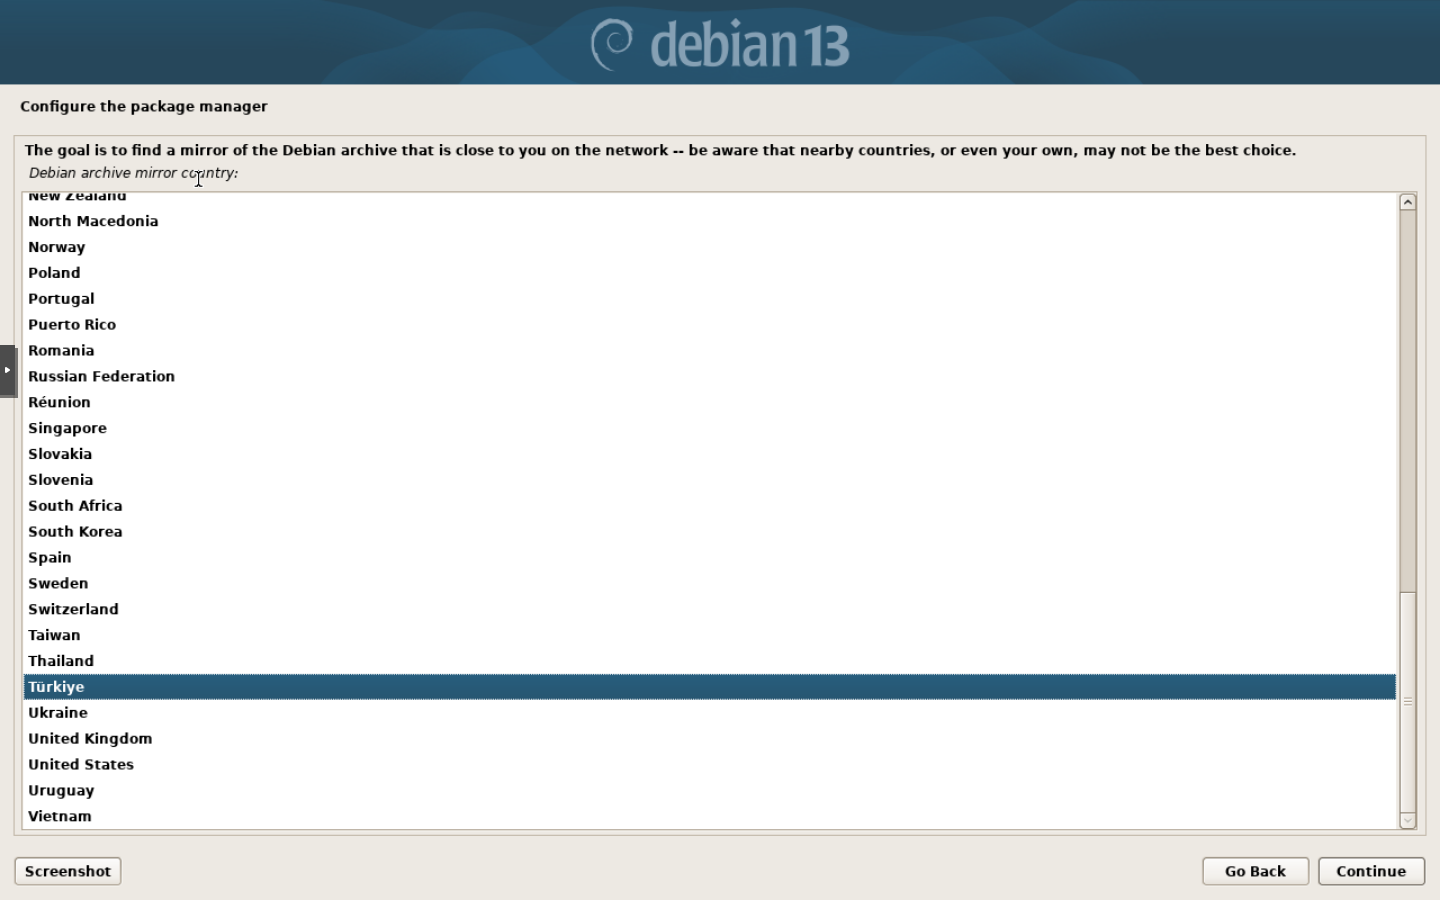
Step 1: Confirm Türkiye
- Confirm Türkiye
Select Türkiye under Debian archive mirror country, then Continue to open the mirror list.
The nearest country does not always offer the fastest network path. The next screen in this example uses the recommended deb.debian.org service.
The installer describes deb.debian.org as usually a good choice. It is the selected entry in the actual demonstration.

Step 1: Continue with deb.debian.org
- Continue with deb.debian.org
Confirm deb.debian.org on the first row of Debian archive mirror and select Continue.
The installer needs working networking and DNS to reach this address. The next screen asks for an HTTP proxy, if required.
The example connection does not use an HTTP proxy, so HTTP proxy information is left empty. Do not enter the server IP address or gateway here.

Step 1: Continue with the empty field
- Continue with the empty field
If you do not use a proxy, leave HTTP proxy information (blank for none) empty and select Continue.
If your network requires a proxy, use the address supplied by its administrator. Continuing with the empty field in this example started retrieval of package indexes from the network repository.
Package usage survey
If you do not wish to send package usage statistics, select No for Participate in the package usage survey? This controls package usage statistics; it is separate from the software selection on the next screen.
popularity-contest asks whether to send package-usage statistics to Debian developers. This server example selects No.
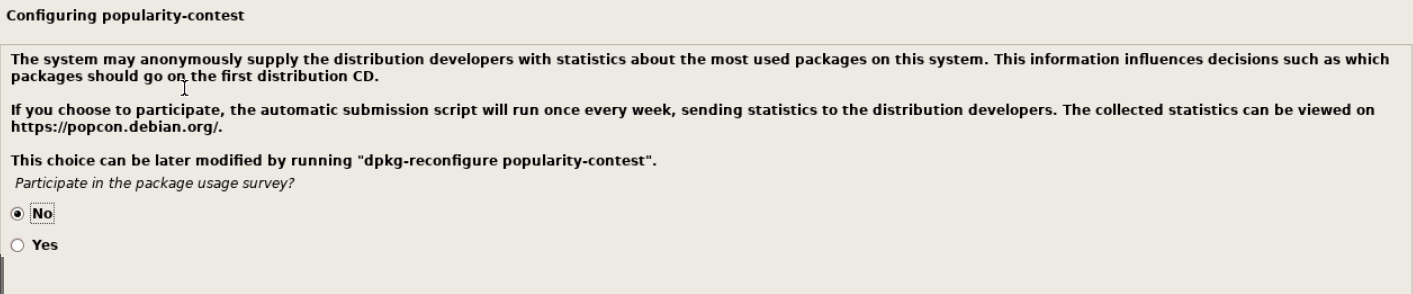
Step 1: Continue with No
- Continue with No
To follow this example, select No and choose Continue. The installer then lists software groups to install.
This choice is separate from selecting software packages on the next screen. You can change the popularity-contest preference after installation.
Deselect desktop tasks and select SSH
Desktop choices may be preselected in Software selection. For a server without a desktop, adjust the choices as follows:
| Choice | What to select | Result |
|---|---|---|
| Debian desktop environment | Uncheck it. | The desktop environment task is not selected. |
| GNOME and other desktops | Leave unchecked. | These tasks do not install graphical desktop packages. |
| SSH server | Check it. | Installs the server software needed for remote SSH access. |
| standard system utilities | Leave checked. | Installs standard system tools. |
Check that only SSH server and standard system utilities are selected on the final screen. Choose Continue and wait for the selected packages to install.
This example uses the graphical installer to set up a server without a desktop. Only SSH server and standard system utilities are checked in the final selection.
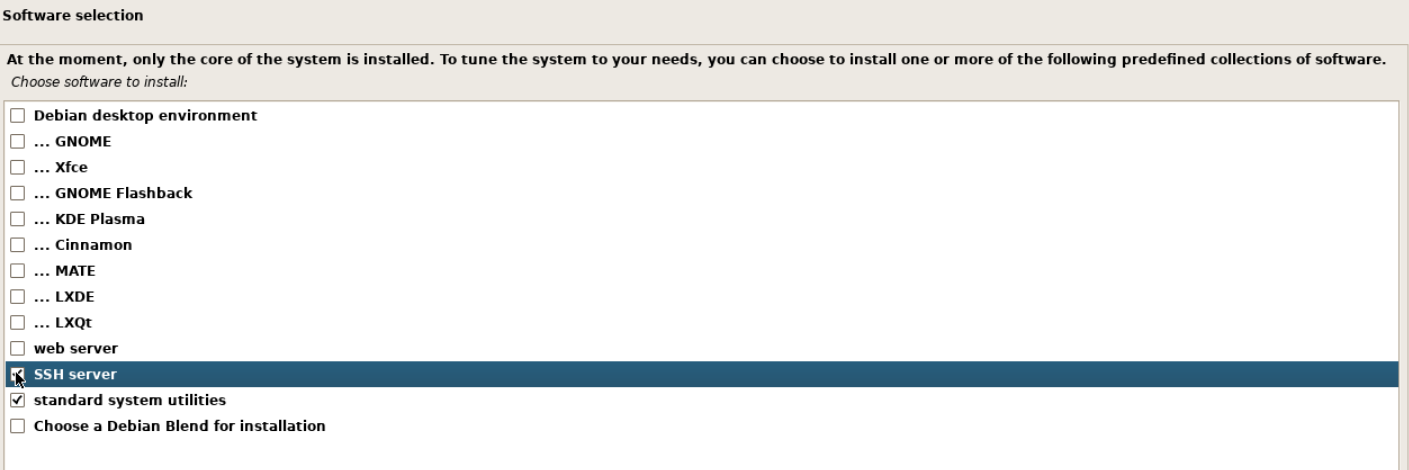
Step 1: Clear the desktop and GNOME checkboxes
- Clear the desktop and GNOME checkboxes
Check Debian desktop environment and the GNOME entry separately and clear both checkboxes. Leave the other desktop environments unchecked.
- Keep SSH server and system utilities selected
Check SSH server and keep standard system utilities selected. After checking the final list, Continue starts installing the selected packages.
Choosing Graphical install does not require a desktop in the installed system. Desktop environments, web server and Debian Blend are unchecked in this final selection.
Actual recording: choose software without a desktop
Actual graphical installer recording: Debian desktop environment and GNOME are unchecked; SSH server is checked and standard system utilities remains selected. The clip ends before Continue is activated.
Written transcript
The recording unchecks Debian desktop environment and GNOME, then checks SSH server while leaving standard system utilities selected. It ends after the choices are reviewed. Clicking Continue and installing the packages happened outside this clip.
You do not need to leave desktop tasks selected to keep using the graphical installer. After installation, you can manage the server through its console or SSH.
8. Install the boot loader and finish setup
Install GRUB on the system disk
Select Yes for Install the GRUB boot loader to your primary drive? This prepares the boot loader so Debian can start from disk. If another operating system on the same disk must be preserved, consider the on-screen warning separately.
The installer asks to install GRUB on the primary drive so the new system can boot. This clean-installation example selects Yes.

Step 1: Continue with Yes
- Continue with Yes
For this clean installation, select Yes and Continue. The next screen separately asks for the boot-loader device.
The warning states that another undetected operating system may be affected. This guide follows a clean installation on the selected demo disk.
In Device for boot loader installation, explicitly select /dev/vda, then choose Continue. Check that the disk containing Debian is selected rather than Enter device manually.
/dev/vda is the whole disk, not a partition path such as /dev/vda1. If your disk has a different name, match it to the system disk selected earlier for partitioning.
Explicitly select the disk row under Device for boot loader installation. In this demonstration, /dev/vda is the system disk where Debian was installed.

Step 1: Choose /dev/vda and continue
- Choose /dev/vda and continue
Select /dev/vda below Enter device manually. Check that the correct disk row is highlighted, then select Continue to install GRUB.
/dev/vda is the whole disk device, rather than a partition path such as /dev/vda1. Your device name may differ; match it to the earlier partitioning target.
Wait for the completion screen
Installation complete confirms that the installer has finished its work. Do not detach the media or restart through the portal before reaching this screen.
Installation complete on Finish the installation confirms that the graphical wizard has finished. The screen asks you to select Continue to start the new system.
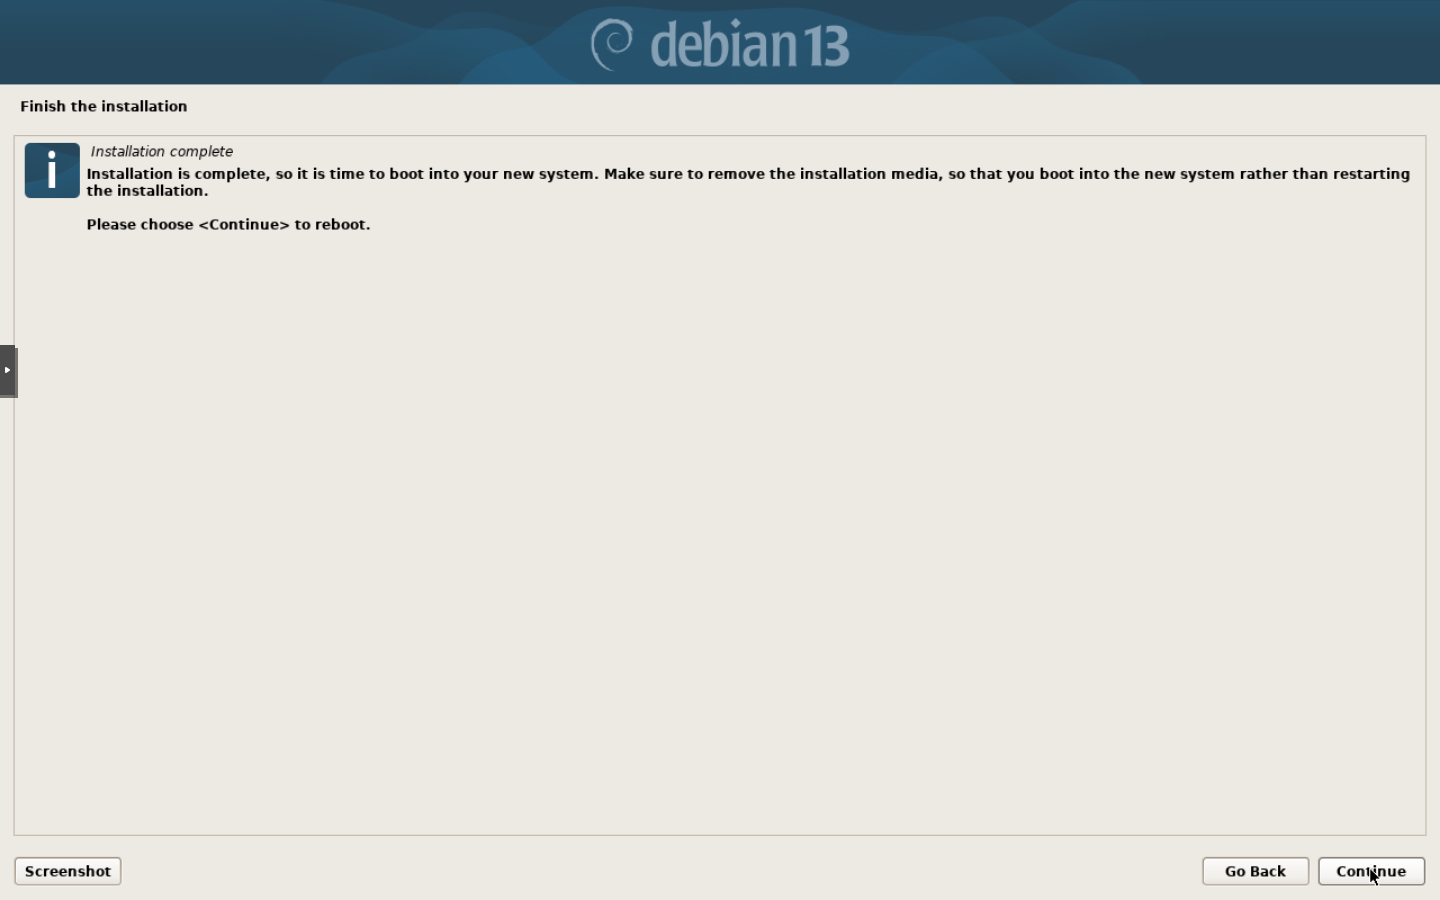
Step 1: Select Continue to reboot
- Select Continue to reboot
After Installation complete appears, click Continue at the bottom right. The console may briefly disconnect during reboot.
Check and detach the mounted ISO in the portal so the server does not return to the ISO installer. After reboot, separately verify booting from disk and SSH access.
Continue proceeds to a restart. The installation media and boot order also need to be checked so the installed system can start. This completion screen alone does not verify the first boot from disk.
Detach the installation ISO
Use Continue to restart, then return to the customer portal and detach the installation ISO:
- Open Templates & ISO → ISO Image for the same service.
- Read the confirmation that the server will restart. Confirm once installation has finished.
- Check the ISO Image detached notification.
- Reopen Console / VNC Console Access and wait for the installed Debian system to start from disk.
After the panel detaches the ISO, it shows ISO Image detached. This notice confirms that the installation media has been disconnected from the virtual drive.

Step 1: Read the ISO Image detached notice
- Read the ISO Image detached notice
After this notice appears, open a fresh console session and verify that the server boots the installed system.
Verify that the installed system boots using the console and SSH checks. This image shows the panel result of detaching the ISO.
ISO Image detaches the installation media and restarts the server. It is different from Delete in the ISO library. The ISO detachment guide covers the menus in detail. If the installation menu opens again, do not repartition the disk; check the boot order.
9. Check the installed system
Log in through the console and SSH
Booting from disk shows a login prompt instead of a desktop. This is expected: no desktop tasks were selected. Log in with the regular username and password created during installation. Password characters may not appear as you type.
The actual reopened console shows Debian GNU/Linux 13 and a login prompt. The hostname is permanently masked.

Step 1: Find the Debian 13 banner and login prompt
- Find the Debian 13 banner and login prompt
Check Debian GNU/Linux 13 on the first line and the login prompt below. You can now sign in with your normal user account.
When this login prompt appears, continue with the account created during installation. Reopen Console from the portal if needed.
After the actual console login, the Linux kernel information and Debian welcome text appear. The username, hostname and shell-prompt identity are permanently masked.
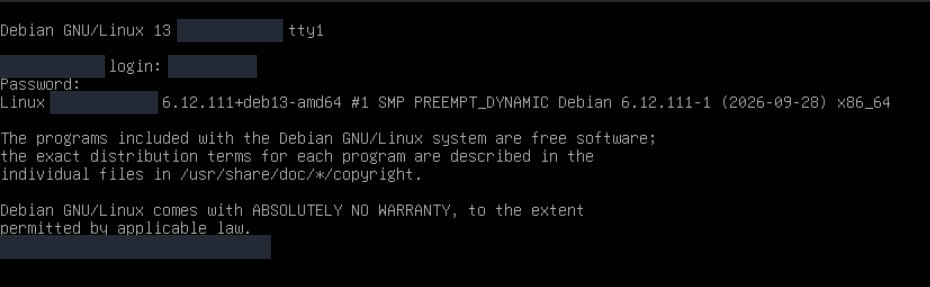
Step 1: Enter your username and password
- Enter your username and password
At login, enter the username created in the Debian installer; at Password, enter that account’s password. Successful login displays the welcome text and a shell prompt.
It is normal for no characters to appear while typing a console password. Also verify SSH access with the same account and sudo access when needed.
To connect from a terminal on your own computer, replace both fields with your details:
ssh USERNAME@SERVER_IP
Verify the server's host-key fingerprint on the first connection. If reinstalling has changed the key stored on your computer, do not dismiss the warning without checking; follow SSH connection and host-key errors.
Check administrative access:
sudo -v
Enter the regular user's password if prompted. Success may produce no further output. Administrative and sudo access are separately verified in the final results table.
Guest agent and time synchronization
After the first login, refresh the package index and install qemu-guest-agent and systemd-timesyncd. The guest agent supports management communication with the virtualization layer; the time service synchronizes the system clock.
sudo apt-get update
sudo apt-get install qemu-guest-agent systemd-timesyncd
sudo systemctl start qemu-guest-agent
sudo systemctl enable --now systemd-timesyncd
These commands refresh the package index and install the two packages needed for the guest agent and time synchronization. Applying all system updates is a separate maintenance step; continue with the Linux updates guide.
Final checks
These commands show release, storage, service and time information:
cat /etc/os-release
uname -r
findmnt /
systemctl is-active ssh qemu-guest-agent systemd-timesyncd
timedatectl status
systemctl --failed
This actual console output shows Debian 13, the ext4 root filesystem and the post-installation service and network checks. The identity in the shell prompt is permanently masked.
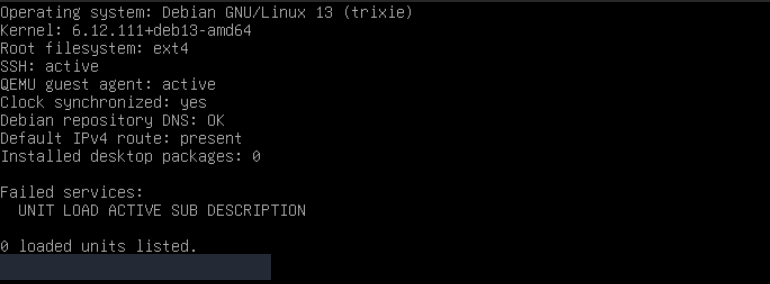
Step 1: Read the system version and root filesystem
- Read the system version and root filesystem
The output shows Debian GNU/Linux 13 (trixie), the installed kernel version and Root filesystem: ext4. Compare these values with your intended installation.
- Check services and clock synchronization
This run reports active for SSH and the QEMU guest agent, and yes for Clock synchronized. Verify these results on your own server.
- Check DNS resolution and the default route
Debian repository DNS: OK and Default IPv4 route: present show that this check resolved the repository name and found a default route.
- Review desktop and failed-unit counts
The desktop package count in this check is 0. Under Failed services, 0 loaded units listed means no failed units were listed in this run.
These are the results on this server at the time of the check. Run the guide’s checks on your own server; investigate the relevant service or network setting if a check fails.
| Check | Verified result in this installation |
|---|---|
| Operating system | Debian 13, trixie. |
| Kernel | 6.12.111+deb13-amd64; later updates can change it. |
| Root filesystem | /dev/vda1, ext4; the system started from disk. |
| Access | Regular-user console and SSH login, followed by successful sudo verification. |
| Networking | A default IPv4 route is present; DNS resolution of deb.debian.org succeeds. |
| Services and time | SSH and the guest agent are active, the clock is synchronized, the timezone is Europe/Istanbul, and there are 0 failed units. |
| Desktop | task-desktop, task-gnome-desktop and gdm3 are not installed. |
These are results from the demo installation. Your disk name, kernel and timezone can differ; assess them against your own requirements.
Delete the unused ISO from the library
After verifying startup from disk, use Delete for the Debian file in ISO Management. In Delete ISO?, check that you are deleting the intended image, then choose Yes, Delete. Choose Cancel if you do not wish to proceed.
Once the ISO is detached and disk boot is verified, choosing Delete for the installation ISO in the library opens this confirmation.
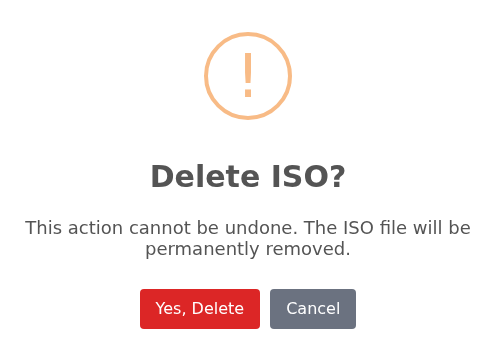
Step 1: Remove it from the library with Yes, Delete
- Remove it from the library with Yes, Delete
Choose Yes, Delete to permanently remove the selected ISO file. Cancel returns without deleting it.
This permanently removes the ISO file from the library. Choose Cancel if you want to keep it.
After deletion, check that the image is no longer listed. Deleting the last image produces the pictured No ISO Images and Nothing to display messages. The list may remain populated if you have other images. Check the remaining upload allowance for your own service.
The ISO library is empty after deletion in this demonstration. It shows No ISO Images and Nothing to display.
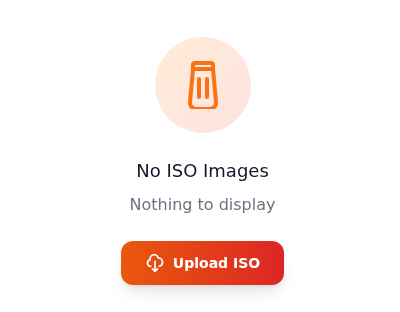
Step 1: Verify the empty-library state
- Verify the empty-library state
No ISO Images and Nothing to display confirm that no ISO files remain in this demonstration’s library.
If the library contains other ISO files, it may remain populated. Verify that the ISO you deleted no longer appears.
Deleting the image does not remove the installed Debian system, which resides on the server disk. To upload the next operating system's image, follow ISO replacement and cleanup.
Frequently asked questions
Is it wrong to select Install instead of Graphical install?
Both options use the same core Debian installation process with different interfaces. Install opens keyboard-driven text screens. Follow the text-based guide if you wish to continue that way. Do not restart merely to change interfaces once installation has started writing to disk.
Why do I see a login prompt rather than a desktop after graphical installation?
That is expected when no desktop tasks were selected. The graphical installer was part of the installation media. The installed server asks for a username in the console and can be managed using SSH. A desktop environment is a separate requirement from this server installation.
What if the server opens the installation menu again?
Do not start partitioning a second time. Confirm that installation finished, then check ISO detachment and boot order.
Next step
Continue with SSH keys and a server backup plan.