VPS ISO installation and management: upload and boot an image
Installing a VPS from an ISO lets you choose the language, disk layout, user account and software in the operating system's own installer. An ISO is an installation image attached to the server as virtual CD/DVD media. After preparing it, you open the installer through the portal console.
This guide covers ISO upload and booting from an ISO in the DCHost customer portal. Once the image is ready, use the installation method table to select your operating system and interface. Reinstallation from a prebuilt operating system template is a separate workflow covered in server management.
The screenshots come from an actual demo server. The text retains the English labels displayed in the portal so you can match each control to the screen. Private account and service details are hidden.
Before you start
The server restarts during installation and existing SSH sessions can disconnect. Schedule a maintenance window if it hosts active websites. Keep a restorable backup outside the server you are installing; see the server backup plan.
Adding an ISO to storage and formatting a disk are separate actions. Approving disk erasure or repartitioning in the installer can remove existing data. Check the selected service first, then check the target disk inside the installer.
| What to prepare | Why you need it |
|---|---|
| Assigned IP address, prefix or subnet mask, gateway and DNS settings | For manual networking if the installer cannot configure it automatically. Do not copy another server's values. |
| Access to the portal console | To use the installation screen before the system or SSH is available. |
| A suitable operating system ISO | To match the release, CPU architecture and application support. |
| A restorable backup stored outside this VM | To recover the data you need after installation. |
Find the server's network information in the portal
Before installation, open Network Management → Network Interfaces for your server. Find IPv4 Addresses inside the IP Configuration card. Record the assigned IP address, network/prefix and Gateway values shown there. Use these values when configuring this same service in the installer.
Open Network Management → Network Interfaces for your service. The IP Configuration card shows the IP address, network/prefix and Gateway.
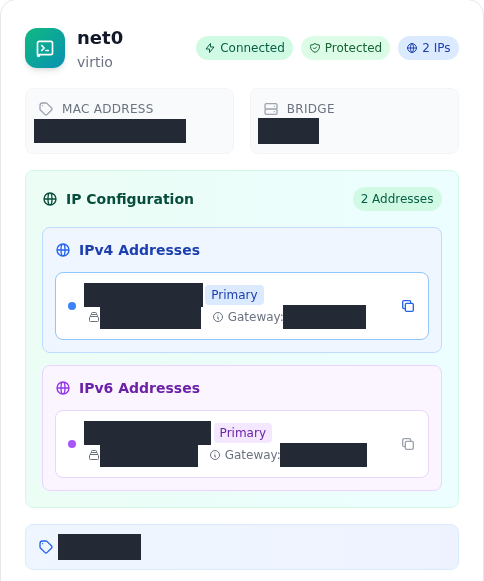
Step 1: Save the IPv4 address and prefix
- Save the IPv4 address and prefix
Under IPv4 Addresses, the main row shows the service IP and the lower row shows the network/prefix. Use your service’s own values for IP address and the installer’s Netmask or Subnet field.
- Save the Gateway value separately
Gateway in the same card is the default gateway. Enter this value in the installer’s Gateway field. Confirm that these details belong to the correct service before changing network settings.
A prefix and subnet mask express the same network size in different forms; use the notation requested by the installer field. Record your DNS server addresses separately. Network values in the installation examples are hidden; use the settings assigned to your own server.
Choose the correct installation image
Start at the distribution's official download page. This series uses 64-bit x86 images: amd64 for Debian and Ubuntu, and x86_64 for CentOS Stream. arm64 or aarch64 targets a different architecture.
| Operating system | Official source | What to select |
|---|---|---|
| Debian | Debian downloads | amd64 netinst; additional packages can be retrieved over the network. |
| Ubuntu Server | Ubuntu Server downloads | The Server image and a supported LTS series. |
| CentOS Stream | CentOS downloads | The Stream release, its CPU requirements and an x86_64 image. |
boot and netinst images may retrieve packages during installation. Uploading the ISO does not mean setup can finish without network access. If you download the file to your computer, follow the distribution's verification instructions too; the checksum must match that exact ISO release.
1. Open the server's ISO Management page
- Sign in to the DCHost customer portal.
- Open the virtual server you want to install. If you have several, compare the service name and IP address.
- Go to Templates & ISO → ISO Management.
- Choose Upload ISO.
The selected virtual server’s ISO Management page shows existing ISO files and the remaining upload allowance.
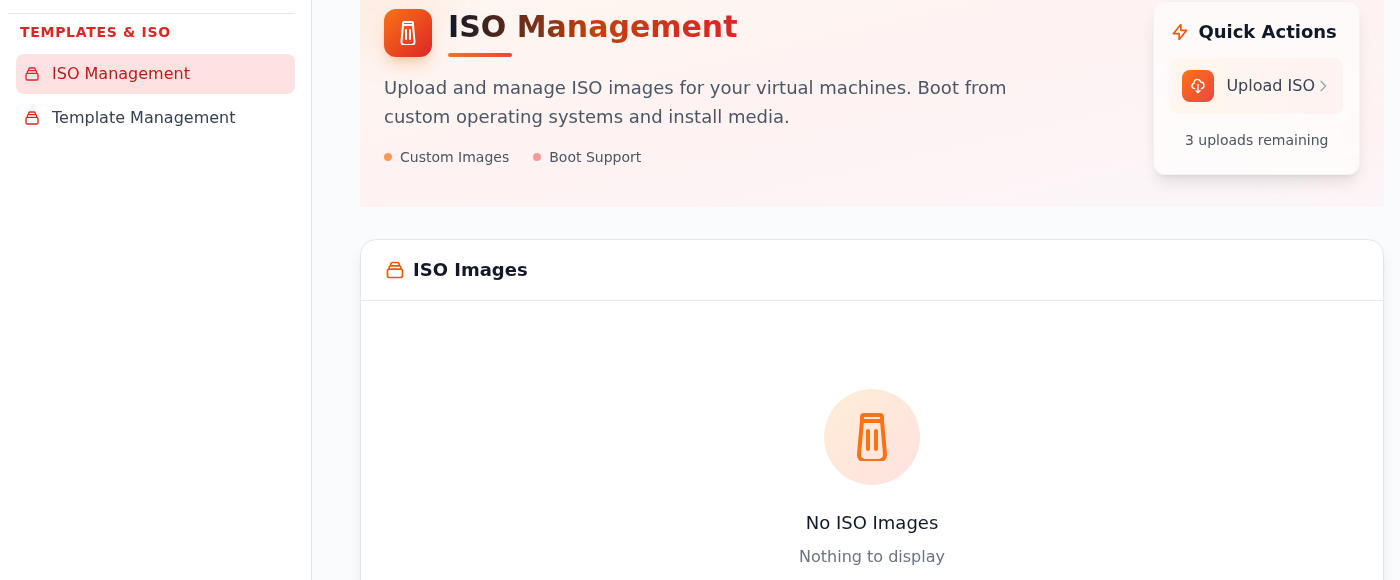
Step 1: Open ISO Management
- Open ISO Management
Select ISO Management under Templates & ISO for your virtual server. Template Management is a separate section.
- Use Upload ISO
Choose Upload ISO in the Quick Actions card on the right. The dialog lets you name the ISO and select an upload method.
- Check whether an ISO is already listed
No ISO Images means no ISO has been uploaded for this service. It does not mean that the server has no operating system.
The example service shows 3 uploads remaining. Check the allowance on your own service; this count is not the file-size limit.
No ISO Images means that no ISO has been uploaded for this service. It does not mean the server has no operating system on disk. uploads remaining is the remaining upload allowance, not the file-size limit in GB. Use the value displayed for your own service.
2. Enter the image name and direct download link
The Upload ISO dialog offers a download URL or a file from your own computer.
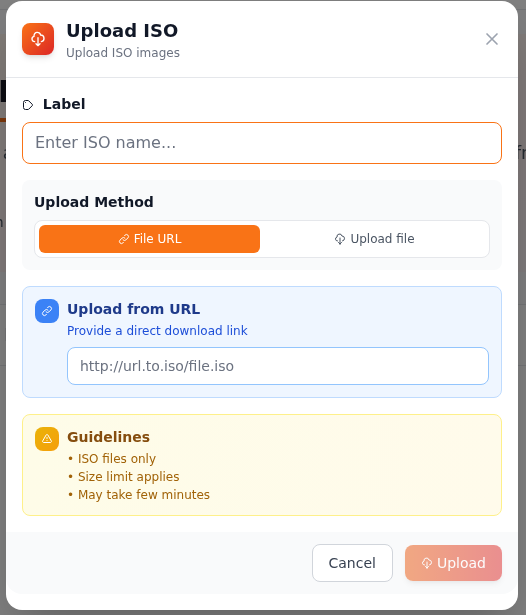
Step 1: Enter a recognizable label
- Enter a recognizable label
Use Label to identify the operating system and version. This helps you select the right file from the ISO list.
- Choose the upload method
Keep File URL selected to download an ISO from its official source. Upload file is the alternative for an ISO already on your computer.
- Paste the direct ISO URL
In Upload from URL, enter the direct address of the ISO file rather than the download page. Obtain the file link from the operating system’s official download page.
Upload is disabled in this screenshot because the fields are empty. Guidelines mentions a size limit without displaying a numeric limit.
| Field | What to enter |
|---|---|
| Label | A recognizable name, such as Debian 13.7 amd64 netinst. |
| Upload Method → File URL | Choose this method to have the ISO retrieved from its official source. |
| Upload from URL | A direct link to the ISO file, rather than a product or download webpage. |
The example uses an ISO from Debian's official cdimage.debian.org host. For another distribution, use its own file link. Check the filename, version and architecture in the URL, then enter a matching Label.
The example contains a label and official download URL for Debian 13.7 amd64 netinst. Upload becomes available when the required fields are filled.
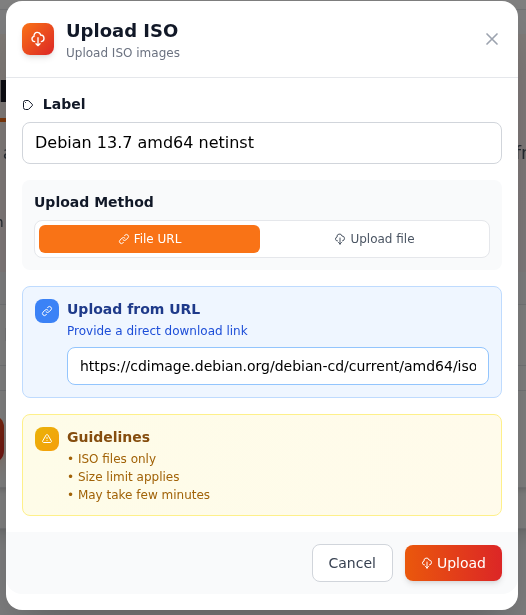
Step 1: Match the label, version and architecture
- Match the label, version and architecture
Make sure Label and the ISO identify the same operating system, version and architecture.
- Confirm the official download source
This example uses cdimage.debian.org. For another distribution, enter that distribution’s own official ISO link.
- Choose Upload when ready
After checking the details, use Upload to request the download. Follow its status in the ISO list.
The URL field displays only part of the long link. Obtain the full link from the official source; it may change with the release.
Choose Upload when the information is correct. Follow the transfer in the ISO list. Expired links, sign-in requirements or links to webpages can prevent the image from being retrieved.
If the ISO is already on your computer
The Upload file tab provides Choose File to select a local ISO. This series uses File URL for the actual installation; the following screenshot shows where the local-file option is located.
If you already downloaded an ISO to your computer, the same dialog offers a local-file selector.
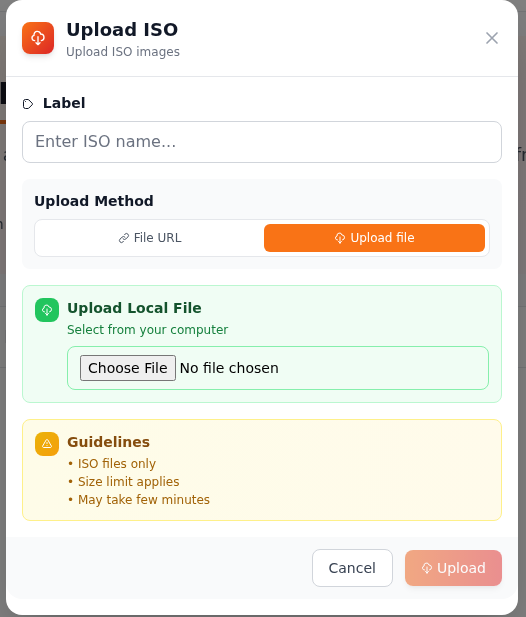
Step 1: Switch to Upload file
- Switch to Upload file
Selecting Upload file under Upload Method replaces the URL field with Upload Local File.
- Find your ISO with Choose File
Choose File opens your computer’s file picker. Check the filename and ISO extension to select the intended installation image.
No local file has been selected in this screenshot. The actual installation in this guide used File URL; this screen locates the local-file alternative.
The dialog states that a size limit applies, but the example does not display a numeric limit. Check your service's allowance for a large image. Selecting a local file is not the same as completing its upload; either method must produce a ready image in the list.
3. Wait for the Ready status
After Upload, the file appears in ISO Images. In this example, its download is still Pending.
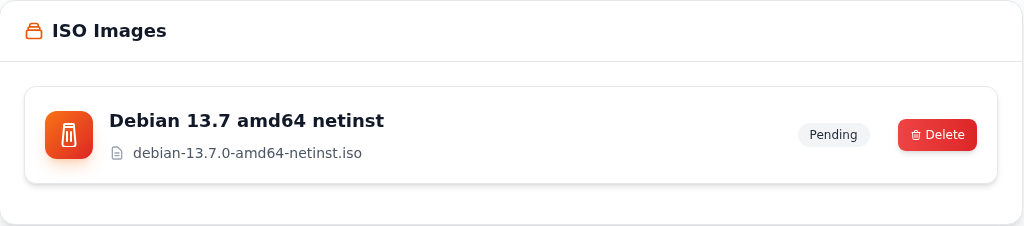
Step 1: Confirm the correct ISO file
- Confirm the correct ISO file
The actual filename appears below your label. Compare the operating system, version and architecture, such as amd64.
- Follow the status
This screenshot shows Pending. The entry has been created, but you still need to wait for the file download to complete.
Pending does not mean the ISO is ready to use. Wait for the download to complete before starting installation.
The new entry may first show Pending. It is not yet ready for installation. Check its status rather than adding the same file repeatedly.
After the download completed, the example entry changed to Ready and offered Boot from ISO.
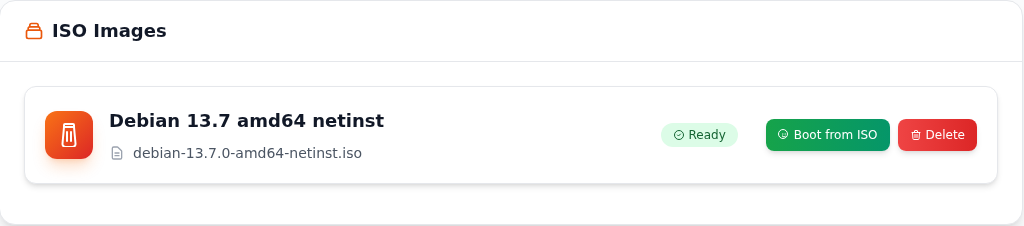
Step 1: Confirm the Ready status
- Confirm the Ready status
Check for Ready next to the intended Debian file. Do not proceed with an entry that is still Pending.
- Proceed with Boot from ISO
After preparing backups and installation settings, select Boot from ISO. The portal asks for confirmation.
A ready ISO does not mean Debian has been installed on the server disk. Installation continues in the console after booting from the ISO.
When the file reaches Ready, Boot from ISO becomes available. At this point the example Debian ISO is ready to use; Debian has not yet been installed on the server's disk.
4. Boot from the ISO and open the console
- Choose Boot from ISO beside the correct Ready image.
- Read the Boot from ISO? confirmation, which states that the selected ISO will be used.
- Choose Boot Now when ready. This restarts the server and affects open connections.
- Open Console / VNC Console Access to continue in the operating system's installer.
The portal displays Boot from ISO? before starting the server with the selected image.
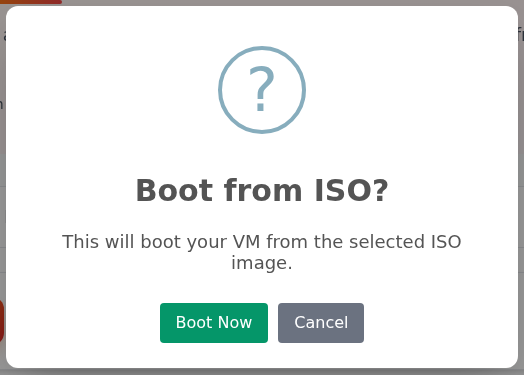
Step 1: Read what will happen
- Read what will happen
This will boot your VM from the selected ISO image refers to the image selected on the previous screen.
- Choose Boot Now to proceed
Choose Boot Now when ready to proceed. Use Cancel to close the dialog if you are not ready.
This can restart the server and interrupt active connections. Disk partitioning and formatting choices are made separately in the operating system installer.
In this demonstration, Boot Now performs the ISO boot operation. No separate “attach ISO” click was required beforehand. Disk erasure and partitioning are approved separately inside the installer.
After the boot request, the example service displayed VM Task in Progress in the Actions card.
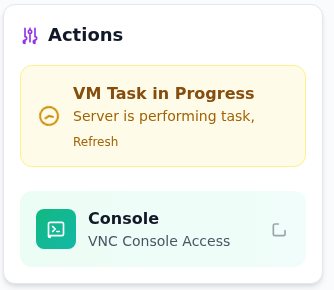
Step 1: Check the task status
- Check the task status
While VM Task in Progress is shown, allow the operation to finish. Refresh checks the status again.
- Open Console for the installer
Console opens the server display through VNC Console Access. This is where you follow the operating system installation steps.
This message indicates an operation in progress. It does not establish that the operating system installation has completed.
If VM Task in Progress appears, wait for the portal operation to finish. This message does not mean the operating system has been installed. Refresh checks status; Console opens the server's display. Click inside the console once to give it keyboard focus. If the boot menu has a countdown, select the required installer entry before it expires.
Actual recording: confirming the ISO boot
Actual portal recording: Boot Now confirmation and the resulting boot-request status. Operating system installation continues in the console.
Written description of the recording
The clip shows the portal confirmation for booting from the Debian ISO. After Boot Now is selected, the boot request's status appears. This short recording does not cover the whole operating system installation or its first boot from disk. Follow the distribution-specific guide for the installer steps.
5. Continue with the operating system installer
A graphical installer uses mouse-driven fields and buttons; a text-based installer uses keyboard navigation. Using a graphical installer does not mean installing a desktop on your server. The software packages you select determine whether a desktop is included.
| Operating system | Graphical installation | Text-based installation |
|---|---|---|
| Debian 13 | Step-by-step Graphical install: mouse-driven language, networking, user and storage choices. | Keyboard-driven Install method: the same core settings and SSH preparation. |
| CentOS Stream 10 | Anaconda graphical installer: settings screens, storage and software selection. | Menus with inst.text: numbered options for networking, LVM and an administrator account. |
| Ubuntu Server 24.04 LTS | The official Server ISO does not offer a separate desktop-style graphical installer. Ubuntu Desktop is a different installation. | Subiquity installation menus: networking, storage, an administrator account and OpenSSH. |
If this is your first Debian or CentOS installation, start with the graphical walkthrough. If you prefer text navigation, follow the corresponding alternative. Check the release, architecture and resource requirements when selecting your installation image.
6. Check that the installed system starts from disk
Detach the installation ISO from the server
Detach the virtual installation media after the operating system installer confirms completion. ISO Image restarts the server. Do not use it while packages are being installed or data is being written to disk.
With an ISO attached, the ISO Image link under Templates & ISO opens a reboot confirmation for detaching the media.
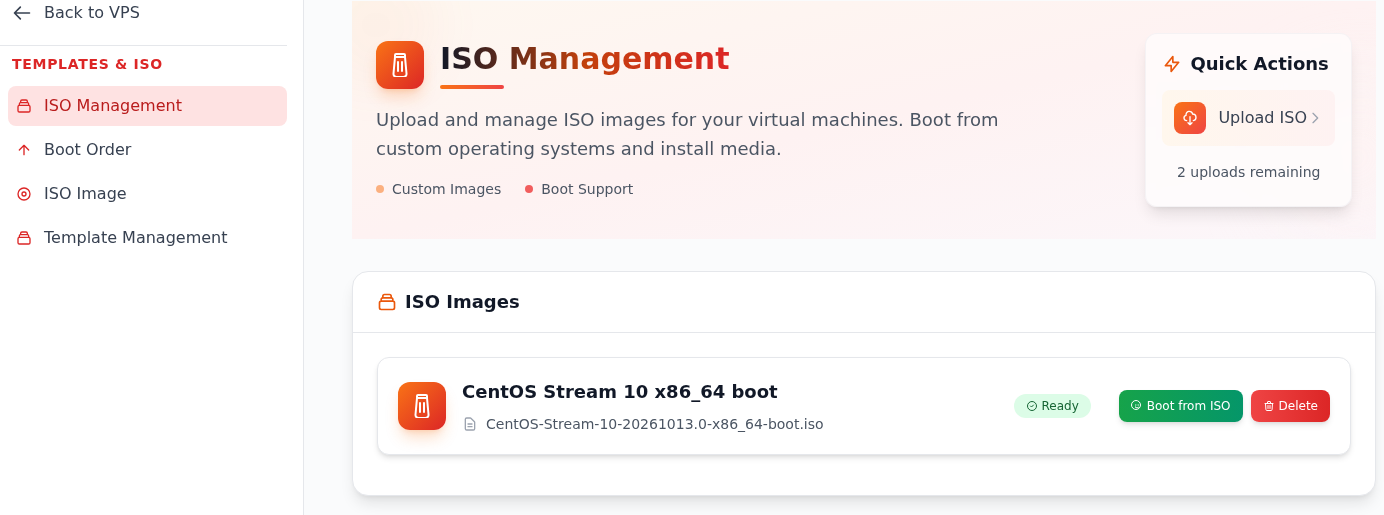
Step 1: Select ISO Image in the left menu
- Select ISO Image in the left menu
After confirming that installation is complete, click ISO Image. There is no separate Detach button in this demonstration; the browser opens a confirmation that the server will reboot. Read the confirmation before accepting.
- Return to the correct server's portal page after installation completes.
- Select Templates & ISO → ISO Image.
- Read the confirmation: This will reboot your server. Do you wish to continue ? The operation will restart the server.
- Confirm only after checking that installation is finished and this is the correct service.
- Check for ISO Image detached, then open Console to follow startup.
This operation was performed after CentOS Stream installation completed, and the portal reported ISO Image detached. Removing the image from ISO storage is a separate operation. Before deleting the file, verify that the new system starts from disk and accepts your user account.
After the operation, the actual portal displays ISO Image detached and the Resetting status.
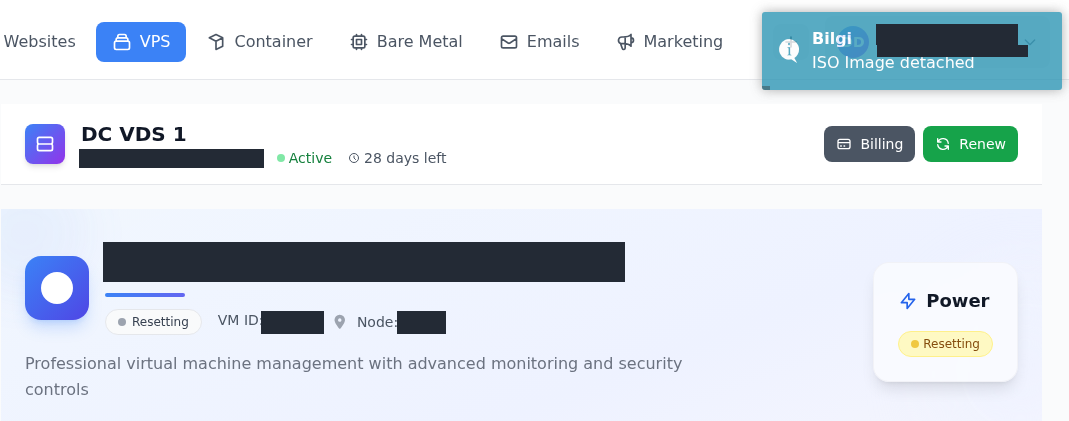
Step 1: Check the ISO Image detached notification
- Check the ISO Image detached notification
This notification confirms that the installation media was detached. Deleting the ISO file from the library is a separate operation. Account details visible behind the notification have been hidden.
- Wait for the Resetting operation to finish
Detaching the media restarts the server. Do not start another operation while Resetting is shown. Then check the installed disk’s boot in the console; this screen alone does not confirm a successful login.
Put the installed disk first in Boot Order
The Boot Order link in the ISO Management sidebar opens the controls for choosing which device the server starts from.
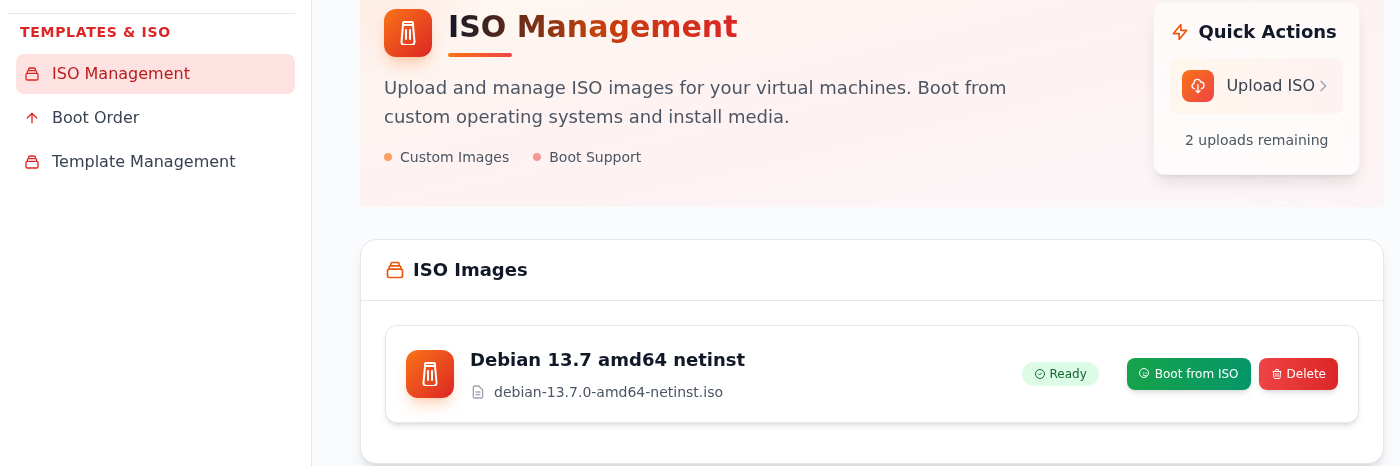
Step 1: Select Boot Order under Templates & ISO
- Select Boot Order under Templates & ISO
After confirming that installation has completed, open Boot Order under Templates & ISO in the sidebar.
If the server returns to the ISO menu after installation has completed, check its boot order. In this demonstration, the ISO menu reopened after Debian finished installing. The portal's Boot Order setting was changed without repartitioning the disk again.
- Open Templates & ISO → Boot Order for the correct server.
- Select the disk containing the installed operating system as the first device.
- Choose Save.
- After Boot order changed appears, reopen the same section and verify that the selections were retained.
Initially, Device #1 selected the ide0 CD-ROM. Review the current order before choosing the installed disk.
The example had CD-ROM "ide0" selected as Device #1. After restarting, the server had returned to the ISO installer menu.
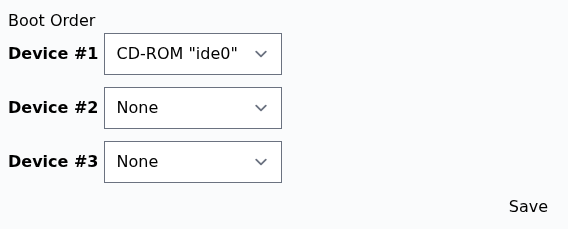
Step 1: Read the device selected for Device #1
- Read the device selected for Device #1
CD-ROM "ide0" is the virtual installation media. Once installation on disk is complete, the next step puts the installed disk first.
The saved order was reopened and verified on the demo server:
| Priority | Selected value |
|---|---|
| #1 | virtio0 — the virtual disk containing the installed operating system. |
| #2 | None |
| #3 | None |
This disk appeared as vda inside the installer. Your service may use a different device name; match it to the disk selected during setup. None means that no additional boot device is selected for that position. Changing boot order does not delete the ISO file.
This screenshot was captured after saving and reopening Boot Order. Device #1 remained set to Disk "virtio0".
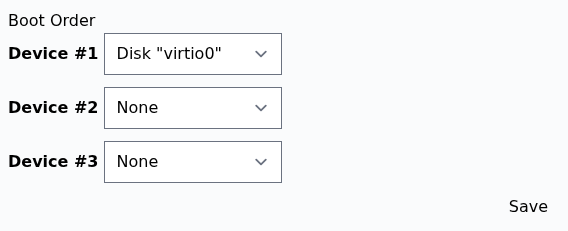
Step 1: Select the installed disk for Device #1
- Select the installed disk for Device #1
The installation disk appears as Disk "virtio0" in this example. Select your installed disk for Device #1. Device #2 and Device #3 were left as None in this demonstration.
- Reopen the page after Save and check the selection
Choose Save, then reopen Boot Order. The Disk "virtio0" selection was confirmed to persist in this example. Startup from that disk is checked in the next step.
Start the server with the new boot order
In this demonstration, the server was waiting at the ISO menu after installation completed. Back to VPS returned to the server overview; Actions → Reset was selected. The Hard reset (force restart) operation was confirmed with Yes, Force Reset.
Reset forces a restart. This example applies to the completed demo installation waiting at the ISO menu. For a running operating system with applications or file writes in progress, use its normal shutdown or restart procedure first.
After restarting, the console displayed Debian's login prompt and accepted the user created during installation. This verified startup from the installed disk. The boot-order setting does not remove the ISO from storage; use the next section to clean up an image you no longer need.
An ISO appearing in storage does not necessarily mean it remains attached to the server. The result to verify after setup is that the new system boots from its installed disk and accepts the account created during installation.
If the installer menu opens again after restarting, do not format the disk again. First check that installation completed, which device the server is booting from, and the ISO attachment state. After the first boot, continue with SSH access, Linux updates and network/DNS checks.
7. Delete an ISO you no longer need
First verify that the installed system boots from disk and accepts your account. Then remove the correct ISO from the image list:
- Return to Templates & ISO → ISO Management.
- Select Delete on the image card, checking its name first.
- Read the Delete ISO? confirmation stating that the file will be permanently removed.
- Confirm with Yes, Delete.
- Wait for the ISO list to update.
After the demo's Debian installation image was deleted, the list showed No ISO Images and the remaining upload allowance returned to 3. This is the value observed for the demo service; use your own service's allowance. The installed Debian system and the stored ISO list are separate.
After disk startup was verified, Delete was selected for the image in ISO Management. The portal warns that the ISO file will be permanently removed.
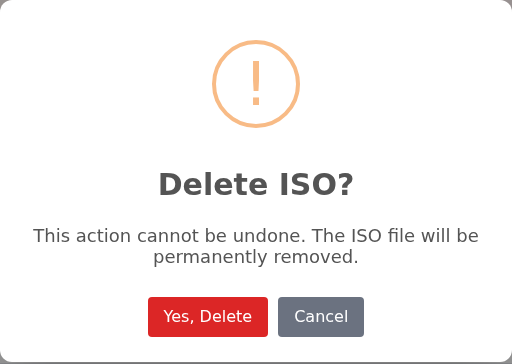
Step 1: Read the file-deletion warning
- Read the file-deletion warning
The Delete ISO? dialog says that the ISO file will be permanently removed. Verify the selected file and that the installed disk boots.
- Select Yes, Delete for the intended ISO
Choose Yes, Delete to remove the file. Use Cancel to stop instead, and check the resulting ISO list after confirming.
After deletion, this example showed No ISO Images and the upload action was available again.
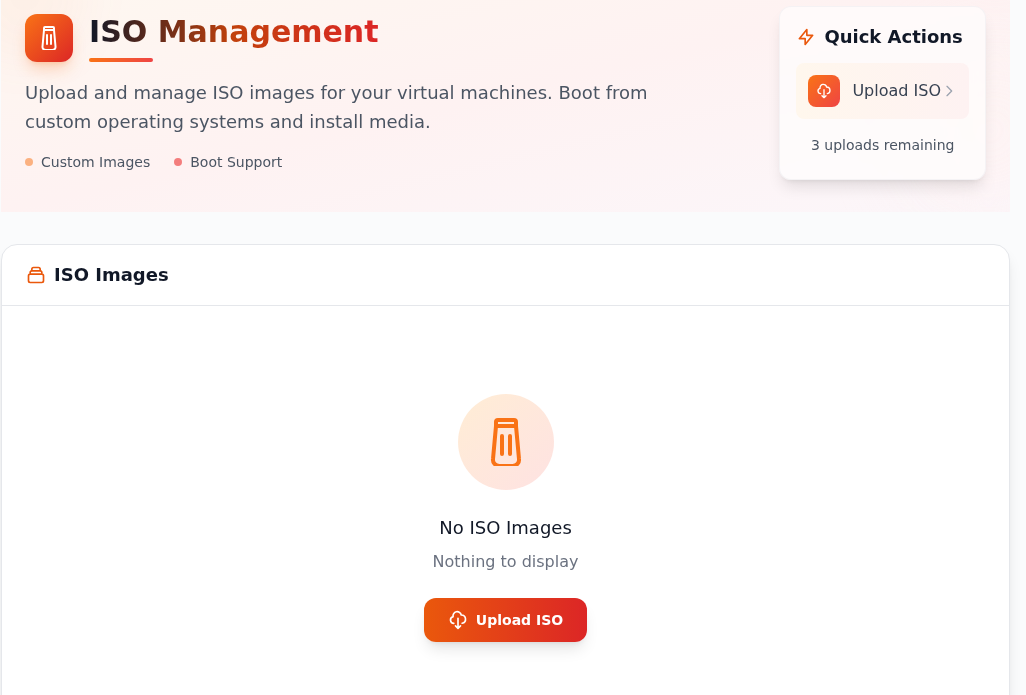
Step 1: Verify the No ISO Images state
- Verify the No ISO Images state
No ISO Images shows that no file remains in this service’s ISO list. The installed operating system is checked separately through disk startup in the console.
- Use Upload ISO for a new image
Use Upload ISO to add another installation image. Check the new file’s official download URL, release and architecture again.
Ejecting an ISO disconnects the virtual installation media from the server. Deleting an ISO removes the image from ISO storage. The portal's Delete confirmation describes permanent removal of the file; it is not a “delete the installed operating system” or “boot from disk” control.
Uploading another operating system's image does not replace the system already on disk. Approving an installation to that same disk can do so. Repeat the backup preparation and target-disk checks whenever you change operating systems.
Upload a new ISO for the next operating system
After removing the old image, reopen Upload ISO. Enter the new image name in Label and its direct official link in the URL field under File URL. Choose Upload and wait for Ready.
This series installed Debian → CentOS Stream → Ubuntu Server in that order. After startup from disk and SSH access were verified for each system, its ISO was deleted; the next image was uploaded and allowed to reach Ready. The Ubuntu ISO was also removed after the final installation.
The CentOS Stream and Ubuntu Server guides show the next steps with each new image. Preparing another ISO does not replace the installed system; writing a new installation to disk requires its separate confirmation.
Frequently asked questions
How does ISO installation differ from a prepared OS template?
An ISO starts the distribution's own installer, where you choose the language, network settings, user, disk layout and software. Installing from a prepared template follows a different workflow. With an ISO, continue from this guide to the instructions for your selected operating system.
Why can't I use the address of a download page?
File URL needs a direct link to the ISO file. A product page, sign-in page or list of download options is not the ISO itself. Select the release and architecture on the official source, then use the file's download link.
Does Ready mean that the operating system is installed?
No. Ready means the ISO file is available to use. You must start it with Boot from ISO and complete the operating system's installer. Confirm success by booting the installed system from disk and signing in with the account you created.
Is the remaining upload count the same as server disk capacity?
No. uploads remaining is the file-upload allowance; server disk capacity is storage for the operating system and data. Do not interpret the upload count as a size limit in GB. Use the allowance shown for your own service.
Do ISO Image and Delete perform the same operation?
ISO Image detaches the attached installation media and asks you to confirm a server restart. ISO Management → Delete removes the uploaded file from ISO storage. Verify that installation is complete, detach the media and check startup of the installed system; then delete an image you no longer need. The detach and delete instructions show the two operations separately.