Install CentOS Stream 10 from an ISO: text-based method
Before installing CentOS on a VPS from an ISO, check the release and application support. The selected system for this guide is CentOS Stream 10. CentOS Stream is part of the RHEL development process and receives regular updates; it is a different release series from the discontinued CentOS Linux 7 and 8.
An ISO installation lets you choose the language, networking, disk layout and administrator account. Prepare the image in the DCHost customer portal, then open the installer through the console. For a prebuilt operating system template, see server management.
This guide shows CentOS Stream 10 installation completed on a real demo server on 16 October 2026. ISO upload, console installation, startup from disk and SSH access were checked. Account, server and network details are hidden in the screenshots.
Graphical or text-based installation?
This page covers the text-based installer, started with Anaconda's inst.text option. You navigate by entering option numbers. For mouse-driven screens, follow CentOS Stream graphical ISO installation.
The graphical installer and the Server with GUI software choice are different things. You can select Minimal Install in the graphical wizard to set up a server without a desktop. Text mode limits some options, including custom partitioning; choose the method that provides the settings you need.
Before you start
Repartitioning the disk can erase its operating system and files. Open the correct service, keep the data you need outside the VM, and complete your backup plan. Record the assigned IP address, prefix or subnet mask, gateway and DNS settings.
Use the portal network information step to find the assigned IPv4 address, network prefix and Gateway field.
Release and CPU compatibility
CentOS Stream 10 on 64-bit x86 requires x86-64-v3 CPU features. An x86_64 architecture alone does not establish that the VM exposes every required feature. Check CPU compatibility before installation; being able to download the ISO does not prove that its installer can boot.
The official CentOS download page lists 31 May 2030 for Stream 10's end of life, tied to the RHEL 10 full-support phase. A control panel's general “supports CentOS” statement is insufficient: verify explicit Stream 10 support. Older CentOS Linux images are not a substitute for a new supported installation.
Boot ISO versus DVD ISO
| Image | Purpose |
|---|---|
| boot.iso | A smaller image that starts the installer. Working networking and an installation source are needed to retrieve selected packages. |
| dvd1.iso | Includes more packages on the media and has a larger download size. Later updates may still require network access. |
The file used in this demonstration is CentOS-Stream-10-20261013.0-x86_64-boot.iso. Select the current image and matching checksum from the official ISO directory. A checksum from a different dated build does not apply.
1. Upload the ISO in the portal
Follow the shared ISO guide to open Templates & ISO → ISO Management → Upload ISO. Use a Label that identifies the release. Under File URL, enter the direct official CentOS ISO link.
This demonstration uploads the CentOS Stream 10 x86_64 boot ISO using File URL.
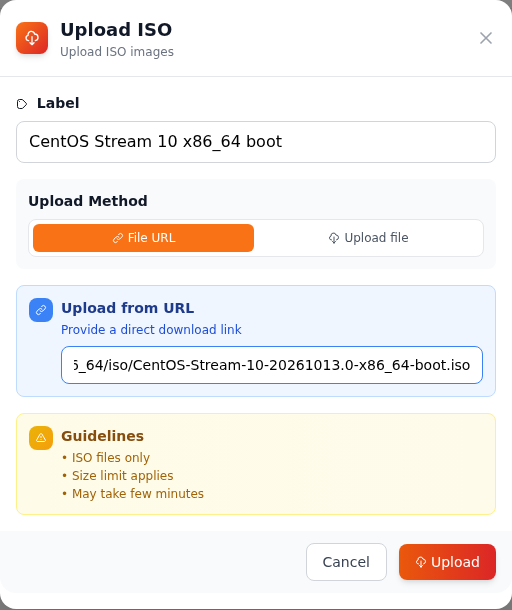
Step 1: Use a release-specific label
- Use a release-specific label
The example uses CentOS Stream 10 x86_64 boot. Include the release and architecture so you can identify the image in the list.
- Enter the direct ISO link using File URL
Enter the direct download link to the official CentOS ISO. In this example the filename ends in CentOS-Stream-10-20261013.0-x86_64-boot.iso.
- Submit the upload request
Check the details and choose Upload, then wait for the image to reach Ready in the ISO list.
This screenshot shows the upload form completed for the CentOS ISO. Check the filename, Stream release and x86_64 architecture. Wait for the file to reach Ready.
The demonstration image was uploaded and reached Ready. Selecting Boot from ISO → Boot Now for that image started the installation media.
The CentOS Stream 10 ISO reached Ready. Its filename, release and architecture are shown on the card.
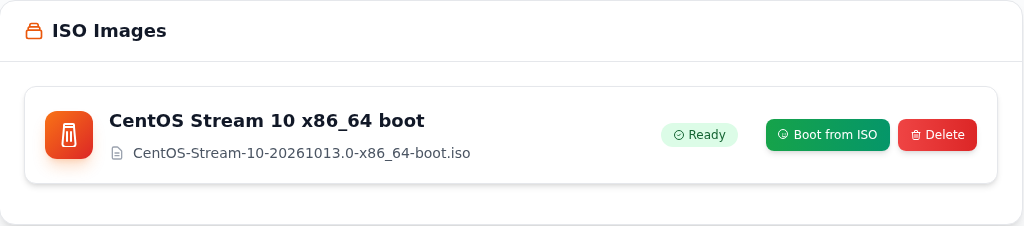
Step 1: Verify the Ready status
- Verify the Ready status
Check that the intended CentOS ISO is Ready. This means the image is available; operating system installation follows in the console.
- Open the Boot from ISO confirmation
Choose Boot from ISO and confirm with Boot Now in the dialog, then follow the installer through Console.
2. Open the installer through the console
The ISO opened in BIOS mode with GNU GRUB 2.12. The selected entry was Test this media & install CentOS Stream 10. That entry was retained, with inst.text added to request the text installer:
Test this media & install CentOS Stream 10 is selected in the actual GRUB menu. This demonstration edits that entry to start a text-mode installation.
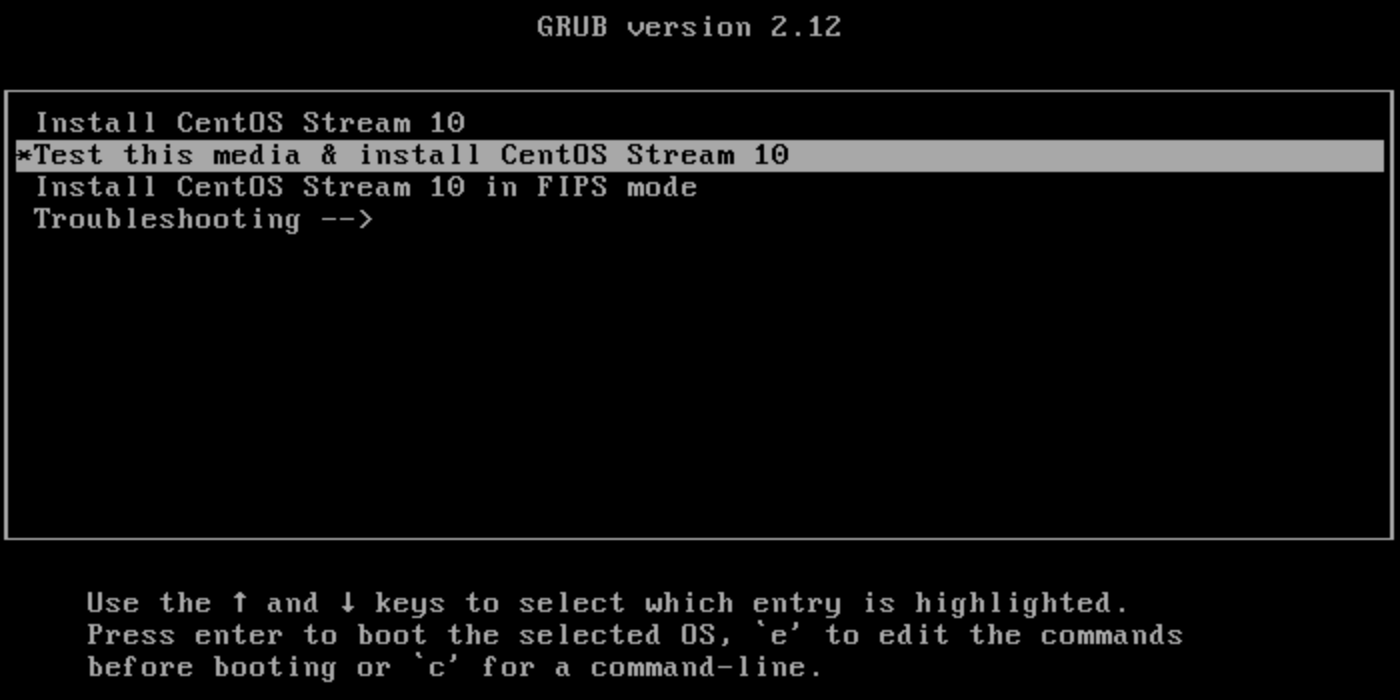
Step 1: Select Test this media & install
- Select Test this media & install
Use the arrow keys to select Test this media & install CentOS Stream 10. Its media-check parameter is preserved in the next edit.
- Press e to edit the boot parameters
Press e on the selected entry. GRUB opens the commands that can be edited before starting the installer.
- Click inside the console.
- With Test this media & install CentOS Stream 10 selected, press
e. - In the editor, find the line beginning with
linuxand move the cursor to its end. - Append a space and
inst.text. Keep the existing parameters, includingrd.live.check, which requests the media check. - Press
Ctrl+xto boot with the change.
Text to append:
inst.text
The confirmed final screen shows inst.text after the existing rd.live.check and quiet parameters on the linux line.
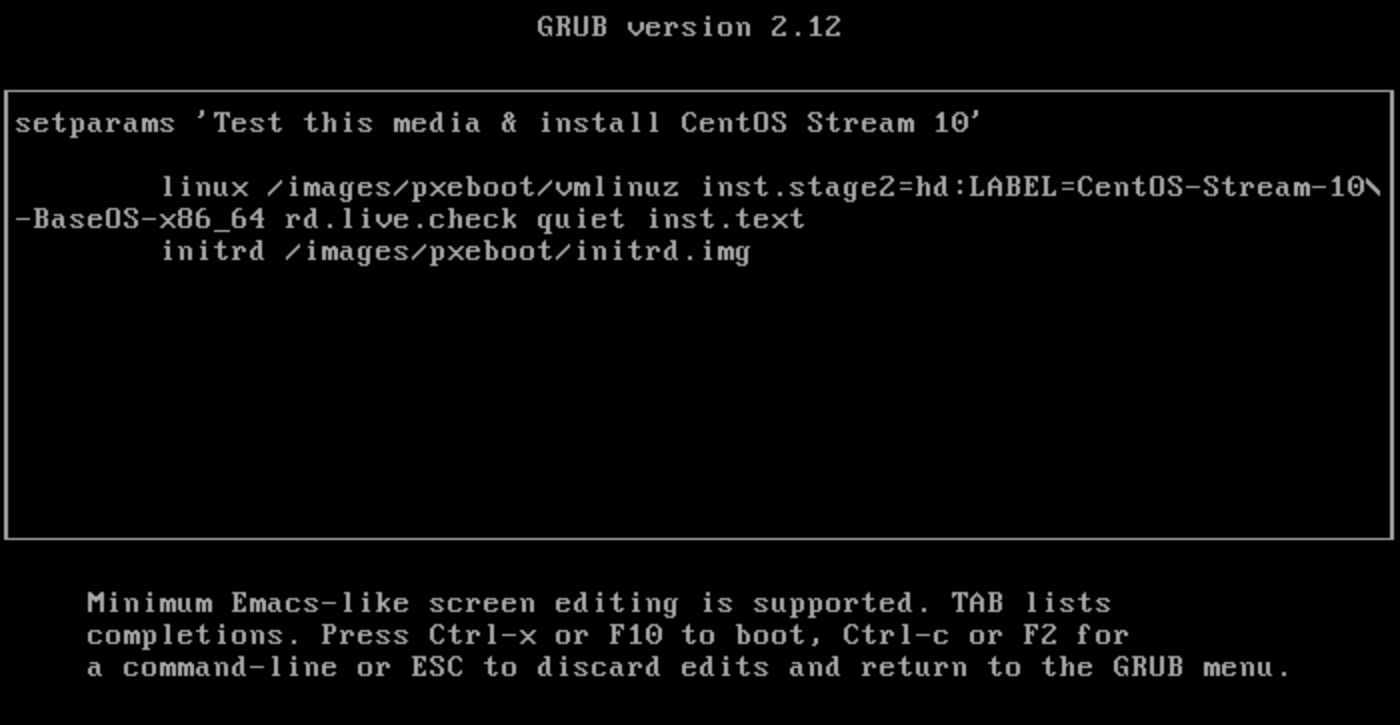
Step 1: Keep the existing parameters and append inst.text
- Keep the existing parameters and append inst.text
Move to the end of the line that begins with linux, add a space and type inst.text. The line may wrap on screen. Keep the existing ISO source and rd.live.check parameter.
- Start with Ctrl+x after checking the edit
When inst.text is on the correct linux line, press Ctrl+x to start. The footer also lists F10; this demonstration used Ctrl+x.
This boot parameter requests the installer's text interface. It does not approve formatting or writing a new system to disk; those choices are made later inside the installer.
Actual recording: starting the text installer
Actual console recording: open the GRUB editor, add inst.text to the linux line and use Ctrl+x to start the boot commands. Installation continues in the following screens.
Recording transcript
The recording starts with Test this media & install CentOS Stream 10 selected in GRUB. Pressing e opens the editor; inst.text is appended to the linux line while retaining the existing parameters. After Ctrl + x, Booting a command list appears. The clip ends at this boot stage; Anaconda choices and disk installation follow in the next steps.
Choose Use text mode in Anaconda
Anaconda explains that text mode limits some installation options and does not provide custom partitioning. The screen offers two paths:
| Option | Purpose |
|---|---|
| 1 | Uses a remote desktop connection for graphical installation. |
| 2 — Use text mode | Continues with the text installer in the console. |
For this guide, 2 was entered and confirmed with Enter. Keep this limitation in mind if you need to design a custom partition layout.
Anaconda explains that custom partitioning is unavailable in text mode. This guide selects Use text mode for the basic server installation.
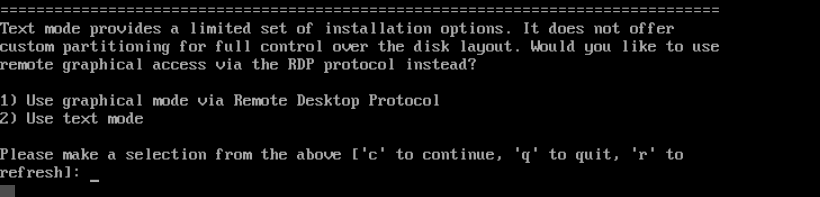
Step 1: Type 2 and press Enter
- Type 2 and press Enter
Use text mode is option 2 on this screen. Type 2, press Enter and wait for the installation menu.
Click inside the console once to give it keyboard focus. Use the keys or option numbers displayed by the installer. Leaving a menu does not necessarily mean a setting is complete; read the corresponding status too.
3. Configure networking and the installation source
The text installer's Installation menu assigns a number to each setting. In this ISO, Network configuration is option 7. Enter the option number and press Enter to open its submenu. The screen uses c to continue from the current menu and r to refresh status. Do not use b to begin installation before completing the required settings.
The menu brings together language, time, installation source, disk, network and user settings. Complete the items marked with an exclamation point before starting installation.
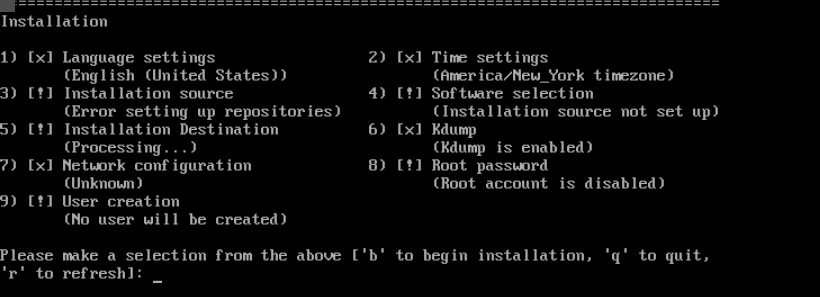
Step 1: Open the network settings first
- Open the network settings first
The network is not connected yet in this demonstration. Type 7 and press Enter to open Network configuration, then enter the network details assigned to this server.
Set the hostname and select the network device
Network configuration shows that ens18 is disconnected. The hostname and network adapter have separate menu options.
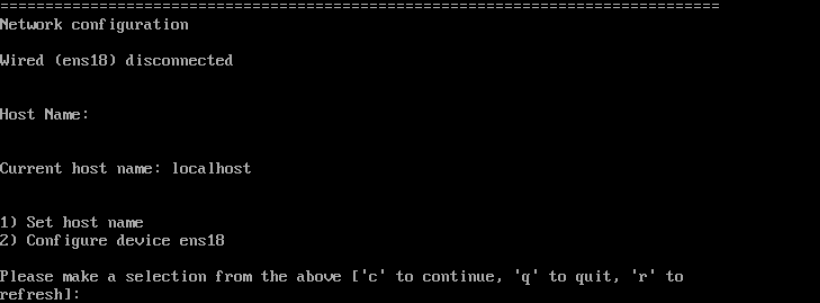
Step 1: Use 1 to set the hostname
- Use 1 to set the hostname
Type 1 and press Enter for Set host name. Enter the short hostname at the prompt.
- Use 2 to configure the adapter
After entering the hostname, you return to this menu. Type 2 and press Enter for Configure device ens18.
- Choose 7 — Network configuration in the main menu.
- Use 1 — Set host name to enter the hostname.
- Back in the network menu, choose 2 — Configure device ens18.
The network device in this installation is ens18, shown as disconnected on the initial network screen. Your server may use a different device name.
Setting a hostname does not create a DNS record. Configure the relevant DNS record separately if you want to connect using a domain name.
The Host Name prompt appears at the bottom after choosing Set host name.

Step 1: Use a short hostname without spaces
- Use a short hostname without spaces
Type a hostname without spaces and press Enter. This name helps you identify the server you are installing.
Device configuration fields
IPv4 address, netmask, gateway and DNS each have their own numbered option. Compare the defaults with the network details for your service.
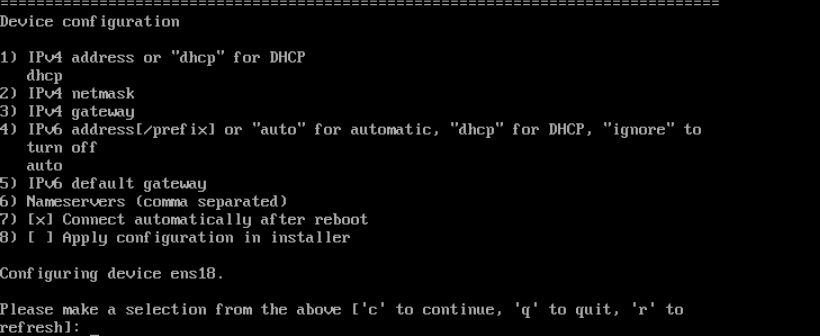
Step 1: Use 1, 2 and 3 for the IPv4 details
- Use 1, 2 and 3 for the IPv4 details
1 sets the IP address, 2 the netmask and 3 the gateway. Type a number and press Enter to open its prompt, then enter the value and press Enter again.
- Use option 6 for DNS
Nameservers asks for the DNS servers. This installer uses commas between multiple DNS addresses.
| Field | Purpose |
|---|---|
| IPv4 address or “dhcp” for DHCP | The assigned IPv4 address or automatic addressing choice. |
| IPv4 netmask | The server's IPv4 subnet mask. |
| IPv4 gateway | The gateway assigned to this service. |
| Nameservers (comma separated) | DNS server addresses; separate multiple addresses with commas. |
| Connect automatically after reboot | Automatically prepare the connection when the installed system restarts. |
| Apply configuration in installer | Apply the network settings in the installation environment as well. The boot ISO needs connectivity to retrieve installation packages. |
The screen also contains IPv6 address and gateway fields. Match the address configuration to the information assigned to your service; do not copy another server's IP address or gateway.
Enter the assigned IPv4 settings and apply the connection
Enter a field's number to open it, then confirm its value with Enter. The demonstration used this sequence:
- Enter the assigned IPv4 address in field 1.
- Enter the dotted subnet mask in field 2.
- Enter the assigned gateway in field 3.
- This is an IPv4-only example, so IPv6 field 4 was set to ignore, with the IPv6 gateway left empty. If you use IPv6, configure the assigned IPv6 settings instead of copying this choice.
- Enter the DNS addresses in field 6, separated by commas.
- Leave 7 — Connect automatically after reboot checked.
- Check 8 — Apply configuration in installer.
- Continue with
c, then userin the network menu to refresh its status.
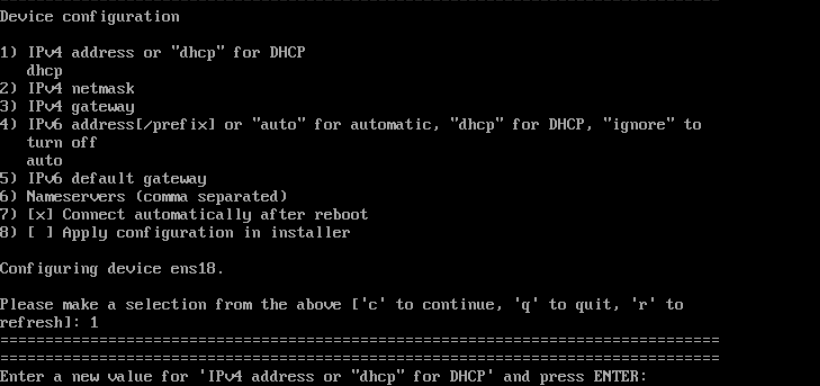
The prompt opened by option 1 asks for the server IPv4 address.
Step 1: Enter the IP assigned to your service
- Enter the IP assigned to your service
Enter the IP assigned to this service in the DCHost customer portal and press Enter. For this static-IP setup, replace the default dhcp value.
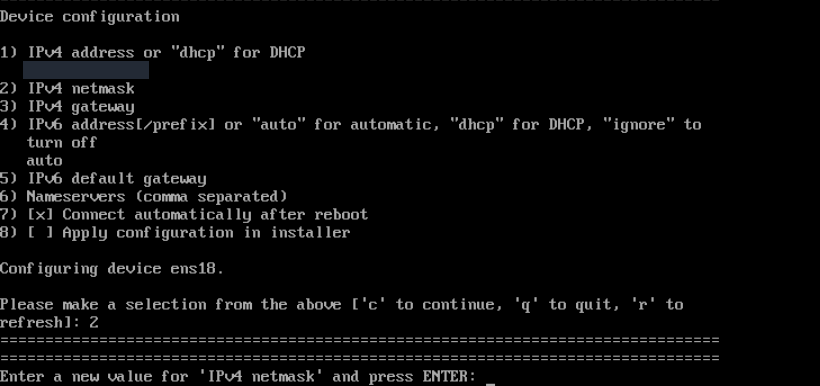
Option 2 asks for the service netmask. The previous IP value is masked.
Step 1: Use the supplied netmask
- Use the supplied netmask
Enter the netmask supplied for your service and press Enter. Use your own service details.
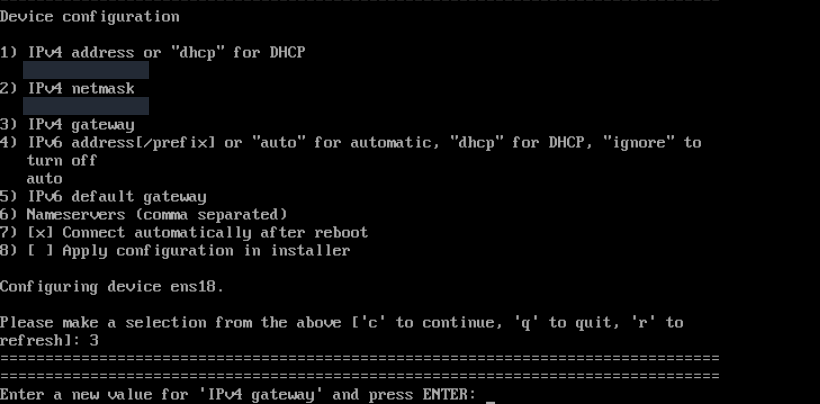
Option 3 asks for the gateway the server uses to reach other networks.
Step 1: Enter the service gateway address
- Enter the service gateway address
Enter the gateway supplied for this service and press Enter. The server IP and gateway are separate settings.
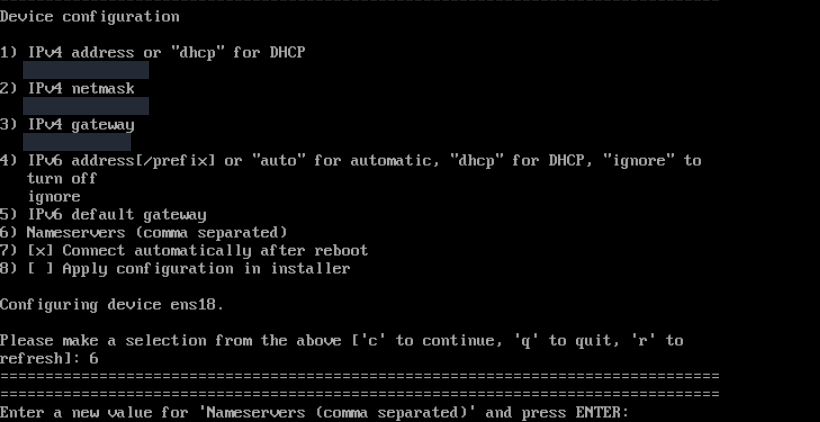
Option 6, Nameservers, asks for the DNS servers used to resolve domain names.
Step 1: Separate multiple addresses with commas
- Separate multiple addresses with commas
Enter the DNS server IP addresses separated by commas and press Enter. This example uses ignore in option 4 because IPv6 is not used.
IPv4, netmask, gateway and DNS have been entered. Actual network values are masked; compare the entries with your own service details.
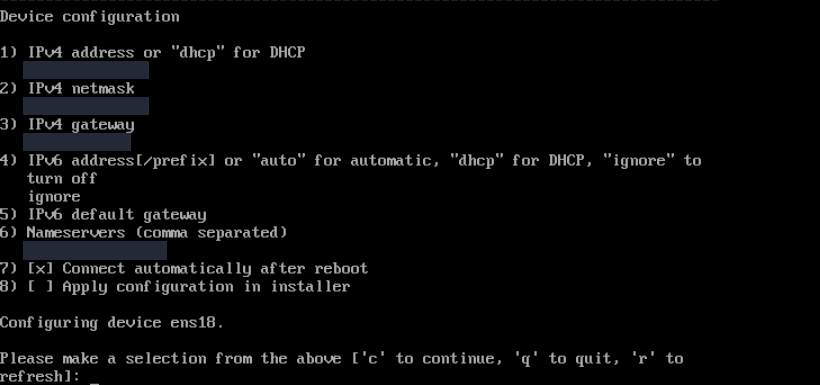
Step 1: Choose IPv6 settings for your service
- Choose IPv6 settings for your service
This IPv4 example sets option 4 to ignore and leaves the IPv6 gateway empty. If you use IPv6, enter the supplied IPv6 address, prefix and gateway.
- Keep automatic connection after reboot enabled
Connect automatically after reboot is checked. Next, enable Apply configuration in installer so the installer can also use the network immediately.
After enabling option 8, both automatic connection and applying the configuration in the installer show [x].
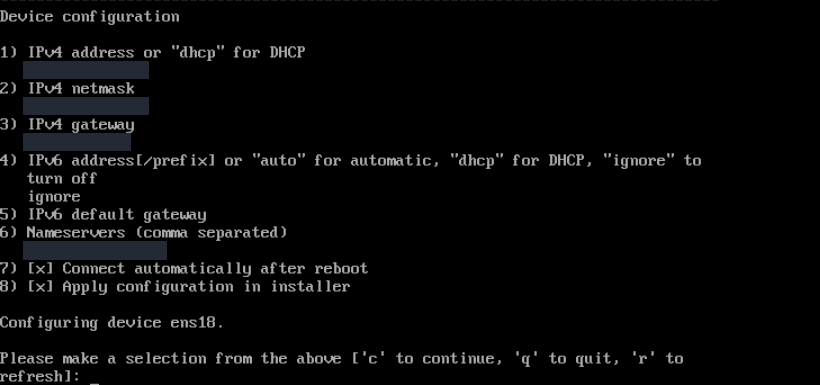
Step 1: Check that both connection options are enabled
- Check that both connection options are enabled
Check for [x] next to option 7, Connect automatically after reboot, and option 8, Apply configuration in installer. Type an option number and press Enter to toggle it.
- Use c to return to the network menu
After checking the settings, type c and press Enter. Wait for the connection status to update in the network menu.
The result was Wired (ens18) connected. Verify the connection state after filling in the fields. Once networking is active, you can prepare the installation package source.
After refreshing with r, the final network screen shows Wired (ens18) connected. This image shows only the current result section.
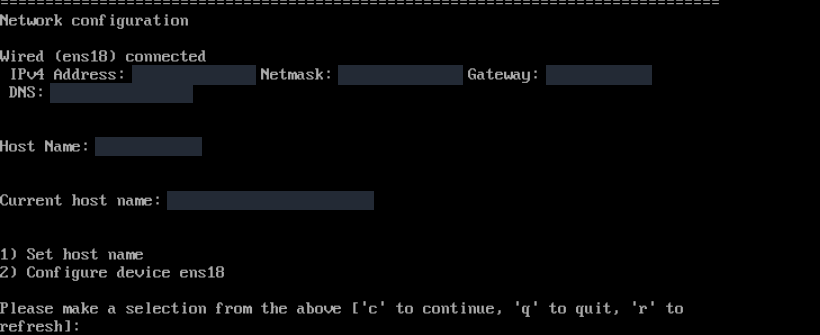
Step 1: Check connected and the network fields
- Check connected and the network fields
Check for Wired (ens18) connected. Verify the IPv4, Netmask, Gateway and DNS fields against your service details. These values are masked in this image.
Select the time zone
This screen opens after choosing option 2, Time settings, in the main menu. It shows the current timezone.
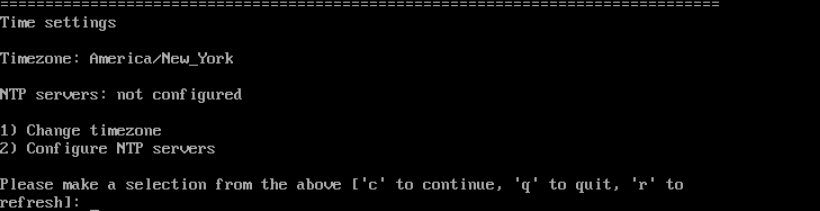
Step 1: Choose 1 for Change timezone
- Choose 1 for Change timezone
Type 1 and press Enter to change the timezone. You choose the region on the next screen.
- Choose 2 — Time settings in the main menu.
- Open 1 — Change timezone.
- Enter Europe as the region and press
Enter. - Enter Istanbul as the city and confirm with
Enter.
After selecting Europe and Istanbul, this installer's summary displayed Asia/Istanbul. That is the name shown for the Istanbul time zone in this demonstration. Choose the region appropriate for your server and check the resulting summary.
In this installation, Istanbul was selected from the Europe region. You can enter the region by name.
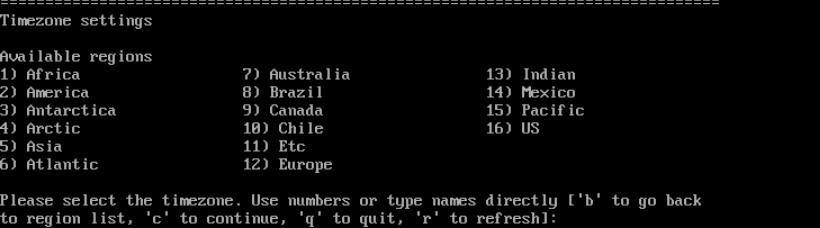
Step 1: Type Europe and press Enter
- Type Europe and press Enter
Type Europe at the prompt and press Enter. The installer lists the timezones in that region.
Istanbul appears in the Europe list. This demonstration selects it by typing the city name.
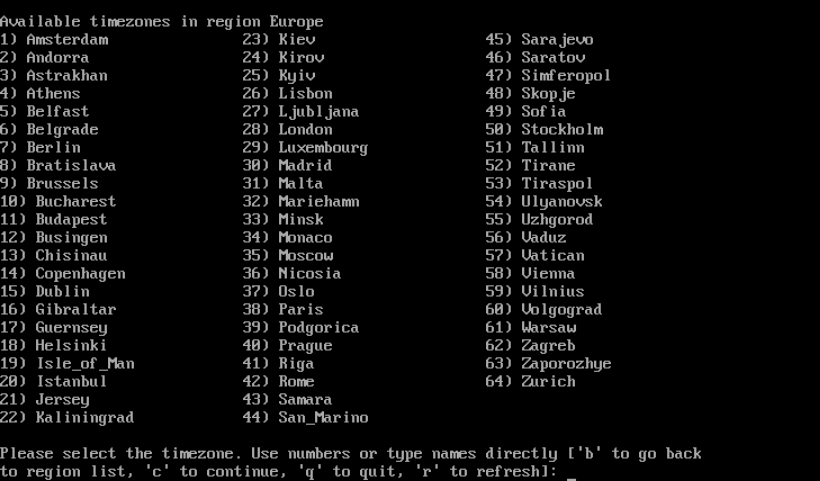
Step 1: Type Istanbul and press Enter
- Type Istanbul and press Enter
Type Istanbul at the prompt and press Enter. Back in the main menu, check the value under Time settings.
The actual installation summary displays Asia/Istanbul timezone under Time settings.
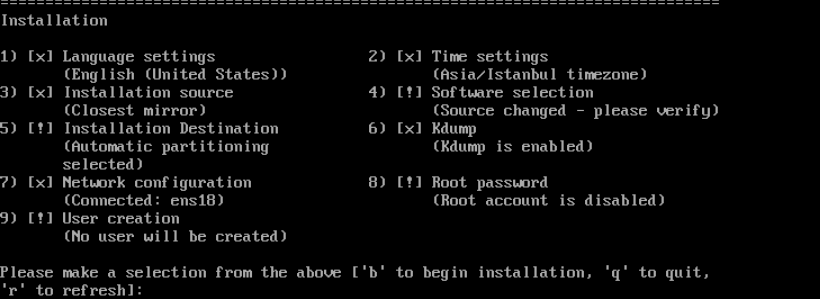
Step 1: Check the Asia/Istanbul value
- Check the Asia/Istanbul value
After selecting Istanbul, this screen shows Asia/Istanbul timezone. Check the value displayed in your installation summary.
Installation package source
A boot ISO needs access to the installation package source.
After networking became active, the installation source automatically became Closest mirror. The setting was inspected through this path:
- Open 3 — Installation source in the main menu.
- Choose 3 — Network.
- Use 1 — Closest mirror.
This workflow uses Closest mirror to retrieve packages from a suitable network mirror; no repository URL was entered manually. The main menu confirmed that Installation source was complete and showed Closest mirror.
Installation source defines where operating system packages are obtained. This boot ISO demonstration uses a network source.
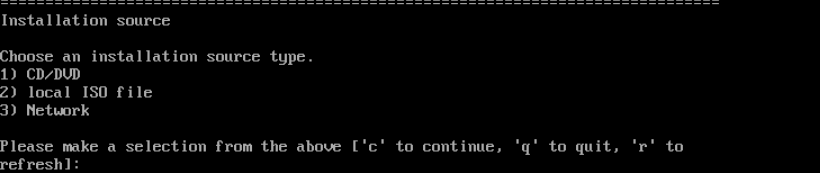
Step 1: Type 3 for Network
- Type 3 for Network
Open Installation source with option 3 in the main menu. In this submenu, type 3 again and press Enter for Network.
The Network submenu offers automatic mirror selection and separate methods for entering an address manually.
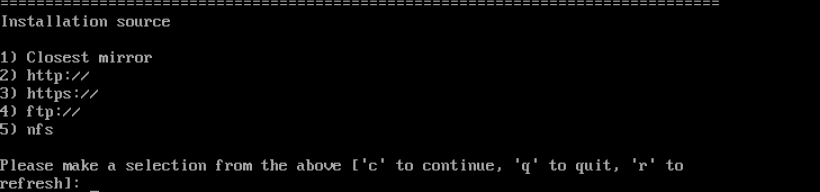
Step 1: Use option 1 for Closest mirror
- Use option 1 for Closest mirror
Type 1 and press Enter for Closest mirror. No repository URL was entered manually in this demonstration.
A progress screen can appear while the package source is being prepared. Wait for the source to become ready before continuing with software selection.
After selecting Closest mirror, the main menu shows Setting up installation source and Processing.
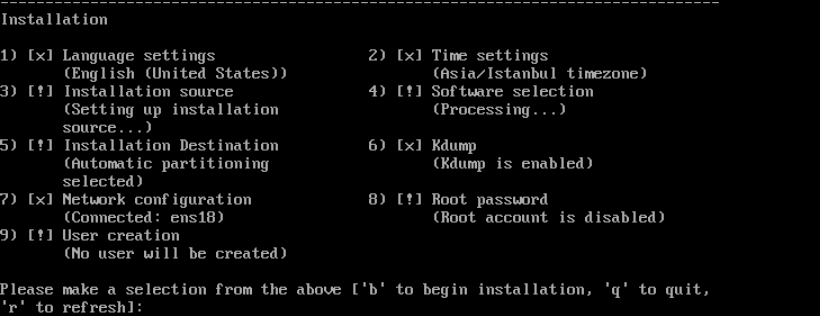
Step 1: Watch the status while preparation runs
- Watch the status while preparation runs
This screen shows preparation in progress. You can configure other settings while the package source is prepared; check the source and software selections again before starting installation.
The ISO download URL and package source are different addresses. If the installer requests an installation source, it must match the selected Stream release and architecture. For network problems, use the DNS and connection guide to check addressing, routing and name resolution separately.
4. Select the Minimal Install software group
- Choose 4 — Software selection in the main menu.
- Select 3 — Minimal Install from the software groups.
- Continue with
c. - On the additional-software screen, all options were left unchecked for this installation;
cwas used again to continue.
Minimal Install was chosen for a basic server system, without adding a desktop environment. Prepare your web server, database or other applications after the operating system is installed.
Minimal Install is selected and Server with GUI is cleared. This installation continues without a desktop environment.
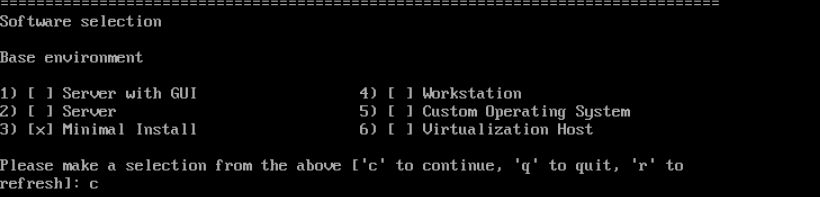
Step 1: Use option 3 for Minimal Install
- Use option 3 for Minimal Install
Open Software selection with option 4 in the main menu. In Base environment, type 3 and press Enter. After checking for [x] beside Minimal Install, continue with c.
Additional software groups appear after Minimal Install. No additional groups were selected in this demonstration.
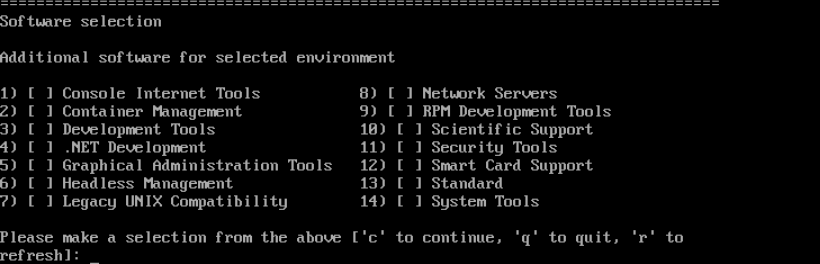
Step 1: Leave the extra groups clear for this basic setup
- Leave the extra groups clear for this basic setup
With all boxes clear, type c and press Enter. You can add the packages you need after installation.
This later summary shows that Installation source and Software selection are ready.

Step 1: Check [x] and the intended selection in both fields
- Check [x] and the intended selection in both fields
Check for Closest mirror under Installation source and Minimal Install under Software selection. This frame shows the result after the earlier Processing state.
5. Create the administrator account
Open 9 — User creation in the main menu. This installation creates a separate user and grants administrative access through Administrator.
| Menu field | Selection made |
|---|---|
| 1 — Create user | User creation enabled. |
| 2 — Full name | The account's display name entered. |
| 3 — Username | The account name for console and SSH login selected. |
| 4 — Use password | Left checked. |
| 5 — Password | The user's password entered and repeated at the next prompt. |
| 6 — Administrator | Left checked; the group field showed wheel. |
Open each text field by its number, enter the value and press Enter. Enter the same strong password at the password and confirmation prompts. Hidden screenshot values are not sample credentials; use your own account details.
The username and hostname are different. Use the account name you created when signing in through the console or SSH. The selected Administrator privilege is for administrative commands through sudo; this account is separate from your customer portal account.
Enabling Create user in User creation reveals the name, username and password fields.
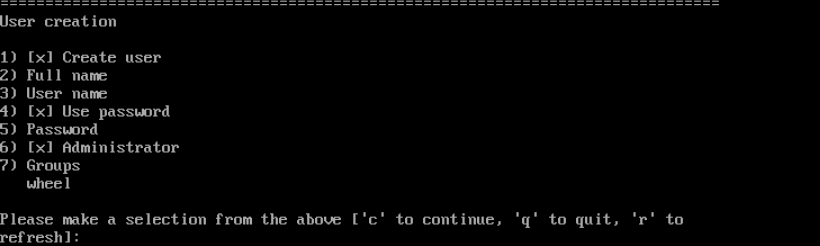
Step 1: Check that Create user is enabled
- Check that Create user is enabled
Open User creation with option 9 in the main menu. If Create user is clear, type 1 and press Enter. The user fields appear when it shows [x].
- Check the password and administrator options
In this demonstration, Use password and Administrator are checked, and Groups shows wheel. Check these settings for the user who will perform administrative tasks.
Full name is the display name used to identify the user. The login username is requested separately.
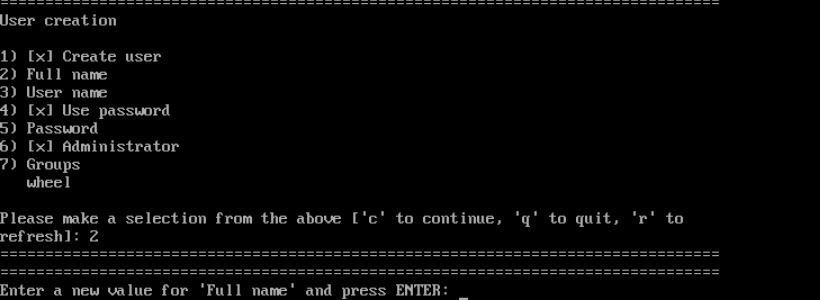
Step 1: Open option 2 for Full name
- Open option 2 for Full name
Type 2 and press Enter. Enter the display name at the Full name prompt and press Enter to save it.
User name is the account name used for console and SSH sign-in. The example identity details are masked.
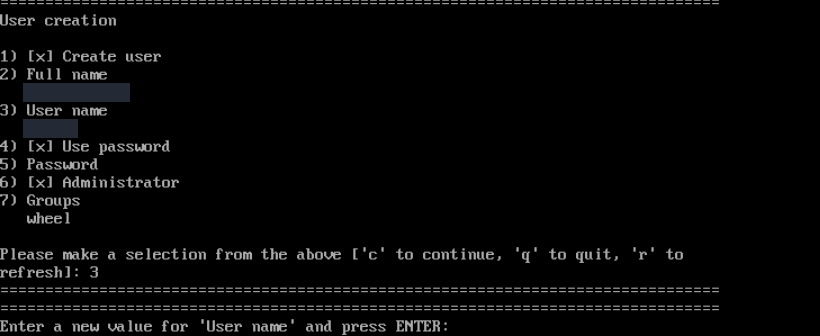
Step 1: Use option 3 to edit User name
- Use option 3 to edit User name
Type 3 and press Enter. Enter a username without spaces; check any suggested name and press Enter to save it.
Option 5, Password, prompts for the password at the bottom of the console. The password you type is not displayed.
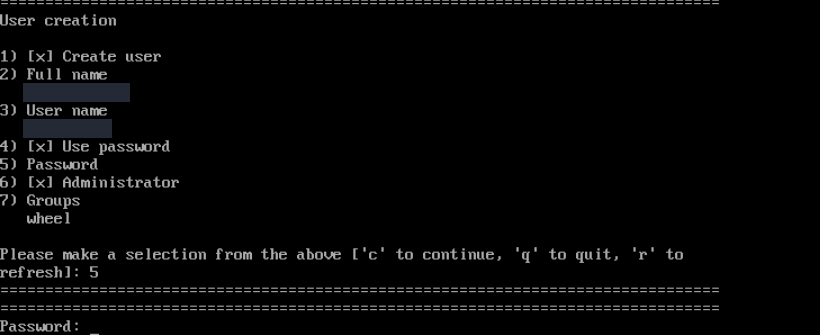
Step 1: Enter the password and press Enter
- Enter the password and press Enter
Enter a strong, unique password for this server and press Enter. Your input is accepted even though the characters are not shown.
The Password (confirm) prompt asks you to repeat the first password.
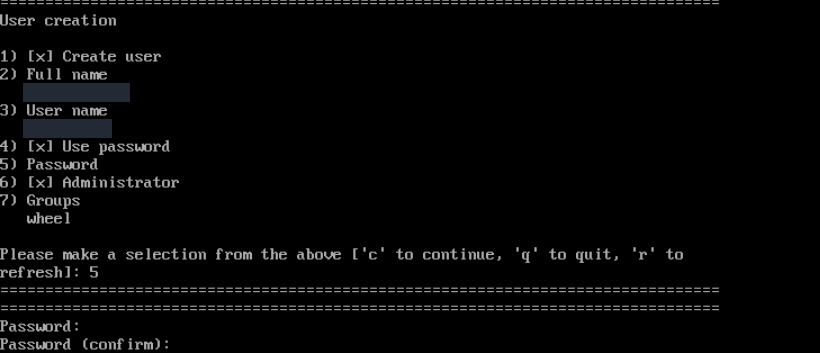
Step 1: Repeat the password at Password (confirm)
- Repeat the password at Password (confirm)
Type the same password again and press Enter. Then check for Password set in the user menu.
The final user menu shows Password set. Use password and Administrator are checked, and Groups remains wheel.
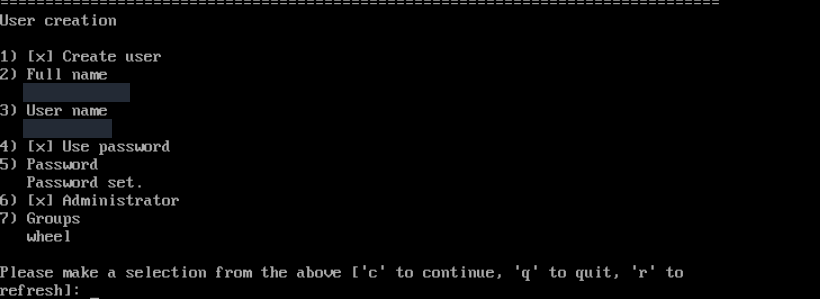
Step 1: Verify Password set and administrator status
- Verify Password set and administrator status
Check Password set, the Administrator box and the wheel group. If the details are correct, type c and press Enter to return to the main menu.
6. Select the installation disk
Choose 5 — Installation Destination in the main menu. The only target in this demonstration is the 40 GiB vda disk. The previous Debian installation occupies that disk, so allocating it to the new installation will remove the existing system.
- Select disk 1, vda, in the disk list.
- Continue with
cto the partitioning options. - Leave Use All Space selected and confirm with
c. - Leave LVM selected as the partitioning scheme and continue with
c. - Storage checking completed, and the main menu showed automatic partitioning as ready.
Use All Space allocates the selected disk to the new installation. Do not copy this selection if a partition needs to be preserved. LVM manages storage through logical volumes; selecting an automatic layout does not by itself mean the full virtual disk becomes a single / filesystem. Check the installed layout after first boot.
The demo server lists one disk, vda with a capacity of 40 GiB. Your server may have a different disk name and capacity.

Step 1: Verify that the selected disk is correct
- Verify that the selected disk is correct
Check the [x] on the DISK row and the selected disk count below it. Installation can erase data on this disk, so verify the target before continuing with c.
Use All Space is selected for this clean demo installation. This choice uses the whole disk for the new installation.
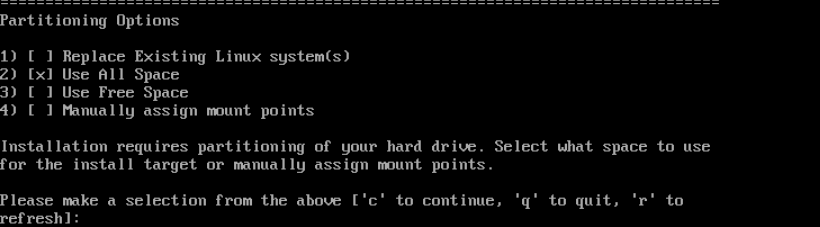
Step 1: Use All Space only for the intended clean installation
- Use All Space only for the intended clean installation
Use All Space removes the existing partitions and data on the selected disk to make room for the installation. Check your backup and target disk. This demonstration keeps option 2 selected and continues with c.
LVM is selected in Partition Scheme Options. This demonstration keeps the default LVM scheme.
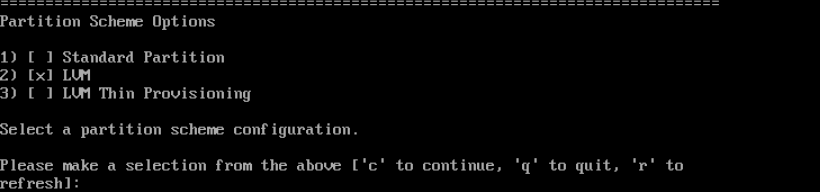
Step 1: Check for [x] beside LVM
- Check for [x] beside LVM
With option 2, LVM, selected, type c and press Enter. The installer saves and checks the storage configuration, then returns to the main menu.
Review the final installation summary
Before installation began, the main screen showed Closest mirror, Minimal Install, automatic partitioning, networking and the administrator account as ready. Root password continued to show that the root account was disabled; a separate user was created for administration in this example.
Kdump was left enabled by default. Kdump collects diagnostic information for kernel crashes; it was not disabled for this installation.
The final summary shows Closest mirror, Minimal Install, automatic partitioning, a connected network and the administrator account settings.
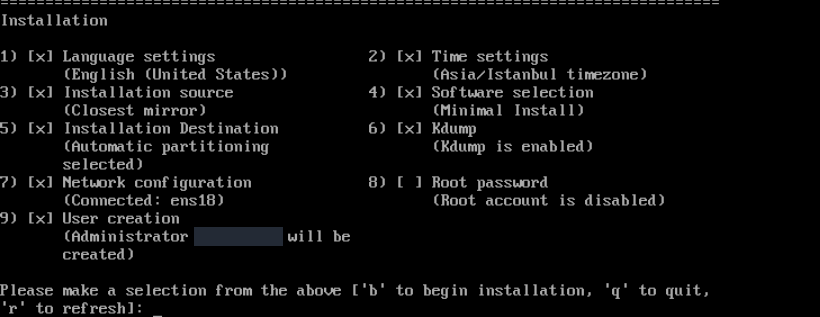
Step 1: Verify the source, software, disk and network settings
- Verify the source, software, disk and network settings
Check that Installation source, Software selection, Installation Destination and Network configuration are ready. This demonstration uses Minimal Install and automatic partitioning.
- Check the administrator account and root status
User creation should show that an administrator will be created. Root account is disabled is intentional in this demonstration; the created user is used for administration.
- When ready, start installation with b and Enter
Check the target disk and your backup once more. Typing b and pressing Enter starts installation and writing to disk; Use All Space erases existing data on the selected disk.
Read the target disk again before the final confirmation. Selecting the wrong disk or approving removal of existing partitions can cause data loss. Compare its capacity and device name with your own service.
7. Complete installation and boot from disk
After checking the target disk and installation summary, enter b in the main menu and press Enter. This starts installation and applies the selected storage layout, so your backup and choices must be ready. Follow the installation progress on the next screen.
The actual progress screen shows creation of a disk label, an XFS filesystem and an LVM physical volume.
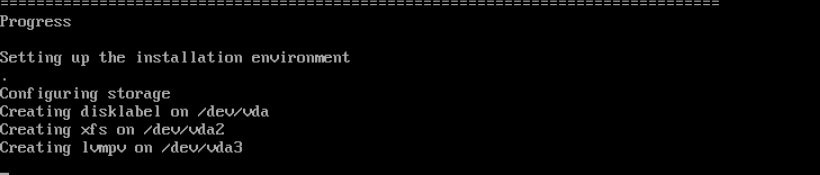
Step 1: Keep the server running during installation
- Keep the server running during installation
Configuring storage and the Creating lines show that disk writes have started. Wait for installation to finish; this screen does not mean that the operating system is ready yet.
After confirmation, the installer began preparing the disk label, filesystems and LVM storage. This is the disk-writing stage, not the completion of operating system installation.
Actual recording: starting installation and writing to disk
Actual console recording: start installation with b and Enter, prepare storage and create a disk label, XFS filesystem and LVM physical volume. Installation is still in progress when the clip ends.
Recording transcript
The recording starts at the final installation summary with the required settings completed. b and Enter confirm the start. The installer prepares the environment and storage, then shows disk-label, XFS-filesystem and LVM-physical-volume creation. The clip ends during this preparation; it does not show completed CentOS installation or startup of the installed system.
Wait for installation to finish
Wait for package installation and final configuration to finish. The duration depends on server resources and the selected packages. Do not detach the ISO or restart the server while these operations are still running.
The completed installation displayed Complete!, Installation complete and Press ENTER to quit. Enter was pressed to leave the completion screen.
The actual installer shows Complete! and Installation complete. The prompt at the bottom asks you to leave the installer.
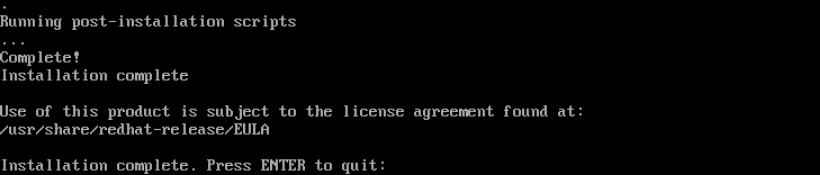
Step 1: Check the Installation complete message
- Check the Installation complete message
Wait for this completion message before restarting the server. This screen confirms the installation has finished; the first boot from disk is a separate next step.
- Press Enter to leave the installer
At Installation complete. Press ENTER to quit, press Enter. Then follow the guide’s boot order and installation media steps.
Detach the ISO and boot from the installed disk
After leaving the completed installer, the server returned to the menu of the still-attached ISO. Without starting another installation, Templates & ISO → ISO Image was selected in the customer portal. The This will reboot your server. Do you wish to continue ? confirmation was accepted, and the portal reported ISO Image detached.
This operation restarts the server. Use it only after installation finishes. The ISO detach instructions explain the portal operation in detail.
With an ISO attached, the ISO Image link under Templates & ISO opens a reboot confirmation for detaching the media.
Step 1: Select ISO Image in the left menu
- Select ISO Image in the left menu
After confirming that installation is complete, click ISO Image. There is no separate Detach button in this demonstration; the browser opens a confirmation that the server will reboot. Read the confirmation before accepting.
After the operation, the actual portal displays ISO Image detached and the Resetting status.
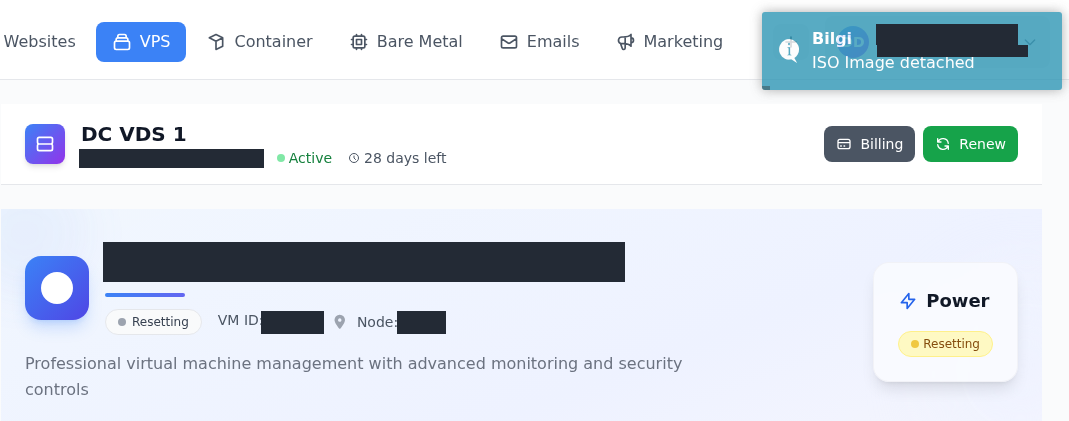
Step 1: Check the ISO Image detached notification
- Check the ISO Image detached notification
This notification confirms that the installation media was detached. Deleting the ISO file from the library is a separate operation. Account details visible behind the notification have been hidden.
- Wait for the Resetting operation to finish
Detaching the media restarts the server. Do not start another operation while Resetting is shown. Then check the installed disk’s boot in the console; this screen alone does not confirm a successful login.
After the ISO was detached, the installed CentOS Stream 10 system started from disk. At the console's login: prompt, enter the username created during installation; at Password:, enter that user's password. Password characters are normally not displayed while typing. Check that the command prompt appears.
The actual console shows CentOS Stream 10 and the command prompt after user login. The username and hostname have been hidden.

Step 1: Confirm that the command prompt is available
- Confirm that the command prompt is available
At the login prompt, enter the username created during installation; at Password, enter that user’s password. Password characters are not displayed. The command prompt ending in $ shows the successful session.
The demonstration verified console login followed by a separate SSH connection. The SSH host key was compared with the key confirmed through the console, and the same user's sudo access was checked.
The portal's previous operating system information may remain unchanged after an ISO installation. In this demonstration, the service card continued to show the previous Ubuntu 24.04 information. Check the installed system with the command below, and sign in using the Linux username and password created during installation.
Returning to the installer after a restart does not mean you should format the disk again. First check that installation completed, which media remains attached, and the boot source. Follow the shared ISO first-boot step.
Check the installed release, addresses, route and SSH service:
cat /etc/os-release
ip -br address
ip route
systemctl is-active sshd
active means that SSH is running; it does not verify access from another computer. Use first SSH login and SSH troubleshooting to check the IP, port, username and server key.
Update packages
sudo dnf upgrade --refresh
This refreshes package information and lists available upgrades. Read the transaction summary and approve it if appropriate. A kernel update may require a reboot before the new kernel is used; see the Linux update guide for final checks.
Results verified on this installation
The actual CentOS Stream 10 console was used to check services, the root filesystem, SELinux and failed units.
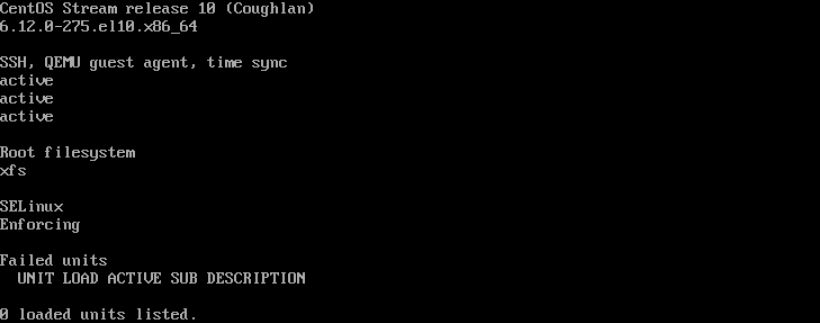
Step 1: Check that all three services return active
- Check that all three services return active
The three active lines below SSH, QEMU guest agent, time sync correspond to SSH, QEMU Guest Agent and chronyd, in that order.
- Check the filesystem and SELinux state
This installation reports xfs under Root filesystem and Enforcing under SELinux. These are the actual results from the installed demonstration system.
- Check the list of failed units
Under Failed units, 0 loaded units listed. means this check found no failed units. If your server reports a different result, inspect the affected service.
The installed system was checked through console login, a separate SSH session, administrator access and access to package repositories:
| Check | Result |
|---|---|
| Installed system | CentOS Stream 10 (Coughlan). |
| Kernel | 6.12.0-275.el10.x86_64. |
| CPU compatibility | x86-64-v3 support verified on the running system. |
| Root filesystem | XFS on LVM, approximately 36 GiB. |
| Other disk space | Approximately 2 GiB /boot, 2 GiB swap and a 1 MiB BIOS boot partition. |
| SSH and administration | sshd active; separate SSH login and sudo verified. |
| Updates | dnf upgrade --refresh completed with Nothing to do at the time of checking. |
| Guest service | qemu-guest-agent installed and active. |
| Time synchronization | chronyd active; chronyc tracking reported Leap status: Normal. |
| SELinux | Enforcing. |
| Failed systemd units | 0. |
A 40 GiB virtual disk does not mean that / has the same capacity. This automatic LVM layout also reserves space for /boot, swap and BIOS boot. Use lsblk -f and df -h / on your own server to check its layout and root filesystem; df also shows available space.
These results apply to the demonstrated installation. Updates can change the kernel version and the number of available upgrades.
8. Delete the installation ISO when it is no longer needed
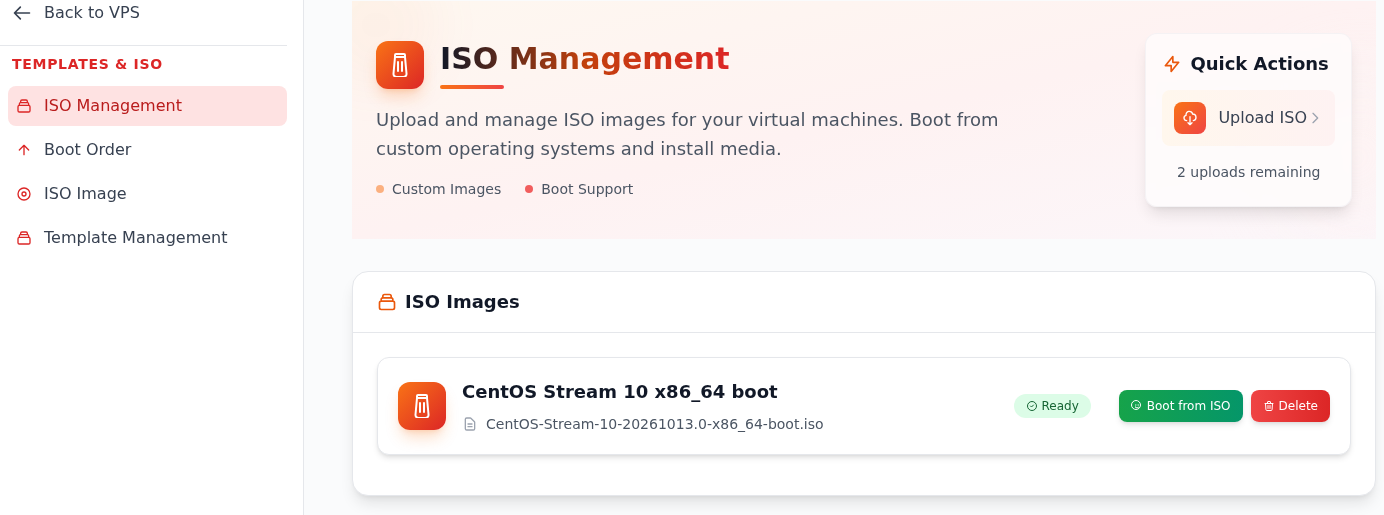
After startup from disk and SSH access were verified, Templates & ISO → ISO Management was opened again. Delete on the CentOS image card was confirmed with Yes, Delete in the Delete ISO? dialog. The list then showed No ISO Images, and the demo service's upload allowance returned to 3.
This removes the unused installation image, not the installed CentOS system. The ISO deletion instructions show how to check the confirmation and image list. Uploading another operating system's ISO also does not replace the installed system automatically; repeat backup and target-disk checks before approving another installation to disk.
Frequently asked questions
Are CentOS Linux and CentOS Stream the same?
They are different release series. This guide covers CentOS Stream 10. CentOS Linux 7 and 8 have reached end of life. Check the exact supported Stream version for your application or control panel, rather than relying on a general “CentOS compatible” statement.
Why do I need networking with the boot ISO?
The boot ISO starts the installer; this guide uses Closest mirror as the network package source. Uploading the image to the portal does not configure networking inside the VM. Apply the assigned IP address, mask, gateway and DNS settings in the installation environment too.
Does Minimal Install add a desktop?
This example selects Minimal Install for the base system and leaves additional software groups unchecked, without adding a desktop environment. Install applications such as a web server or database afterward according to your needs.
Can every x86_64 VPS run CentOS Stream 10?
The x86_64 architecture label alone is not enough. CentOS Stream 10 requires x86-64-v3 CPU features, and the features exposed to the virtual machine must meet that requirement. Installation and startup from disk completed on this guide's demo server. Check release and CPU compatibility for your own service before installing.