Install Proxmox VE 9.2 on a server: screenshot and video guide
Proxmox VE lets you create and manage virtual machines and Linux containers from a browser. This guide starts with its graphical ISO installer, prepares the management interface and updates, then creates a small Debian virtual machine with private networking. The final exercise backs up that VM and restores it to another VM ID.
The main installation and management steps use graphical interfaces. A few short commands in the Debian guest console check the finished system and create a harmless restore-test file. Using the graphical installer does not require a desktop environment on either the Proxmox host or the Debian guest.
The selected installer is Proxmox VE 9.2-1 for x86-64, the current stable ISO listed by the vendor when checked on 30 October 2026. Proxmox does not publish a separate LTS installer; this guide uses the current stable release. Proxmox recommends keeping supported installations updated to current packages; the ISO revision and the package version displayed after updating can differ. See the official download page and support lifecycle FAQ.
Proxmox VE on a server and the VDS demonstration
Proxmox VE is a bare-metal virtualization platform: its ISO installs the host operating system and virtualization tools onto the server's selected disks. A dedicated physical server is the normal starting point when designing a production installation.
This guide's screenshots and videos were made on a DCHost VDS reserved for testing. Running Proxmox inside another virtualization platform is called nested virtualization. The guide follows the graphical installer and management interface. On a physical server, also follow the manufacturer's instructions for BIOS/UEFI, RAID and USB or remote media preparation; those hardware operations are outside these VDS captures.
The interface uses English labels. Enter your own server details in the network and account fields concealed in the screenshots.
Before you start
The installer can erase the existing operating system and all data on the selected disks. Choose the intended server, save anything you need outside it, and prepare a server backup plan before repartitioning.
| Preparation | Why it matters |
|---|---|
| A dedicated installation target | The host ISO replaces the system on the selected disk. |
| x86-64 virtualization support | The selected ISO is for Intel/AMD 64-bit systems; a nested lab also needs the outer host to expose virtualization extensions. |
| Server console access | The installer and recovery screens are available before the web interface starts. |
| Assigned management IP, prefix, gateway and DNS | These values keep the host reachable after installation. |
| A planned hostname | Choose the node's full hostname before installing. |
| Host and guest capacity | Reserve memory and storage for Proxmox as well as the VMs, ISO images and backups. |
The selected demonstration plan is DC VDS4, advertised with 4 vCPU, 6 GB RAM and 70 GB storage. The installer displayed the target disk as vda — 70.00 GiB. These plan values and the displayed disk measurement are not Proxmox's minimum requirements or a production sizing recommendation. The first Debian guest was allocated 2 vCPU, 1,536 MiB RAM and a 16 GiB virtual disk. Only one copy runs at a time during the restore exercise. Section 9 records available storage after updating and before adding the guest. The vendor's system requirements reserve memory for the host in addition to guest workloads.
For a VDS lab, confirm that your service exposes the required nested KVM features before installing.
The pre-installation check found the vmx CPU flag and /dev/kvm device inside the VDS. After installing Proxmox, the first running VM also returned kvm support: enabled in its Monitor. This confirms KVM acceleration for the inner VM in this lab; the Debian installation section includes that screen.
Find the service's assigned network values using portal network information. Do not infer a gateway from the IP address or assume that every service uses a /24 prefix.
1. Prepare the Proxmox VE ISO
Use the standard x86-64 file from the official Proxmox ISO page. The separately listed ARM64 image is for a different CPU architecture.
| Item | Selected official image |
|---|---|
| Filename | proxmox-ve_9.2-1.iso |
| Release date | 21 May 2026 |
| Published size | 1.71 GB |
| Exact file size reported by the download server | 1,706,178,560 bytes |
Direct ISO address:
https://enterprise.proxmox.com/iso/proxmox-ve_9.2-1.iso
The matching official SHA-256 file gives this value:
4e88fe416df9b527624a175f24c9aa07c714d3332afb1ee3dbf3879573ef2c6c
For the DCHost lab:
- Open the new service's Templates & ISO → ISO Management → Upload ISO page.
- Enter a recognizable Label, such as
Proxmox VE 9.2 x86-64. - Select File URL and enter the complete direct ISO address.
- Choose Upload and wait for Ready.
Ready indicates that the media is available; it does not mean Proxmox has been installed. The full portal workflow is covered by ISO upload and management. If the portal is still importing the file, track that task before submitting another copy.
The full ISO was downloaded for the lab, and its calculated SHA256 matched the official value.
In Upload ISO, choose a label and use the direct download URL of the official ISO file.
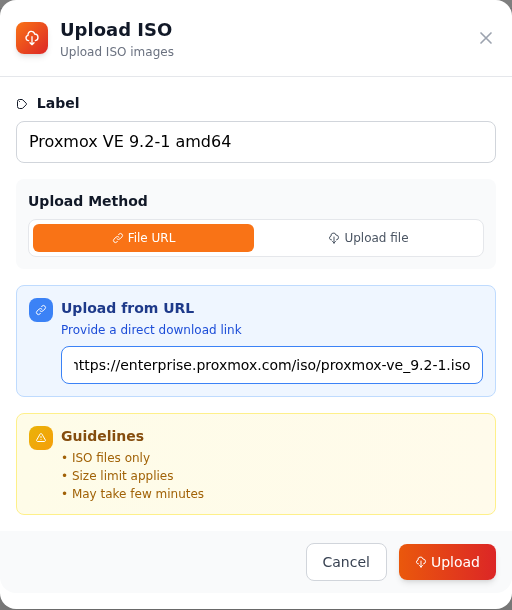
Step 1: Enter a recognizable label
- Enter a recognizable label
Enter a name in Label that identifies the release. This example uses Proxmox VE 9.2-1 amd64.
- Enter the official ISO URL
Keep File URL selected. Paste the direct link to the .iso file into Upload from URL, rather than the downloads page URL.
- Start the import
After checking the label and URL, click Upload.
What you should see: The dialog closes and the import status appears in the ISO list.
Label is only the name shown in the portal. Get the link for your chosen release from the Proxmox downloads page.
Watch Importing while the transfer runs; the media is not ready at that stage.
After submission, a new entry appears in the ISO list. This screenshot was captured while the import was still running.
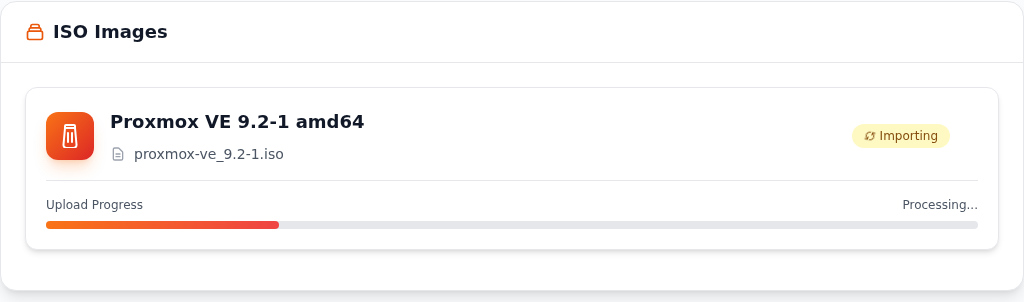
Step 1: Check the Importing status
- Check the Importing status
Importing and Upload Progress show that the import is still running. Wait for the ready state.
Importing does not mean complete. Wait until the ISO is ready before attaching it and booting from it.
Video: start the ISO import
This real DCHost portal recording follows label and URL entry through to the Importing state.
Entering the ISO URL and starting the import
00:00 — Enter a label. Use File URL for the official ISO link.
00:08 — Click Upload.
00:11 — Importing: the transfer is running. Completion is not shown in this clip.
When the import finishes, check that the ISO card shows Ready.
When the import finishes, the ISO entry shows Ready and a Boot from ISO button.
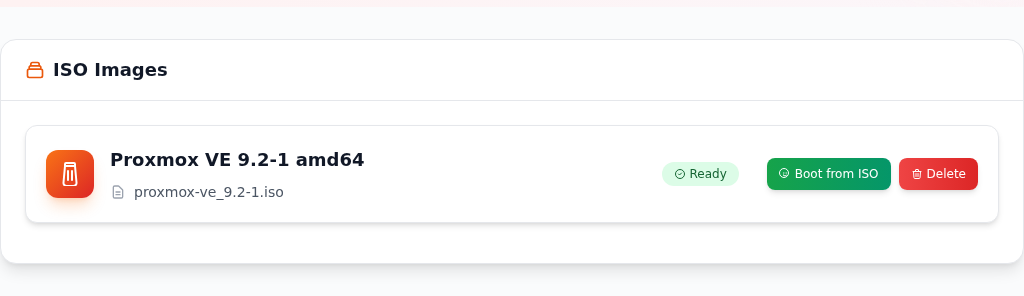
Step 1: Verify Ready
- Verify Ready
Check that the correct ISO is listed and its status is Ready before continuing.
- Click Boot from ISO
Click Boot from ISO on the imported ISO entry to open the boot confirmation.
This button opens a confirmation dialog. The installer performs disk operations later.
2. Start the graphical installer
- Check the filename on the correct Ready ISO card, then choose that card's Boot from ISO action.
- Read the restart warning and select Boot Now. The confirmation dialog does not display the ISO name, so check the preceding Ready card rather than looking for it in this dialog.
- Open Console / VNC Console Access.
- Select Install Proxmox VE (Graphical) in the boot menu and press
Enter.
Wait for the installer to load. Use its Next button to move between pages. The official installation guide also documents a Terminal UI alternative if the graphical interface cannot start on a particular device.
The lab boot menu displayed Proxmox VE 9.2 / ISO release 1. The graphical installer and licence page opened.
The Boot from ISO? dialog confirms that the selected ISO image will be used.
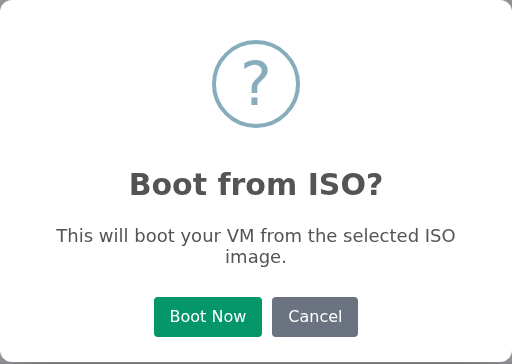
Step 1: Continue with Boot Now
- Continue with Boot Now
Check that you are on the intended test server, then click Boot Now.
After confirming, open the console and watch for the Proxmox boot menu.
This actual console capture shows the Proxmox VE 9.2 ISO release 1 boot menu.
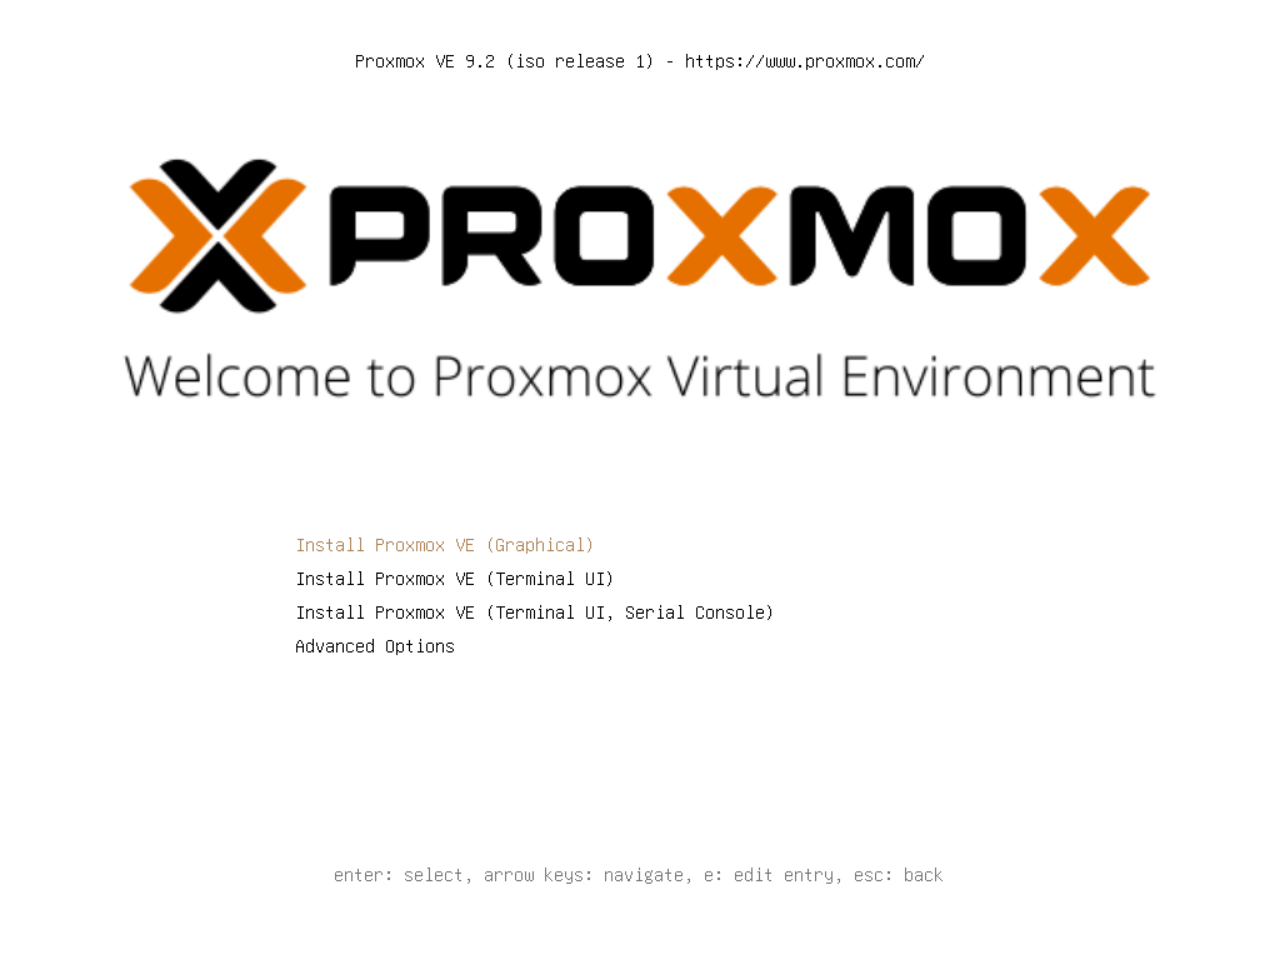
Step 1: Select Install Proxmox VE (Graphical)
- Select Install Proxmox VE (Graphical)
Use the arrow keys to highlight Install Proxmox VE (Graphical), then press Enter.
This was captured in a VDS test environment; it does not show physical-server firmware or disk-controller settings.
3. Accept the licence and choose the host disk
Read the End User License Agreement (EULA) and choose I agree to continue if you accept it.
The graphical installer first opens the End User License Agreement (EULA).
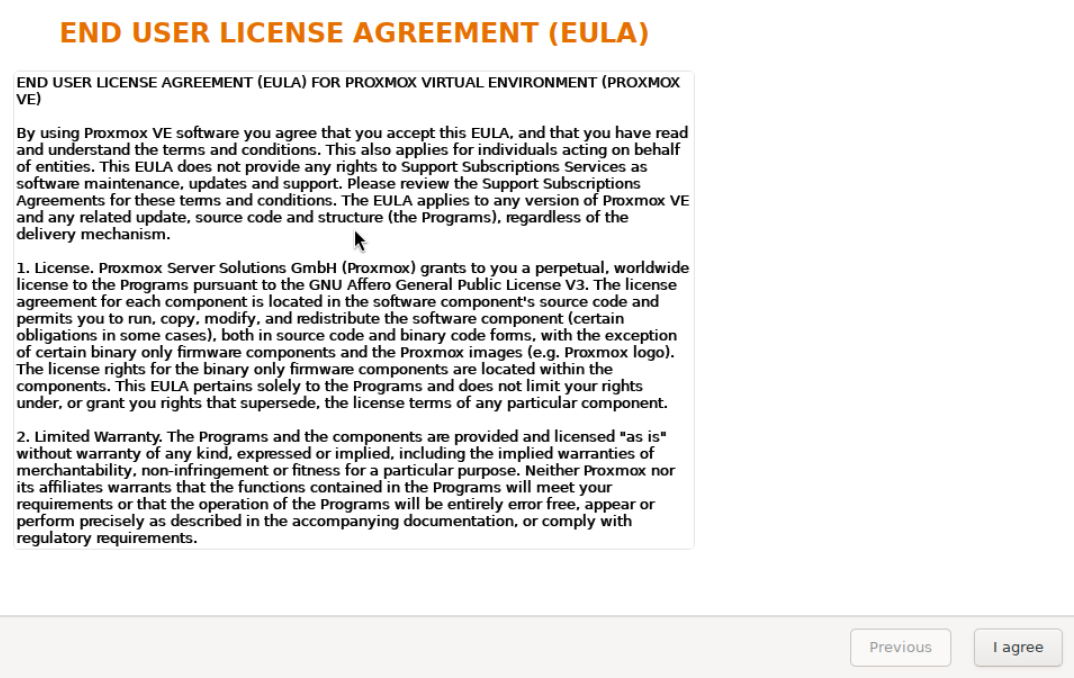
Step 1: Continue with I agree
- Continue with I agree
Read the agreement and click I agree if you accept its terms.
Continue if you accept the terms. The next step selects the installation target.
On the disk page, select the target by checking its device identity and capacity. The lab selected vda — 70.00 GiB.
Target Harddisk determines where Proxmox will be installed. This lab shows /dev/vda (70.00GiB).
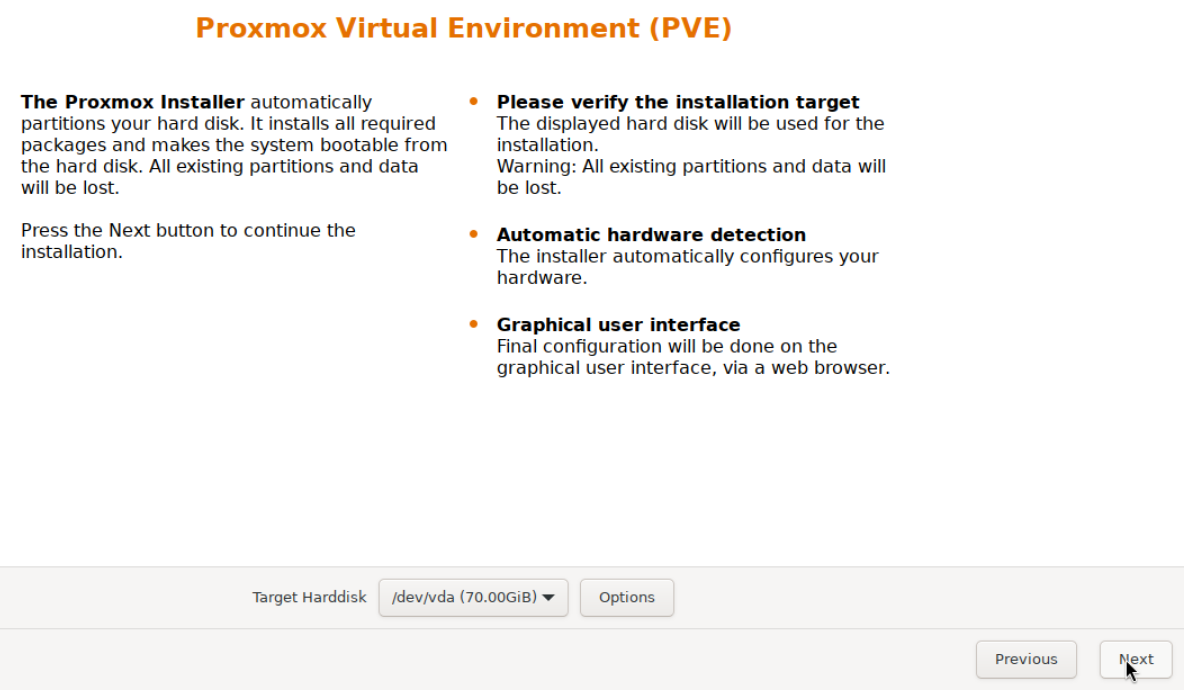
Step 1: Select the correct disk
- Select the correct disk
Select the disk reserved for installation in Target Harddisk and check its capacity.
- Inspect Options if needed
Options opens filesystem and space-allocation settings. The next screenshot shows this lab’s defaults.
- Continue after checking the disk
After closing Options and verifying the target disk, click Next.
Installation removes existing partitions and data on the selected disk. The disk name and capacity here are examples; verify your own target.
For this single-disk lab, Options showed ext4; the advanced disk values were left at their defaults. Proxmox uses an LVM-based layout with this selection. More complex layouts such as ZFS require separate storage planning; they are not needed for this exercise. The vendor warns that ZFS on top of a hardware RAID controller is unsupported. Official installation and storage choices.
Review the chosen disk again before moving on. The disk shown here belongs to the Proxmox host. Later, the Debian installer will see a smaller virtual disk created inside Proxmox; the two installation targets are different.
In Harddisk options, Filesystem is set to ext4. This capture was taken without entering custom allocation values.
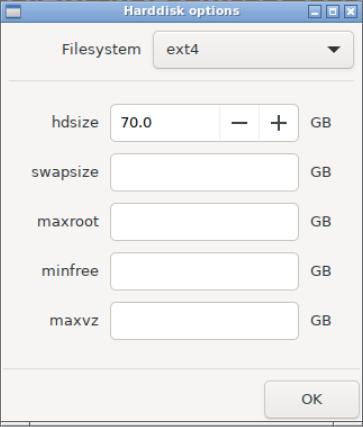
Step 1: Check Filesystem
- Check Filesystem
The example uses ext4. Plan the requirements before choosing a different filesystem or disk layout.
- Return to disk selection with OK
In this example, the advanced fields remain unchanged and OK closes the dialog.
This guide proceeds with this lab’s ext4 defaults. Blank advanced fields do not mean zero; evaluate them against your own storage plan.
4. Set location, keyboard and the administrator account
The lab selected Country → Türkiye, Time zone → Europe/Istanbul, and Keyboard Layout → U.S. English. Search for Türkiye in the country field: entering Turkey did not match a country in this installer. Choose the values appropriate to your own location and keyboard. Keyboard layout affects password characters, including punctuation.
This lab uses Country Türkiye, Time zone Europe/Istanbul and Keyboard Layout U.S. English.
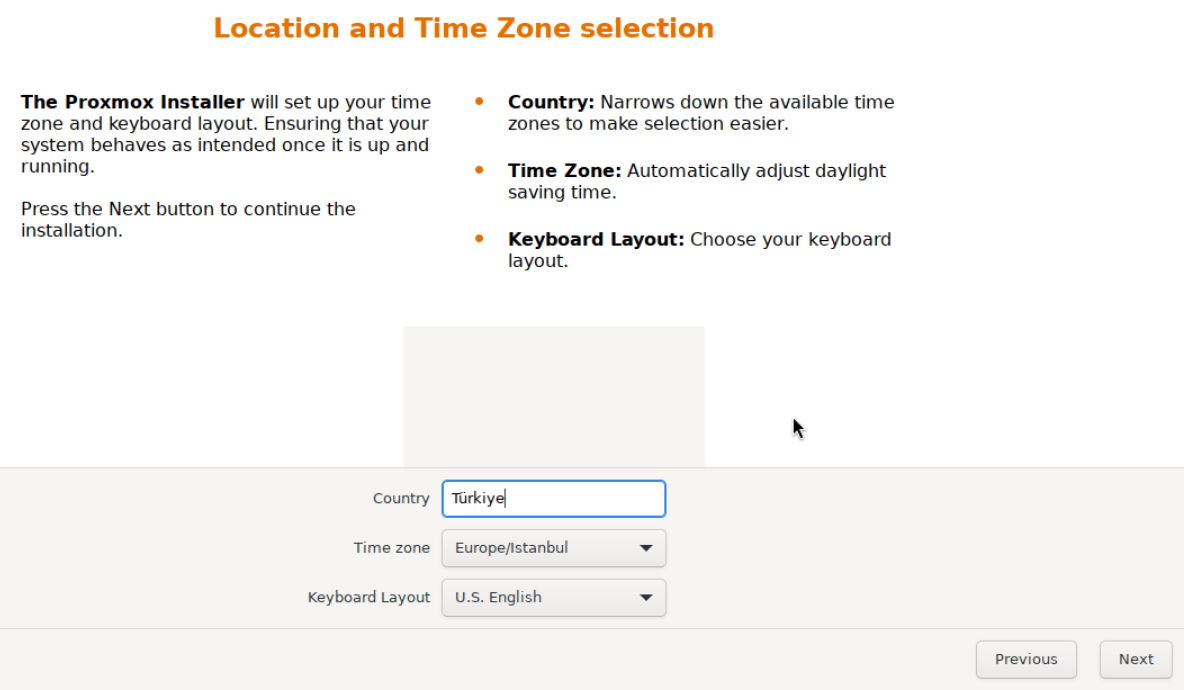
Step 1: Choose country and time zone
- Choose country and time zone
Set Country and Time zone for your location. The Türkiye example uses Europe/Istanbul.
- Check the keyboard layout
Choose the layout you will use in Keyboard Layout. U.S. English is the selection for this test.
- Continue with Next
After checking all three selections, click Next.
Keyboard layout is separate from the country setting. Choose the layout you will use in the console; it also applies when entering passwords.
On the administrator page:
- Enter a strong, unique root password.
- Enter the same password again in its confirmation field.
- Provide an administrator email address for system notifications.
This root account belongs to the Proxmox host. It is separate from your DCHost portal account and from the regular user you will create inside Debian. Keep the password in a password manager and out of screenshots. Entering an email address does not by itself prove that outbound notification delivery works.
This step asks for the root password, its confirmation, and an email address for notifications.
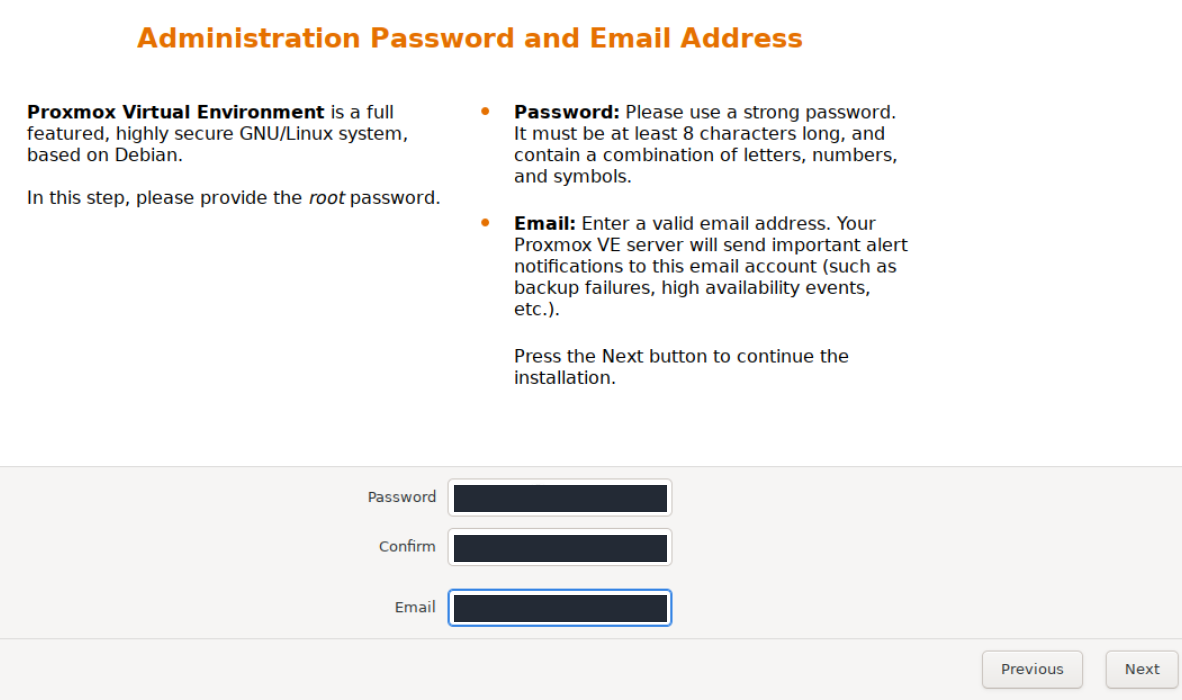
Step 1: Enter the password twice
- Enter the password twice
Choose a strong, unique root password. Enter the same password in Password and Confirm.
- Set the notification email
Enter a valid email address you monitor in Email. The installer identifies this address as the destination for alert notifications.
- Continue with Next
Check the password confirmation and email address, then click Next.
Use the keyboard layout selected during installation; the same root password is needed for the first web-interface login.
5. Configure the management network
The management address is how you will reach Proxmox after reboot. Enter the values assigned to the new service, using the portal network details.
| Installer field | Value to enter |
|---|---|
| Management Interface | The interface connected to the service network. The lab selected nic0 (virtio_net). |
| Hostname (FQDN) | The intended full node name, for example pve1.example.com. |
| IP Address (CIDR) and adjacent prefix box | Enter the assigned management address and its prefix in the separate boxes. |
| Gateway | The service's assigned default gateway. |
| DNS Server | A resolver that the host can reach. |
The lab left Pin network interface names checked. The IP address and prefix use separate input boxes; do not paste both into the address box.
The hostname example is explanatory. Use your own planned name; typing it here does not create a public DNS record. The private 10.77.0.0/24 guest network introduced later also does not belong in these host management fields.
Select the interface carefully when more than one appears. A correct address on the wrong interface can leave the web interface unreachable. Review all fields before continuing to the final summary. The installer creates a management bridge named vmbr0 as part of the usual network setup. Official network configuration.
Management Network Configuration shows the management interface, FQDN, IP/CIDR, gateway and DNS fields.
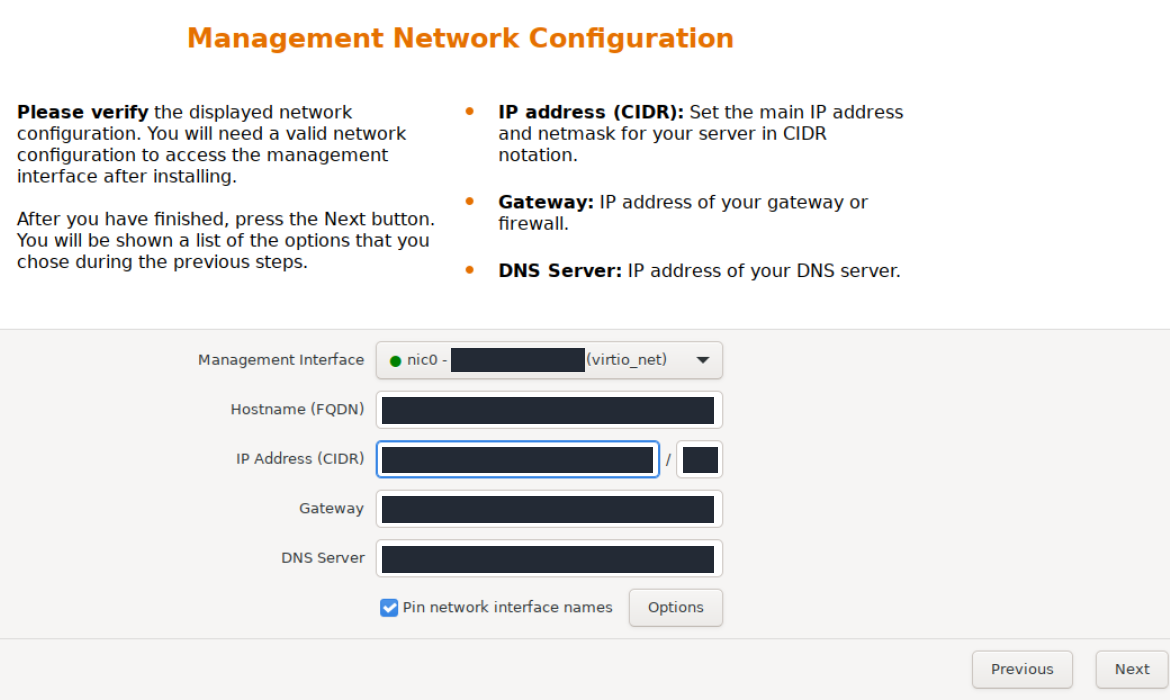
Step 1: Verify the management interface
- Verify the management interface
Verify the interface connected to the management network in Management Interface. This example uses nic0.
- Enter the server FQDN
Fill Hostname (FQDN) with the fully qualified domain name planned for your server.
- Check IP, gateway and DNS
Match IP Address (CIDR), the prefix length, Gateway and DNS Server to the allocated network details.
- Open the summary with Next
After checking the network settings, click Next to open the installation summary.
Use the network details allocated to your server. Pin network interface names remains selected in this example.
6. Install, detach the media and restart
The summary brings together the disk, location, account and network choices. Check the target disk and management address one final time. Use Previous to correct a mistake. Uncheck Automatically reboot after successful installation to control the restart manually, then choose Install when ready to erase the selected installation disk.
The lab summary was reviewed, automatic reboot was disabled, and Install was clicked.
The Summary table brings together the selected disk, locale and management network settings before installation starts.
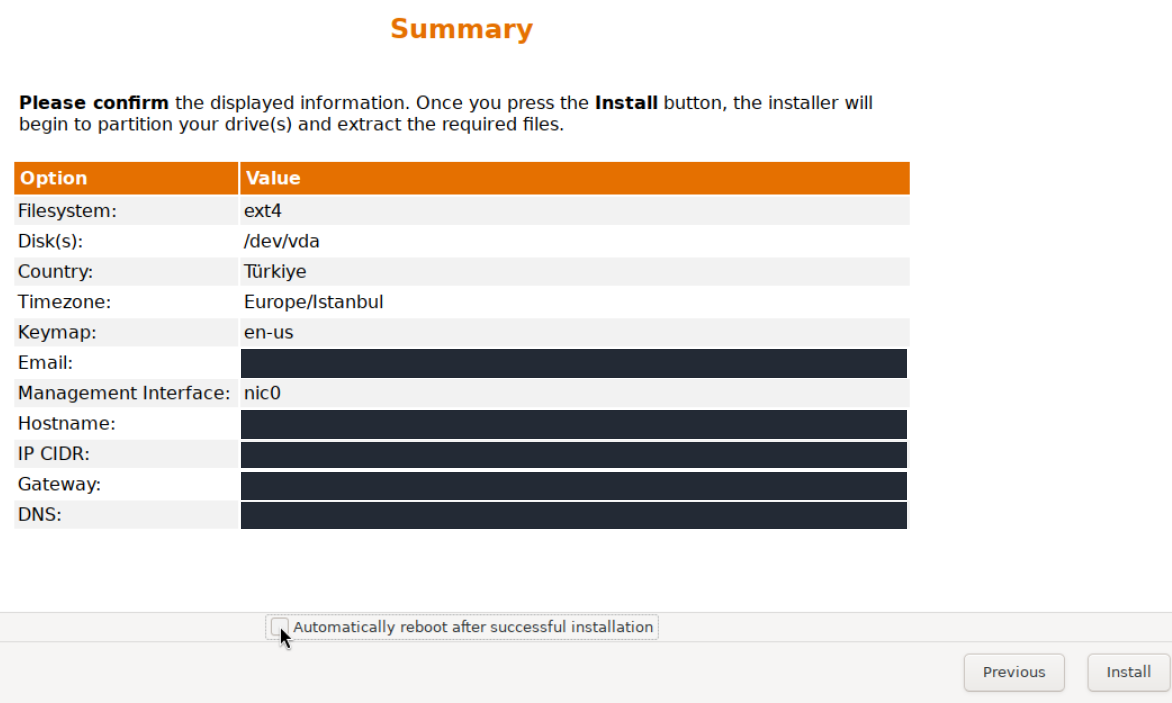
Step 1: Review the selections in the table
- Review the selections in the table
Check the filesystem, Disk(s), locale, email and management network rows once more.
- Keep automatic reboot unchecked
In this workflow, Automatically reboot after successful installation is unchecked so that reboot can be performed manually afterward.
- Click Install when ready
After verifying the target disk and all settings, click Install.
Install starts partitioning the selected disk and writing the installation files. This image was captured before installation started.
Video: start installation
This real recording in a nested VDS test environment shows Summary, automatic reboot being disabled, the Install click and installation starting through 5% progress.
From summary to installation start
00:00 — On Summary, automatic reboot is turned off.
00:05 — Install is clicked. Installation starts.
00:07 — The progress bar shows disk preparation in progress.
00:21 — Progress reaches 5%. Installation is still running.
Wait for completion and detach the media
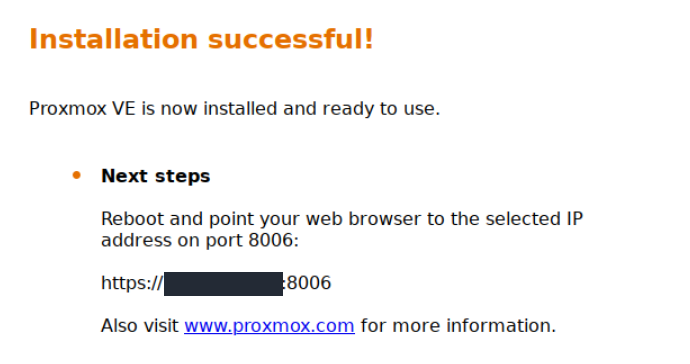
Wait for the installer to finish formatting and copying packages. Do not interrupt it while it is writing the disk. Automatic reboot was left off in this workflow; the lab then reached Installation successful!.
Installation successful! confirms that installation has finished. The same screen shows the management interface address.
Step 1: Check the success message
- Check the success message
Verify that Installation successful! appears; a progress bar alone does not establish completion.
- Note HTTPS and port 8006
After booting from disk, open your own management IP address using HTTPS and port 8006.
Automatic reboot is disabled in this workflow. Detaching the ISO in the portal in the next step reboots the test server.
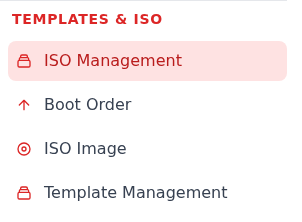
After completion, open Templates & ISO → ISO Image for the same DCHost service. Read and accept the restart warning in the browser's native confirmation dialog. In this portal workflow, detaching the ISO also restarts the server; it is different from deleting an image from the library.
After installation finishes, return to Templates & ISO in the DCHost portal.
Step 1: Open ISO Image
- Open ISO Image
Click ISO Image. Read the reboot confirmation and confirm detaching the ISO.
In this portal workflow, detaching the ISO also triggers a reboot. Watch the system disk boot in the console.
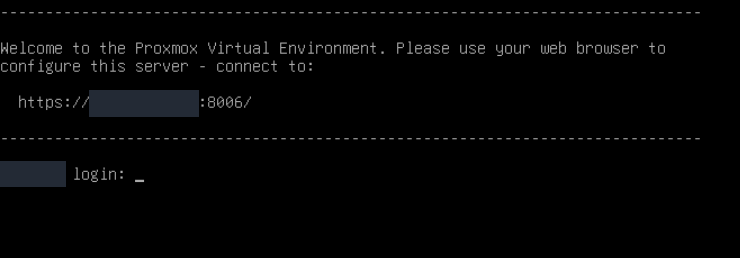
The lab booted Proxmox from its installed disk after detachment. The console showed its welcome message, HTTPS management address and login: prompt.
This actual console capture shows the installed Proxmox system’s welcome text, HTTPS management address and console login prompt.
Step 1: Open the HTTPS address in a browser
- Open the HTTPS address in a browser
Use the management address shown in your own console, keeping the https:// scheme and :8006 port.
- Recognize the console login prompt
The login: prompt shows that the console is waiting for authentication. Use the HTTPS address above to open the web interface.
If the browser shows a certificate warning, first verify the server address and certificate fingerprint through a trusted, independent management channel. Do not continue without verifying the identity.
See ISO detachment for the provider controls.
An installer completion screen shows that the installation task ended. The next check is whether the installed host boots and offers its management address. If the boot menu returns to the ISO, correct the attached media or boot order before starting another installation.
7. Open the Proxmox web interface
From a browser that can reach the management network, open:
https://YOUR_MANAGEMENT_IP:8006
Use HTTPS and include port 8006. The default node certificate is signed by Proxmox's own cluster CA, which browsers do not trust automatically. Verify the server address and certificate fingerprint through a trusted, independent management channel before accepting an exception for that endpoint. Do not disable certificate validation globally. See official certificate management.
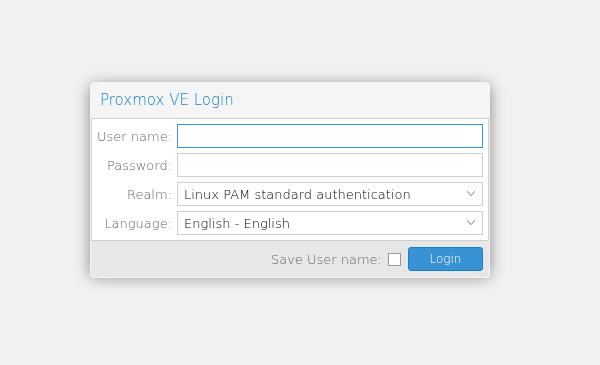
Log in with username root, the password created during installation, and the Linux PAM standard authentication realm. Select English if needed to match the interface labels in this guide. The official manual documents web access after installation.
The Proxmox VE Login window has empty username and password fields, with Linux PAM standard authentication selected as the realm.
Step 1: Use the account configured during installation
- Use the account configured during installation
For the first administrator sign-in, enter root in User name and the root password set during installation in Password.
- Verify the Linux PAM realm
For the root account configured during installation, Realm should be Linux PAM standard authentication. Language sets the interface language.
- Sign in with Login
After checking the username, password and Realm selection, click Login.
Language selects the web interface language; it does not change the console keyboard layout.
The left tree separates several objects:
| Object | What it represents |
|---|---|
| Datacenter | Settings and views that can apply across a Proxmox environment. A single-node setup also uses this entry. |
| The node name | This Proxmox host, including its CPU, memory, network and updates. |
| A VM ID and name | A guest managed by the host. |
| A storage entry | A location for the content types that storage supports. |
Select the node's Summary to inspect its resource usage and software information. Select System → Network to review the management interface and vmbr0. Merely opening these pages does not require changing a working network configuration.
Verified first-install values
These values describe the initial installation before package upgrade. Later updates can change the Proxmox and kernel versions.
| Check | Verified value |
|---|---|
| Proxmox VE | 9.2.2 |
| Kernel | 7.0.2-6-pve |
| CPUs | 4 |
| System memory | 5,923 MiB |
| Virtual disk | 70 GiB |
local total capacity | 27.32 GiB |
local-lvm total capacity | 25.16 GiB |
| Boot and access | ISO detached; disk boot and browser Linux PAM login succeeded. |
Storage capacity is not the same as remaining free space. Check current free space before preparing the first guest and backup.
8. Configure repositories and install updates
An installation ISO represents the packages available when it was built. Install current updates after setup to receive later fixes. The ISO filename 9.2-1 and the package version shown after updating do not have to match.
For production, Proxmox recommends its Enterprise repository, which requires a valid subscription. This unsubscribed lab used No-Subscription, a repository the vendor describes as intended for testing and non-production use. Choose the repository appropriate to your own subscription and deployment. Official repository guidance.
Select repositories for the lab
- Select the node → Updates → Repositories panel.
- Select the enabled pve-enterprise entry and choose Disable.
- This installation also had a ceph-squid / enterprise entry. It was disabled for this unsubscribed lab, which does not use Ceph. Do not disable repositories on a working Ceph cluster by copying this lab choice.
- Choose Add, select No-Subscription, read its description and choose Add to save it.
This nested VDS test uses the No-Subscription repository.
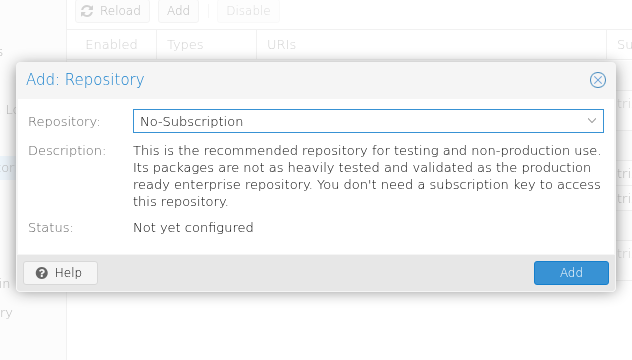
Step 1: No-Subscription is for this test environment
- No-Subscription is for this test environment
No-Subscription is selected in Repository. Its description identifies testing and non-production use.
- Add the test repository
In this lab workflow, Add saves the selected repository.
This is not a production default. Use the Enterprise repository with an appropriate subscription for production systems.
Video: add the test repository
In this real nested VDS test, No-Subscription is selected and added. The final screen shows the production warning; package-list refresh is outside this recording.
Selecting and adding the test repository
00:00 — Select No-Subscription. For this test environment only.
00:03 — Add saves the repository.
00:05 — Production warning: not recommended for production.
Back in the list, check that trixie / pve-no-subscription is enabled. Keep the Debian trixie, trixie-updates and trixie-security repositories enabled. The final lab configuration was verified as follows:
| Repository | State in this lab |
|---|---|
| Proxmox pve-no-subscription, trixie | Enabled. |
| Proxmox pve-enterprise | Disabled. |
| ceph-squid / enterprise | Disabled; this example does not use Ceph. |
| Debian trixie, trixie-updates, trixie-security | Enabled. |
The Debian repositories and pve-no-subscription are enabled; the PVE and Ceph enterprise entries are disabled.
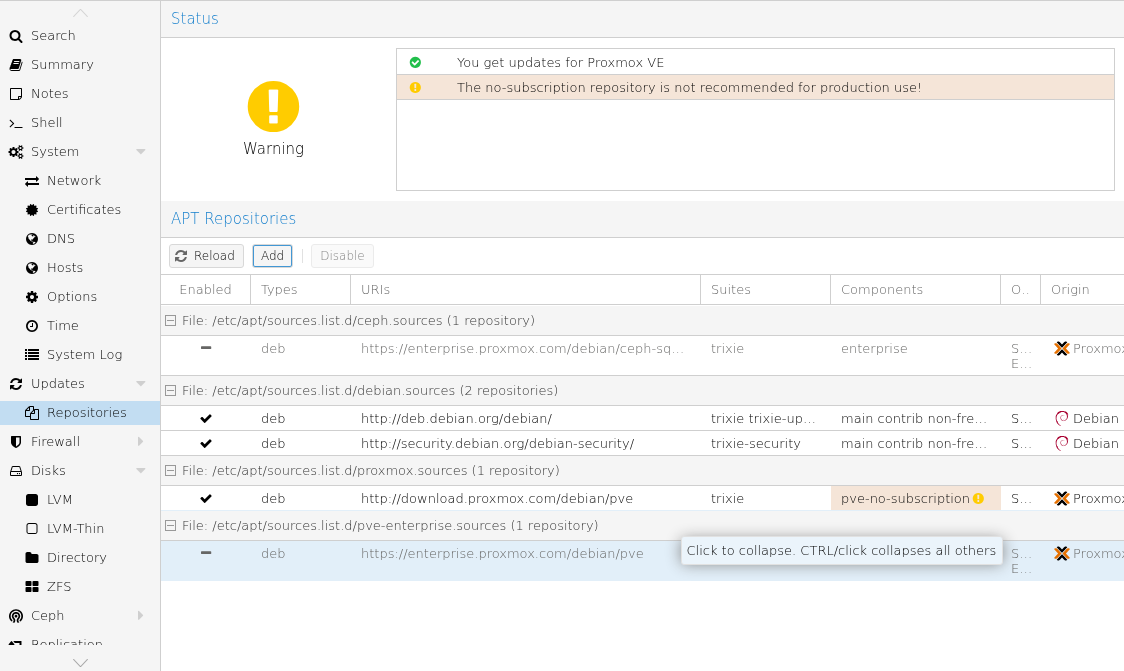
Step 1: Read the production warning
- Read the production warning
No-Subscription is not recommended for production use. The Warning state here accompanies the lab repository choice.
This screen shows repository configuration. Refreshing package lists is a separate step.
Do not select pve-test for this guide or apply old Bookworm repository instructions to Proxmox 9. Choosing No-Subscription does not purchase a subscription; the interface can continue to show its production and subscription notices.
Update, reboot and verify
- Open Updates → Refresh and wait for TASK OK in the task output. Resolve refresh errors before starting an upgrade.
- Review the available updates and choose Upgrade. Proxmox runs the update in its own terminal window.
- Read the proposed upgrades, additions and removals. The lab offered 191 upgraded packages, 2 new packages and 0 removals. Your list may differ. If the proposed changes are appropriate, confirm with
YandEnter. - If a changelog pager appears, read the notes. In this lab, pressing
qclosed the notes and allowed the upgrade to continue. Keep the terminal open while packages are being installed and configured. - The lab reached Your System is up-to-date and recommended a reboot for the new kernel. Shut down any running guests cleanly, then use the node's Reboot → Yes action.
- Sign back in when the node returns. Check the version and running kernel in Summary, then run Updates → Refresh again.
The post-reboot check confirmed Proxmox VE 9.2.24 running kernel 7.0.14-26-pve. The package audit reported no partially configured packages, and the Proxmox management services were active.
Open the node’s Summary page to check resource usage and running versions. This actual capture shows the state after the upgrade and reboot.
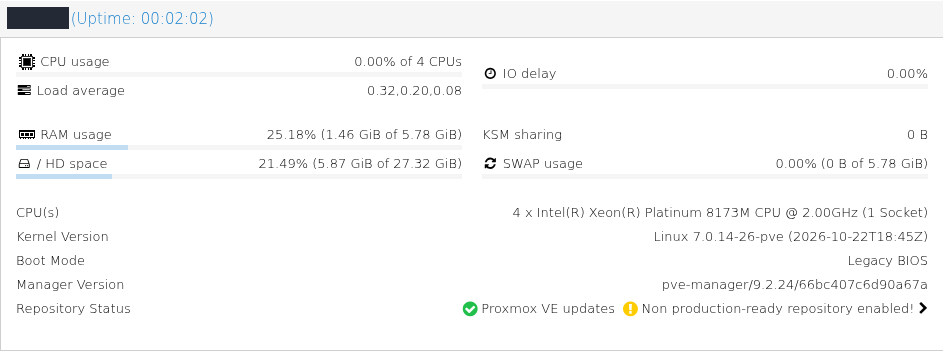
Step 1: Review resource usage
- Review resource usage
Review CPU usage, RAM usage and / HD space. These values are measurements from this test at that moment; assess available memory and disk space on your own server.
- Verify the running kernel and manager versions
Check Kernel Version and Manager Version. This capture shows kernel 7.0.14-26-pve running with manager version 9.2.24. These are the versions verified for this capture.
The yellow Repository Status warning relates to the no-subscription repository used in this test. Assess repository and subscription choices separately for production. This summary alone does not establish that every service is healthy.
The final refresh completed with TASK OK, and Updates displayed No updates available. Verify these outcomes rather than assuming that a closed update window proves completion.
Open Updates on the node and refresh the package list with Refresh. This post-upgrade capture shows No updates available.
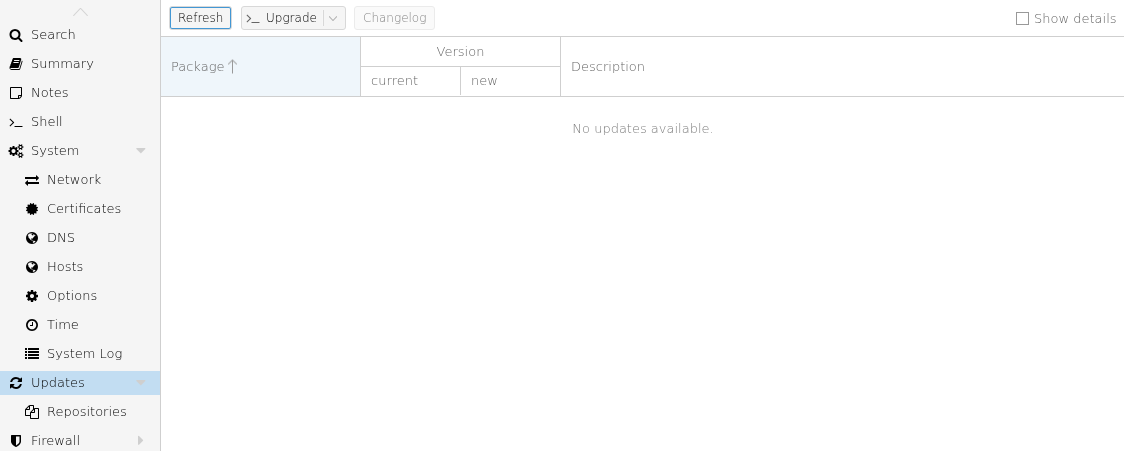
Step 1: Read the refreshed list’s result
- Read the refreshed list’s result
Check for No updates available. If packages are listed, review the upgrade plan and carry out the required update steps; the list is empty in this example.
This result means the last refresh found no pending package updates in the configured repositories. New updates may become available later.
9. Understand local storage before adding a VM
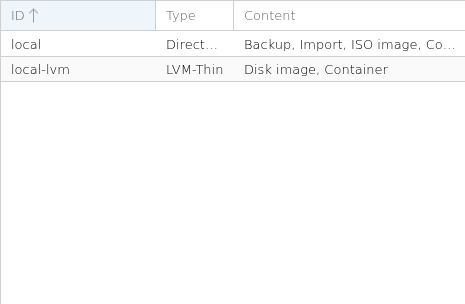
This ext4 installation created two local storage definitions. Open Datacenter → Storage and read the Content column to see which data types each accepts:
| Storage | Verified type and content | Use in this guide |
|---|---|---|
| local | Directory, /var/lib/vz; Backup, Import, ISO image, Container template. | The Debian installer ISO and file-based backup archive. |
| local-lvm | LVM-Thin; Disk image, Container. | The Debian VM disk. |
Compare ID, Type and Content on Datacenter → Storage. In this capture, local and local-lvm are configured for different content types.
Step 1: Check local for ISO files and backups
- Check local for ISO files and backups
The Content column for local includes Backup and ISO image. In this installation, local is configured to accept ISO files and backups.
- Choose local-lvm for VM disks
The local-lvm row shows LVM-Thin with Disk image and Container content. When creating a VM, match its virtual disk target to this support; ISO and backup content are not listed for this row.
Content types reflect this installation’s settings and may differ elsewhere. Backup support shown here does not mean a backup has been created or a restore tested.
local-lvm is not an ordinary directory for ISO uploads or backup files. Select storage supporting ISO image for the installer, Backup for a file archive, and Disk image for a VM disk.
After updating, before downloading the Debian ISO or creating the first guest, local had 27.32 GiB total capacity and approximately 20.04 GiB available. local-lvm had 25.16 GiB total capacity and was empty. These are measurements from this lab at that point; installation choices and later files change the remaining space.
The plan's advertised 70 GB is not available independently in both storage entries. Installation divides the disk between the host, swap and guest disk pool. The node's Summary → / HD space indicator also does not describe the whole guest pool; inspect each storage entry's own Summary.
Thin provisioning may avoid allocating a virtual disk's entire advertised capacity immediately. Guest writes, snapshots and additional copies still use real pool space. Check the relevant destination again before downloading an ISO, creating a VM or starting a backup. Official storage documentation.
10. Create private guest networking with Simple SDN and SNAT
The lab has one public management IP. Its inner Debian guest will use a private address and share the host's outbound connection through Source NAT, shown as SNAT in Proxmox. The guest does not receive an extra public address by being connected to vmbr0, and a provider may filter additional guest MAC addresses.
The supported core Simple SDN network creates an isolated bridge on this node. Adding a subnet gateway and enabling SNAT supplies the guest's outbound route. This example uses a static guest address; leave Automatic DHCP off. Official Simple zone and Source NAT examples.
Use these example values only if 10.77.0.0/24 does not overlap your provider, management, VPN or other local networks:
| Setting | Example |
|---|---|
| Zone ID | labzone |
| VNet name | labnet |
| Subnet | 10.77.0.0/24 |
| Subnet gateway | 10.77.0.1 |
| Debian guest address | 10.77.0.10 |
| Debian subnet mask | 255.255.255.0 |
| Debian DNS | An actual resolver reachable through the host's outbound connection. |
Create the zone and VNet
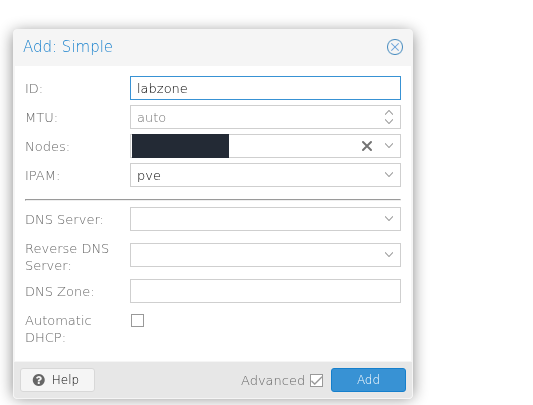
- Open Datacenter → SDN → Zones → Add → Simple.
- Set the zone ID to
labzone. Select the intended node in Nodes and leave Automatic DHCP unchecked. The demonstration explicitly selected its one lab node and did not enable automatic DHCP. - Open VNets → Create.
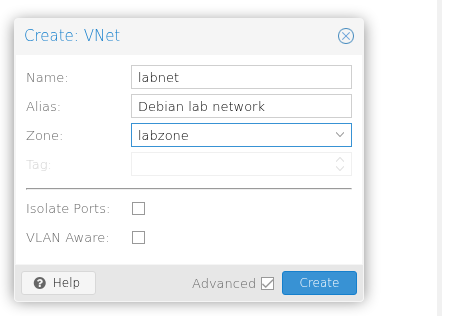
- Set Name to
labnetand Zone tolabzone, then create the VNet. The lab used the aliasDebian lab network, left Tag empty and left VLAN Aware off. This Simple example does not need a VLAN tag.
Add the subnet and apply the configuration
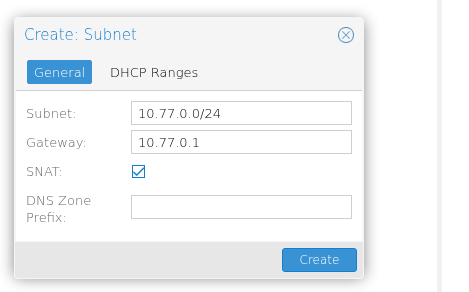
- Select
labnetand choose Create in its Subnets panel. - Under General, enter Subnet
10.77.0.0/24and Gateway10.77.0.1. - Enable SNAT. Leave DHCP Ranges empty.
- Return to the main SDN panel and choose Apply.
- Wait for the result. In the lab, Reload network configuration on all nodes and SRV networking - Reload both ended with OK, and the SDN panel showed
labzoneas available.
SDN edits are pending until Apply. The gateway address is the host's address on this private guest network; it is not automatically a DNS resolver. Keep the host's working provider interface and management vmbr0 configuration in place.
Open Datacenter → SDN → Zones and choose Add → Simple. This form is ready to add the labzone zone for the test node.
Step 1: Set up the Simple zone
- Set up the Simple zone
Enter labzone as the ID, select the test node in Nodes, and leave IPAM set to pve.
- Check DHCP and add the zone
Automatic DHCP is off in this test. Check the settings, then click Add.
This example uses one test node. The DNS fields are blank and MTU remains auto.
The Create form under SDN → VNets links the labnet network to the previously created labzone zone.
Step 1: Choose the VNet name and zone
- Choose the VNet name and zone
Enter labnet in Name and select labzone as the Zone. In this example, Alias contains the description Debian lab network.
- Create the VNet
Isolate Ports and VLAN Aware are unchecked in this test. Review the form and click Create.
After creating the VNet, define its subnet; apply the SDN changes in the final step.
With the labnet VNet selected, open Create in the Subnets section. The image shows the subnet and SNAT settings filled in.
Step 1: Enter the private subnet and gateway
- Enter the private subnet and gateway
Subnet is set to 10.77.0.0/24 and Gateway to 10.77.0.1. These are the guide’s private lab-network examples.
- Check SNAT and create the subnet
SNAT is checked. Click Create to add the subnet with these lab settings.
Automatic DHCP is off in this test; the guest’s IP settings are configured separately.
Return to Datacenter → SDN and use Apply to apply the configuration. This final view shows labzone as available.
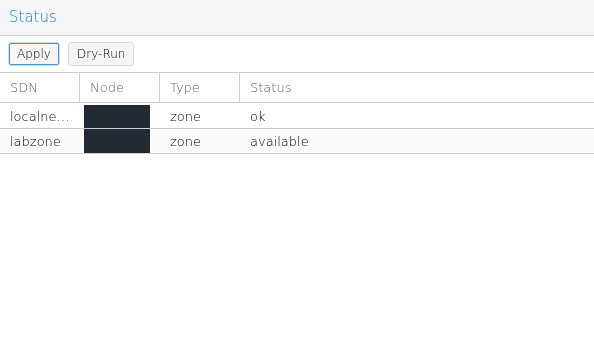
Step 1: Verify the labzone status
- Verify the labzone status
After Apply completes on the SDN page, check the Status column for labzone. It reads available in this capture.
When creating the guest virtual machine, you can select the labnet network prepared for this test.
11. Download the Debian guest ISO into Proxmox
Download the Debian ISO to local storage inside the installed Proxmox system. This file installs the new guest; it is separate from the Proxmox installer ISO attached through the DCHost portal earlier.
This test used Debian 13.7.0 amd64 netinst. Debian announced this stable point release on 12 September 2026.
https://cdimage.debian.org/debian-cd/current/amd64/iso-cd/debian-13.7.0-amd64-netinst.iso
The file size is 792,723,456 bytes. Its official SHA256SUMS value is:
a7ef94ac2fb9a7fec454552abd629b7cc9d5155c886165a45649f5ce6167e355
- Under the node, open local → ISO Images → Download from URL. Enter the ISO URL and use Query URL to fetch the file details.
- Under Advanced, choose Hash algorithm → SHA-256 and enter the full value in Checksum. Keep Verify certificates checked.
- Check the filename, then start the transfer with Download.
Open local → ISO Images → Download from URL. Enter the official Debian ISO URL and use Query URL to fetch its details; this example shows debian-13.7.0-amd64-netinst.iso.
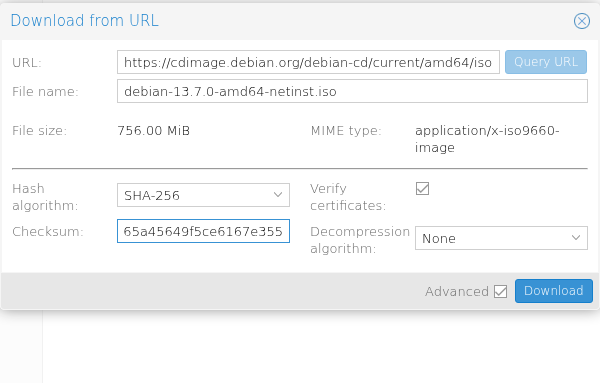
Step 1: Prepare SHA-256 verification
- Prepare SHA-256 verification
Under Advanced, choose SHA-256 as the Hash algorithm and enter the official Debian checksum in Checksum. Keep Verify certificates checked, then start the download with Download.
Only part of the checksum is visible in the field. Use the full published checksum for your download version instead of copying the fragment in the image.
In the task's Output tab, wait for 100%, checksum verified and TASK OK. The download and SHA-256 check completed successfully in this test.
The download task’s Output tab shows the completed download and successful checksum check. You can attach this ISO to the new virtual machine in the next step.
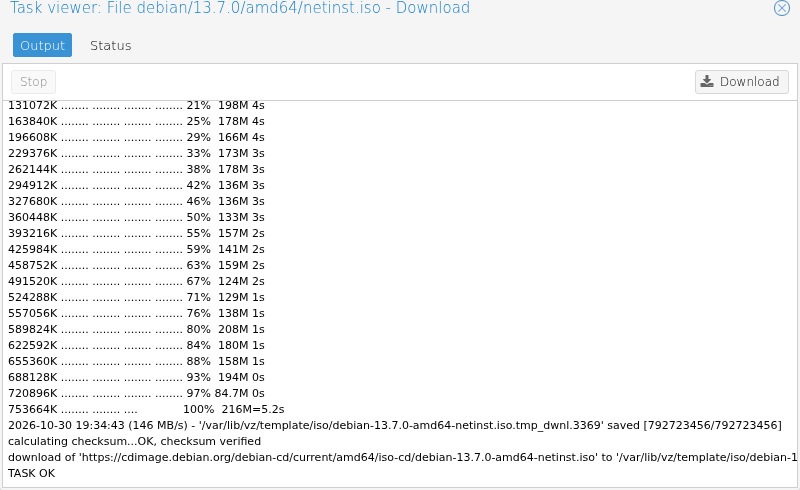
Step 1: Read the checksum result and TASK OK
- Read the checksum result and TASK OK
At the end of the output, check for 100%, checksum verified and TASK OK. This actual task output shows that the ISO download and configured checksum check succeeded.
This result concerns downloading the ISO file; installing the guest operating system is a later stage.
Debian's current directory changes with new releases. If the file URL above no longer opens, find the current amd64 image on the official netinst download page and use its matching value from SHA256SUMS in the official ISO directory. To use the same release, check the official Debian image archive. Netinst needs a working network connection to download additional packages.
12. Create the Debian virtual machine
Open the wizard with Create VM. On General, select the node; this test used VM ID → 100, Name → debian-lab, with Start at boot unchecked. Choose an unused VM ID in your own environment.
Open the wizard with Create VM and fill in the basic fields on General. This guide uses 100 and debian-lab as lab examples.
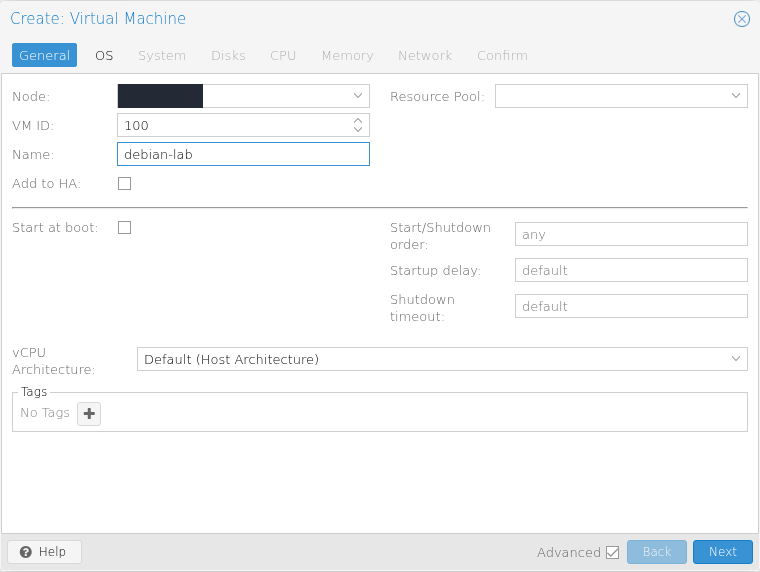
Step 1: Set the VM ID and name
- Set the VM ID and name
Select the test node in Node. This example uses VM ID 100 and Name debian-lab. Start at boot is unchecked.
Choose an unused VM ID and a meaningful name in your environment. Resource Pool is blank here.
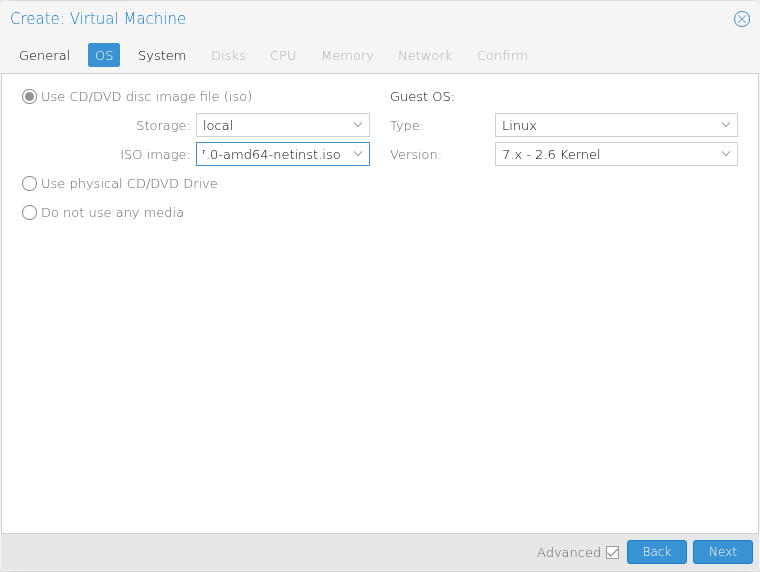
On OS, use Use CD/DVD disc image file (iso) to attach debian-13.7.0-amd64-netinst.iso from local storage. Guest OS → Type was set to Linux, with Version → 7.x - 2.6 Kernel.
On OS, select the verified ISO download and the guest OS type. The narrow ISO field shows only part of the filename.
Step 1: Select the ISO from local
- Select the ISO from local
Use the Use CD/DVD disc image file (iso) option. Choose local for Storage and attach the downloaded Debian ISO in ISO image.
- Check the guest OS type
Under Guest OS, Type is Linux and Version is 7.x - 2.6 Kernel. These are the selections used for this Debian virtual machine.
The full ISO path also appears in the ide2 row on Confirm.
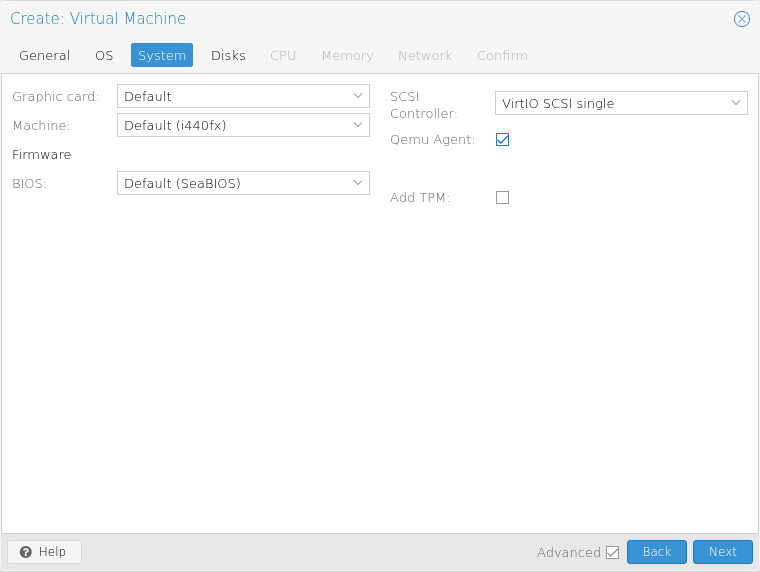
On System, Machine → Default (i440fx) and BIOS → Default (SeaBIOS) were retained. SCSI Controller → VirtIO SCSI single was selected and Qemu Agent was checked. This checkbox does not install the agent inside Debian; to use it, also install the package and prepare the service in the guest.
Compare the System tab with the actual settings used in this test. Add TPM is unchecked.
Step 1: Check the machine and BIOS selections
- Check the machine and BIOS selections
This test leaves Machine at Default (i440fx) and BIOS at Default (SeaBIOS). Graphic card also remains Default.
- Choose VirtIO SCSI and Qemu Agent
SCSI Controller is VirtIO SCSI single and Qemu Agent is checked. This setting still requires the agent software to be installed and running inside the guest.
This screen shows virtual hardware settings; it is not a physical server BIOS or hardware validation.
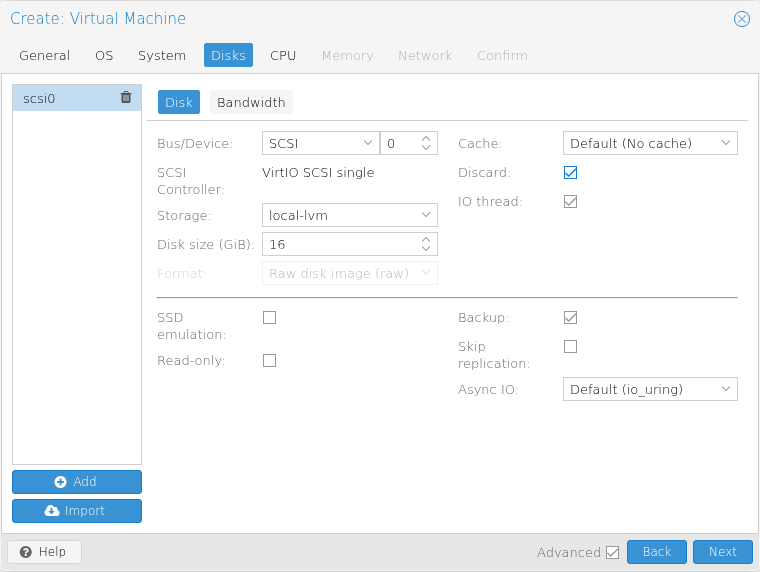
On Disks, create a 16 GiB SCSI disk on local-lvm. This test enabled Discard and IO thread, leaving Cache → Default (No cache). The virtual disk uses existing storage; it does not add physical capacity. Official Proxmox VM hardware settings.
On Disks, check the VM disk destination, capacity and I/O options. The ISO is stored on local, while this VM disk is allocated on local-lvm.
Step 1: Allocate a 16 GiB disk on local-lvm
- Allocate a 16 GiB disk on local-lvm
Storage is local-lvm and Disk size (GiB) is 16. The disk is attached as scsi0 on the SCSI bus; choose capacity for your own workload.
- Check Discard and IO thread
Discard and IO thread are checked in this capture. Cache remains Default (No cache).
Backup is checked. This setting permits including the disk in backups; this screen does not show an existing backup.
On CPU, this test used Sockets → 1, Cores → 2, Type → host. On Memory, 1536 MiB was allocated and Ballooning Device was disabled; the resulting configuration shows balloon: 0. These are the resource choices for this nested VDS test.
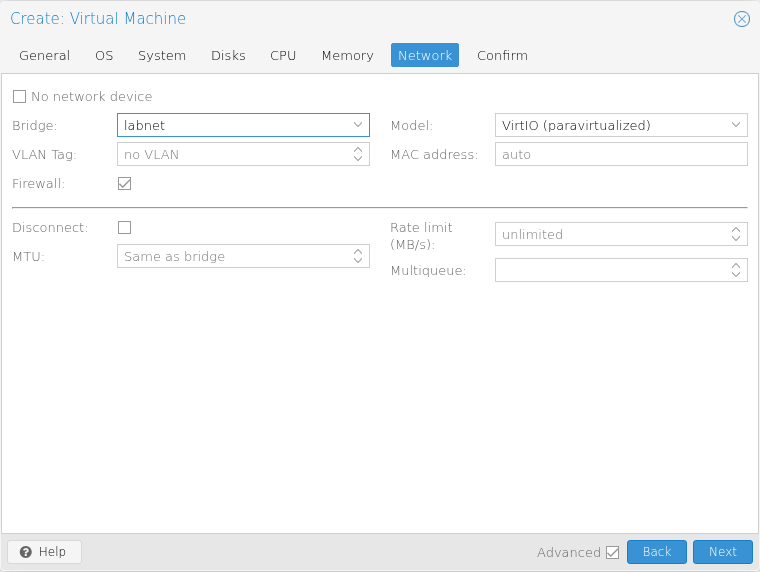
On Network, select Bridge → labnet and Model → VirtIO (paravirtualized). This test kept Firewall checked, VLAN Tag → no VLAN and MAC address → auto. Guest IP and DNS settings are configured during the installation that follows.
On Network, select the private labnet network prepared for this test. This image shows the virtual NIC connection; guest IP settings are configured separately.
Step 1: Connect to the prepared labnet network
- Connect to the prepared labnet network
Bridge selects the previously created labnet network. This test leaves VLAN Tag at no VLAN and checks Firewall.
- Keep VirtIO and automatic MAC allocation
Model is VirtIO (paravirtualized) and MAC address is auto. No fixed MAC address has been entered in this form.
No network device and Disconnect are unchecked. DHCP is off in this test, so complete the guest network configuration separately in the next stage.
On Confirm, review the ISO, disk, CPU, memory and network rows. Leave Start after created unchecked; the first start is separate in this example. When ready, select Finish and wait for the VM 100 - Create task to report OK.
Confirm lists the settings selected in the wizard before Finish. This image shows a configuration ready to create.
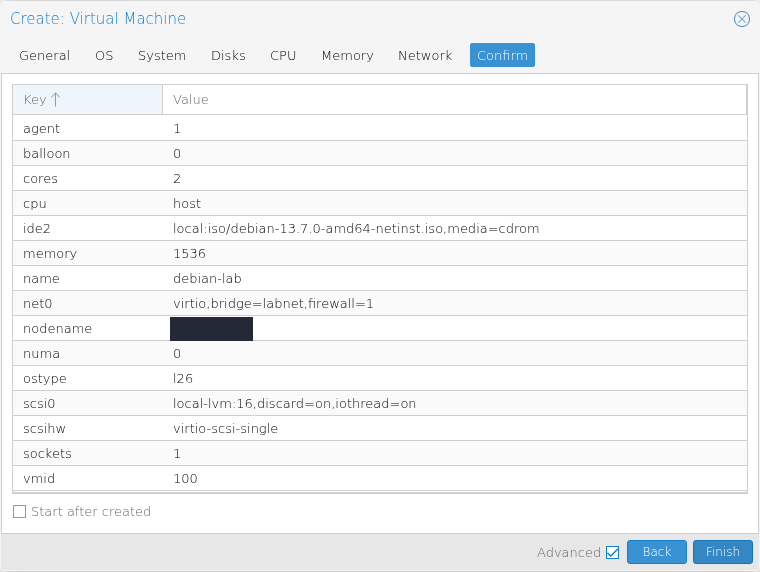
Step 1: Compare CPU, memory and agent settings
- Compare CPU, memory and agent settings
In Confirm, check agent 1, balloon 0, cores 2, cpu host and memory 1536. These are the values selected in the wizard for this test.
- Check the initial automatic-start option
Start after created is unchecked in this capture. Also check VM ID 100; the first start will be performed separately after the VM is created.
- Create the VM with Finish when the settings are correct
Also review the ISO, disk and network rows: ide2 shows the Debian ISO, scsi0 the 16 GiB disk on local-lvm, and net0 the labnet connection. Click Finish when ready.
This screen does not show the VM creation or guest boot result. After Finish, check the task result and the first console startup separately.
Video: create the VM
In this nested VDS test, Finish creates VM 100 with Start after created unchecked. The final task row shows OK. This recording covers creation only; it does not show the VM booting.
On a narrow screen, use fullscreen to read the task result in the video.
Creating the first VM
00:00 — Finish creates the VM.
00:01 — Wait for the result.
00:04 — OK
13. Install Debian in the guest console
Select 100 (debian-lab), choose Start, then open Console. Select Debian's Graphical install entry and press Enter. This graphical installer can prepare a server without installing a desktop environment.
The lab selected English, Other → Asia → Türkiye, the en_US.UTF-8 locale and American English keyboard. Choose the settings appropriate for your own keyboard and location. The Debian graphical installation guide explains these screens in detail.
Enter the private network manually
This network has no DHCP server, so automatic address configuration cannot succeed. On the network configuration method screen, choose Configure network manually.
Automatic DHCP is off in the SDN zone, so this test uses manual networking in the Debian installer.
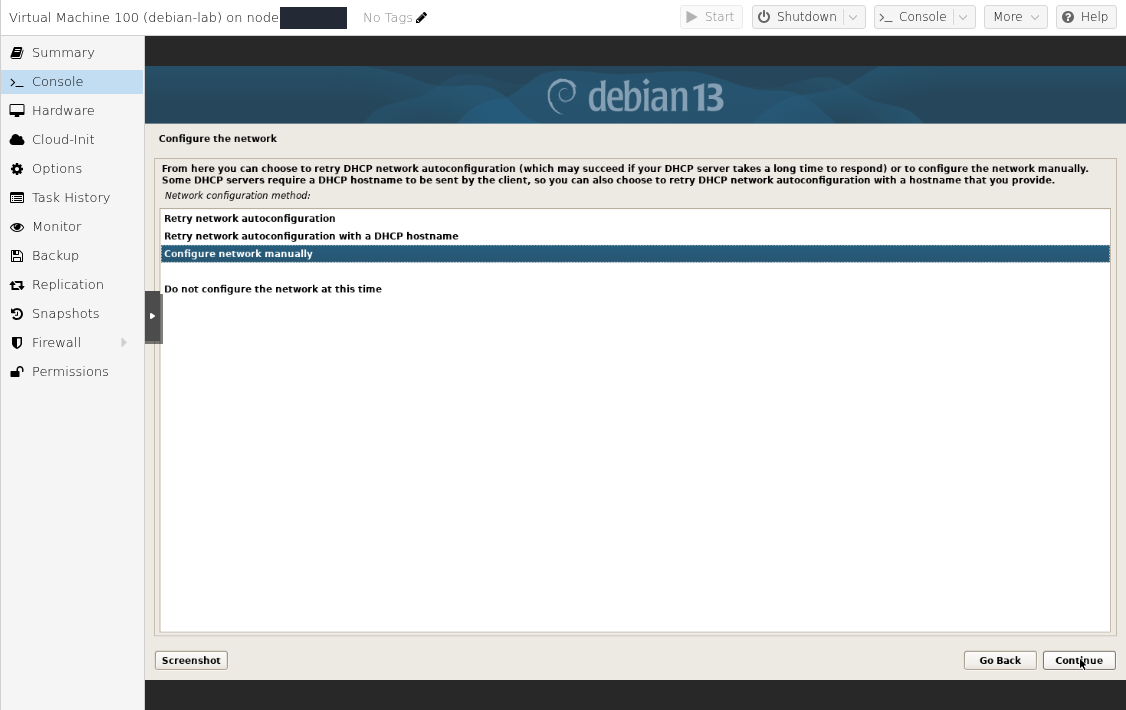
Step 1: Select manual networking
- Select manual networking
Select Configure network manually and continue with Continue.
This view shows the guest installer’s network choice; connectivity is checked later.
| Debian field | Value used in this lab |
|---|---|
| IP address | 10.77.0.10/24 |
| Gateway | 10.77.0.1 |
| Name server addresses | 8.8.8.8 |
| Hostname | debian-lab |
| Domain name | Left empty. |
The address was entered as 10.77.0.10/24, including its network prefix. The installer therefore did not open a separate Netmask page. /24 represents 255.255.255.0; if your installer asks for a mask separately, use the value for your own network.
In this test, the Debian guest attached to labnet receives 10.77.0.10/24.
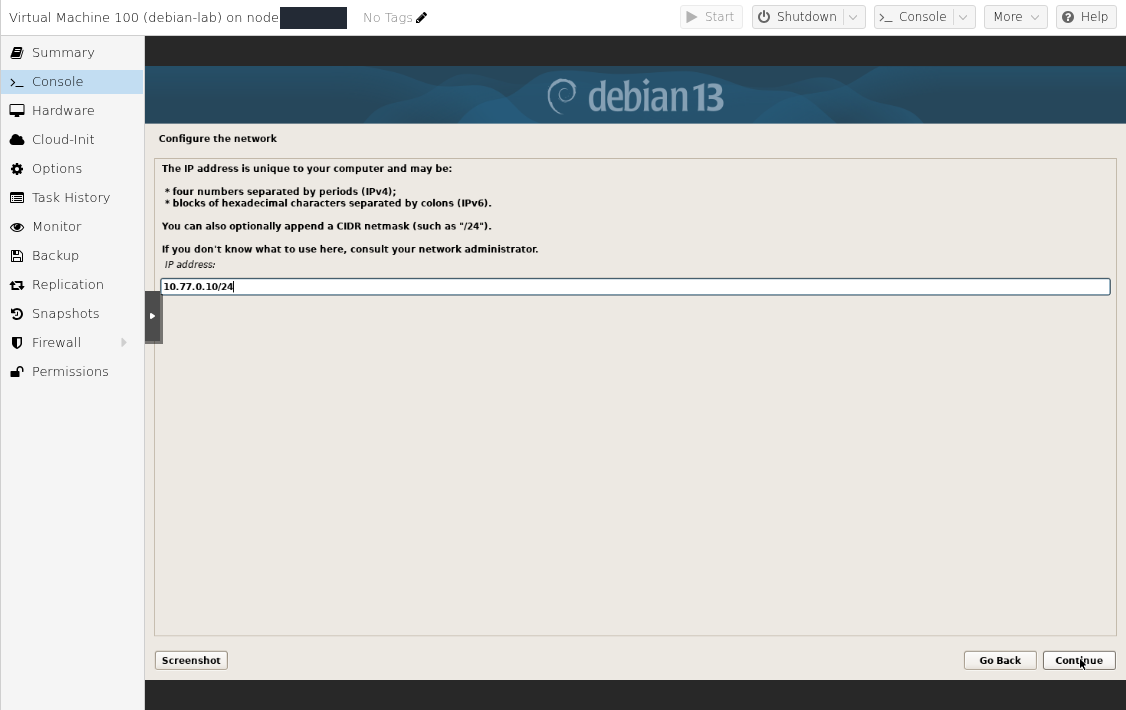
Step 1: Enter the address and /24 prefix together
- Enter the address and /24 prefix together
Enter 10.77.0.10/24 in IP address. Check the value and click Continue.
The /24 prefix is part of this entry; this flow did not open a separate netmask page.
Set Gateway to the private gateway created under Simple SDN: 10.77.0.1 in this example.
The Debian guest uses the gateway 10.77.0.1 defined in the SDN subnet.
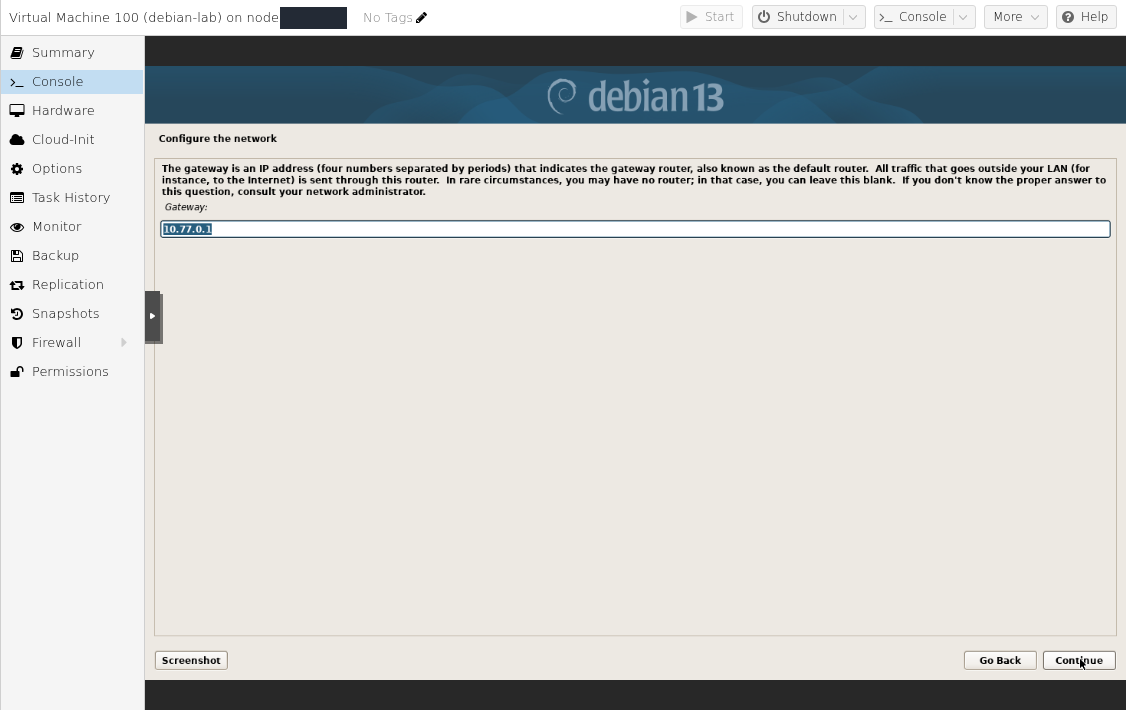
Step 1: Check the Gateway field
- Check the Gateway field
Set Gateway to 10.77.0.1 and click Continue.
This value belongs to the guide’s private lab network; use your own gateway on another network.
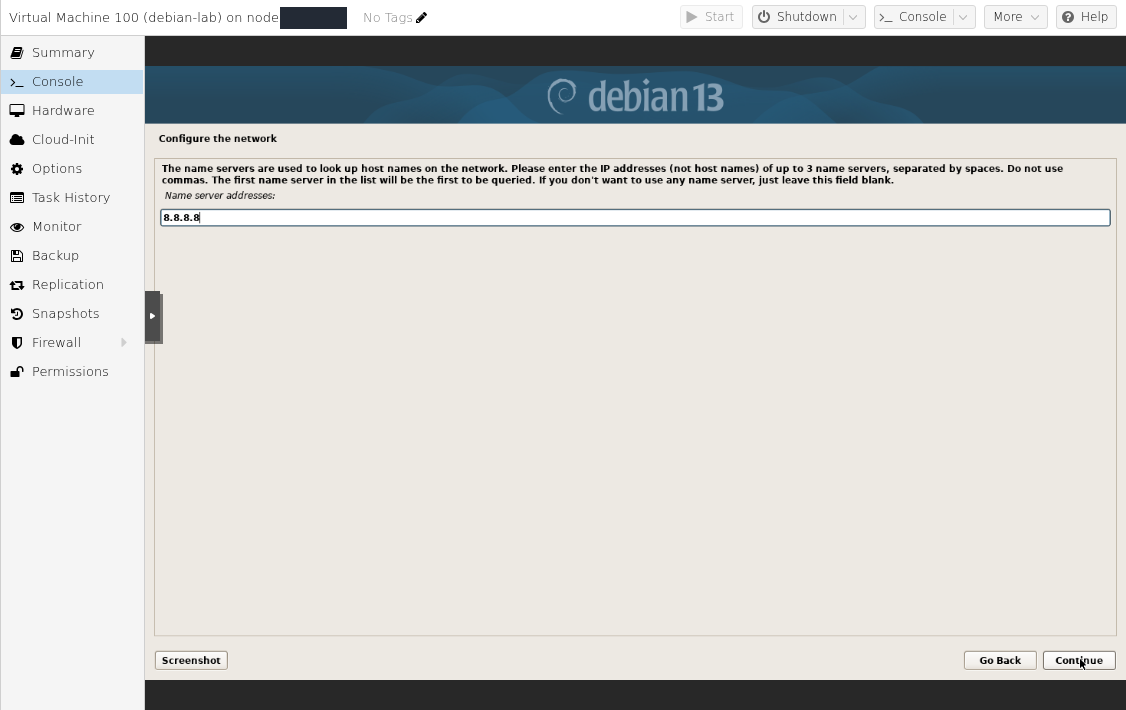
For Name server addresses, enter an actual DNS resolver reachable from the guest. This lab used 8.8.8.8. The gateway address is suitable here only if a DNS service is actually available at that address.
This test enters 8.8.8.8 in the Debian installer’s Name server addresses field.
Step 1: Check DNS and continue
- Check DNS and continue
Fill in Name server addresses and click Continue. This example uses the single DNS address 8.8.8.8.
Use a resolver appropriate for your network’s DNS policy. This entry alone does not establish DNS reachability.
These values belong to the example 10.77.0.0/24 network. Change them together if you selected a different subnet. Do not copy the Proxmox host's public management IP into the guest.
Video: gateway and DNS
For VM 100 in the nested VDS test environment, the recording begins with gateway 10.77.0.1 already filled. DNS 8.8.8.8 is entered, then the Hostname prompt appears. IP entry, a separate netmask page and a connectivity test are not shown in this recording.
Gateway and DNS in the Debian installer
00:00 — Gateway: 10.77.0.1
00:01 — Enter DNS: 8.8.8.8.
00:06 — The hostname prompt opens.
Use fullscreen on a small display to read the fields.
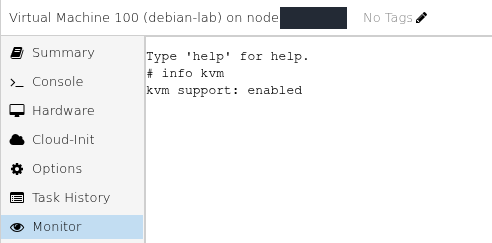
In the running VM's Monitor, info kvm returned kvm support: enabled. This confirms KVM acceleration for the inner virtual machine while the Debian installer is running.
Under VM 100 → Monitor, the info kvm command shows the running virtual machine’s KVM state.
Step 1: Read the info kvm result
- Read the info kvm result
Run info kvm in Monitor. The response in this capture is kvm support: enabled.
The result establishes that KVM acceleration is enabled for this running nested test VM.
User, guest disk and package mirror
Leave Debian's root password fields empty, then create a regular account with a strong password specific to this guest. The initial user can administer Debian through sudo. This choice does not change the Proxmox host's root account.
For partitioning:
- Choose Guided - use entire disk.
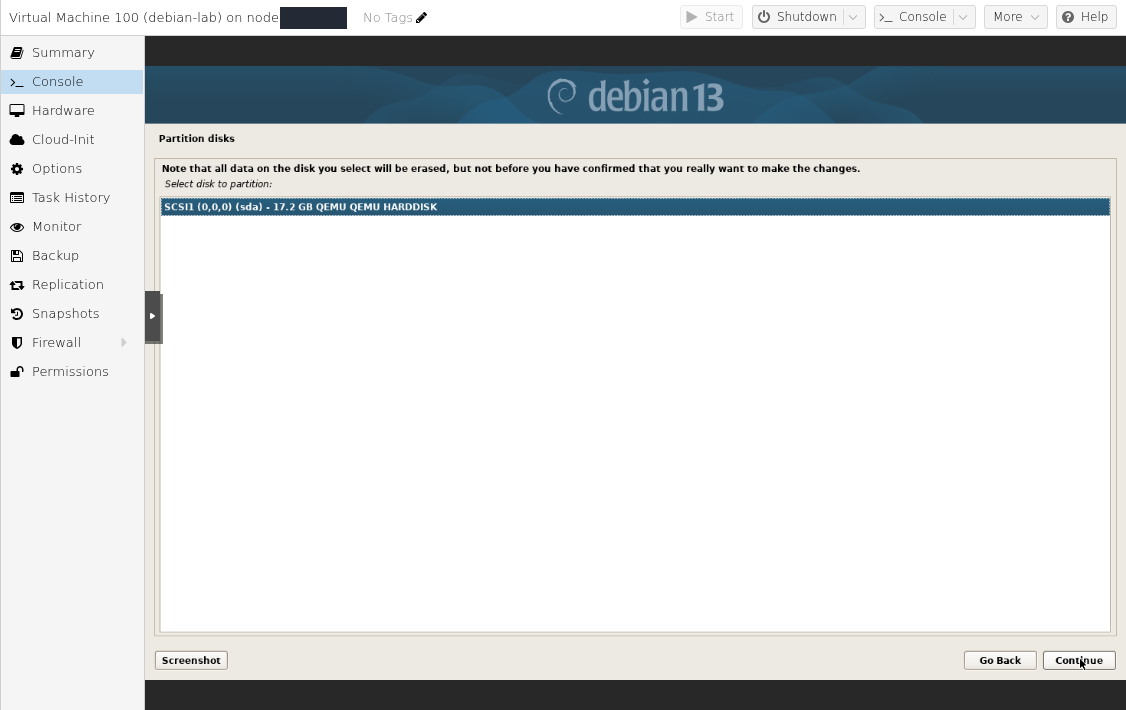
- Match the guest disk by name and size. This test displayed SCSI1 (0,0,0) (sda) — 17.2 GB QEMU HARDDISK. The decimal 17.2 GB measurement represents the 16 GiB disk allocated in Proxmox.
- Choose All files in one partition. Review the layout and select Finish partitioning and write changes to disk, then confirm writing after checking the target.
The Debian installer lists the 16 GiB virtual disk as 17.2 GB in decimal units.
Step 1: Check the size of sda
- Check the size of sda
Verify that 17.2 GB QEMU HARDDISK is the 16 GiB guest disk. Select the correct disk and click Continue; review the later write confirmation carefully.
The Proxmox host installation used a 70 GiB disk. This step concerns the 16 GiB guest disk created for VM 100.
This confirmation formats the new guest disk. Check that the console's VM name is debian-lab before proceeding.
The lab selected No for scanning additional installation media, Türkiye for mirror location and deb.debian.org as the mirror. HTTP proxy information was left empty because this network requires no proxy. After installing the base system, the installer reached the software-installation stage.
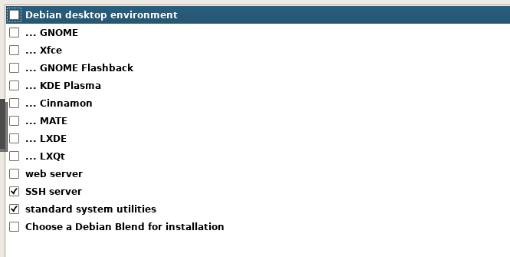
When asked about package-usage statistics, this lab selected popularity-contest → No. In Software selection, only SSH server and standard system utilities were checked; Debian desktop environment, GNOME and other desktop tasks were cleared. The selections were reviewed before Continue started package installation.
This example selects SSH server and standard system utilities. Desktop environments are not installed.
Step 1: Leave desktop options unchecked
- Leave desktop options unchecked
Clear Debian desktop environment and the desktop options below it. This server example does not need a graphical desktop.
- Select SSH and standard tools
Keep SSH server and standard system utilities selected. Installing SSH alone does not provide access from the internet; private networking and access rules still apply.
Using the graphical installer does not require installing a desktop on the server. Check the selections, then continue with Continue.
Installing SSH does not publish the private guest address through SNAT; this exercise uses the console.
Select Yes when asked to install GRUB on the primary drive. On the next screen, choose this guest's /dev/sda disk, the QEMU virtual disk listed in this lab. GRUB lets Debian boot from its system disk without the ISO. Then wait for Installation complete.
Install the boot loader on the virtual disk where Debian was installed. The target is /dev/sda in this example.
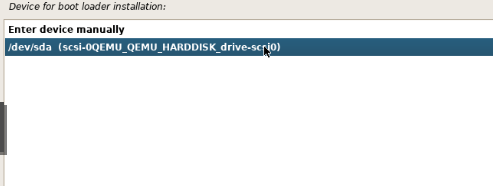
Step 1: Verify the installation disk
- Verify the installation disk
Select the /dev/sda row and continue with Continue. If there are multiple disks, first verify which disk contains the Debian installation.
This screen belongs to the Debian guest inside Proxmox. The selected disk is not the disk of the Proxmox host.
Boot from the installed guest disk
Debian reached the Installation complete screen. It asks you to remove the installation media and use Continue to reboot.
Installation complete confirms that installation has finished. Detach the guest ISO before booting from the system disk.
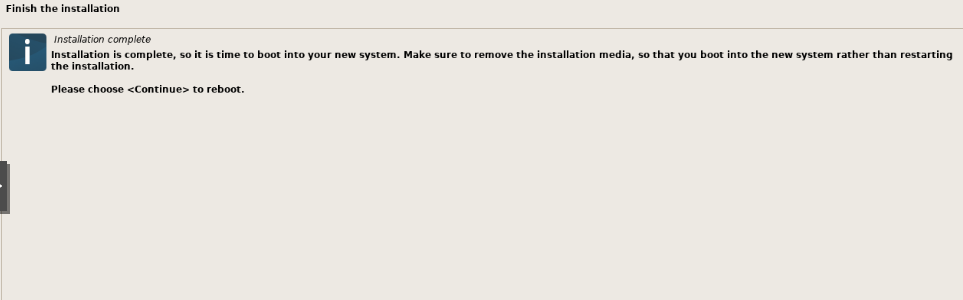
Step 1: Check the completion message
- Check the completion message
Read Installation complete and the reboot instruction. Do not assume installation is finished from a progress bar alone.
This success screen is not yet a disk-boot or network test result. After detaching the ISO, reboot with Continue.
Open the same VM's Hardware → CD/DVD Drive → Edit, select Do not use any media, then save with OK.
In the Debian VM, open Hardware > CD/DVD Drive (ide2). Do not use any media removes the installation ISO from the virtual drive.
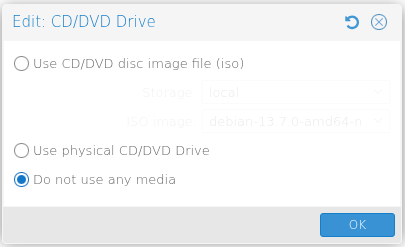
Step 1: Select no media
- Select no media
Select Do not use any media. Verify that you are editing the Debian guest hardware, not the Proxmox host.
- Save the change
Save with OK. The CD/DVD row in Hardware should now show none instead of the ISO filename.
This does not delete the ISO file from storage. It only empties the Debian virtual machine’s virtual CD/DVD drive.
Check that the CD/DVD row now shows none,media=cdrom in Hardware. This means the Debian ISO is detached from the virtual drive; the file remains in storage.
The CD/DVD Drive (ide2) row in Hardware shows none,media=cdrom. The ISO is no longer attached.
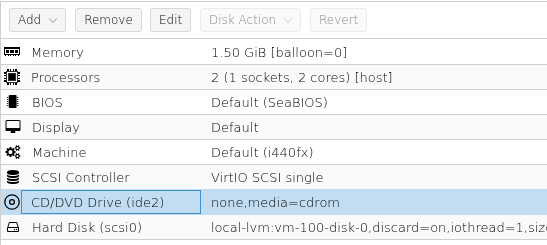
Step 1: Verify the none value
- Verify the none value
Confirm none,media=cdrom in the CD/DVD Drive (ide2) row. This verifies ISO detachment, but does not itself prove disk boot.
Return to the Debian installer console and reboot with Continue. Then verify that the system boots from its virtual disk.
Return to Console and use Continue on the installer's final screen to reboot. If the ISO menu appears again, check that the system disk is enabled under Options → Boot Order. This is separate from detaching the outer Proxmox installer through the DCHost portal.
Log in with the regular account through Debian's Console. The lab verified disk boot with the ISO detached, regular-user login and administrative access through sudo -v. A text login prompt is expected for a server installed without desktop tasks.
Check the Debian release and network
Run these commands inside the Debian guest console:
cat /etc/os-release
ip -4 address
ip route
getent hosts deb.debian.org
sudo apt-get update
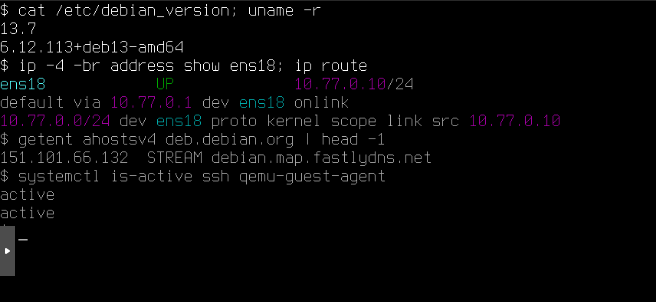
They check the Debian release, address, route, DNS resolution and package-index access. The default route should use 10.77.0.1. Also check that the package-index refresh finishes without errors.
The installed Debian guest returned these results after disk boot:
| Check | Result in this installation |
|---|---|
| Debian release | 13.7 |
| Running kernel | 6.12.113+deb13-amd64 |
| Network interface | ens18, UP; 10.77.0.10/24 |
| Default route | Via 10.77.0.1. |
| DNS | deb.debian.org resolves. |
| Package access | sudo apt-get update completed successfully. |
| SSH service | active; this guide accesses the guest through its console. |
Check QEMU Guest Agent
The Qemu Agent option selected in the VM wizard lets Proxmox exchange status information with Debian. The guest also needs the package and running service:
sudo apt-get install -y qemu-guest-agent
systemctl is-active qemu-guest-agent
The package was already current in this installation, so the command installed no new package. The service was verified as active. Both the VM option and guest service are needed for Proxmox to retrieve guest IP and operating-system information.
The installed system reports Debian 13.7. Its private IP address and default route are listed; SSH and QEMU Guest Agent both return active.
Step 1: Verify the installed version
- Verify the installed version
cat /etc/debian_version and uname -r show the version and running kernel of the Debian system booted from disk.
- Check that both services are active
systemctl is-active ssh qemu-guest-agent should return two separate active lines. Also check the network address and default route in the output above.
This example uses private address 10.77.0.10/24 and gateway 10.77.0.1. Use the values assigned to your own network.
Create a restore-test file
Create a harmless file that will let you recognize restored data:
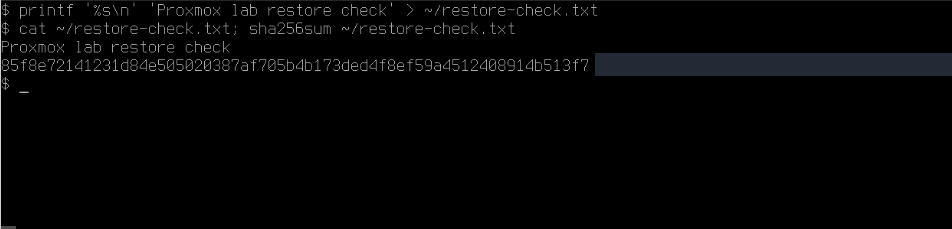
printf '%s\n' 'Proxmox lab restore check' > ~/restore-check.txt
cat ~/restore-check.txt
sha256sum ~/restore-check.txt
Reading the same content after restoration helps verify that the data came back from the backup.
The file was created in the lab; its Proxmox lab restore check content and SHA-256 value were recorded. The next step backs up the VM containing this file.
Create a small file before taking the backup. After restoring, compare both its contents and its SHA-256 checksum.
Step 1: Record the file contents
- Record the file contents
cat ~/restore-check.txt shows Proxmox lab restore check. Keep the sha256sum result for the recovery check as well.
This file does not replace an application backup. It provides a simple check that the restored virtual machine contains the same data.
14. Back up the installed VM
For a separate backup server and scheduled jobs, continue with Proxmox Backup Server installation and automated backups.
This exercise backs up a stopped virtual machine. Select the VM and use Shutdown → Yes to shut down Debian cleanly, then wait for Stopped. The power menu's Stop is a forced power-off; use Shutdown for a routine clean shutdown.
- Select VM
100and open Backup. - Choose Backup now.
- Select Storage → local. In your environment, use a target with Backup content enabled and enough free space.
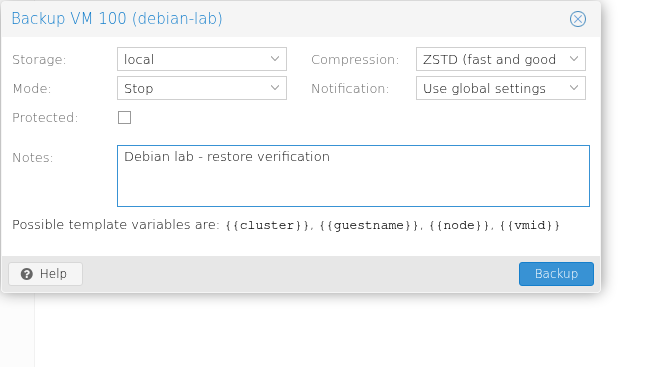
- Choose Mode → Stop and Compression → ZSTD (fast and good).
- Add a recognizable Notes value; this test used
Debian lab - restore verification. Start the backup and wait for its successful task result. - Confirm that the dated backup archive is listed.
The backup dialog's Mode → Stop is a backup method, separate from the power menu's forced-stop button. In this test, the VM was already shut down before backup and remained stopped afterwards.
Open Backup now for the shut-down Debian VM. This example uses Storage local, Mode Stop and Compression ZSTD.
Step 1: Choose storage and backup mode
- Choose storage and backup mode
Storage is local and Mode is Stop. In this walkthrough the VM was first shut down normally with Shutdown.
- Check the compression setting
Compression is set to ZSTD. Enter a short description in Notes so that you can identify the backup later.
- Start with Backup
Click Backup. Check the final result in the task window that opens.
local is on the same Proxmox server. Also keep backups on a separate system to protect against failure of the entire host.
Video: Starting a virtual machine backup
Starting with Backup and watching task progress. The completion result is shown in the next screenshot.
On a narrow screen, use fullscreen to read the task output.
Starting a virtual machine backup
00:00 — local · Stop · ZSTD
00:01 — Backup starts the backup task.
00:06 — Watch progress in the task window.
00:14 — When the task finishes, check for TASK OK.
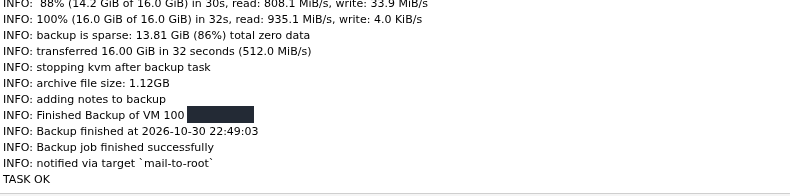
The task backed up the 16 GiB scsi0 disk and ended with TASK OK. The archive contained 1,197,301,200 bytes, displayed as about 1.20 GB in the VM's Backup list and 1.12 GiB under local → Backups. These are different units for the same archive. Sparse blocks and compression can make an archive smaller than the virtual disk's configured capacity.
The task log ends with Backup job finished successfully and TASK OK. The same output lists the archive size.
Step 1: Check the TASK OK result
- Check the TASK OK result
Read the task output through to the end. TASK OK confirms that this backup task completed successfully.
Creating the archive is the first check. Next, restore it to a separate virtual machine and verify the file contents too.
Check the task log if the job fails. Do not restore an incomplete archive. Proxmox backups include guest configuration and backed-up disk data; disks deliberately excluded from backup require separate handling. See the official backup modes and storage documentation.
A backup stored on the same VDS shares that VDS's disk-failure risk. It is useful for learning the workflow, but independent recovery requires another storage location. Proxmox recommends a dedicated Proxmox Backup Server host and also documents NFS as an alternative. Build an external backup plan for important data.
15. Restore to a new VM ID and check the result
Keep the original VM stopped and restore to a new, unused VM ID. There is no need to delete or overwrite the original for this exercise.
Use local → Backups in the left server tree. In this interface, Restore within the VM's own Backup view opens Overwrite Restore: VM 100, targeting that existing VM. To create a separate copy, close that dialog and use the storage-level Backups list instead.
Select local storage in the Proxmox tree, then open Backups. Select the archive you want to restore.
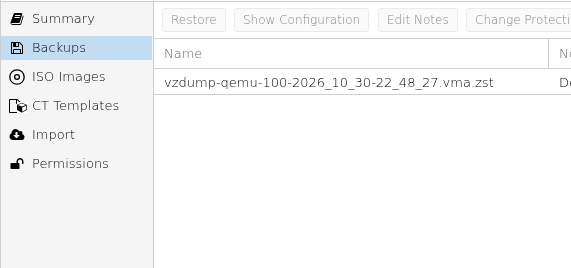
Step 1: Select the correct backup archive
- Select the correct backup archive
Check the VM ID and date in the filename. This example creates a new VM101 from the VM100 backup.
Use the storage Backups list to restore to a new VM ID. Do not use an Overwrite option that replaces the existing VM.
Select the completed archive under local → Backups and choose Restore. This test used:
| Field | Selection and purpose |
|---|---|
| Storage | local-lvm, the destination for the restored virtual disk. |
| VM ID | 101, confirmed unused before starting. |
| Name | debian-restore-test, to distinguish the restored copy. |
| Unique | Checked, to generate new MAC addresses. |
| Start after restore | Unchecked, so settings can be inspected before booting. |
| CPU, socket and memory fields | Left empty to preserve the settings in the backup. |
| Add to HA | Unchecked. |
This example uses target Storage local-lvm and new VM ID101. Unique is checked and Start after restore is off.
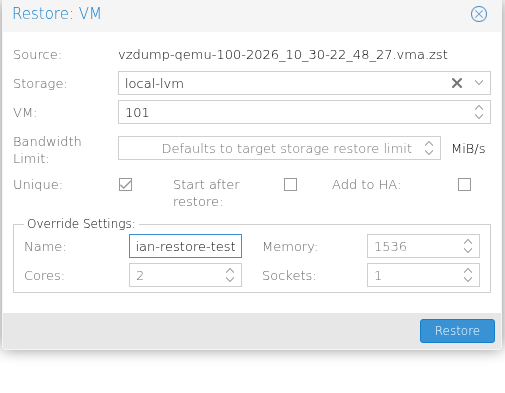
Step 1: Choose a new VM ID
- Choose a new VM ID
Enter the unused ID101 instead of the existing ID100. Storage is local-lvm, where the restored virtual disk will be written.
- Keep automatic start disabled
Keep Unique checked and Start after restore unchecked. First check the restored settings and confirm that the original VM is stopped.
- Start with Restore
Recheck the selected archive and new VM ID, then click Restore.
Unique generates new hardware identities; it does not change a static IP inside the operating system. Do not start two VMs with the same IP together.
Video: Restoring the backup to a new VM
Starting Restore for new VM 101 and watching task progress. The success result is in the next screenshot.
On a narrow screen, use fullscreen to read the task output.
Restoring the backup to a new VM
00:00 — New VM 101 · local-lvm
00:01 — Restore starts the recovery task.
00:06 — Watch progress in the task window.
00:18 — When finished, check TASK OK at the bottom of the log.
Choose an unused VM ID in your own environment. Review the source archive, target ID and storage before starting Restore. In the lab, the task finished with TASK OK and created 101 (debian-restore-test).
The task output ends with 100 percent progress and TASK OK. You can now check the restored virtual machine settings.
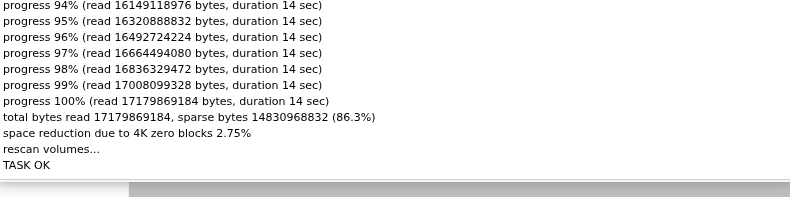
Step 1: Check TASK OK on the final line
- Check TASK OK on the final line
Scroll the task log to the bottom. After 100 percent progress, verify the TASK OK line.
TASK OK confirms completion of the restore task. Next, boot VM101 and verify the file contents.
Check the network before starting the copy
The restored Debian disk retains the static 10.77.0.10 address. Generating a new MAC with Unique does not change that IP. Keep the original VM stopped; do not run both copies on the same network at once. Alternatively, disconnect the restored copy's network device while checking disk boot and the file through its console.
The Name value debian-restore-test is the VM label in Proxmox. The restored Debian system retained its own debian-lab hostname, which is expected.
Inspect the new VM's Hardware and Options. Confirm that its CD/DVD drive is empty and its system disk is enabled for booting. This test kept VM 100 stopped, then started VM 101.
Verify the restored file
Open the restored copy's Console, log in with the same Debian account and check:
cat ~/restore-check.txt
sha256sum < ~/restore-check.txt
cat /etc/os-release
VM 101 booted from its own disk with no ISO attached. User login succeeded; the file returned Proxmox lab restore check, and its SHA-256 matched the pre-backup file. The restored system also verified Debian 13.7, its gateway and DNS. The original VM 100 remained stopped throughout the check.
After VM101 boots, read the check file and calculate its SHA-256 checksum. The contents and checksum match the pre-backup values.
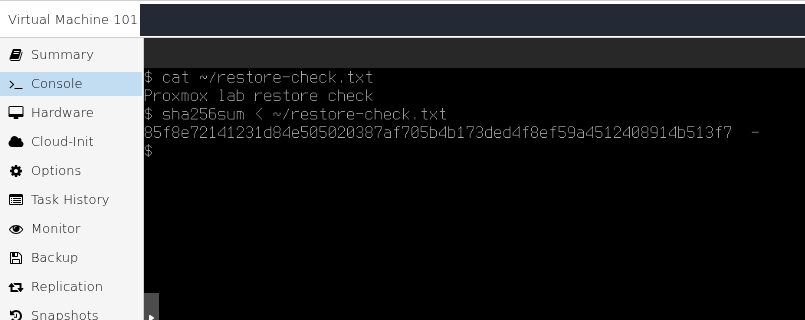
Step 1: Verify the test file contents
- Verify the test file contents
Compare Proxmox lab restore check from cat ~/restore-check.txt with the pre-backup file. The SHA-256 result is shown separately in the full screenshot and the guide command step.
The original VM100 remained stopped during this check. Do not run two VMs with the same static IP at the same time.
Video: Verify the file in the restored VM
The file contents and SHA-256 checksum are checked in VM 101. Both match the pre-backup values.
Use fullscreen to read the commands and SHA-256 value.
Verify the file in the restored VM
00:00 — VM 101: read the check file.
00:02 — The check text appears.
00:03 — Calculate the file’s SHA-256 checksum.
00:05 — Compare it with the pre-backup checksum.
This checks operating-system boot and access to the sample data as well as completion of the restore task. See the official restore documentation.
Final checks
Compare the results of this completed exercise with your own installation:
| Check | Verified result in this exercise |
|---|---|
| Host | Proxmox 9.2.24, running kernel 7.0.14-26-pve; installed disk boot with the ISO detached. |
| Management | Successful HTTPS 8006 login with root / Linux PAM. |
| Updates | Final Refresh task TASK OK and No updates available. |
| Storage | ISO and backup archive on local; VM disks on local-lvm. |
| Nested virtualization | The first running VM returned kvm support: enabled. |
| Debian | 13.7, installed disk boot, regular-user login and sudo access verified. |
| Network | 10.77.0.10/24, gateway 10.77.0.1; successful DNS and package access. |
| Backup | VM 100's Stop / ZSTD backup finished with TASK OK. |
| Restore | VM 101 booted; its marker content and SHA-256 matched. The original VM stayed stopped. |
Troubleshooting
During this installation, Debian's mirror scan stopped progressing for a while. Guest checks confirmed gateway access, DNS resolution and an official Debian file download. Using Cancel → Retry in the installer repeated the scan and allowed software installation to proceed. If this happens, check network and mirror access before assuming the installation is damaged.
| Symptom | What to check |
|---|---|
| The Proxmox graphical installer does not open | Check the ISO architecture and integrity, console error and server resources. If the graphical interface remains unavailable, the boot menu's Terminal UI offers an alternative installer with a different screen layout. |
| A VM reports that KVM virtualization is unavailable | Check whether the outer VDS exposes virtualization extensions. Host CPU branding alone does not prove nested KVM support. Ask the provider about that service's capabilities; software emulation is not an equivalent performance fix. |
| The web interface does not load | Use https:// with port 8006; check the management IP/prefix, gateway, selected interface, route to the server and applicable access rules. Use the provider console when a network change has removed browser access. |
| The installer appears again after reboot | Check attached media and boot order. Do not start repartitioning an already installed disk. |
| Updates return an Enterprise authorization error | Confirm subscription status and the repository entry producing the error. An unsubscribed lab needs working public repositories; Debian repositories must remain available. |
labnet cannot be selected for the guest | Check the selected node, saved zone/VNet and the SDN Apply task. Pending changes are not an applied bridge. |
| Debian's automatic network setup fails | Expected when Automatic DHCP is disabled. Enter the planned private IP, mask, gateway and reachable DNS resolver manually. |
The guest reaches 10.77.0.1 but cannot download packages | Check subnet SNAT, the host's own outbound connection, guest default route and DNS separately. The gateway address is not automatically a DNS service. |
You cannot SSH directly to 10.77.0.10 from the Internet | This is a private guest address. SNAT provides outbound access; use the Proxmox console or separately design private/routed inbound access. |
| Proxmox does not show the guest's IP in Summary | Check that Qemu Agent is selected in the VM settings and that the package and running service are available inside Debian. An empty display alone does not establish a network failure. |
| A backup runs out of space | Check the backup target's free file space as well as the VM disk pool. Choose an adequately sized target before retrying. |
| The restored VM conflicts with the original | Both disks may contain the same static guest IP. Keep the original stopped, isolate the restored NIC, or deliberately assign a different guest address before running both. |
Related guides
- ISO upload, attachment and boot order
- Debian graphical ISO installation
- Server backup planning
- Linux updates
For larger deployments, continue with the official Proxmox administration guide. Production storage, network redundancy, access control and independent backup design require planning beyond this single-node nested lab.