Back up and restore an Ubuntu/Linux server with Proxmox Backup Client
An Ubuntu server running outside Proxmox VE can send backups directly to an existing Proxmox Backup Server. proxmox-backup-client runs on Ubuntu, reads the source data and uploads it to a PBS datastore. The source can be a physical server or a virtual machine on another platform.
In this guide, you will create an encrypted directory backup, restore it into a different directory, compare its contents and Linux permissions, and schedule daily runs with systemd. You will also restore a small test block device from .img, then back up the root filesystem and separate boot files and extract them into other directories.
Example environment: Ubuntu 24.04.5 LTS, x86-64, Linux 6.8.0-147-generic; official static client package 4.2.8-1 (version: 4.2.8); existing PBS 4.2.8-1. Directory and system-file restores, byte-for-byte image recovery and an automatic timer trigger were verified.
For this walkthrough, we used an isolated Ubuntu VM hosted on PVE and ran the standalone backup client inside Ubuntu. The same client can also back up compatible physical Linux servers and Linux VMs on other platforms.
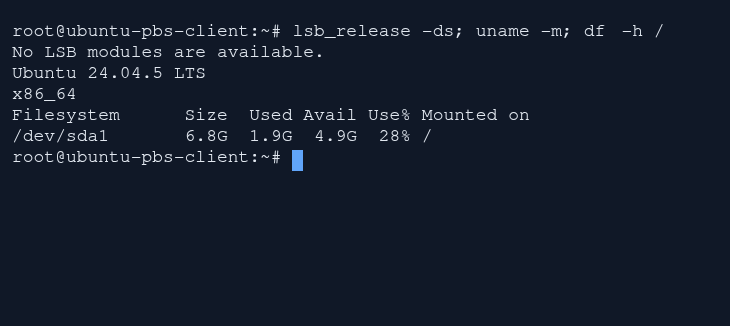
Step 1: Release and architecture
- Release and architecture
This test client runs Ubuntu 24.04.5 LTS on x86_64.
- Inspect available space
Read the Avail column in df; plan additional space for backup sources and the restore destination.
This screen shows client prerequisites only; no backup has run yet.
Which backup type covers your data?
| Requirement | Method | Coverage |
|---|---|---|
/etc, website files, user or application directories | data.pxar:/source/directory | Files and supported Linux filesystem metadata |
| Operating system files | root.pxar:/ plus other required filesystems | Partitioning and bootloader recovery require a separate plan |
| Contents of a block device | disk.img:/dev/DEVICE | Raw bytes from the selected device; the source must be consistent |
| Running database | Engine-supported backup first, then PBS | Copying its live data directory alone is insufficient |
Proxmox's regular client packages target Debian. Its official static client is provided for modern x86-64 Linux systems; this guide uses Ubuntu 24.04. We do not add a current Debian repository to Ubuntu. Do not assume native Windows, macOS or ARM support from this package.
1. Give this server limited access to PBS
PBS must already have a datastore, and Ubuntu must be able to reach its HTTPS port, 8007. If you still need to set up PBS, complete the Proxmox Backup Server installation guide first.
In the PBS management interface:
- Create the
ubuntu-clientnamespace inside the datastore you will use. - Open Configuration → Access Control → User Management and add
ubuntu-backup@pbs. - Under API Tokens, create the
ubuntu24token for this user. Save the displayed token secret securely; the same value will not be displayed again. - Under Permissions, assign
DatastoreBackupon/datastore/DATASTORE/ubuntu-clientto both the userubuntu-backup@pbsand the tokenubuntu-backup@pbs!ubuntu24. ReplaceDATASTOREwith your existing datastore name.
A token's effective privileges are the intersection of its own permissions and its user's permissions. That is why both entries are needed. DatastoreBackup can create and restore its own backups; the source server does not need administrator or backup deletion privileges. A namespace groups data within a datastore; it does not create a separate physical disk or quota.
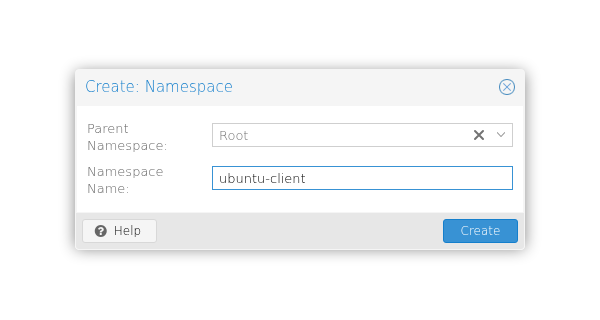
Step 1: Parent namespace
- Parent namespace
Root selects the datastore root. This example groups Ubuntu backups in a separate namespace.
- Namespace name
Namespace Name is ubuntu-client. Grant the user and token permissions on this exact namespace path.
Create has not yet been submitted; this screen shows the selected parent and name.
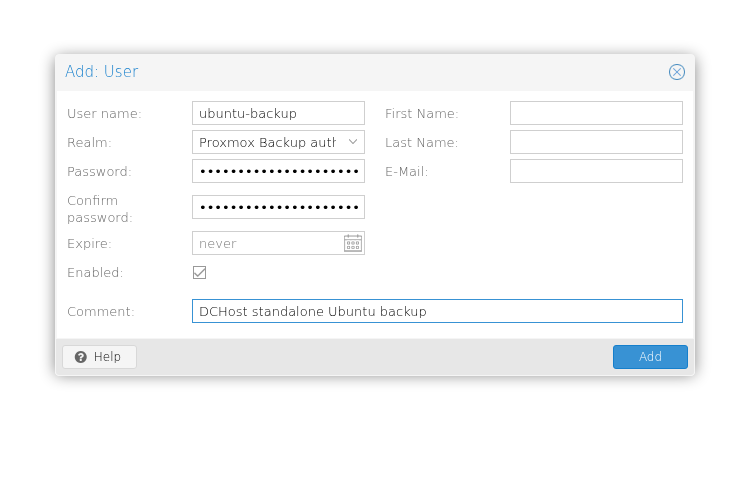
Step 1: Dedicated PBS user
- Dedicated PBS user
Enter ubuntu-backup in User name and select Proxmox Backup auth; the identity becomes ubuntu-backup@pbs.
- Keep the user enabled
Keep Enabled selected. Do not publish password values; the client will use a separate API token.
The form has not yet been submitted with Add; saved permissions appear in the following screens.
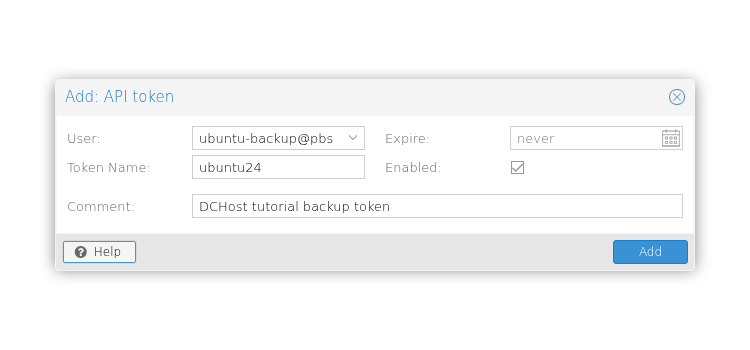
Step 1: User and token name
- User and token name
User is ubuntu-backup@pbs and Token Name is ubuntu24; the API identity becomes ubuntu-backup@pbs!ubuntu24.
No token secret exists in this preparation screen. Store the secret shown after creation in a private file.
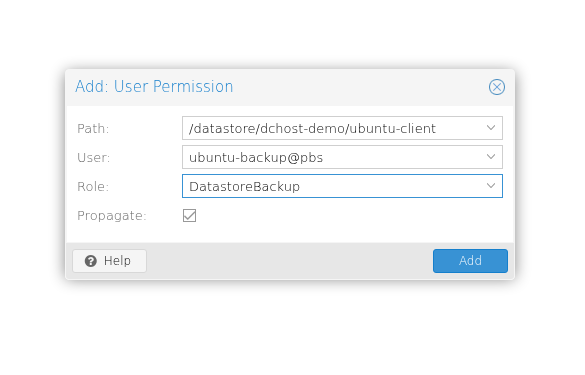
Step 1: Exact namespace path
- Exact namespace path
Path is /datastore/dchost-demo/ubuntu-client; avoid a broader grant on the datastore root.
- DatastoreBackup role
The role is DatastoreBackup. Add a separate permission for the API token on the same namespace.
Add has not yet been submitted. Save the user and token permissions separately.
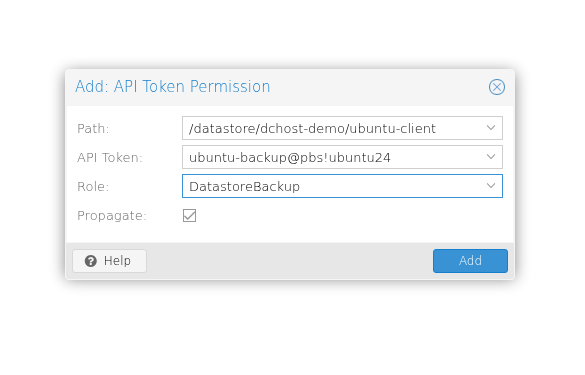
Step 1: Exact namespace path
- Exact namespace path
Path is /datastore/dchost-demo/ubuntu-client; avoid a broader grant on the datastore root.
- DatastoreBackup role
The role is DatastoreBackup. Token permissions are also limited by the linked user’s effective permissions.
Add has not yet been submitted. Save the user and token permissions separately.
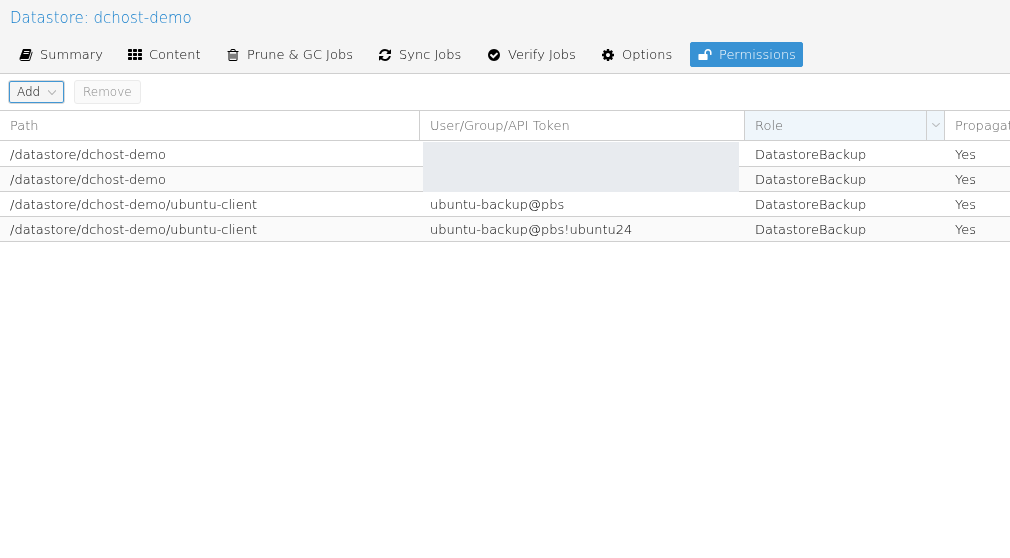
Step 1: The same exact namespace path
- The same exact namespace path
The last two rows use /datastore/dchost-demo/ubuntu-client, limiting this client’s grant to the selected namespace.
- Separate user and token rows
Both ubuntu-backup@pbs and ubuntu-backup@pbs!ubuntu24 have a saved DatastoreBackup role.
Unrelated existing backup identities are masked; their permissions were not changed.
Obtain the PBS certificate fingerprint through your trusted PBS administration session. We will use it when connecting with a self-signed certificate. If PBS has a valid certificate issued by a CA trusted by the client, you can omit the PBS_FINGERPRINT setting.
2. Place the official static client on Ubuntu
Check the architecture first:
uname -m
cat /etc/os-release
This example expects x86_64. Install the supporting tools from Ubuntu's own repositories:
sudo apt update
sudo apt install --no-install-recommends ca-certificates curl gpgv python3 acl
The guide's downloadable, readable helper script downloads the official 4.2.8-1 static client package. It verifies the published Proxmox key hash, repository signature and package hashes, then extracts the package into a working directory. It does not add an APT repository, install a Debian package or execute the downloaded program.
curl --fail --show-error --location \
  --output fetch-pbs-client.py 'https://docs.dchost.com/downloads/pbc-fetch-client.py' &&
python3 fetch-pbs-client.py &&
sudo install -o root -g root -m 0755 \
  pbs-client-4.2.8-1/extracted/usr/bin/proxmox-backup-client \
  /usr/local/bin/proxmox-backup-client &&
/usr/local/bin/proxmox-backup-client version
Stop if a signature or hash check fails. The helper pins the version verified for this guide. A copied client is not updated automatically by APT; authenticate the official package again and repeat backup and restore checks when upgrading. The static client does not use custom libc/NSS name resolution modules; confirm that it resolves your PBS address in a connection test.
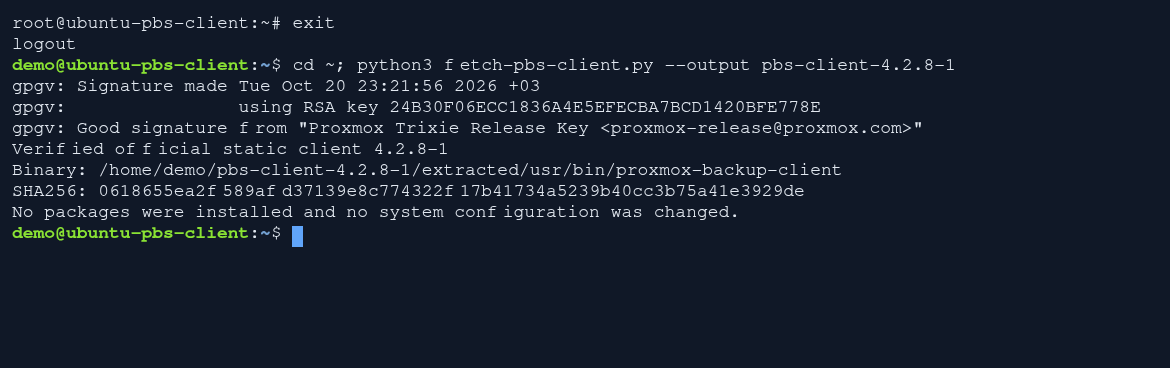
Step 1: Authentication completed
- Authentication completed
Verified official static client identifies the authenticated file. Verify the hash chain from signed repository metadata before running the binary.
This capture runs a prepared authentication helper; no package was installed at this stage. The visible release key and hash are public verification metadata.
Step 1: Working client
- Working client
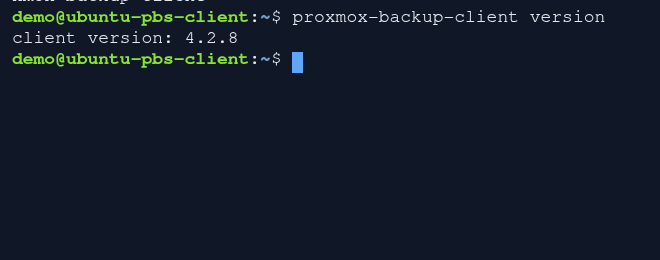
The client version: 4.2.8 result shows that the installed client runs in this Ubuntu session.
The version command ran after the actual installation; this check does not yet prove PBS connectivity or a backup.
In a real Ubuntu SSH session, the previously uploaded fetch-pbs-client.py helper verifies the official repository metadata signature and the hash chain leading to the static client. The extracted binary is installed with sudo install and reports version 4.2.8. Preparing the helper is outside this recording.
Client installation transcript
00:00 — The prepared verification helper runs.
00:03 — The official static client is verified and extracted.
00:07 — The installed client reports version 4.2.8.
This real Ubuntu SSH session invokes the previously uploaded fetch-pbs-client.py helper; preparing that helper is outside the recording. Verification of the official repository metadata signature and hash chain is followed by extraction of the verified static client. The line saying that no packages or system configuration changed describes this first phase. The actual sudo install command then runs, and the version query returns client version: 4.2.8. This clip shows no backup or restore result.
cd ~; python3 fetch-pbs-client.py --output pbs-client-4.2.8-1
sudo install -m 0755 pbs-client-4.2.8-1/extracted/usr/bin/proxmox-backup-client /usr/local/bin/proxmox-backup-client
proxmox-backup-client version
3. Prepare connection and encryption credentials
Run the remaining Ubuntu commands in a root shell. This permits ownership and permissions to be restored:
sudo -i
umask 077
install -d -m 0700 /etc/proxmox-backup
Edit /etc/proxmox-backup/client.env. Replace the server, datastore and fingerprint with your values; do not place the token secret in this file:
PBS_REPOSITORY='ubuntu-backup@pbs!ubuntu24@pbs.example.com:DATASTORE'
PBS_FINGERPRINT='VERIFIED_SHA256_FINGERPRINT_OF_THE_PBS_CERTIFICATE'
Save the token secret separately without displaying it:
systemd-ask-password 'PBS token secret:' > /etc/proxmox-backup/pbs-api-token
chmod 0600 /etc/proxmox-backup/client.env /etc/proxmox-backup/pbs-api-token
set -a
. /etc/proxmox-backup/client.env
set +a
export PBS_PASSWORD_FILE=/etc/proxmox-backup/pbs-api-token
Create the encryption key. Enter a new key passphrase at the first prompt, then enter the same passphrase in the second command:
proxmox-backup-client key create /etc/proxmox-backup/encryption-key.json
systemd-ask-password 'Backup key passphrase:' > /etc/proxmox-backup/pbs-key-password
chmod 0600 /etc/proxmox-backup/encryption-key.json /etc/proxmox-backup/pbs-key-password
export PBS_ENCRYPTION_PASSWORD_FILE=/etc/proxmox-backup/pbs-key-password
The PBS access token, backup encryption key and key passphrase are separate credentials. Keep an accessible recovery copy of the key and its passphrase in a secure location separate from the source server. If the only copy is inside the encrypted backup that needs that key, losing the source server can also make the backup inaccessible. Do not record token or passphrase entry.
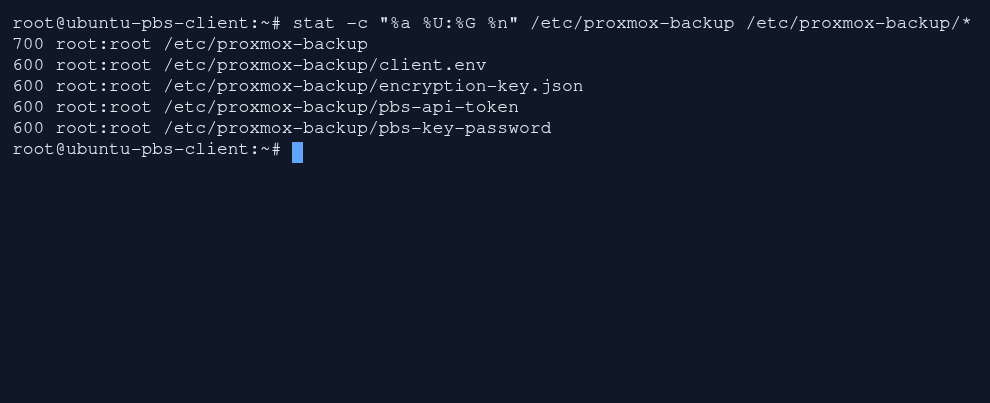
Step 1: Directory 700, files 600
- Directory 700, files 600
/etc/proxmox-backup is mode 700; its environment, token, encrypted key and key-password files show mode 600 and root:root ownership.
stat shows only filenames, modes and ownership; token, password and key contents were not opened.
4. Back up a directory and restore it elsewhere
This example uses /srv/pbs-demo. Create a test file; this example also grants a read ACL to UID 1000. For real use, select the source directory and ACL user for your environment:
set -euo pipefail
install -d -m 0750 /srv/pbs-demo
printf 'PBS file restore test\n' > /srv/pbs-demo/restore-check.txt
chmod 0640 /srv/pbs-demo/restore-check.txt
setfacl -m u:1000:r-- /srv/pbs-demo/restore-check.txt
proxmox-backup-client backup data.pxar:/srv/pbs-demo \
  --backup-type host --backup-id ubuntu24-lab --ns ubuntu-client \
  --keyfile /etc/proxmox-backup/encryption-key.json
proxmox-backup-client snapshot list --ns ubuntu-client
In the datastore's Content view on PBS, select the ubuntu-client namespace. Check the host/ubuntu24-lab group, completed task and encrypted data.pxar archive. Use the same identity, namespace and source archive plan for subsequent backups of that group.
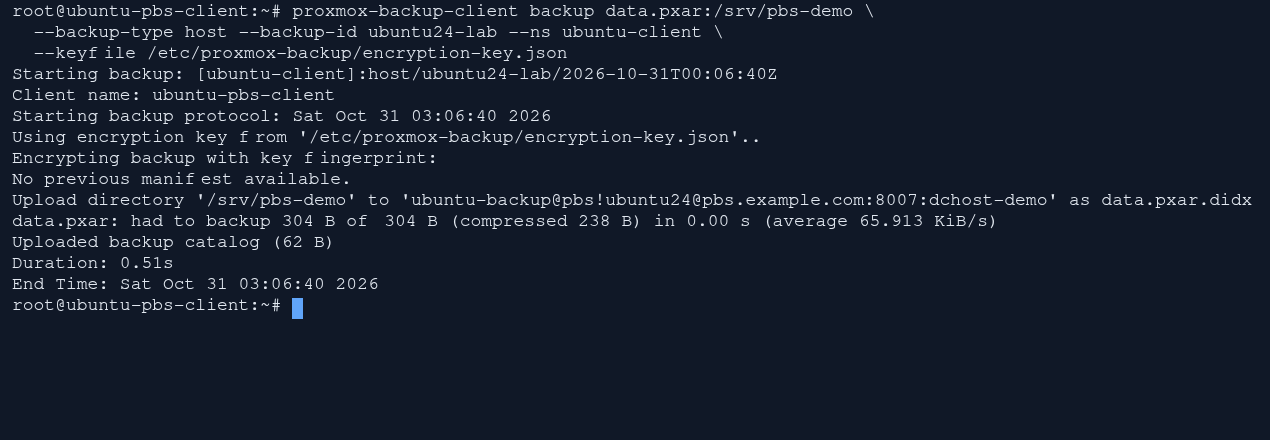
Step 1: Command completed
- Command completed
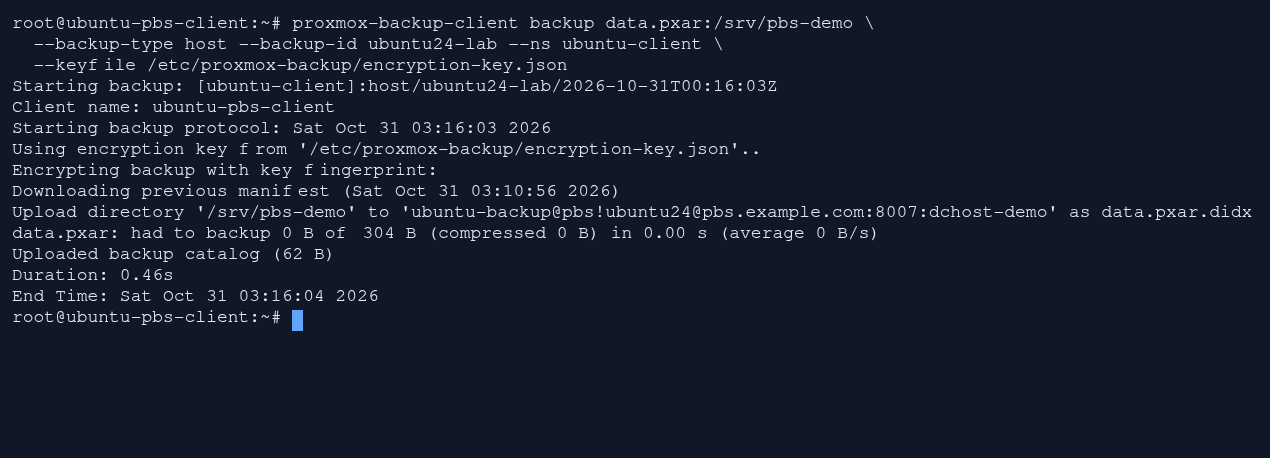
The catalog uploaded, Duration and End Time were printed, and the shell prompt returned. Inspect the actual snapshot and archive next.
The encryption-key fingerprint is permanently masked. Timing for this tiny test directory is not a production-performance benchmark.
The file-backup video shows an actual repeated run using the same test data. It reported 0 B of new archive data and 304 B reused; these values are not a measurement of total network traffic.
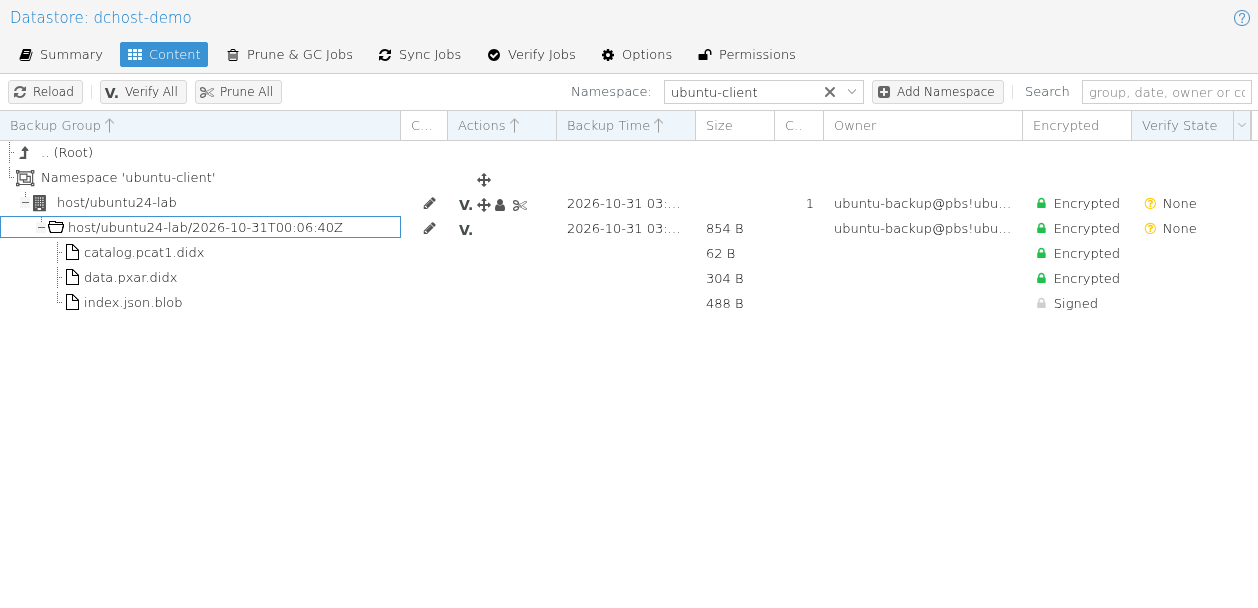
Step 1: Snapshot and archive
- Snapshot and archive
The expanded snapshot contains data.pxar.didx. The client restore command uses data.pxar as the archive name.
- Encrypted and Signed
The data/catalog archives show Encrypted, while index.json.blob shows Signed. Store the encryption key separately and securely.
Verify State is still None. Encrypted storage alone does not show that verification or a restore test passed.
Step 1: 0 B new data, completed command
- 0 B new data, completed command
The data.pxar row shows 0 B newly sent for 304 B of content. Catalog, duration and end-time output are followed by the shell prompt.
This is not the first backup. The real repeated run reuses data from the unchanged tiny test directory. The encryption fingerprint is masked.
In a real Ubuntu SSH session, the same sample directory is backed up again as an encrypted data.pxar archive. The client uses the previous manifest, reuses the unchanged 304 B and reports 0 B of new file data. This is a repeated backup; it shows no restore.
Repeated directory backup transcript
00:00 — The same directory is backed up again.
00:02 — 304 B reused; new data: 0 B.
The recording begins in a cleared, real Ubuntu SSH terminal. The command below repeats an encrypted backup of the sample /srv/pbs-demo directory as data.pxar in the ubuntu-client namespace. Playback is at real speed: this tiny sample finishes in about 0.46 seconds, with the result held for about five seconds. Downloading previous manifest shows that the client uses the earlier backup. The result data.pxar: had to backup 0 B of 304 B means that the unchanged 304 B of file data is reused. Uploaded backup catalog (62 B), the duration, end time and returned shell prompt are also visible; 0 B does not mean zero network traffic. This clip proves neither the first backup nor a restore. The key fingerprint is masked; the key file contents are never displayed.
proxmox-backup-client backup data.pxar:/srv/pbs-demo \
  --backup-type host --backup-id ubuntu24-lab --ns ubuntu-client \
  --keyfile /etc/proxmox-backup/encryption-key.json
Step 1: The data.pxar archive
- The data.pxar archive
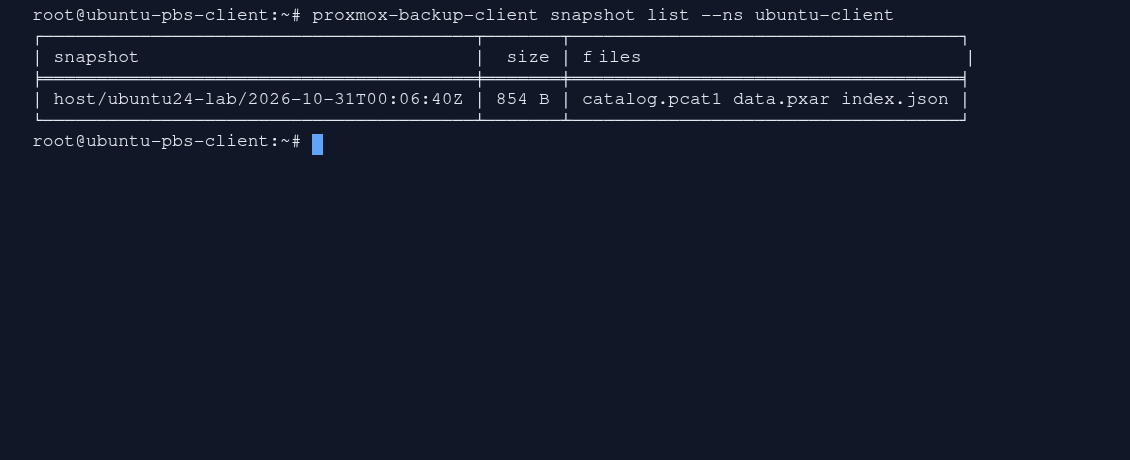
The files column shows catalog.pcat1, data.pxar and index.json. Use data.pxar as the archive name when restoring.
- Complete snapshot identity
Use the full snapshot identity beginning with host/ubuntu24-lab and keep the namespace option in the command.
The list shows that a backup exists; restoration is tested in the next step.
Copy the real snapshot path from the list. Replace the date in this example with your output. Choose a different, unused destination directory:
SNAPSHOT='host/ubuntu24-lab/2026-10-31T00:06:40Z'
proxmox-backup-client restore "$SNAPSHOT" data.pxar /srv/pbs-restore-check \
  --ns ubuntu-client --keyfile /etc/proxmox-backup/encryption-key.json
cmp /srv/pbs-demo/restore-check.txt /srv/pbs-restore-check/restore-check.txt
stat -c '%u:%g %a %n' \
  /srv/pbs-demo/restore-check.txt /srv/pbs-restore-check/restore-check.txt
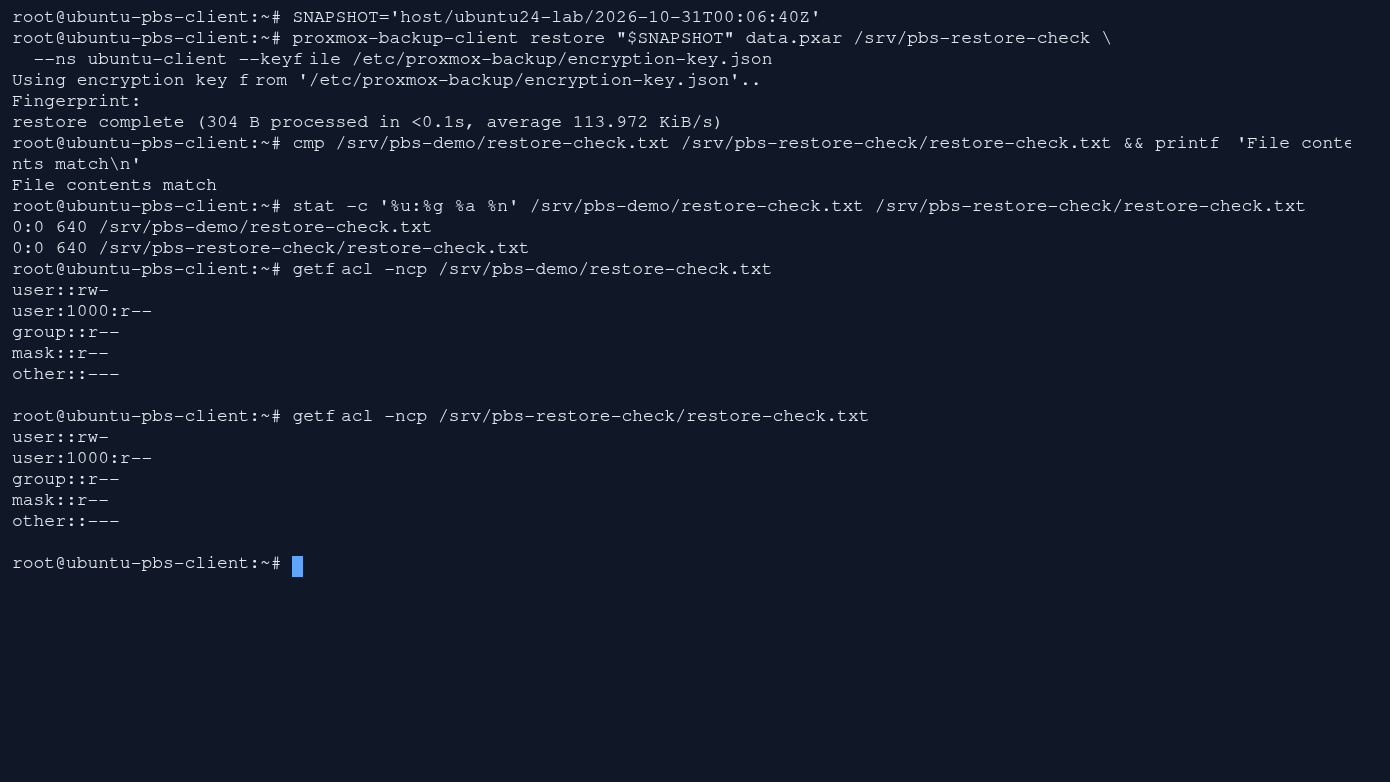
cmp prints nothing when it succeeds. Both files should have the same numeric user/group and mode. If you use ACLs, install Ubuntu's acl package and compare getfacl -cp FILE output for the source and destination too. In the example, source and restored file SHA-256 hashes matched; UID:GID 0:0, mode 0640 and the r-- ACL entry for UID 1000 were preserved.
Step 1: Contents and metadata match
- Contents and metadata match
cmp is followed by File contents match. Both files show 0:0 / 640; both ACL outputs have the same entries, including user:1000:r--.
This test verifies file contents and the displayed metadata; it does not prove boot, whole-machine or live-database recovery. The encryption fingerprint is masked.
In a real Ubuntu SSH session, data.pxar is restored into a separate directory. File contents, numeric ownership, mode 640 and POSIX ACL output are compared. The final ACL result is visible briefly at the end; pause or read the transcript.
File restore transcript
00:00 — Restore into a separate directory.
00:02 — Compare contents and permissions.
The first approximately 0.15 seconds retain the preceding successful backup and snapshot listing; the terminal then clears. The selected data.pxar archive is restored into /srv/pbs-restore-check, separate from the source /srv/pbs-demo directory. The client reports restore complete. cmp succeeds and prints File contents match. Both files report numeric owner/group 0:0 and mode 640. The two getfacl -ncp outputs contain the same ACL entries: user::rw-, user:1000:r--, group::r--, mask::r--, other::---. The restored file’s final ACL output appears only in the last approximately 0.2 seconds; pause the recording to inspect it. The encryption-key fingerprint is permanently masked. This proves recovery of the sample file contents and shown permission metadata; it is not an application, database or bootable system recovery test.
SNAPSHOT='host/ubuntu24-lab/2026-10-31T00:06:40Z'
proxmox-backup-client restore "$SNAPSHOT" data.pxar /srv/pbs-restore-check \
  --ns ubuntu-client --keyfile /etc/proxmox-backup/encryption-key.json
cmp /srv/pbs-demo/restore-check.txt /srv/pbs-restore-check/restore-check.txt && printf 'File contents match\n'
stat -c '%u:%g %a %n' /srv/pbs-demo/restore-check.txt /srv/pbs-restore-check/restore-check.txt
getfacl -ncp /srv/pbs-demo/restore-check.txt
getfacl -ncp /srv/pbs-restore-check/restore-check.txt
5. Schedule daily backups with systemd
Scheduling runs on Ubuntu. Create /etc/systemd/system/pbs-client-backup.service:
[Unit]
Description=Back up Ubuntu files to Proxmox Backup Server
Wants=network-online.target
After=network-online.target

[Service]
Type=oneshot
User=root
EnvironmentFile=/etc/proxmox-backup/client.env
LoadCredential=pbs-api-token:/etc/proxmox-backup/pbs-api-token
LoadCredential=pbs-key-password:/etc/proxmox-backup/pbs-key-password
Environment=PBS_PASSWORD_FILE=%d/pbs-api-token
Environment=PBS_ENCRYPTION_PASSWORD_FILE=%d/pbs-key-password
ExecStart=/usr/local/bin/proxmox-backup-client backup data.pxar:/srv/pbs-demo --backup-type host --backup-id ubuntu24-lab --ns ubuntu-client --keyfile /etc/proxmox-backup/encryption-key.json
Create /etc/systemd/system/pbs-client-backup.timer:
[Unit]
Description=Daily Proxmox Backup Client backup

[Timer]
OnCalendar=*-*-* 02:30:00
RandomizedDelaySec=15m
Persistent=true
Unit=pbs-client-backup.service

[Install]
WantedBy=timers.target
Run the service manually and check its result before enabling the timer:
systemd-analyze verify /etc/systemd/system/pbs-client-backup.service /etc/systemd/system/pbs-client-backup.timer
systemctl daemon-reload
systemctl start pbs-client-backup.service
systemctl show pbs-client-backup.service --property=Result --property=ExecMainStatus
journalctl -u pbs-client-backup.service --no-pager -n 30
systemctl enable --now pbs-client-backup.timer
timedatectl
systemctl list-timers --all pbs-client-backup.timer
A successful first run should report Result=success and ExecMainStatus=0; PBS should also show a new snapshot. A finished oneshot service normally becomes inactive (dead). The timer runs around 02:30 in the server's local timezone, with up to 15 minutes of randomized delay plus systemd's scheduling tolerance; read the actual next trigger in the NEXT column. The timer does not restart the same service while it is still active. Persistent=true can catch a missed calendar run when the timer becomes active again; this example does not configure automatic failure notifications or retries.
The lab's actual automatic trigger completed at 03:10:14 on 31 October 2026 (Europe/Istanbul), using a temporary OnActiveSec=35s test setting. It reported success with exit code 0. The temporary setting was removed, leaving the daily 02:30 schedule and 15-minute randomized delay shown above enabled.
Step 1: Load credentials from files
- Load credentials from files
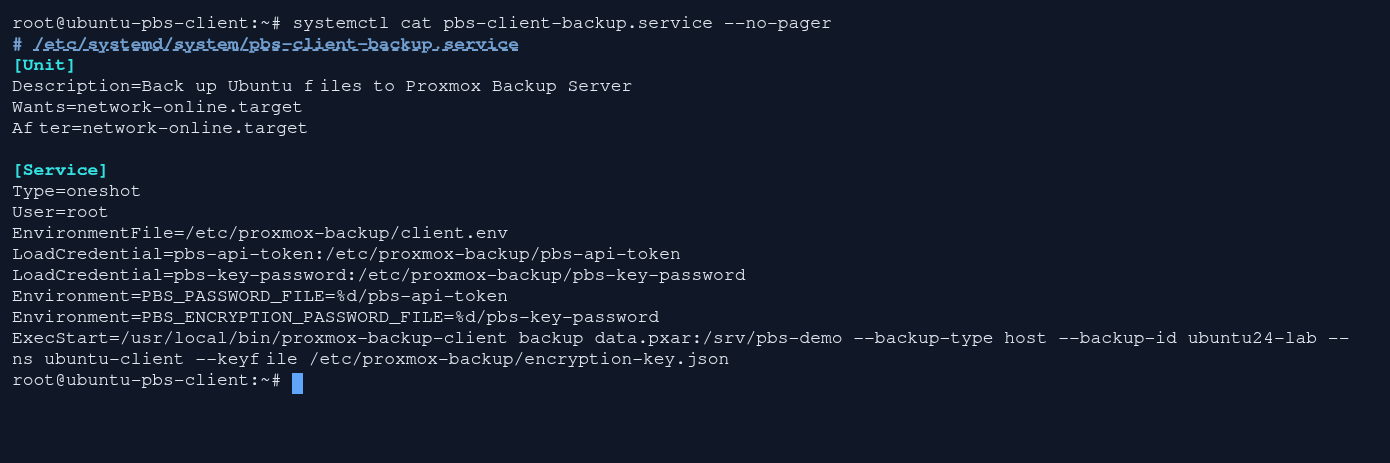
The two LoadCredential entries bind the API token and key password to systemd credentials. Type=oneshot and ExecStart are visible in the same actual service definition.
This service backs up /srv/pbs-demo files. LoadCredential shows file paths; secret values are not displayed.
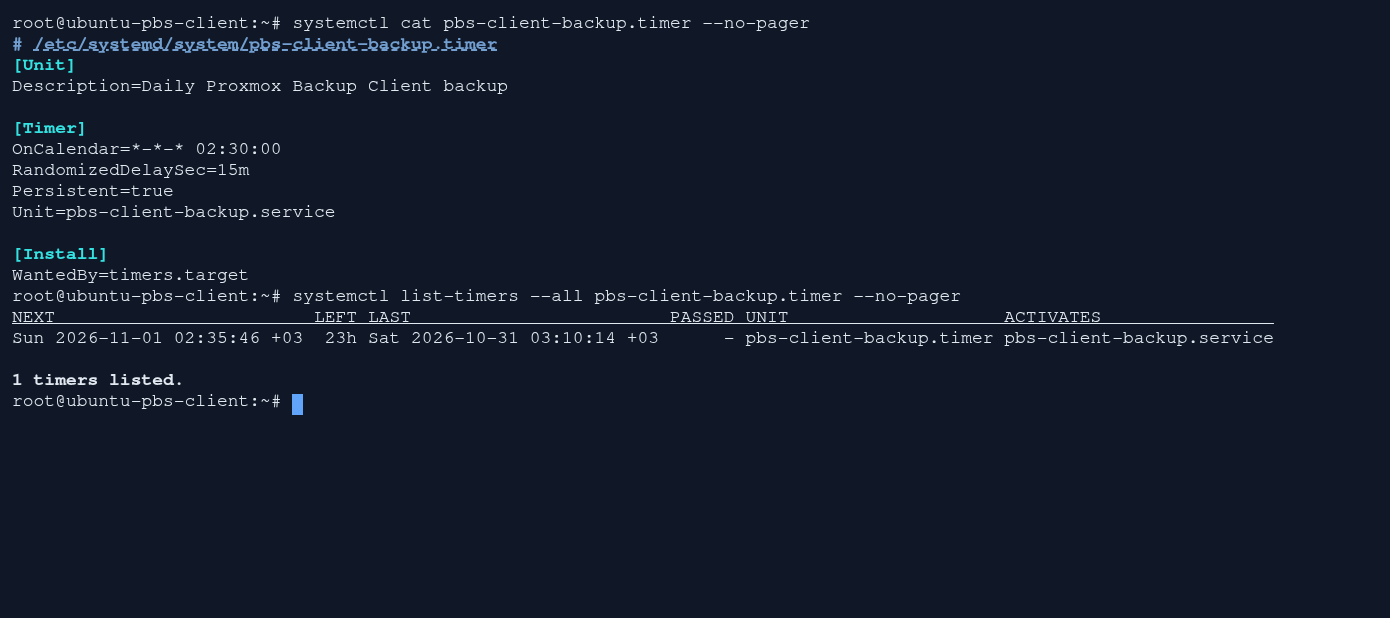
Step 1: 02:30 with up to 15 minutes of delay
- 02:30 with up to 15 minutes of delay
OnCalendar is saved as daily 02:30. RandomizedDelaySec=15m and Persistent=true are visible in the same definition.
- The actual next trigger time
NEXT in list-timers shows 1 November 2026 at 02:35:46 +03, the next run calculated from the daily calendar and randomized delay.
The visible LAST value comes from the earlier short test timer. The first nightly run of this final daily schedule has not yet been observed.
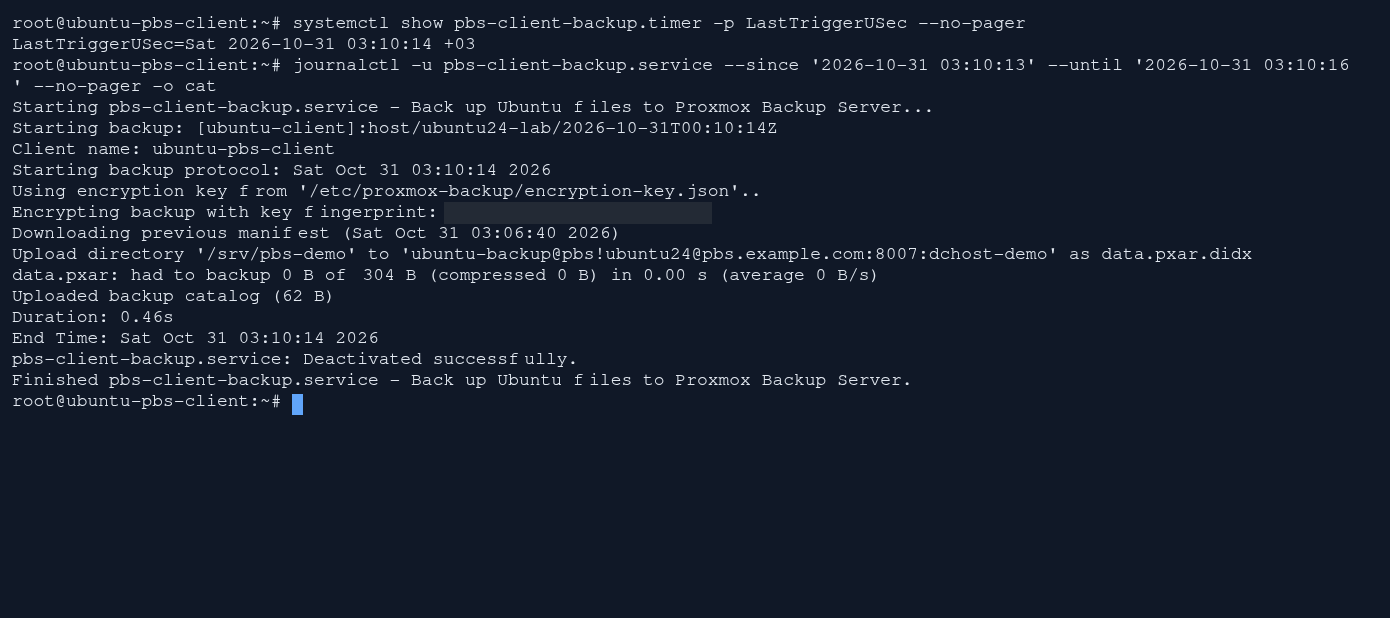
Step 1: The service finished
- The service finished
The journal shows the service deactivated successfully and the Finished line. LastTriggerUSec records the 31 October 03:10:14 +03 trigger.
This result belongs to the temporary 35-second test timer. The daily 02:30 calendar was restored afterward; this screen does not prove its first nightly run.
6. Back up a block device as .img
This section uses only a newly created 64 MiB test image. Never pass a production or root disk to the mkfs command. Run these commands in the same root Bash session. set -euo pipefail prevents a file write after a failed mount. Prepare the test file and loop device:
set -euo pipefail
PBS_IMAGE_WORK=$(mktemp -d /var/tmp/pbs-image-demo.XXXXXX)
truncate -s 64M "${PBS_IMAGE_WORK:?}/source.img"
mkfs.ext4 -F "${PBS_IMAGE_WORK:?}/source.img"
PBS_DEMO_LOOP=$(losetup --find --show "${PBS_IMAGE_WORK:?}/source.img")
install -d "${PBS_IMAGE_WORK:?}/source-mount"
mount "${PBS_DEMO_LOOP:?}" "${PBS_IMAGE_WORK:?}/source-mount"
printf 'PBS block image test\n' > "${PBS_IMAGE_WORK:?}/source-mount/image-check.txt"
umount "${PBS_IMAGE_WORK:?}/source-mount"
if findmnt -rn -S "$PBS_DEMO_LOOP"; then
  printf 'ERROR: test device is still mounted.\n' >&2
  exit 1
fi
The final check stops the procedure if the device is still mounted. Keep this device free of writes throughout the backup. A .img operation does not create a snapshot or stop applications.
sha256sum "$PBS_DEMO_LOOP"
proxmox-backup-client backup demo.img:"$PBS_DEMO_LOOP" \
  --backup-type host --backup-id ubuntu24-lab-image --ns ubuntu-client \
  --keyfile /etc/proxmox-backup/encryption-key.json
proxmox-backup-client snapshot list --ns ubuntu-client
We use ubuntu24-lab-image as a separate group from the scheduled directory job. Select its snapshot and restore the image to a new regular file:
IMAGE_SNAPSHOT='host/ubuntu24-lab-image/2026-10-31T00:12:04Z'
proxmox-backup-client restore "$IMAGE_SNAPSHOT" demo.img "${PBS_IMAGE_WORK:?}/restored.img" \
  --ns ubuntu-client --keyfile /etc/proxmox-backup/encryption-key.json
sha256sum "$PBS_DEMO_LOOP" "${PBS_IMAGE_WORK:?}/restored.img"
cmp "$PBS_DEMO_LOOP" "${PBS_IMAGE_WORK:?}/restored.img"
The two SHA256 hashes must match. In the lab, the SHA-256 hashes of the 64 MiB source device and restored image matched; cmp also verified every byte. To check the file inside, mount the restored ext4 image read-only with journal replay disabled:
install -d "${PBS_IMAGE_WORK:?}/restore-mount"
mount -o loop,ro,noload "${PBS_IMAGE_WORK:?}/restored.img" "${PBS_IMAGE_WORK:?}/restore-mount"
cat "${PBS_IMAGE_WORK:?}/restore-mount/image-check.txt"
umount "${PBS_IMAGE_WORK:?}/restore-mount"
losetup -d "$PBS_DEMO_LOOP"
This proves that the selected block device's bytes were recovered. It does not prove that an operating system boots or that a live database recovers. An image of one partition or LVM logical volume does not include the disk's other partitions or its complete disk layout.
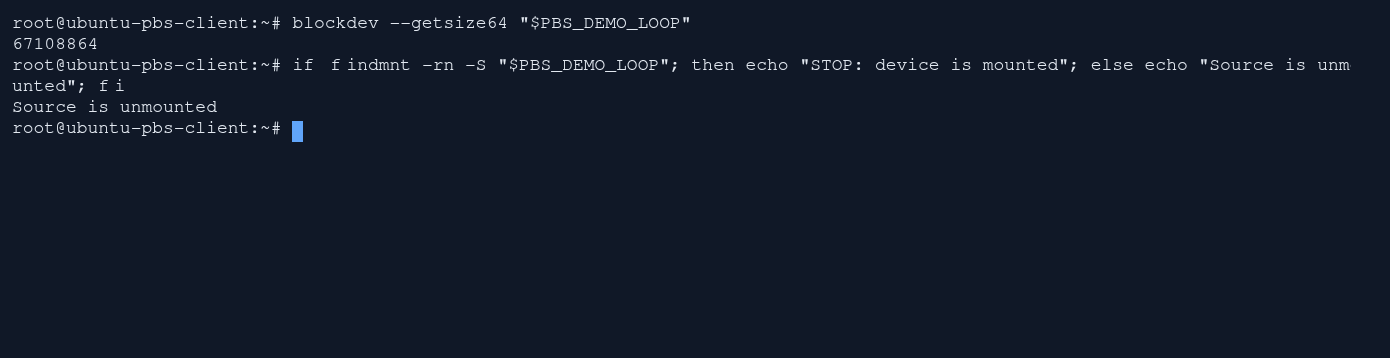
Step 1: The source is unmounted
- The source is unmounted
The visible check reports Source is unmounted. The 67108864-byte value above confirms the 64 MiB size.
This example uses a 64 MiB loop device. It is not an operating-system disk or a boot-recovery test.
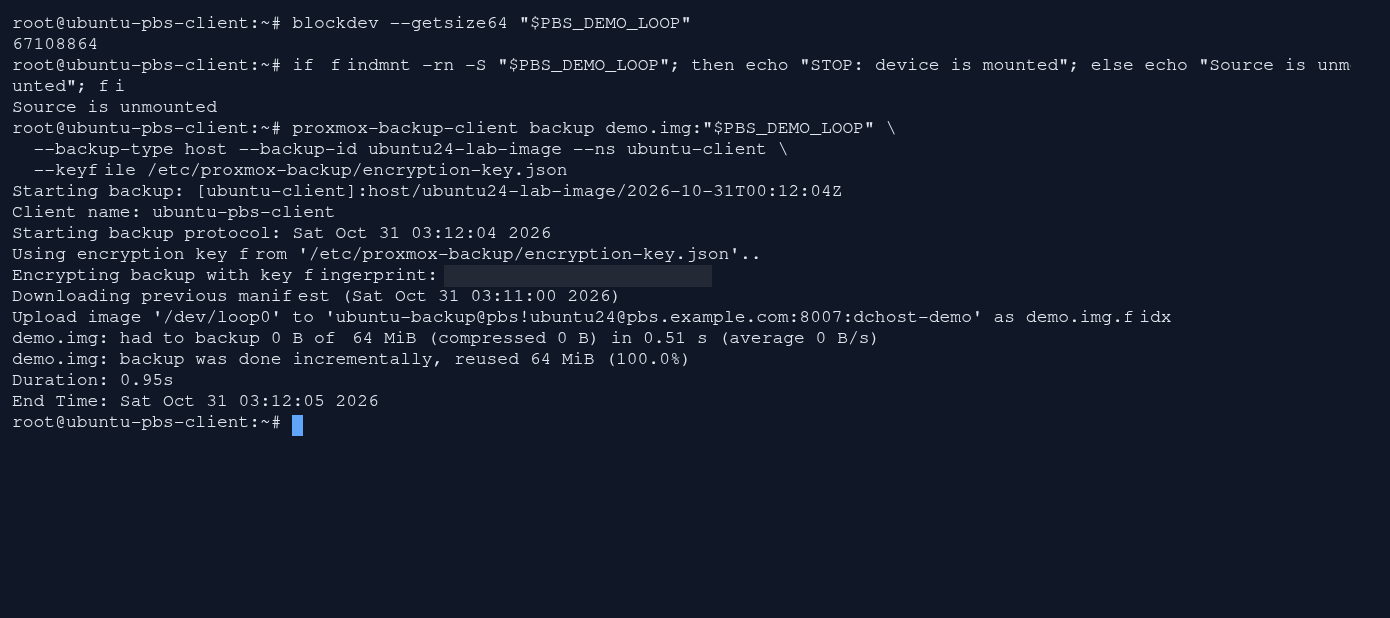
Step 1: 64 MiB was reused
- 64 MiB was reused
The demo.img line reports reused 64 MiB (100.0%). The output also records 0 B transferred and completion in 0.95 seconds.
This is not the first image backup. The actual repeat run shows reuse of the unchanged 64 MiB contents.
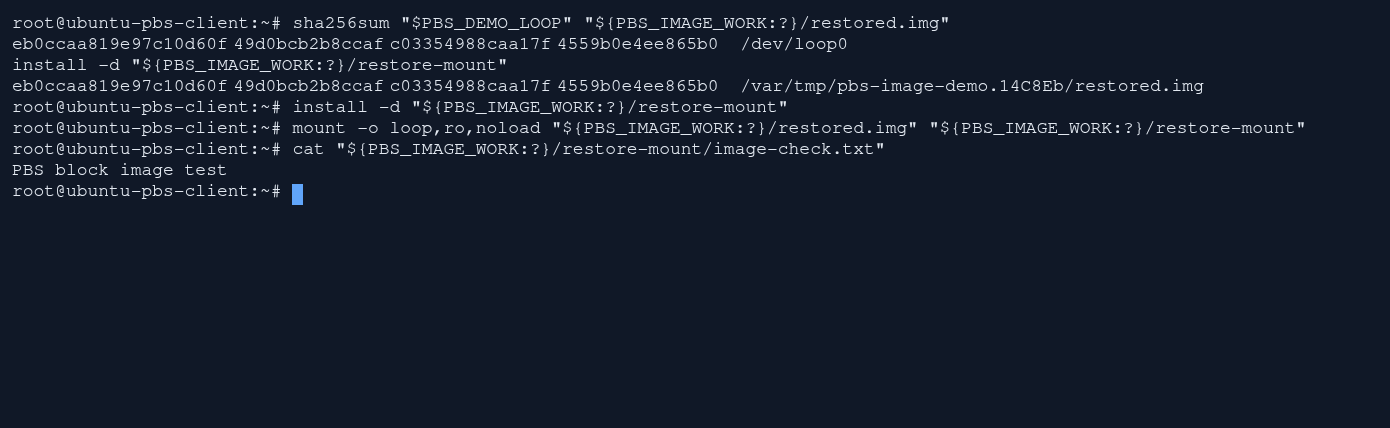
Step 1: The test file inside the image was read
- The test file inside the image was read
cat reads PBS block image test from the restored image. The preceding mount command visibly uses loop,ro,noload.
The image was mounted read-only. This file read and byte comparison are not an operating-system boot test.
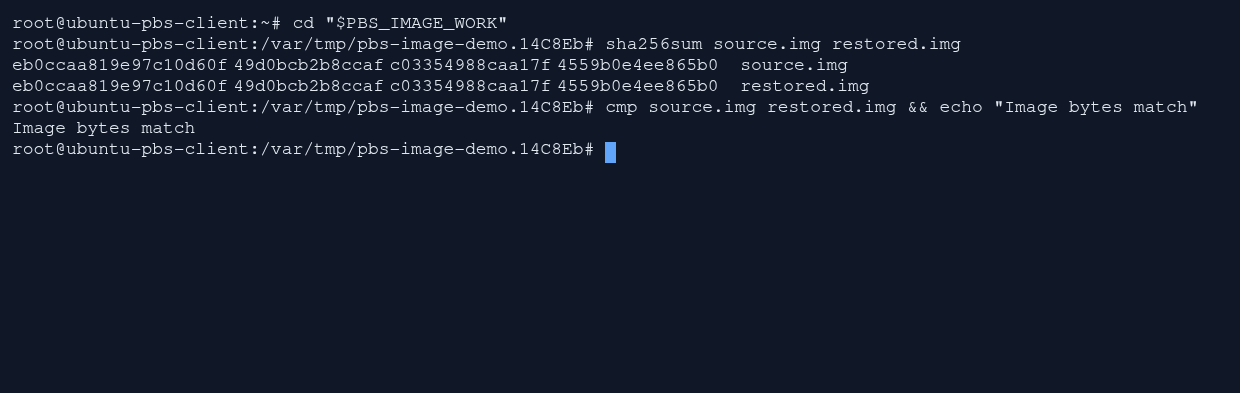
Step 1: The image bytes match
- The image bytes match
Image bytes match after cmp confirms byte equality. The same SHA-256 value is visible above for source.img and restored.img.
This independent check compares the two regular image files. Equality applies to the bytes of the 64 MiB example.
In a real Ubuntu SSH session, the image backup of an unmounted 64 MiB test block device is repeated; demo.img is restored to a separate file. The source and restored image have matching SHA-256 values, and the marker file is read from a read-only mount. This test does not demonstrate OS boot or whole-machine recovery.
Test image backup and restore transcript
00:00 — 64 MiB test image; source is unmounted.
00:04 — 64 MiB reused; new image data: 0 B.
00:09 — The image is restored to a separate file.
00:12 — The SHA-256 values are compared.
00:15 — Read-only mount; the marker file is read.
The recording runs continuously at real speed. Its first approximately 0.135 seconds retain the previous successful preparation and first image-backup output, followed by an actual terminal clear. blockdev --getsize64 reports 67108864 bytes (64 MiB); the findmnt check returns Source is unmounted. The backup executed in this clip is a repeat: the client downloads the previous manifest, reuses all 64 MiB and reports 0 B of new image data. Backup duration is 0.95 seconds. restore complete confirms that 64 MiB was restored to the separate restored.img file.
After a second actual clear, the source loop device and restored file show the same SHA-256 value. The restored image is mounted read-only with loop,ro,noload; image-check.txt is read as PBS block image test. The mount is then removed and the source loop device detached. cmp is not run in this clip; it appears in the separate clean checksum screenshot. Key fingerprints are covered by opaque masks; key-file contents are never displayed. These commands belong to this prepared, unmounted test device; they do not prove a consistent image of a running root disk, bootability or whole-machine recovery.
blockdev --getsize64 "$PBS_DEMO_LOOP"
if findmnt -rn -S "$PBS_DEMO_LOOP"; then
  echo "STOP: device is mounted"
else
  echo "Source is unmounted"
fi
proxmox-backup-client backup demo.img:"$PBS_DEMO_LOOP" \
  --backup-type host --backup-id ubuntu24-lab-image --ns ubuntu-client \
  --keyfile /etc/proxmox-backup/encryption-key.json
IMAGE_SNAPSHOT='host/ubuntu24-lab-image/2026-10-31T00:12:04Z'
proxmox-backup-client restore "$IMAGE_SNAPSHOT" demo.img "${PBS_IMAGE_WORK:?}/restored.img" \
  --ns ubuntu-client --keyfile /etc/proxmox-backup/encryption-key.json
sha256sum "$PBS_DEMO_LOOP" "${PBS_IMAGE_WORK:?}/restored.img"
install -d "${PBS_IMAGE_WORK:?}/restore-mount"
mount -o loop,ro,noload "${PBS_IMAGE_WORK:?}/restored.img" "${PBS_IMAGE_WORK:?}/restore-mount"
cat "${PBS_IMAGE_WORK:?}/restore-mount/image-check.txt"
umount "${PBS_IMAGE_WORK:?}/restore-mount" && losetup -d "$PBS_DEMO_LOOP"
7. Back up operating system files and restore them elsewhere
This example backs up selected files from the root filesystem as root.pxar. It also creates separate archives for /boot and /boot/efi if they are separate mounts. Recovery goes into a new directory under /var/tmp, leaving the running operating system in place. Files on the live root filesystem can change while being read; this operation does not create a coordinated application snapshot.
Check the disk layout and space available for the restore:
findmnt -R /
lsblk -f
df -h /var/tmp
root.pxar:/ skips mountpoints on other devices by default. Plan separate coverage if /home, /var or application data uses another filesystem. Extracted files consume space on Ubuntu; compression and deduplication on PBS do not remove that local space requirement.
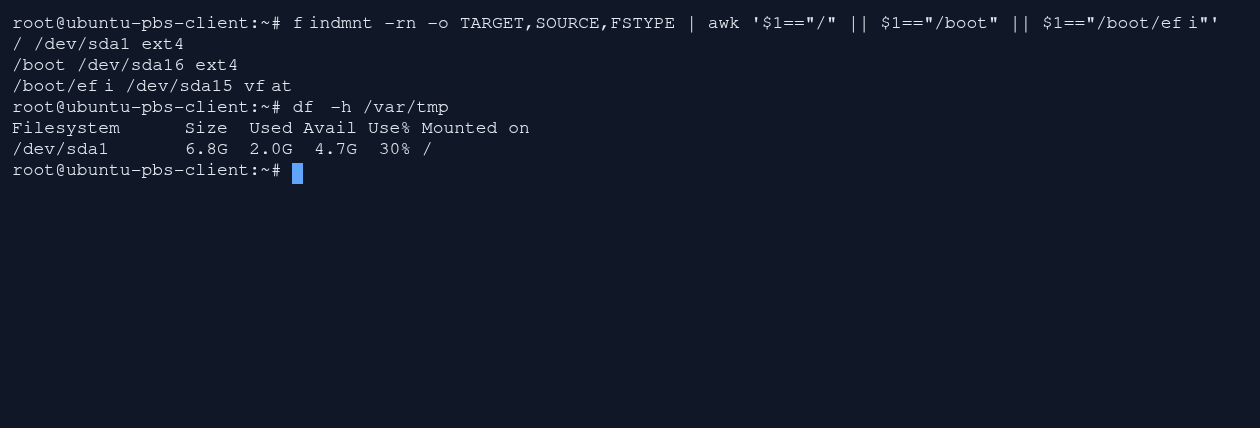
Step 1: Available space for the restore
- Available space for the restore
df reports 4.7G available for /var/tmp. The findmnt result above lists the root, /boot and /boot/efi filesystems separately.
The separate mounts prevent assuming that one root-directory archive automatically contains all these files. This capacity belongs only to the shown lab.
The exclusions below belong to this example environment. Temporary files, caches, logs, swap files and the restore staging area are left out. /etc/proxmox-backup and the root user's client configuration/cache directories are excluded too; do not expect to recover the token or encryption key from this archive. They require their own recovery copy. The earlier file restore destination /srv/pbs-restore-check and this lab's client download directory /home/demo/pbs-client-4.2.8-1 are also excluded; use the actual paths for your environment.
For root.pxar:/, --exclude=/etc/proxmox-backup excludes that directory and its descendants; no trailing /** is needed. The leading / anchors a pattern to the archive root. Existing .pxarexclude files can change selection, so inspect existing rules first:
find / -xdev -name .pxarexclude -print
No additional rule files are expected in this clean Ubuntu example. If any appear, review their interaction with your exclusions before proceeding. Run these commands in the same root Bash session; set -euo pipefail prevents later steps from continuing after a failed command:
set -euo pipefail
PBS_SYSTEM_ARCHIVES=(root.pxar:/)
if mountpoint -q /boot; then
  PBS_SYSTEM_ARCHIVES+=(boot.pxar:/boot)
fi
if mountpoint -q /boot/efi; then
  PBS_SYSTEM_ARCHIVES+=(efi.pxar:/boot/efi)
fi
proxmox-backup-client backup "${PBS_SYSTEM_ARCHIVES[@]}" \
  --backup-type host --backup-id ubuntu24-lab-system --ns ubuntu-client \
  --keyfile /etc/proxmox-backup/encryption-key.json \
  --exclude=/proc --exclude=/sys --exclude=/dev --exclude=/run \
  --exclude=/tmp --exclude=/var/tmp --exclude=/mnt --exclude=/media \
  --exclude=/swap.img --exclude=/swapfile --exclude=/lost+found \
  --exclude=/etc/proxmox-backup --exclude=/root/.config/proxmox-backup \
  --exclude=/root/.cache --exclude=/var/cache/apt/archives --exclude=/var/log \
  --exclude=/srv/pbs-restore-check --exclude=/home/demo/pbs-client-4.2.8-1
proxmox-backup-client snapshot list --ns ubuntu-client
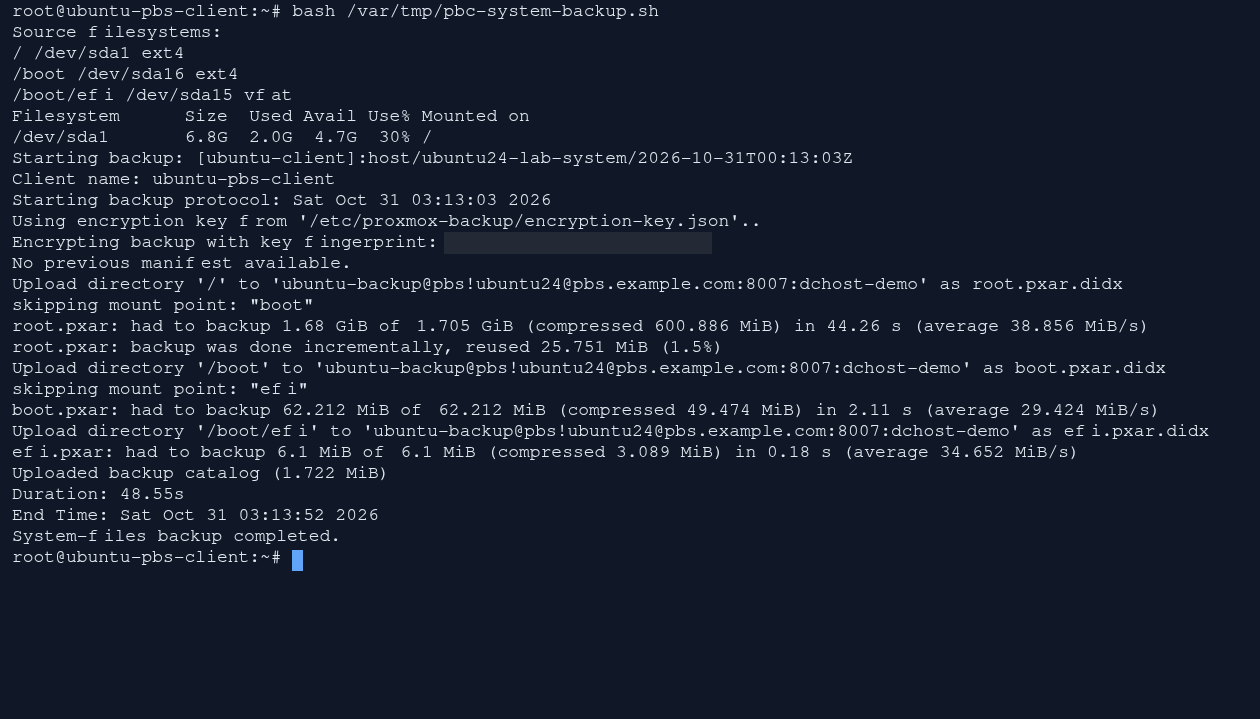
Step 1: The three-archive operation completed
- The three-archive operation completed
System-files backup completed follows the root.pxar, boot.pxar and efi.pxar operations. The same result records Duration: 48.55s.
These are three file archives. This does not prove running-application consistency, a whole-machine image or bootable recovery.
In the real Ubuntu session, the prepared script backs up /, /boot and /boot/efi into separate root.pxar, boot.pxar and efi.pxar archives. The first selected system-file backup completes in 48.55 seconds and lists all three encrypted archives. The recording runs at real speed; it does not establish application consistency or whole-machine recovery.
System-file backup transcript
00:00 — Check separate filesystems and available space.
00:04 — The prepared script backs up three archives.
00:10 — Root files are uploading. Playback is at real speed.
00:49 — Boot and EFI files upload to separate archives.
00:53 — System-file backup completed in 48.55 s.
00:57 — The three encrypted archives are listed.
The initial terminal briefly retains the preceding block-image test output, followed by the real clear command. findmnt shows ext4 for / and /boot, and vfat for /boot/efi. After checking space in /var/tmp, the previously prepared bash /var/tmp/pbc-system-backup.sh script runs; writing that script is outside the recording. It backs up / as root.pxar, separate /boot as boot.pxar, and separate /boot/efi as efi.pxar. The root archive skips the separate boot mount; the boot archive skips the separate EFI mount. This first selected system backup has no previous manifest, although existing chunks supply 1.5% of the root data. The output reports 48.55 seconds and completion. Then proxmox-backup-client snapshot files "$SYSTEM_SNAPSHOT" --ns ubuntu-client lists all three archives in encrypt mode. A permanent opaque mask hides the encryption-key fingerprint. This is a system-file backup; it does not establish point-in-time consistency of running applications or recovery of a bootable whole machine.
This job writes to ubuntu24-lab-system, separately from the directory timer. Copy the completed snapshot path from the list and inspect which archives were created:
PBS_SYSTEM_SNAPSHOT='host/ubuntu24-lab-system/2026-10-31T00:13:03Z'
proxmox-backup-client snapshot files "$PBS_SYSTEM_SNAPSHOT" --ns ubuntu-client
PBS_SYSTEM_RESTORE=$(mktemp -d /var/tmp/pbs-system-restore.XXXXXX)
proxmox-backup-client restore "$PBS_SYSTEM_SNAPSHOT" root.pxar \
  "${PBS_SYSTEM_RESTORE:?}/root" \
  --ns ubuntu-client --keyfile /etc/proxmox-backup/encryption-key.json
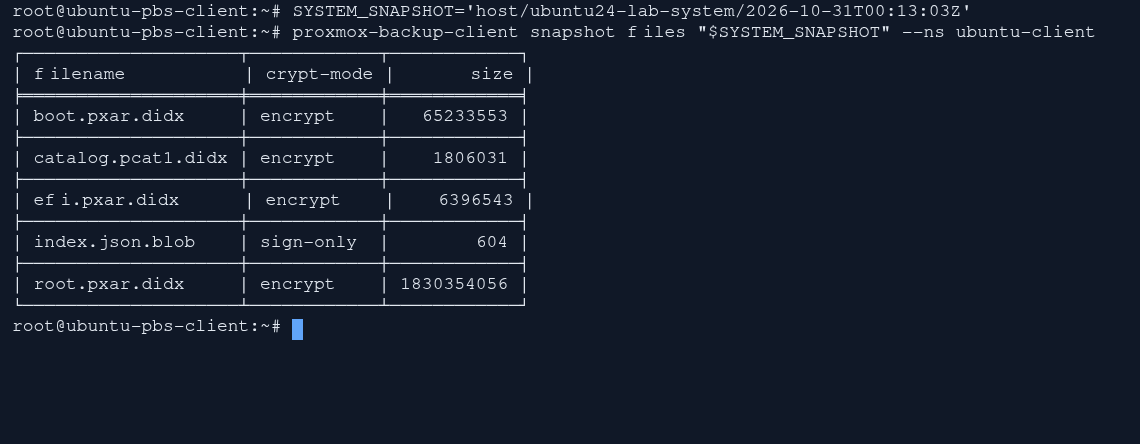
Step 1: All three data archives are encrypted
- All three data archives are encrypted
boot.pxar.didx, efi.pxar.didx and root.pxar.didx each show encrypt. index.json.blob separately shows sign-only.
The list shows archive presence and encryption mode. Restore evidence comes from the separate operation that follows.
If the snapshot contains boot.pxar or efi.pxar, run only the following commands for archives that actually exist. They also restore into separate test directories:
proxmox-backup-client restore "$PBS_SYSTEM_SNAPSHOT" boot.pxar \
  "${PBS_SYSTEM_RESTORE:?}/boot" \
  --ns ubuntu-client --keyfile /etc/proxmox-backup/encryption-key.json
proxmox-backup-client restore "$PBS_SYSTEM_SNAPSHOT" efi.pxar \
  "${PBS_SYSTEM_RESTORE:?}/efi" \
  --ns ubuntu-client --keyfile /etc/proxmox-backup/encryption-key.json
Compare system files and the test file created earlier. If source files changed after the backup, compare against hashes recorded before backup instead:
cmp /usr/lib/os-release "${PBS_SYSTEM_RESTORE:?}/root/usr/lib/os-release"
cmp /etc/fstab "${PBS_SYSTEM_RESTORE:?}/root/etc/fstab"
cmp /srv/pbs-demo/restore-check.txt \
  "${PBS_SYSTEM_RESTORE:?}/root/srv/pbs-demo/restore-check.txt"
stat -c '%u:%g %a %n' /srv/pbs-demo/restore-check.txt \
  "${PBS_SYSTEM_RESTORE:?}/root/srv/pbs-demo/restore-check.txt"
getfacl -ncp /srv/pbs-demo/restore-check.txt > "${PBS_SYSTEM_RESTORE:?}/source.acl"
getfacl -ncp "${PBS_SYSTEM_RESTORE:?}/root/srv/pbs-demo/restore-check.txt" \
  > "${PBS_SYSTEM_RESTORE:?}/restored.acl"
cmp "${PBS_SYSTEM_RESTORE:?}/source.acl" "${PBS_SYSTEM_RESTORE:?}/restored.acl"
for PBS_EXCLUDED_PATH in etc/proxmox-backup root/.config/proxmox-backup root/.cache var/tmp srv/pbs-restore-check home/demo/pbs-client-4.2.8-1; do
  test ! -e "${PBS_SYSTEM_RESTORE:?}/root/$PBS_EXCLUDED_PATH"
  test ! -L "${PBS_SYSTEM_RESTORE:?}/root/$PBS_EXCLUDED_PATH"
done
printf 'System files match; PBS credentials and staging paths are absent.\n'
The lab used ext4 /dev/sda1 for /, ext4 /dev/sda16 for /boot, and vfat /dev/sda15 for /boot/efi. root.pxar, boot.pxar and efi.pxar were extracted into new directories, using approximately 2 GiB. System/test files, ownership, mode and ACL matched; the vmlinuz kernel file and BOOTX64.EFI also passed byte comparisons. Credential, temporary, previous-restore and client-download directories were confirmed absent. The restore did not replace the running root filesystem.
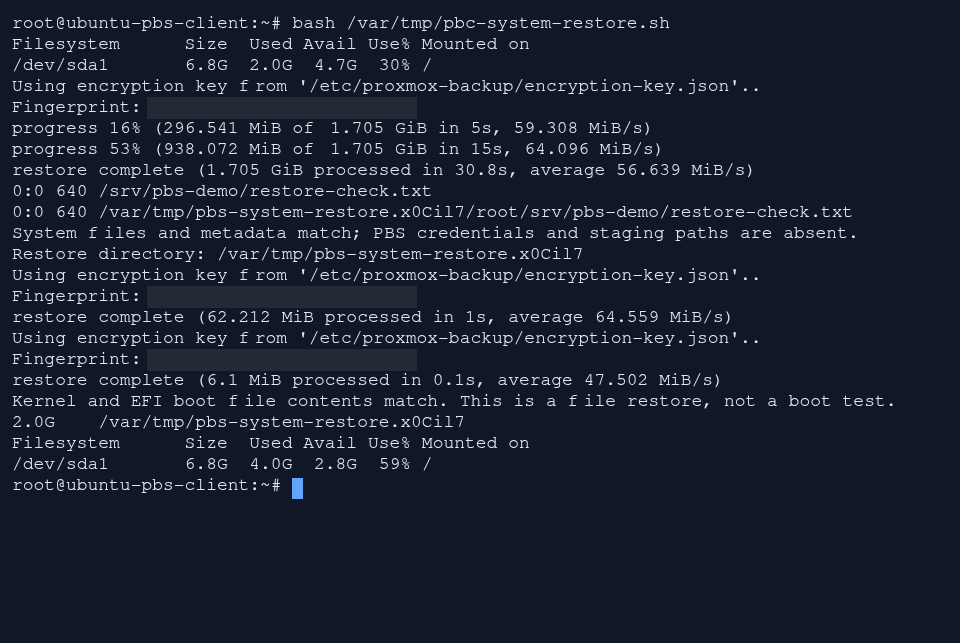
Step 1: The kernel and EFI files match
- The kernel and EFI files match
The final check reports matching kernel and EFI boot-file contents. Above it, the output confirms system-file and metadata equality and exclusion of credential and staging paths.
Files were restored into a new directory. Partitioning, bootloader installation and machine boot were not tested.
In the real Ubuntu session, the prepared script restores the root, boot and EFI archives into a fresh directory under /var/tmp. File content, ownership/mode, exclusion and kernel/EFI file comparisons pass. The recording runs at real speed; it shows no repartitioning, bootloader installation or boot test.
System-file restore transcript
00:00 — The prepared restore script runs.
00:06 — Root files are restoring. Playback is at real speed.
00:32 — Root file and permission checks pass.
00:34 — Boot and EFI files are also restored.
00:35 — File comparisons pass. No boot test is performed.
The preceding system-backup archive listing remains briefly at the start, followed by the real clear command. The previously prepared bash /var/tmp/pbc-system-restore.sh script runs; writing it is outside the recording. It restores the root, boot and EFI archives into separate targets under the fresh /var/tmp/pbs-system-restore.x0Cil7 directory. Root files complete in 30.8 seconds. Source and restored check files both show owner/group 0:0 and mode 640; the script confirms file/metadata equality and absence of PBS credentials and staging paths. Boot and EFI restores also finish, followed by passing kernel and EFI file-content comparisons. The output shows about 2.0G of restored data and remaining space. Permanent opaque masks hide encryption-key fingerprints. This proves system-file restoration into a separate directory. It does not recreate partitions, install a bootloader or test booting the restored operating system.
What this recovery proves
The tested operation here restores selected operating system files and required separate boot archives into other directories. A new disk can still require partition/LVM/encryption setup, UUID and /etc/fstab alignment, initramfs, GRUB/UEFI and network configuration. Full-machine recovery is complete only after preparing that layout on the new target and checking that the machine boots and its applications work. This guide does not claim that boot test.
Databases, retention and recurring checks
Proxmox Backup Client does not automatically stop a database or create a consistent snapshot while reading files. Copying a running PostgreSQL/MySQL/MariaDB data directory can produce an unusable database backup even when the PBS task succeeds. First produce consistent output using the engine's supported logical/physical backup or coordinated snapshot method, send the completed output to PBS, and restore it into a separate database. Plan WAL/binlog retention and point-in-time recovery separately when production requirements call for them.
On PBS, manage retention, prune, garbage collection and verification jobs that cover this namespace. A keep-daily policy selects recovery points by day; it does not retain every snapshot taken on the same day. Before restoring, list the snapshots again and choose one that is still available. The source token does not need additional deletion privileges. During recurring restore tests, check file contents, ownership/permissions, access to the encryption key and application behavior. For 403 errors, check both user and token namespace permissions. For missing snapshots, check the namespace and complete snapshot path. For ownership errors, check which identity originally created the group.
In the PBS datastore's Content tab, select the ubuntu-client namespace and use Verify All to verify that scope. In this lab, the task checked seven snapshots across three backup groups and finished with TASK OK and no errors. The final view showed all three groups as encrypted and All OK. This server-side check verifies stored backup integrity; the actual restores above separately verified that the encryption key could be used and the files could be recovered.
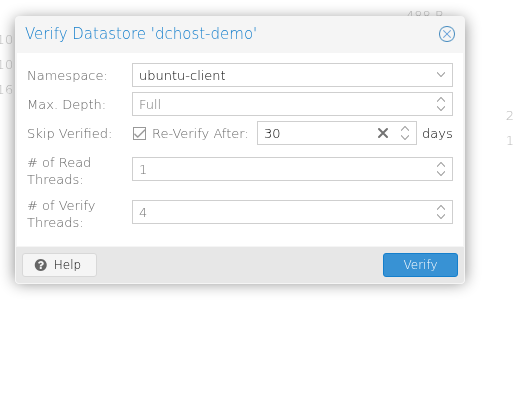
Step 1: The ubuntu-client namespace is selected
- The ubuntu-client namespace is selected
The Verify dialog is scoped to the ubuntu-client namespace. This view shows the selection before verification starts.
- Start verification
Verify starts the server-side integrity check of stored backups. Check completion in the separate task output.
This ready dialog is not completion evidence. Server verification does not replace a plaintext file-restore test.
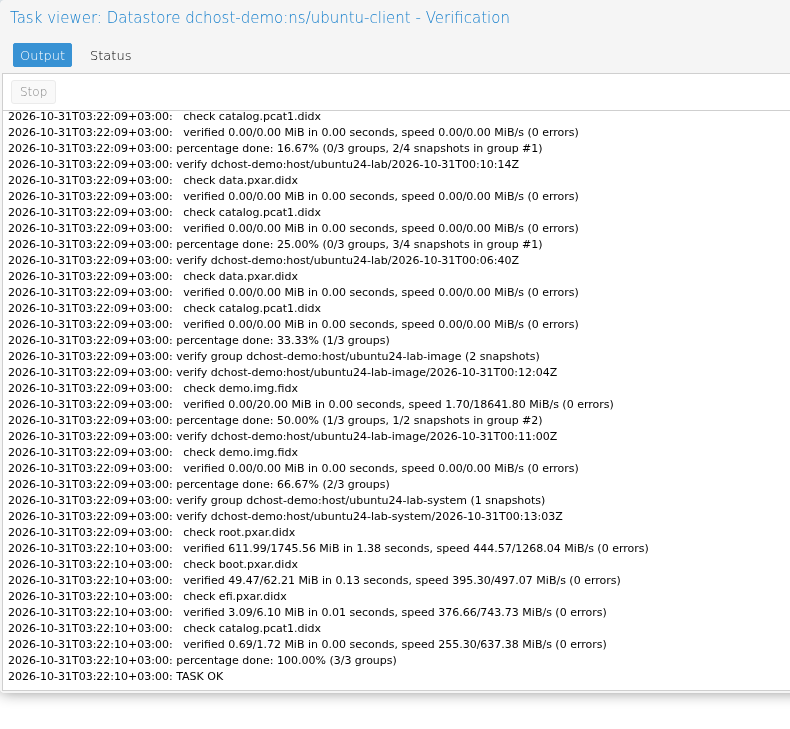
Step 1: 3/3 groups and TASK OK
- 3/3 groups and TASK OK
The final lines show 100.00% (3/3 groups) and TASK OK. The visible final root, boot and efi archive checks report 0 errors.
This is the server-side integrity check of stored backups. Plaintext restores and file comparisons were tested in separate operations.
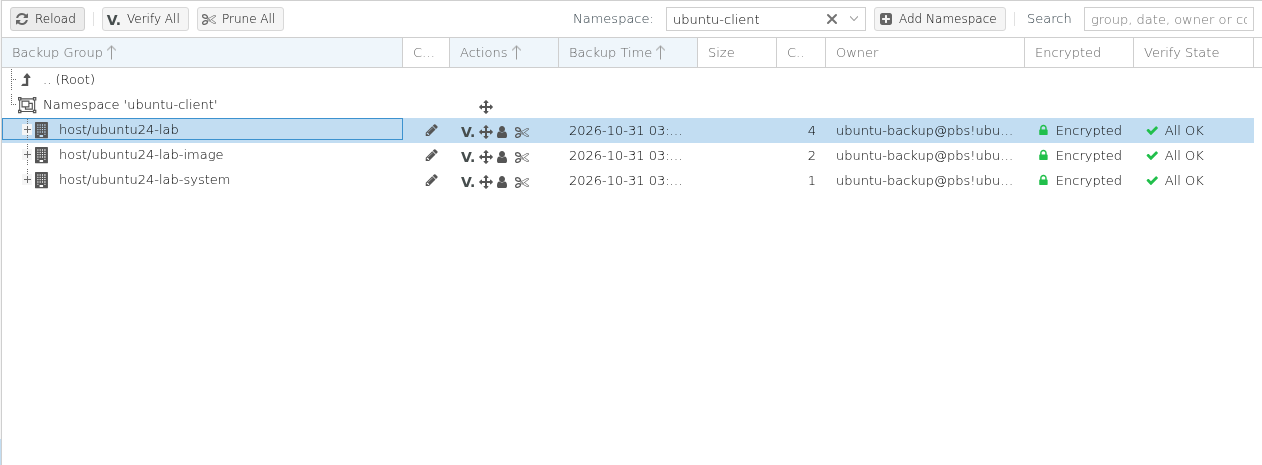
Step 1: All OK on all three groups
- All OK on all three groups
The file, image and system-file groups show Encrypted and All OK. Their counts are 4, 2 and 1, for seven snapshots in total.
All OK is the server-side verification status of stored backups. File and image restores were tested separately.